
Popular categories
Looking for a yarn?


Clue #9 - Assembly of squares + Start of the edge
Here's the 9th clue for our Mystery Blanket CAL. And we have gotten far enough into our blanket that we can start to put our squares together!
When the squares from the first 8 clues are done, we should have a total of 40 squares (5 squares of each of the 8 different flowers).
Sort the squares in 8 rows of 5 squares each. There is no fixed pattern, place the squares the way you think it looks nice.
Here is a suggestion on how you can put the squares together:

1 = Anemona
2 = Buttercup
3 = Marigold
4 = Sunflower
5 = Daisy
6 = Cornflower
7 = Wild Rose
8 = Water lily
We will work the squares together first vertically:

And then horizontally:

And here's how we do it!
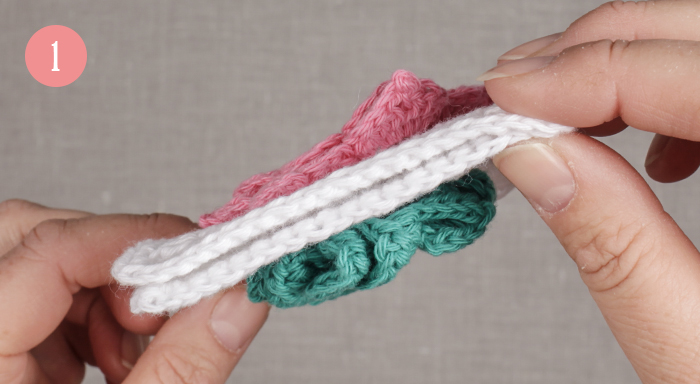
Place 2 and 2 squares on top of each other WS against WS, and work them tog with opal green (no. 17) on hook size 3 mm.

Beg with 1 ch - READ CROCHET TIP.
CROCHET TIP:
Work 1 ch and finish working the last two squares tog with 1 ch (this is done to make the fastening of strands nicer).

Beg in 1 dc at the top of corner (dc after htr).

Work 1 dc through dc on both squares.

Work * 1 dc in every dc through dc on both squares (= 18 dc), skip htr, 3 ch *, repeat from *-*, 6 more times. (We only show 3 squares vertically in this lesson).

Finish with 1 dc in each of the next 18 dc on the last 2 squares and finish with 1 ch - READ CROCHET TIP, on the last 2 squares that are worked tog vertically.
The pictures on this lesson show us crocheting only 3 squares vertically but remember that you need to put together 8 squares vertically and 5 horizontally.

Complete description how to work the vertically square tog:
Beg with 1 ch - READ CROCHET TIP, beg in 1 dc at the top of corner (dc after htr). Work * 1 dc in every dc through dc on both squares (= 18 dc), skip htr, 3 ch *, repeat from *-*, 6 more times, 1 dc in each of the next 18 dc on the last 2 squares and finish with 1 ch - READ CROCHET TIP, on the last 2 squares that are worked tog vertically (= 16 squares worked tog).

Work 8 new squares the same way on one of the sides and repeat this until all squares have been worked tog vertically.

Now work squares tog horizontally the same way.

3 ch between squares.

Remember CROCHET TIP - Finish with 1 ch on every row.

Repeat until you have crocheted all the squares tog horizontally.

We show here only 6 squares crocheted tog (the blanket has 40 squares).

Make sure to avoid a tight edge between each square.

Fasten off!

Ch one the beginning and ending in the rows, turn back so that it becomes more prettier when fasten off the threads.
Backside:

All squares:

And now we are ready to get started with the first part of the edge!

EDGE 1 - dc and ch:
Round 1: Work an edge with opal green (no. 17) on hook size 3 mm around the blanket as follows: Beg in one dc in a corner (dc after htr).

Work 1 ch (= 1st dc) on long side (8 squares).

Work 1 dc in next st, 1 ch, skip 1 dc.

Work * 1 dc in next st, 1 ch, skip 1 dc *, repeat *-* 7 times totalt, finish with 1 dc in last st on square, 3 ch (over htr).
Now continue like this over all squares on round: 1 dc in each of first 2 dc on square, * 1 ch, skip 1 dc, 1 dc in next st *, repeat *-* 7 more times and work 3 ch between each square (over htr).

Work as follows in each corners (htr): 1 dc, 3 ch, 1 dc.

Small part of the chart, edge 1, round 1.
 |
= dc |
 |
= ch |
 |
= htr |
 |
= sl st |
 |
= start |

Complete description on edge 1:
EDGE 1 - dc and ch:
Work an edge with opal green (no. 17) on hook size 3 mm around the blanket as follows: Beg in one dc in a corner (dc after htr) with 1 ch (= * 1st dc) on long side (8 squares), * 1 dc in next st, 1 ch, skip 1 st *, repeat *-* 7 more times, finish with 1 dc in last st on square, 3 ch (over htr).
Now continue like this over all squares on round: 1 dc in each of first 2 dc on square, * 1 ch, skip 1 dc, 1 dc in next st *, repeat *-* 7 more times and work 3 ch between each square (over htr). Work as follows in each corners (htr): 1 dc, 3 ch, 1 dc, finish with 1 sl st in 1st dc on round at the same time change to light turquoise (no. 19) = 268 dc and 286 ch. READ COLOUR CHANGE! Don’t cut the yarn, you are ready for the next clue!
COLOUR CHANGE:
When changing colour work as follows: Before last pull through of last loop on hook, switch colour, pull the last loop on hook through with the new colour.
Tutorial Video
IMPORTANT: The video shows an example where we crochet 3 x 2 squares together, but remember that you need to crochet 8 x 5 squares (all 40) to finish this first stage of your mystery blanket!


With over 40 years in knitting and crochet design, DROPS Design offers one of the most extensive collections of free patterns on the internet - translated to 17 languages. As of today we count 304 catalogues and 11422 patterns - 11422 of which are translated into English (UK/cm).
We work hard to bring you the best knitting and crochet have to offer, inspiration and advice as well as great quality yarns at incredible prices! Would you like to use our patterns for other than personal use? You can read what you are allowed to do in the Copyright text at the bottom of all our patterns. Happy crafting!
Hvis man gerne vil lave tæppet både bredere og længere er det så en til af hver blomst og så lave en ekstra bredde her eller bliver der mulighed for bredere borter senere?
24.05.2016 - 12:43