
Populära kategorier
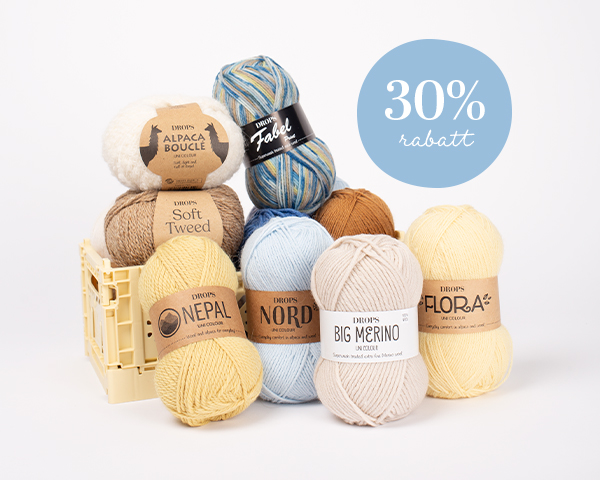
Letar du efter ett garn?


|
||||||||||||||||||||||||||||||||||||||||||||||
Fall Festival |
||||||||||||||||||||||||||||||||||||||||||||||
 |
 |
|||||||||||||||||||||||||||||||||||||||||||||
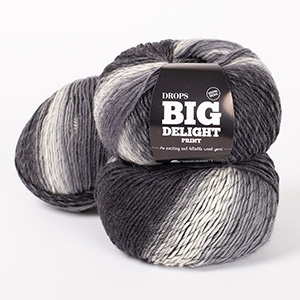
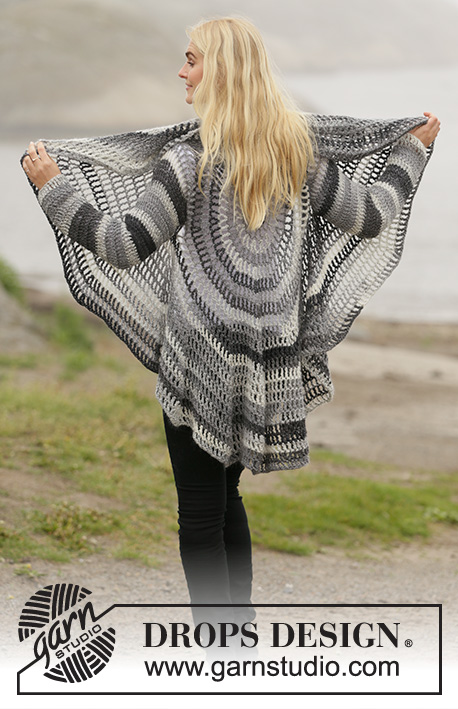
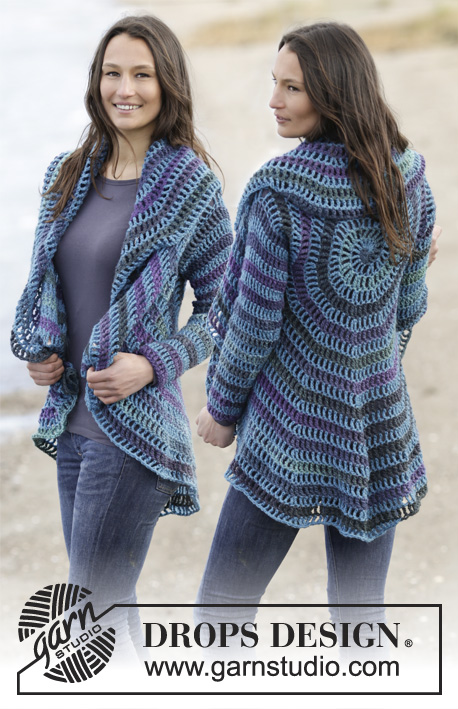
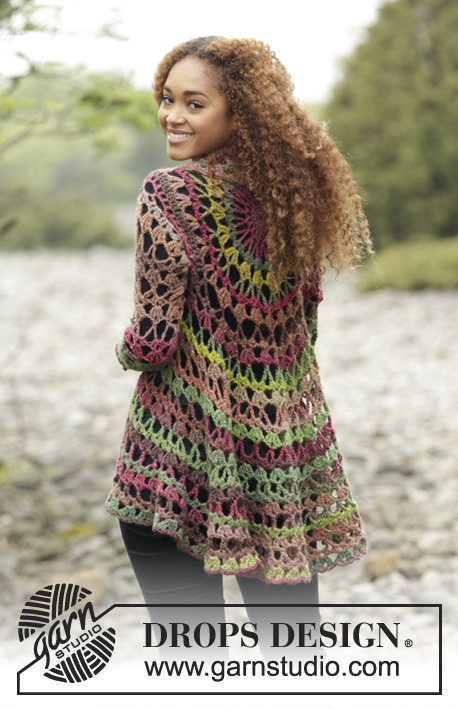
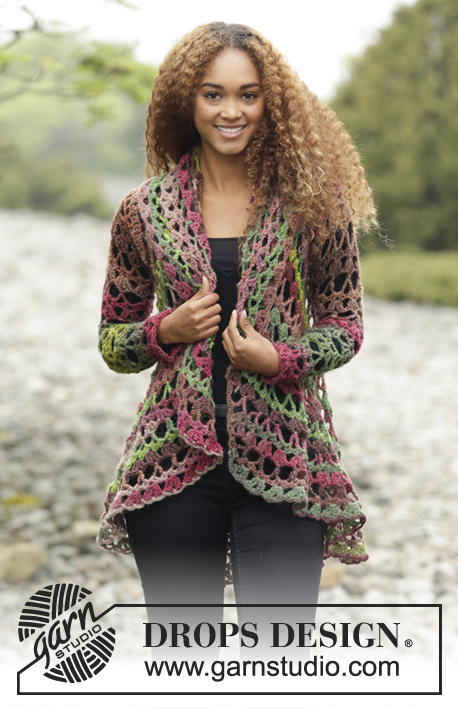
Virkad cirkelkofta i 1 tråd DROPS Big Delight eller 1 tråd DROPS Fabel tillsammans med 1 tråd DROPS Flora . Strl S - XXXL.
DROPS 171-21 |
||||||||||||||||||||||||||||||||||||||||||||||
|
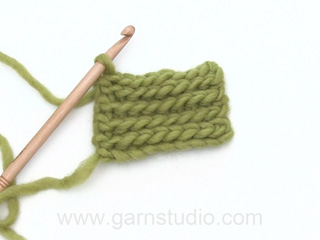
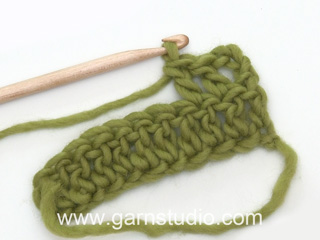
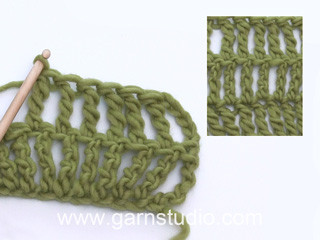
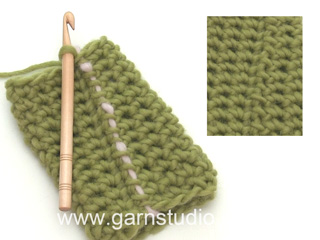
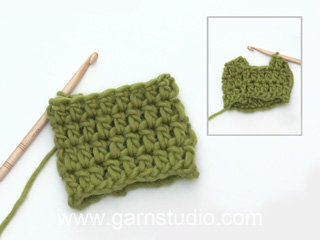
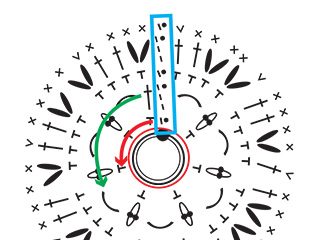
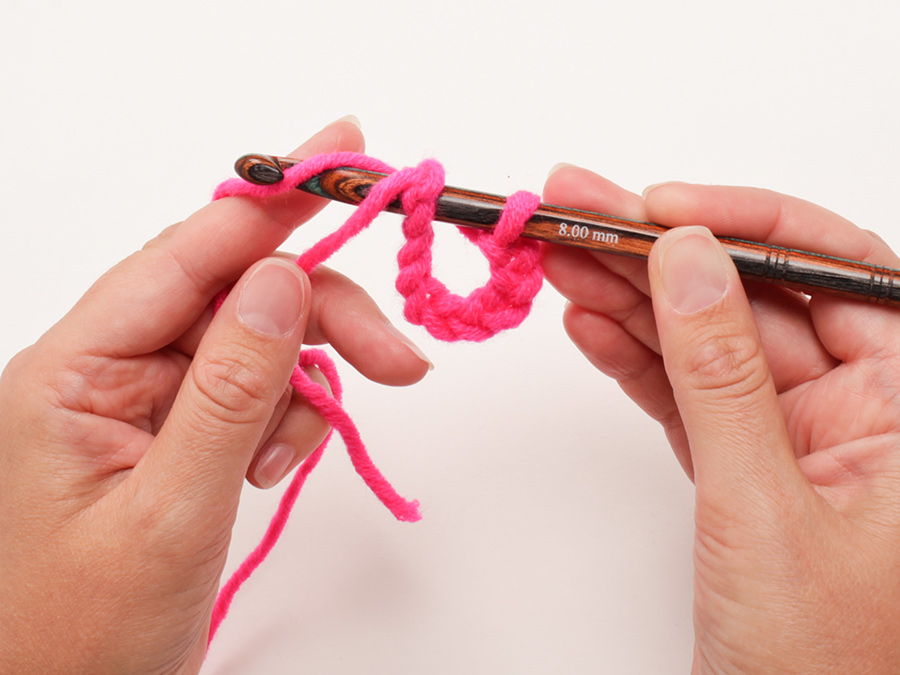
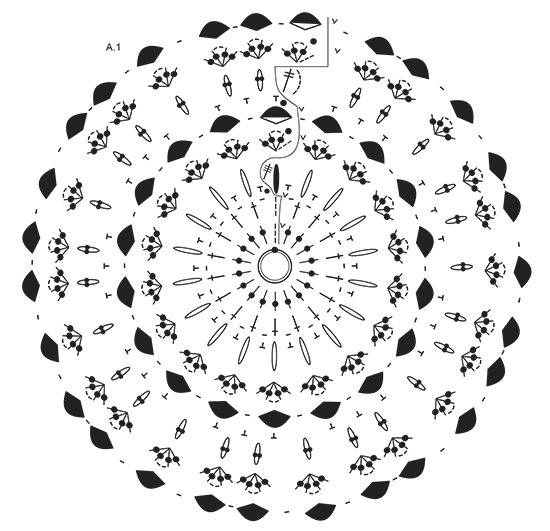
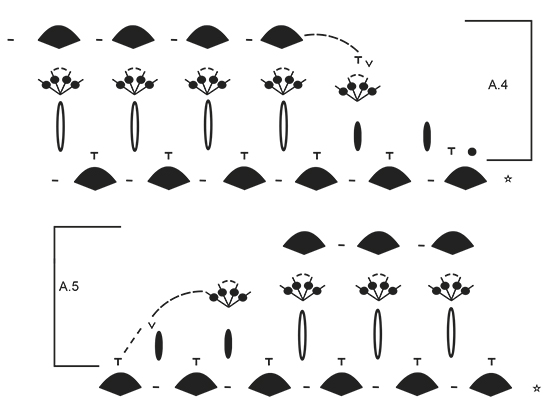
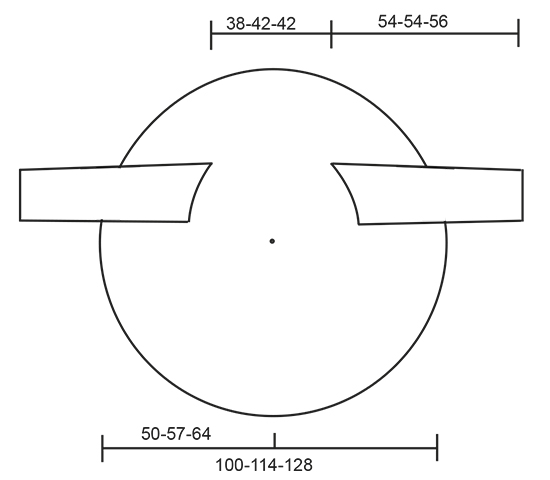
MÖNSTER: Se diag A.1 till A.5. VIRKINFO: Första fm i början på v ersätts av 1 lm, v avslutas med 1 sm i 1:a lm i början på v. Första st i början på v ersätts av 3 lm, v avslutas med 1 sm i 3:e lm i början på v. Första dst i början på v ersätts av 4 lm, v avslutas med 1 sm i 4:e lm i början på v. ---------------------------------------------------------- CIRKELKOFTA: Virka 4 lm med nål 5,5 med Big Delight (eller 1 tråd DROPS Fabel tillsammans med 1 tråd DROPS Flora), och sätt ihop dem till en ring med 1 sm. Sedan fortsätts det efter A.1. LÄS VIRKINFO! KONTROLLERA VIRKFASTHETEN! När A.1 är färdigvirkat mäter cirkeln ca 33 cm i diameter, och det är 27 dst-grupper på v. Stl L/XL-XXL/XXXL: Virka efter A.2, på första v i A.2 ökas det 9 lm-bågar jämnt fördelat (det ökas på samma sätt som på 6:e v i A.1, öka 1 lm-båge så här: virka 1 fm om lm-bågen mitt i dst-gruppen, 9 lm, 1 fm om lm mellan dst-grupperna, 9 lm, 1 fm om lm-bågen mitt i nästa dst-grupp) = 36-36 lm-bågar. Virka A.2 färdigt 1 gång på höjden. ALLA STL: = 27-36-36 dst-grupper. Nästa v virkas som 1:a v i A.3, SAMTIDIGT virkas det ärmhål så här: 1 fm om lm-bågen mitt i dst-gruppen, virka 30-33-36 lösa lm, hoppa över 5-6-7 dst-grupper, 1 fm om lm-bågen mitt i nästa dst-grupp (det har nu virkats ett ärmhål), * 12 lm, 1 fm om lm-bågen mitt i nästa dst-grupp *, upprepa *-* totalt 8-14-12 ggr, virka 30-33-36 lösa lm, hoppa över 5-6-7 dst-grupper, 1 fm om lm-bågen mitt i nästa dst-grupp (det har nu virkats ett ärmhål till), * 12 lm, 1 fm om lm-bågen mitt i nästa dst-grupp *, upprepa *-* v runt och avsluta med 1 sm i första fm i början på v (i stället för 1 fm om nästa lm-båge). Nästa v virkas som 2:a v i A.3 så här: Virka på samma sätt som förut med 2 st + 2 lm + 2 st om varje lm-båge, om varje lm-båge för ärmhål virkas det 6-7-8 st-grupper, SAMTIDIGT ökas det 9 st-grupper jämnt fördelat på v, öka 1 st-grupp genom att virka 2 st + 2 lm + 2 st + 2 st + 2 lm + 2 st om 1 lm-båge = 36-45-45 st-grupper. VARV 3: Virka 2 dst + 2 lm + 2 dst om lm-bågen mitt i varje st-grupp och 1 lm mellan varje dst-grupp = 36-45-45 dst-grupper med 1 lm mellan varje. Fortsätt att virka efter A.3, SAMTIDIGT ökas det 9 lm-bågar jämnt fördelat varje gång 1:a v virkas, så här: VARV 1: Virka sm till mitten av första lm-bågen (mitt i en dst-grupp), 1 fm, * 12 lm, 1 fm om nästa lm-båge mitt i en dst-grupp *, upprepa *-* v runt SAMTIDIGT som det ökas 9 lm-bågar jämnt fördelat på v = 45-54-54 lm-bågar (avsluta v med 6 lm och 1 3-dst i första fm i början på v). VARV 2: Virka 2 st + 2 lm + 2 st om varje lm-båge v runt = 45-54-54 st-grupper. VARV 3: Virka 2 dst + 2 lm + 2 dst om varje lm-båge mitt i st-gruppen och 1 lm mellan varje dst-grupp v runt = 45-54-54 dst-grupper med 1 lm mellan varje. Upprepa 1:a-3:e v 3-3-4 ggr till, SAMTIDIGT som det ökas 9 lm-bågar varje gång 1:a v virkas = 72-81-90 dst-grupper. För att koftan ska få en oval form virkas det sedan fram och tillbaka över endast de nedersta 47-54-61 dst-grupperna, det virkas inte över de mittersta 25-27-29 dst-grupperna överst i nacken. Börja från rätsidan och upprepa 1:a-3:e v i A.3 som förut totalt 2 ggr (dvs bakst får 6 v mer på höjden), för en fin övergång varje gång det vänds virkas det som visat i A.4 och A.5, SAMTIDIGT ökas det 7 lm-bågar varje gång 1:a v virkas (= totalt 86-95-104 dst-grupper på v inkl dst-grupperna mot nacken). Till slut virkas det 1 v med lm-bågar runt hela koftan (från rätsidan) så här: * 4 lm, 1 fm om lm-bågen mitt i en dst-grupp, 4 lm, 1 fm före nästa dst-grupp *, upprepa *-* v runt, klipp av tråden och fäst den. ÄRM: Virka upp 60-66-72 st runt ärmhålet (ca 5 st i varje dst-grupp och ca 30-33-36 st om lm-bågen – börja mitt under ärmen). Nästa v virkas så här: * 1 st i första/ nästa st, 1 lm, hoppa över 1 st *, upprepa *-* v runt = 30-33-36 st + 30-33-36 lm. Sedan virkas det så här: VARV 1: * 6 lm, hoppa över 5 m, 1 fm i nästa m *, upprepa *-* v runt = 10-11-12 lm-bågar. VARV 2: Virka 2 st + 2 lm + 2 st om varje lm-båge v runt = 10-11-12 st-grupper. VARV 3: Virka 2 dst + 2 lm + 2 dst om varje lm-båge mitt i st-gruppen och 1 lm mellan varje dst-grupp v runt = 10-11-12 dst-grupper med 1 lm mellan varje. VARV 4: * 12 lm, 1 fm om lm-bågen mitt i dst-gruppen *, upprepa *-* v runt = 10-11-12 lm-bågar, men minska samtidigt 1 lm-båge på v mitt under ärmen så här: 1 fm om lm-bågen mitt i näst sista dst-gruppen på v, 6 lm, 1 st om lm-bågen mitt i dst-gruppen det ska hoppas över, 6 lm, 1 fm om lm-bågen mitt i nästa dst-grupp). På nästa v virkas st-gruppen mitt under ärmen i st mellan de 2 lm-bågarna med 6 lm = 9-10-11 st-grupper. Upprepa varv 2-4 och minska samtidigt 1 lm-båge på vart 3:e v så att det för varje rapport på höjden blir 1 dst-grupp/lm-båge mindre på v. När det är 5-6-7 dst-grupper/lm-bågar på v virkas det sedan utan minskn till ärmen mäter 54-54-56 cm, eller till önskat mått, prova koftan på under arb gång. Klipp av tråden och fäst den och upprepa på den andra ärmen. |
||||||||||||||||||||||||||||||||||||||||||||||
Diagram förklaring |
||||||||||||||||||||||||||||||||||||||||||||||
|
||||||||||||||||||||||||||||||||||||||||||||||
|
||||||||||||||||||||||||||||||||||||||||||||||

|
||||||||||||||||||||||||||||||||||||||||||||||
|
||||||||||||||||||||||||||||||||||||||||||||||
|
||||||||||||||||||||||||||||||||||||||||||||||
|
Har du stickat/virkat detta mönster, eller några av våra andra designs? Dela dina bilder i sociala medier och använd taggen #dropsdesign så vi också kan se dem! Behöver du hjälp med mönstret?Du hittar instruktionsvideoer, kommentarer/frågor och mer i mönstret på www.garnstudio.com © 1982-2024 DROPS Design A/S. Alla rättigheter är reserverade. Detta dokument med tillhörande underdokument har copyright. Läs mer om vad du kan göra med våra mönster längst ner på vår hemsida. |
||||||||||||||||||||||||||||||||||||||||||||||


Med över 40 år i stick- och virkbranschen erbjuder DROPS Design en av de mest omfattande samlingarna av gratis mönster på internet - översatt till 17 språk. Per idag har vi 304 kataloger och 11422 mönster på och alla är översatta till Svenska.
Vi arbetar hårt för att kunna erbjuda det bästa inom stickning och virkning, inspiration och goda råd, men också kvalitetsgarn till fantastiska priser! Vill du använda våra mönster till annat än personligt användande? Du kan läsa om vilka regler som gäller i texten Copyright längst ner på sidan på alla våra mönster. Lycka till!
Kommentarer / Frågor (292)
Buongiorno. Ha provato a seguire lo schema ma non mi è chiaro come devo procedere con le maniche. Può gentilmente aiutarmi? Grazie
27.02.2021 - 14:03DROPS Design answered:
Buonasera Katya, quale parte delle maniche le crea difficoltà? Buon lavoro!
27.02.2021 - 19:26No es muy exacto el patrón, yo decidí hacerle ajustes, porque las explicaciones son confusas y cuando vi la cantidad de preguntas, me quedo claro que hay problemas con la explicación. Yo hice el círculo hasta obtener el ancho de espalda y luego tejí cadenas que para hacer las sisas y una vez las cerré, recomencé la puntada, porque no cuadra fácilmente con las explicaciones. Creo que quien las escribe, no diseño el tejido
16.02.2021 - 05:25I have crocheted a few round rows, the last round I crocheted had the long chains that skipped groups in order to make sleeves. However moving in to the next several rounds has me confused. Should the rounds after the sleeves include working the chains that previously made the sleeve and skipping that same section that was skipped when making the sleeve chain, or should I skip the chain and work the Part that was skipped over for the chain sleeve as part of the round. Or should I work both.
08.02.2021 - 06:13DROPS Design answered:
Dear Natalie, for the armholes you are skipping stitches replaced by chains on both places on the round. After this round has been worked, you will crochet in the round as before, ie crochet in both ch-spaces for armholes as they were stitches and no holes so that the pattern will continue as before. Hope this will help. Happy crocheting!
08.02.2021 - 11:04I have just finished A3 . it says Repeat 1st-3rd round (4) more times.. so I am going around the whole piece doing A3-- 4 more times? I feel like that will wind up covering the beautiful circle mandala in the middle of the back. If this is the case... then how do I then skip to under the middle and neck area back and forth to make the "oval"? where am I starting the row on the piece? My clusters look good but my bumber count is off so 29 groups is not the right place on my piece
05.02.2021 - 16:01DROPS Design answered:
Dear Lanie, if your tension is correct, you should have same measurements as in the chart when you have worked the 5 repeats of A.3 in total (increasing 9 ch-spaces every time you work 1st round so that you end with 90 tr-groups. To make the oval shape, lye circle flat and fold it double so that armholes are over each other, place markers to count the bottom 61 tr groups where you will work over and the 29 tr-groups towards neck you will leave now unworked. Happy crocheting!
08.02.2021 - 07:32How can I get this pattern in English on YouTube
23.01.2021 - 21:04DROPS Design answered:
Dear Dorena, this pattern is only available in our website - you will find some lessons and video to help you if required - see just above your comment. Happy crocheting!
25.01.2021 - 09:07I am working on the first row after the armholes, 2nd row of A3. So If I am understanding correctly, I need to do the increase after every 4th dc group to add 9 evenly around. So does that mean in the armhole space I will add an increase at the 4th dc group which would be the 3rd dc group in the armhole, so with that plus the 8 dc groups in the armhole chain space I would actually have 9 dc groups in the first armhole space?
31.12.2020 - 19:12DROPS Design answered:
Dear Crystal, after the armhole you continue working in the both chains for armholes as if they weren't stitch groups skipped and at the same time you increase evenly in the round 9 dc groups, ie the 9 ch-spaces have to be increased evenly and not only in the chains for armholes. Happy crocheting!
04.01.2021 - 13:58Hello there, Can you tell me which size would make a UK 12-14 please?
29.12.2020 - 21:08DROPS Design answered:
Hi Alison, There is a measurements chart for each size at the bottom of the pattern . Happy crocheting!
30.12.2020 - 08:05Why not offer full written instructions for this pattern for people who struggle to follow a chart. You seem to reply to endless questions relating to problems understanding the chart which could easily be avoided if the instructions were written out in full. Drops do have some lovely patterns but so many are difficult to follow.
27.12.2020 - 22:19DROPS Design answered:
Dear Maura McFall! Maybe you find this lesson helpful: https://www.garnstudio.com/lesson.php?id=69&cid=19 Hope it helps!
03.01.2021 - 03:01I love the looks of this pattern and I'd really like to make the sweater, however, I notice the yarn is 100% wool. I am super sensitive to itchy wools. Can you recommend a yarn substitute that is NOT itchy?
14.11.2020 - 16:41DROPS Design answered:
Dear Susanne, everyone's sensitivity is different, the best would be to contact your DROPS Store - even per mail - they will be able to help you finding the best alternatives for you. Happy knitting!
16.11.2020 - 08:20I finished the jacket and it turned out so cool this is my first ever jacket I have made so I am super excited about it! I wish I knew how to share a picture! Thank you!!! ♡
29.10.2020 - 23:04DROPS Design answered:
Dear Christine, we are really happy that you finished the jacked and you like it. You can always share the picture with us on Facebook at the DROPS workshop group, or by taggong wour pictures on the social networking sites (facebook, instagram etc) with #dropsdesign #dropsfan tags. Gappy Crafting!
31.10.2020 - 13:20