DROPS Kid-Silk uni colour 75% Mohair, 25% Silk |
5.05 € /25g |
Order |
Clicking the ORDER button will redirect you to Mallia Kouvaria - pleko.gr. website
The yarn cost is calculated from the pattern’s smallest size and the yarn’s cheapest product type. Looking for an even better price? You might find it on the DROPS Deals!
-------------------------------------------------------
Alternative Yarn – See how to change yarns here
Yarn Groups A to F – Use the same pattern and change the yarn here
Yarn usage using an alternative yarn – Use our yarn converter here
-------------------------------------------------------
DROPS Kid-Silk uni colour 75% Mohair, 25% Silk 5.05 € /25g Order |
Clicking the ORDER button will redirect you to Mallia Kouvaria - pleko.gr. website
The yarn cost is calculated from the pattern’s smallest size and the yarn’s cheapest product type. Looking for an even better price? You might find it on the DROPS Deals!
This pattern has been corrected. Click here to see the correction/s.
= purl | |
= knit |
Each of our patterns has specific tutorial videos to help you.
These step-by-step tutorials might also help you:
Why is the knitting/crochet tension so important?
Knitting tension is what determines the final measurements of your work, and is usually measured per 10 x 10 cm. It is provided like so: number of stitches in width x number of rows in height - eg: 19 stitches x 26 rows = 10 x 10 cm.
The knitting tension is very individual; some people knit/crochet loosely while others work tightly. You adjust the knitting tension with the needle size, which is why the suggested needle size is only meant as a guide! You need to adjust this (up or down) to ensure that YOUR knitting tension matches the knitting tension provided in the pattern. If you work with a different knitting tension than provided you will have a different yarn consumption, and your work will have different measurements than what the pattern suggests.
The knitting tension also determines which yarns can replace each other. As long as you achieve the same knitting tension you can replace one yarn with another.
See DROPS lesson: How to measure your tension/gauge
See DROPS video: How to make a gauge tension swatch
How do I know how many balls of yarn I need?
The required amount of yarn is provided in grams, eg: 450 g. To calculate how many balls you’ll need you first need to know how many grams are in 1 ball (25g, 50g or 100g). This information is available if you click on the individual yarn quality on our pages. Divide the amount required with the amount of each ball. For example, if each ball is 50g (the most common amount), the calculation will be as follows: 450 / 50 = 9 balls.
Can I use a different yarn than what the pattern suggests?
The important thing when changing from one yarn to another is that the knitting/crochet tension remains the same. This is so that the measurements of the finished piece will be the same as on the sketch provided. It is easier to achieve the same knitting tension using yarns from the same yarn group. It is also possible to work with multiple strands of a thinner yarn to achieve the knitting tension of a thicker one. Please try our yarn converter. We recommend you to always work a test swatch.
Please NOTE: when changing yarn the garment might have a different look and feel to the garment in the photo, due to individual properties and qualities of each yarn.
See DROPS lesson: Can I use a different yarn than the one mentioned in the pattern?
What are the yarn groups?
All our yarns are categorised into yarn groups (from A to F) according to thickness and knitting tension – group A contains the thinnest yarns and group F the thickest. This makes it easier for you to find alternative yarns to our patterns, should you wish to switch yarn. All yarns within the same group have a similar knitting tension and can easily replace each other. However, different yarn qualities have different structures and properties which will give the finished work a unique look and feel.
How do I use the yarn calculator?
At the top of all our patterns you’ll find a link to our yarn calculator, which is a helpful tool should you wish to use a different yarn than suggested. By filling in the yarn quality you wish to replace, the amount (in your size) and number of strands, the calculator will present good alternative yarns with the same knitting tension. Additionally it will tell you how much you’ll require in the new qualities and whether you’ll need to work with multiple strands. Most skeins are 50g (some are 25g or 100g).
If the pattern is worked with multiple colours, every colour will have to be calculated separately. Similarly, if the pattern is worked with several strands of different yarns (for example 1 strand Alpaca and 1 strand Kid-Silk) you will have to find alternatives for each, individually.
Why do you show discontinued yarns in the patterns?
Since different yarns have different qualities and textures we have chosen to keep the original yarn in our patterns. However, you can easily find options among our available qualities by using our yarn calculator, or simply pick a yarn from the same yarn group.
It is possible that some retailers still have discontinued yarns in stock, or that someone has a few skeins at home that they would like to find patterns for.
The yarn calculator will provide both alternative yarn as well as required amount in the new quality.
What size should I knit?
If you think it's hard to decide what size to make, it can be a good idea to measure a garment you own already and like the size of. Then you can pick the size by comparing those measures with the ones available in the pattern's size chart.
You'll find the size chart at the bottom of the pattern.
See DROPS lesson: How to read size chart
Why do I get the wrong knitting tension with the suggested needle size?
The needle size provided in the pattern serves only as a guide, the important thing is to follow the knitting tension. And since knitting tension is very individual, you will have to adjust the needle size to ensure that YOUR tension is the same as in the pattern – maybe you’ll have to adjust 1, or even 2 needle sizes, up or down to achieve the correct tension. For this, we recommend that you work test swatches.
Should you work with a different knitting tension than the one provided, the measurements of the finished garment might deviate from the measurement sketch.
See DROPS lesson: How to measure your tension/gauge
See DROPS video: How to make a tension/gauge swatch
Why is the pattern worked top-down?
Working a garment top-down provides more flexibility and room for personal adjustment. For example it is easier to try the garment on while working, as well as making adjustments to length of yoke and shoulder caps.
The instructions are carefully explaining every step, in the correct order. Diagrams are adjusted to the knitting direction and are worked as usual.
How do I work according to a knitting diagram?
The diagram depicts all rows/rounds, and every stitch seen from the right side. It is read from bottom to top, from right to left. 1 square = 1 stitch.
When working back and forth, every other row is worked from the right side and every other row is worked from the wrong side. When working from the wrong side, the diagram will have to be worked reversed: from left to right, knit stitches are purled, purl stitches are knit etc.
When working in the round every round is worked from the right side and the diagram are worked from right to left on all rounds.
See DROPS lesson: How to read knitting diagrams
How do I work according to a crochet diagram?
The diagram depicts all rows/rounds, and every stitch seen from the right side. It is worked from bottom to top, from right to left.
When working back and forth every other row is worked from the right side: from right to left and every other row is worked from the wrong side: from left to right.
When working in the round, every row in the diagram are worked from the right side, from right to left.
When working a circular diagram you start in the middle and work your way outwards, counter clockwise, row by row.
The rows usually start with a given number of chain stitches (equivalent to the height of the following stitch), this will either be depicted in the diagram or explained in the pattern.
See DROPS lesson: How to read crochet diagrams
How do I work several diagrams simultaneously on the same row/round?
Instructions for working several diagrams after each other on the same row/round, will often be written like so: “work A.1, A.2, A.3 a total of 0-0-2-3-4 times". This means you work A.1 once, then A.2 is worked once, and A.3 is repeated (in width) the number of times provided for your size – in this case like so: S = 0 times, M = 0 times, L=2 times, XL= 3 times and XXL = 4 times.
The diagrams are worked as usual: begin with the first row in A.1, then work the first row in A.2 etc.
See DROPS lesson: How to read knitting diagrams
See DROPS lesson: How to read crochet diagrams
Why are the sleeves shorter in larger sizes?
The total width of the garment (from wrist-to-wrist) will be larger in the larger sizes, despite the actual sleeves being shorter. The larger sizes have longer sleeve caps and wider shoulders, so there will be a good fit in all sizes.
Where on the garment is the length measured?
The measurement sketch/schematic drawing provides information regarding the full length of the garment. If it’s a jumper or a jacket the length is measured from the highest point on the shoulder closest to the neckline, and straight down to the bottom of the garment. It is NOT measured from the tip of shoulder. Similarly, the length of yoke is measured from the highest point on the shoulder and down to where yoke is split into body and sleeves.
On a jacket measures are never taken along bands, unless specifically stated. Always measure inside band stitches when measuring the length.
See DROPS lesson: How to read a schematic drawing
What is a repeat?
Diagrams are often repeated on the round or in height. 1 repeat is the diagram the way it appears in the pattern. If it says to work 5 repeats of A.1 in the round, then you work A.1 a total of 5 times after/next to each other in the round. If it says to work 2 repeats of A.1 vertically/in height you work the entire diagram once, then begin again at the start and work the entire diagram one more time.
Why does the piece start with more chain stitches than it’s worked with?
Chain stitches are slightly narrower than other stitches and to avoid working the cast-on edge too tight, we simply chain more stitches to begin with. The stitch count will be adjusted on the following row to fit the pattern and measurement sketch.
Why increase before the rib edge when the piece is worked top-down?
The rib edge is more elastic and will contract slightly compared to, for example, stocking stitch. By increasing before the rib edge, you avoid a visible difference in width between the rib edge and the rest of the body.
Why increase in the cast-off edge?
It’s very easy to cast off too tightly, and by making yarn overs while casting off (and simultaneously casting these off) you avoid a too tight cast off edge.
See DROPS video: How to bind off with yarn overs (yo)
How do I increase/decrease on every 3rd and 4th row/round alternately?
To achieve an even increase (or decrease) you can increase on, for example: every 3rd and 4th row alternately, like so: work 2 rows and increase on the 3rd row, work 3 rows and increase on the 4th. Repeat this until the increase is complete.
See DROPS lesson: Increase or decrease 1 st on every 3rd and 4th row alternately
How can I work a jacket in the round instead of back and forth?
Should you prefer to work in the round instead of back and forth, you may of course adjust the pattern. You’ll need to add steeks mid-front (usually 5 stitches), and follow the instructions. When you would normally turn and work from the wrong side, simply work across the steek and continue in the round. At the end you’ll cut the piece open, pick up stitches to work bands, and cover the cut edges.
See DROPS video: How to knit steeks and cut open
Can I work a jumper back and forth instead of in the round?
Should you prefer to work back and forth instead of in the round, you may of course adjust the pattern so you work the pieces separately and then assemble them at the end. Divide the stitches for the body in 2, add 1 edge stitch in each side (for sewing) and work the front and back pieces separately.
See DROPS lesson: Can I adapt a pattern for circular needles into straight needles?
Why is the pattern slightly different than what I see in the photo?
Pattern repeats can vary slightly in the different sizes, in order to get the correct proportions. If you’re not working the exact same size as the garment in the photo, yours might deviate slightly. This has been carefully developed and adjusted so that the complete impression of the garment is the same in all sizes.
Make sure to follow instructions and diagrams for your size!
How do I make a women’s size garment into a men’s size one?
If you have found a pattern you like which is available in women’s size it’s not very difficult to convert it to men’s size. The biggest difference will be the length of sleeves and body. Start working on the women size that you think would fit across the chest. The additional length will be worked right before you cast off for the armhole/sleeve cap. If the pattern is worked top-down you can add the length right after the armhole or before the first decrease on sleeve.
Regarding additional yarn amount, this will depend on how much length you add, but it is better with a skein too many than too few.
How do I prevent a hairy garment from shedding?
All yarns will have excess fibres (from production) that might come off as lint or shedding. Brushed yarns (ie hairier yarns) have more of these loose, excess fibres, causing more shedding.
Shedding also depends on what is worn under or over the garment, and whether this pulls at the yarn fibres. It’s therefore not possible to guarantee that there will be no shedding
Below are some tips on how to get the best result when working with hairier yarns:
1. When the garment is finished (before you wash it) shake it vigorously so the looser hairs come off. NOTE: do NOT use a lint roller, brush or any method that pulls at the yarn.
2. Place the garment in a plastic bag and put it in your freezer - the temperature will cause the fibres to become less attached to each other, and excess fibres will come off easier.
3. Leave in the freezer for a few hours before taking it out and shaking it again.
4. Wash the garment according to the instructions on the yarn label.
Why does my garment pill?
Pilling is a natural process that happens to even the most exclusive of fibers. It's a natural sign of wear and tear that is hard to avoid, and that is most visible in high friction areas of your garment like a sweater's arms and cuffs.
You can make your garment look as new by removing the pilling, using a fabric comb or a pill/lint remover.
Tween Twinkle |
|||||||
|
|
||||||
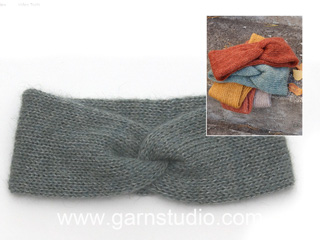
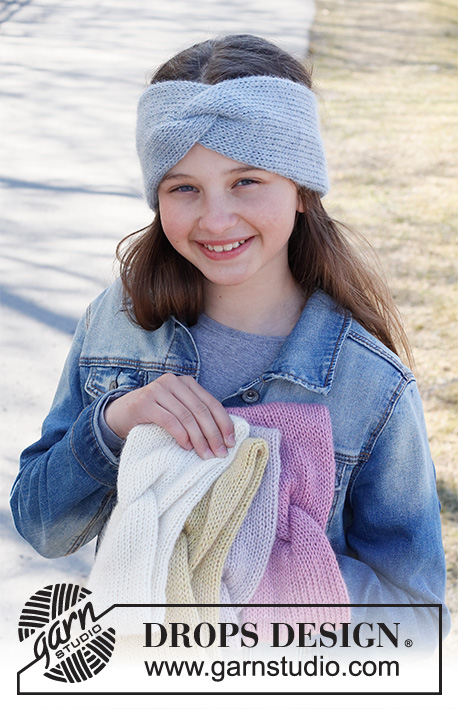
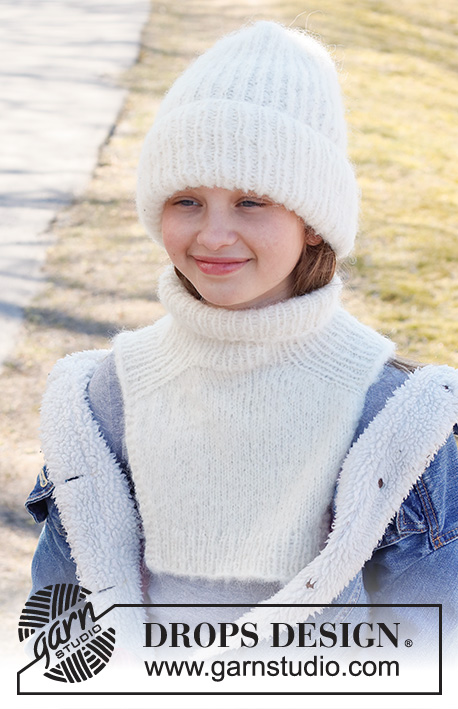
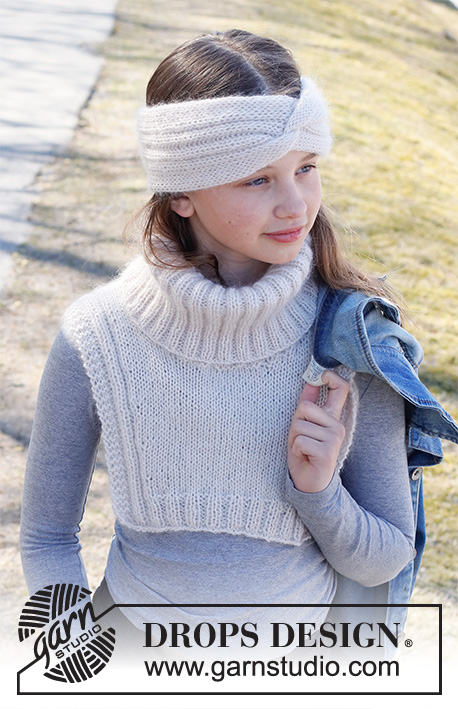
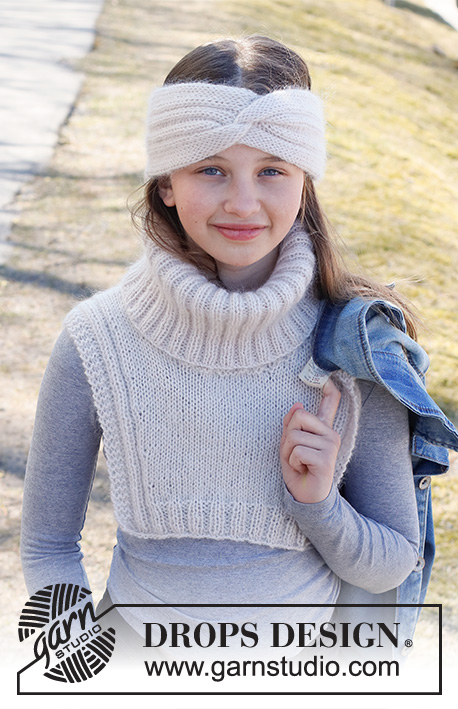
Knitted head-band and neck-warmer with cable for children in DROPS Flora and DROPS Kid-Silk. The piece is worked with rib and stocking stitch. Sizes 2– 12 years.
DROPS Children 40-33 |
|||||||
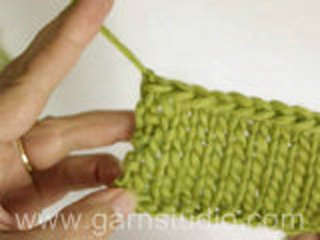
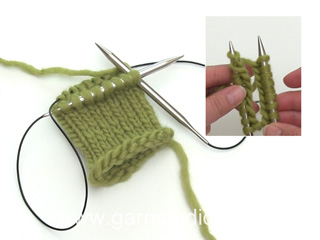
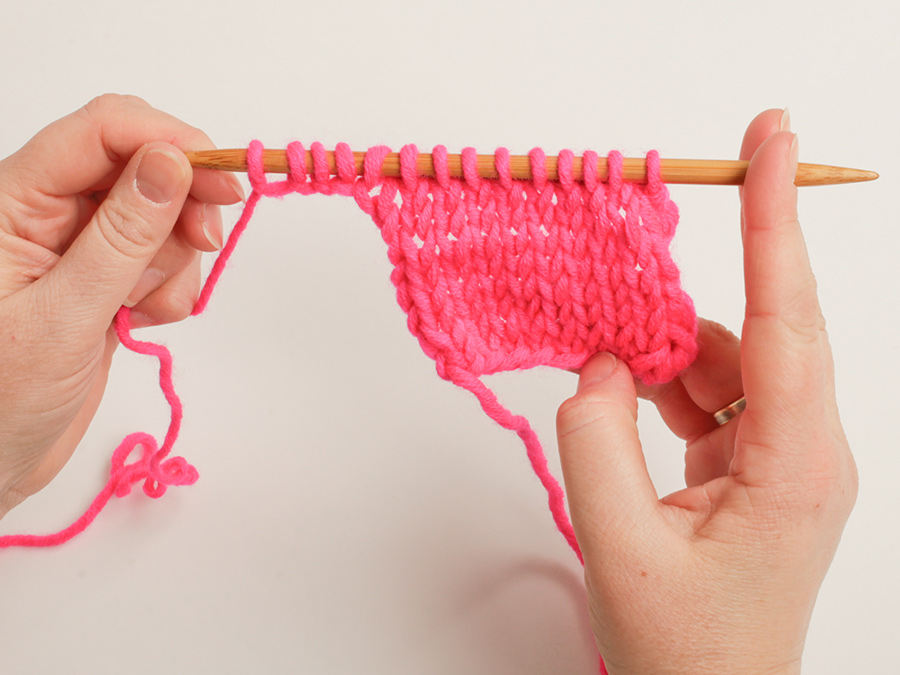
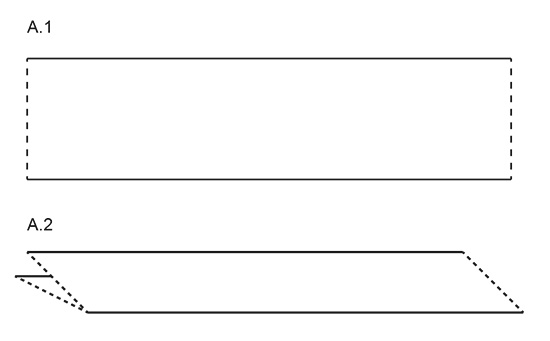
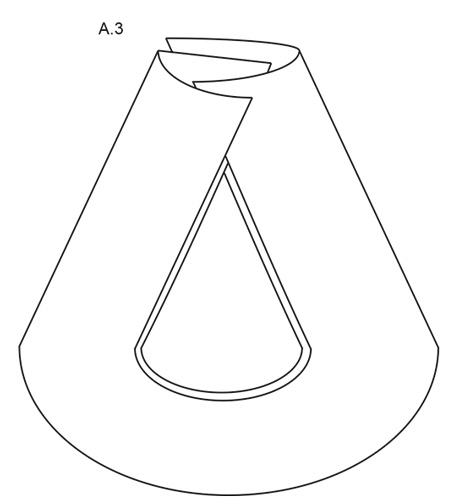
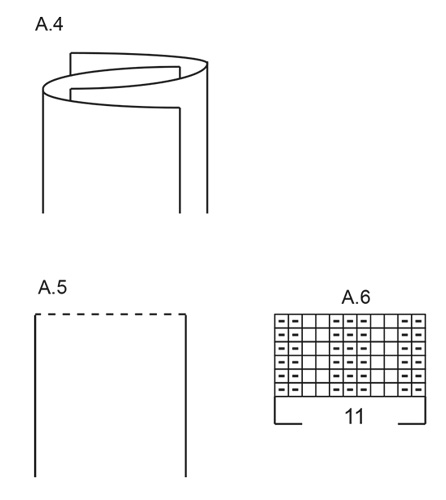
------------------------------------------------------- EXPLANATIONS FOR THE PATTERN: ------------------------------------------------------- DIAGRAMS: See diagrams A.1 to A.6. Diagrams A.1 to A.5 are used when assembling the head-band. Diagram A.6 is for the pattern on the head-band. CASTING-OFF TIP: To avoid the cast-off edge being tight you can cast off with a larger size needle. If the edge is still tight, make 1 yarn over after approx. each 4th stitch at the same time as casting off; the yarn overs are cast off as normal stitches. ------------------------------------------------------- START THE PIECE HERE: ------------------------------------------------------- HEAD-BAND – SHORT OVERVIEW OF THE PIECE: The piece is worked in the round as a tube, with double pointed needles. It is sewn together to create a cable mid-front. HEAD-BAND: Cast on 33-35-37-39 stitches with double pointed needles size 5 mm and 1 strand DROPS Flora and 1 strand DROPS Kid-Silk (2 strands). Work in the round as follows: Work 11-12-13-14 stitches in stocking stitch, diagram A.6 (= 11 stitches) and 11-12-13-14 stitches in stocking stitch. REMEMBER THE KNITTING TENSION! Continue working until the piece measures 45-47-48-49 cm, or to desired length – the head-band should sit a little tightly. Cast off with knit. ASSEMBLY: The piece is now a tube open at each end. Lay it flat – making sure it is not twisted and A.6 is in the middle of the tube (this will be the right side when the band is worn). Close the openings at both ends together by sewing across the ends in the outermost loop of the outermost stitch so the seam is flat – see broken line in diagram A.1. The piece is now a flat rectangle. Fold it double length-wise, with the pattern inside the fold - see diagram A.2. Now put the long sides together in layers, without twisting the piece – see diagram A.3. The ends are alternately inside and outside of each other and edge to edge, - see diagram A.4. Now sew through all layers along the broken line in diagram A.5 (across the ends), sew with tight casting stitches, 1 stitch in each stitch – it is important to sew through all the layers so the seam is invisible when the band is turned inside-out. Cut and fasten the strand. Turn the piece inside-out, so the seam is on the inside. ------------------------------------------------------- NECK-WARMER – SHORT OVERVIEW OF THE PIECE: The piece is worked back and forth, bottom up, starting at the bottom of the front piece. Stitches are cast off for the neck-line and each shoulder is worked separately, over to the back. Stitches are increased for the neck-line at the back and then the back piece is worked. The neck is worked to finish. NECK-WARMER: Cast on 32-36-44-48 stitches with circular needle size 5 mm and 1 strand DROPS Flora and 1 strand DROPS Kid-Silk (= 2 strands). Purl 1 row. The next row is worked as follows from the right side: Work 3 edge stitches in GARTER STITCH – read description above, work rib (purl 2, knit 2) until there are 5 stitches left, purl 2 and 3 edge stitches in garter stitch. Continue this rib for 4 cm. REMEMBER THE KNITTING TENSION! The next row is worked as follows from the right side: Work the first 9 stitches as before, stocking stitch over the next 14-18-26-30 stitches and work the last 9 stitches as before. When the piece measures 6 cm, increase on each side from the right side as follows: Work the first 10 stitches as before, 1 yarn over, work as before until there are 10 stitches left, 1 yarn over and work to the end of the row. The next row is worked as before, with the yarn overs purled twisted. Repeat this increase every 2½-2½-3-2½ cm a total of 3-3-3-4 times on each side = 38-42-50-56 stitches. Work until the piece measures 14-15-16-17 cm. Work the next row from the right side as follows: Work the first 16-17-20-22 stitches as before and place them on a thread for the left shoulder, cast off 6-8-10-12 stitches for the neck and work to the end of the row. The shoulders are worked separately. RIGHT SHOULDER: = 16-17-20-22 stitches. Start from the wrong side and cast off for the neck at the beginning of each row from the right side as follows: 2 stitches 2-2-2-2 times and 1 stitch 1-2-2-2 times = 11-11-14-16 stitches. Work until the piece measures 18-20-22-24 cm from the cast-on edge. Insert a marker in the piece to measure from (= top of shoulder). Work until the piece measures 1-1½-2½-2½ cm from the marker and the next row is from the wrong side. Stitches are now cast on at the end of each row from the wrong side as follows: 1 stitch 1-2-2-2 times and 2 stitches 2-2-2-2 times = 16-17-20-22 stitches. The piece measures approx. 4-5-6-7 cm from the marker. Cut the strand and place the stitches on a thread. LEFT SHOULDER: Place the 16-17-20-22 stitches from the first thread back on the needle. Start from the wrong side and cast off for the neck at the beginning of each row from the wrong side as follows: 2 stitches 2-2-2-2 times and 1 stitch 1-2-2-2 times = 11-11-14-16 stitches. Work until the piece measures 18-20-22-24 cm from the cast-on edge. Insert a marker in the piece to measure from (= top of shoulder). Work until the piece measures 1-1½-2½-2½ cm from the marker and the next row is from the right side. Stitches are now cast on at the at the end of each row from the right side as follows: 1 stitch 1-2-2-2 times and 2 stitches 2-2-2-2 times = 16-17-20-22 stitches. Then cast on 6-8-10-12 stitches at the end of the next row from the right side = 22-25-27-34 stitches. The piece measures approx. 4-5-6-7 cm from the marker. The left and right shoulder are now worked together and the back piece continued from here. Place the right-shoulder stitches on the needle and work them from the right side = 38-42-50-56 stitches. BACK PIECE: Work stocking stitch back and forth, with 3 edge stitches in garter stitch on each side and 6 ribbed stitches on each side as before. AT THE SAME TIME when the piece measures 7-9-10-10½ cm from the marker on the shoulder, decrease stitches inside the 10 outermost stitches on each side as follows, from the right side: Work as before over the first 10 stitches, knit 2 together, work until there are 12 stitches left, slip 1 stitch as if to knit, knit 1 and pass the slipped stitch over and work the last 10 stitches as before. Repeat this decrease every 2½-2½-3-2½ cm a total of 3-3-3-4 times on each side = 32-36-44-48 stitches. Work until the piece measures approx. 14-16-18-20 cm from the marker – adjust to match the length of the front piece (without the rib). Work the next row from the right side as follows: Work 3 edge stitches in garter stitch, work rib (purl 2, knit 2) until there are 5 stitches left, purl 2 and 3 edge stitches in garter stitch. Continue this rib for 4 cm, with the next row from the right side. Cast off with knit over knit and purl over purl - read CASTING-OFF TIP! NECK: Use circular needle size 4 mm and 1 strand DROPS Flora and 1 strand DROPS Kid-Silk (= 2 strands). Start at the marker on the shoulder and knit up 72-80-84-88 stitches around the neck. Purl 1 round and increase to 88-92-96-104 stitches. Work rib (knit 2, purl 2) for approx. 16-18-22-22 cm. Cast off with knit over knit and purl over purl - remember CASTING-OFF TIP! |
|||||||
Diagram explanations |
|||||||
|
|||||||
Have you made this or any other of our designs? Tag your pictures in social media with #dropsdesign so we can see them! Do you need help with this pattern?You'll find tutorial videos, a Comments/Questions area and more by visiting the pattern on garnstudio.com. © 1982-2024 DROPS Design A/S. We reserve all rights. This document, including all its sub-sections, has copyrights. Read more about what you can do with our patterns at the bottom of each pattern on our site. |
With over 40 years in knitting and crochet design, DROPS Design offers one of the most extensive collections of free patterns on the internet - translated to 17 languages. As of today we count 304 catalogues and 11422 patterns - 11422 of which are translated into English (UK/cm).
We work hard to bring you the best knitting and crochet have to offer, inspiration and advice as well as great quality yarns at incredible prices! Would you like to use our patterns for other than personal use? You can read what you are allowed to do in the Copyright text at the bottom of all our patterns. Happy crafting!
Comments / Questions (4)
Heidi wrote:
Onko kaulurin pääntien reunuksen pituus oikeasti 4 cm? Kuvassa näyttää siltä että se on paljon enemmän (noin 20 senttiä ehkä=)
15.09.2022 - 08:55DROPS Design answered:
Hei, tämä malli neulotaan alhaalta ylös, eli alareunan reunuksen pituus on 4 cm. Pääntien reunuksen pituus on n- 16-22 cm (koosta riippuen).
20.09.2022 - 18:47Patrycja wrote:
Prawe ramię-czy zamykanie oczek na dekolt wykonuje się na pewno na początku rzędu na prawej stronie?
30.11.2021 - 22:13DROPS Design answered:
Witaj Patrycjo, zaczynasz prawe ramię na lewej stronie robótki, przerabiasz rząd na lewej stronie i obracasz robótkę. Teraz będziesz zamykać oczka na dekolt i powtarzać to na początku każdego rzędu na prawej stronie robótki. Pozdrawiamy!
01.12.2021 - 08:43Signe Britt Halvorsen wrote:
Får ikke fram diagrammet i denne oppskriften sånn at jeg kan skrive den ut.
06.10.2021 - 00:21DROPS Design answered:
Hei Signe Britt, Det er bare 1 diagram med mønster, helt i bunnen av oppskriften. God fornøyelse!
06.10.2021 - 07:02Signe Britt Halvorsen wrote:
Får ikke fram diagrammet til denne oppskriften.Dermed får jeg ikke skrevet det ut.Det kommer ikke ut med annet en den vanlige oppskriften som er skriftlig.
06.10.2021 - 00:20