
Popular categories
Looking for a yarn?


|
|
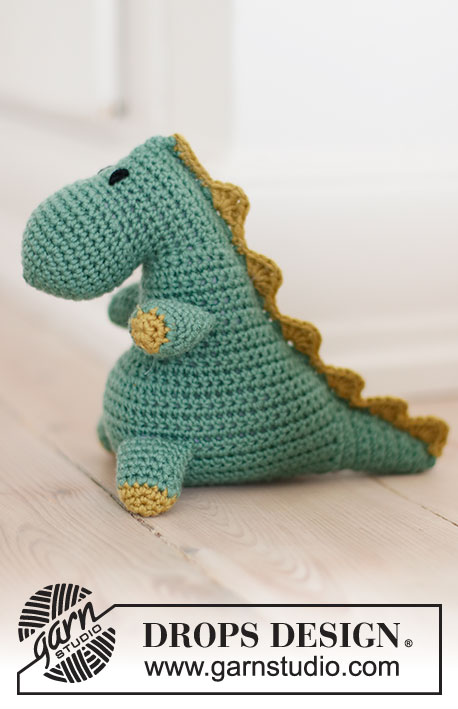
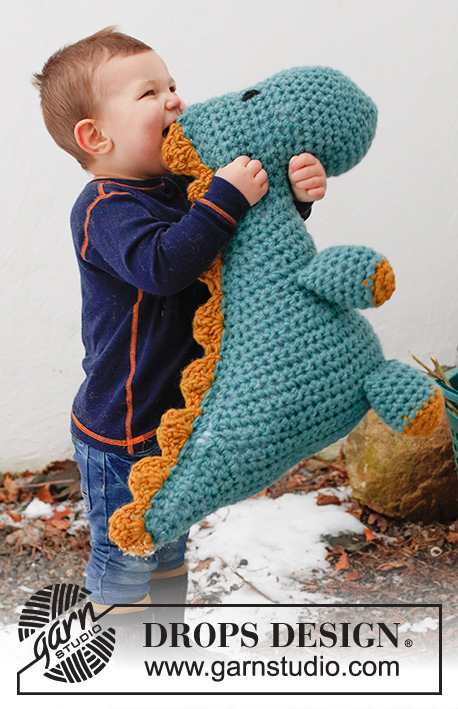
Dino Cuddles |
|
 |
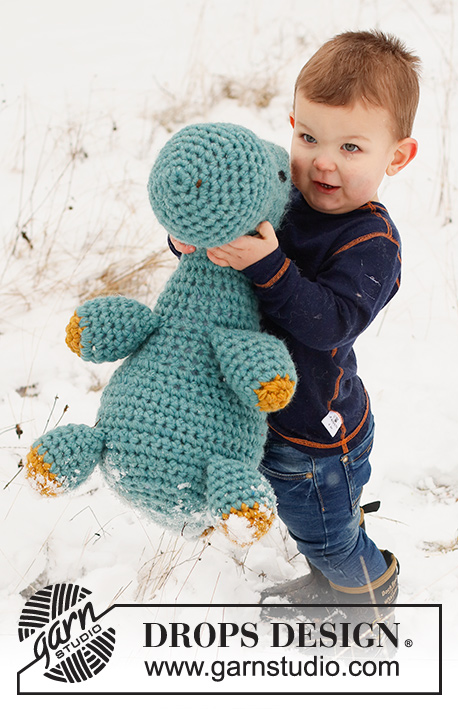 |
Crocheted Dinosaur (T-Rex) in 2 strands DROPS Snow. The piece is worked from nose to tail with 1 seam. Theme: Soft toys.
DROPS Children 41-29 |
|
|
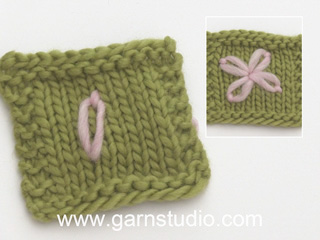
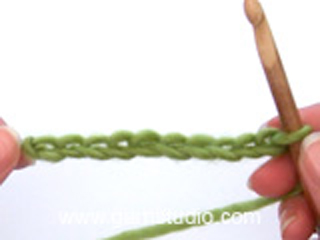
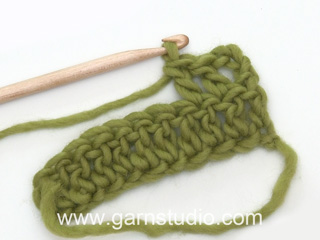
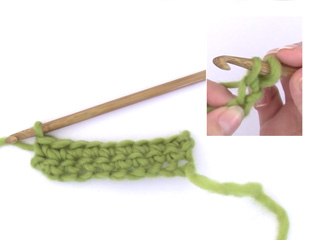
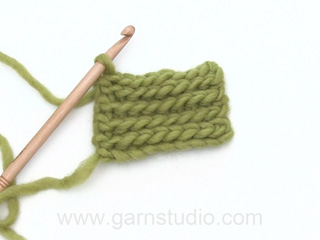
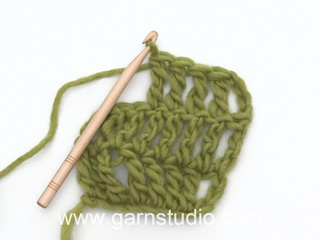
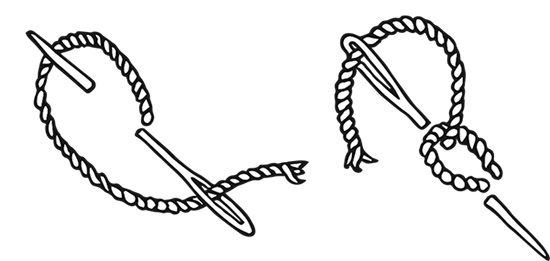
------------------------------------------------------- EXPLANATIONS FOR THE PATTERN: ------------------------------------------------------- CROCHET TIP (chain stitch): 1 chain stitch should equal 1 double crochet in width. Make sure the chain-stitch loop is pushed up the hook so it is not tight. If the chain stitches are tight, the piece will also be tight in sections where there are a lot of chain stitches. WORK 2 double crochets TOGETHER: Insert the hook through the first stitch and pick up the strand, insert the hook in the next stitch and pick up the strand (= 3 loops), make 1 yarn over and pull it through all 3 loops (= 1 stitch decreased). LOOP STITCH: Sew with a single strand and black. The eye is embroidered over rows 1 and 2 of the face with 5 stitches between each eye. See diagram which shows how to work loop stitch. ------------------------------------------------------- START THE PIECE HERE: ------------------------------------------------------- DINOSAUR – SHORT OVERVIEW OF THE PIECE: The whole piece is worked with 2 strands, from nose to tail and with 1 seam under the body. 4 legs are worked separately, then the head is worked, continued to the neck and body at the same time as the front and back legs are attached. The spines are worked to finish. FRONT LEGS: Work 2 chain stitches with hook size 8 mm and 2 strands curry DROPS Snow – read CROCHET TIP. In the first chain stitch work 5 double crochets, which form a small circle. Finish the circle with 1 slip stitch in the first double crochet. ROUND 1 is finished. ROUND 2: Work 1 chain stitch, then 2 double crochets in each stitch. Finish the round with 1 slip stitch in the first double crochet = 10 stitches. Cut the strands and change to 2 strands sea green. ROUND 3: Work 1 chain stitch, * 2 double crochets in the next stitch, 1 double crochet in the next stitch, * work from *-* to the end of the round (= 15 stitches). Finish with 1 slip stitch in the first double crochet. ROUNDS 4-9: Work 1 chain stitch, 1 double crochet in each stitch. Finish with 1 slip stitch in the first double crochet (= 15 stitches). Cut the strands and pull them through the last loop. Work 1 more leg and fill both with wadding. BACK LEGS: Work in the same way as the FRONT LEGS, but with an extra round of curry before changing to sea green. NOSE: Work 2 chain stitches with hook size 8 mm and 2 strands sea green. In the first chain stitch work 5 double crochets, which form a small circle. Finish the circle with 1 slip stitch in the first stitch. ROUND 1 is finished. ROUND 2: Work 1 chain stitch, then 2 double crochets in each stitch (= 10 stitches). Finish with 1 slip stitch in the first stitch. ROUND 3: Work 1 chain stitch, * 2 double crochets in the next stitch, 1 double crochet in the next stitch, * work from *-* to the end of the round. Finish with 1 slip stitch in the first stitch (= 15 stitches). ROUND 4: Work 1 chain stitch, * 2 double crochets in the next stitch, 1 double crochet in each of the next 2 stitches *, work from *-* to the end of the round. Finish with 1 slip stitch in the first stitch (= 20 stitches). ROUND 5: Work 1 chain stitch, * 2 double crochets in the next stitch, 1 double crochet in each of the next 3 stitches *, work from *-* to the end of the round. Finish with 1 slip stitch in the first stitch (= 25 stitches). ROUND 6: Work 1 chain stitch, * 2 double crochets in the next stitch, 1 double crochet in each of the next 4 stitches *, work from *-* to the end of the round. Finish with 1 slip stitch in the first stitch (= 30 stitches). ROUNDS 7-11: Work 1 chain stitch, then 1 double crochet in each stitch. Finish with 1 slip stitch in the first stitch (= 30 stitches). ROUND 12: Work 1 chain stitch, * 1 double crochet in each of the next 2 stitches, work together the next 2 double crochets– read WORK TOGETHER 2 DOUBLE CROCHETS in the explanations above *, work from *-* until there are 2 stitches left, work 1 double crochet in each of the last 2 stitches, finish with 1 slip stitch in the first stitch at the beginning of the round (= 23 stitches). ROUND 13: Work 1 chain stitch, 1 double crochet in each stitch. Finish with 1 slip stitch in the first stitch (= 23 stitches). FACE: Continue working back and forth. ROWS 1-4: Work 1 chain stitch, 1 double crochet in each stitch. Turn. ROWS 5-6: Work 1 chain stitch, 2 double crochets in the first stitch, 1 double crochet in each stitch until there is 1 stitch left and 2 double crochets in the last stitch (= 2 stitches increased) (= 27 stitches). Turn. ROWS 7-8: Work 1 chain stitch, 1 double crochet in each stitch. Turn. Now embroider 2 eyes with LOOP STITCH – read explanation above. NECK: Along the side of the FACE you have 8 rows, continue back and forth along both sides of the face (a total of 16 rows): ROW 1: Work 2 double crochets in the last row worked on the face, * 1 double crochet in each of the next 2 rows, 2 double crochets in the next row *, work from *-* to the end of the 16 rows = 22 stitches. Turn. ROW 2: Work 1 chain stitch, 1 double crochet in each stitch. Turn. ROW 3: Work 1 chain stitch, 2 double crochets in the first stitch, 1 double crochet in each stitch until there is 1 stitch left, 2 double crochets in the last stitch (= 2 stitches increased). Turn. Work ROWS 2 and 3 until you have a total of 6 rows (= 26 stitches on row 6). Turn. BODY: Now the 2 front legs are attached to the body. ROW 1: Work 1 chain stitch, 2 double crochets in the first stitch, 1 double crochet in each of the next 4 stitches, fold one front leg double and lay it onto the body so the next 6 stitches are worked through 3 layers, work 1 double crochet in each of the next 4 stitches (= mid-front/between legs), fold the other front leg double and lay it onto the body so the next 6 stitches are worked through 3 layers, 1 double crochet in each of the next 4 stitches, 2 double crochets in the last stitch (= 28 stitches). Turn. ROW 2: Work 1 chain stitch, 1 double crochet in each stitch. Turn. ROW 3: Work 1 chain stitch, 2 double crochets in the first stitch, 1 double crochet in each stitch until there is 1 stitch left, 2 double crochets in the last stitch (= 2 stitches increased). Turn. Work ROWS 2 and 3 until you have a total of 5 rows (= 32 stitches on ROW 5). Turn. ROW 6: Increase for the stomach as follows: Work 1 chain stitch, 2 double crochets in the first stitch, 1 double crochet in each of the next 8 stitches, * 2 double crochets in the next stitch, 1 double crochet in the next stitch *, work from *-* a total of 7 times, 2 double crochets in the next stitch, 1 double crochet in each of the next 7 stitches, 2 double crochets in the last stitch (= 10 increased stitches, 42 stitches). Turn. ROW 7: Work 1 chain stitch, 1 double crochet in each stitch. Turn. ROW 8: On this row increase for the stomach: Work 1 chain stitch, 2 double crochets in the first stitch, 1 double crochet in each of the next 16 stitches, * 2 double crochets in the next stitch, 1 double crochet in the next stitch *, work from *-* a total of 4 times, 1 double crochet in each of the next 16 stitches, 2 double crochets in the last stitch (= 6 increased stitches, 48 stitches). Turn. ROW 9: Work 1 chain stitch, 1 double crochet in each stitch. Turn. ROW 10: Work 1 chain stitch, 2 double crochets in the first stitch, 1 double crochet in each stitch until there is 1 stitch left and 2 double crochets in the last stitch (= 2 increased stitches, 50 stitches). Turn. ROW 11: Work 1 chain stitch, 1 double crochet in each stitch. Turn. ROW 12: Work 1 chain stitch, 2 double crochets in the first stitch, 1 double crochet in each stitch until there is 1 stitch left and 2 double crochets in the last stitch (= 2 increased stitches, 52 stitches). Turn. ROW 13: Now attach the back legs to the body. Work 1 chain stitch, 1 double crochet in each of the first 15 stitches, fold one back leg double and lay it onto the body so the next 6 stitches are worked through 3 layers, work 1 double crochet in each of the next 10 stitches (= mid-front/between legs), fold the other back leg double and lay it onto the body so the next 6 stitches are worked through 3 layers, 1 double crochet in each of the last 15 stitches. Turn. UNDER-SIDE: ROWS 1-3: Work 1 chain stitch, 1 double crochet in each stitch. Turn. ROW 4: On this row decrease for the flat bottom: Work 1 chain stitch, 1 double crochet in each of the first 18 stitches, * work together the next 2 double crochets *, work from *-* a total of 8 times, 1 double crochet in each of the last 18 stitches (= 8 decreased stitches, 44 stitches). Turn. ROW 5: Work 1 chain stitch, 1 double crochet in each stitch. Turn. ROW 6: Work 1 chain stitch, 1 double crochet in each of the first 14 stitches, work together the next 2 double crochets *, work from *-* a total of 8 times, 1 double crochet in each of the last 15 stitches (= 8 decreased stitches, 36 stitches). Turn. ROW 7: Work 1 chain stitch, 1 double crochet in each stitch. Turn. ROW 8: Work 1 chain stitch, 1 double crochet in each of the next 14 stitches, * work together the next 2 double crochets *, work from *-* a total of 4 times, 1 double crochet in each of the last 14 stitches (= 4 decreased stitches, 32 stitches). Cut and fasten the strands. ASSEMBLY: Fold the bottom length-wise and sew the stitches together edge to edge so the bottom is flat. TAIL: Use hook size 8 mm and 2 strands sea green. Along the side of the UNDER-SIDE you have 8 rows (each side of the seam), you now work back and forth along both sides of the seam, i.e. 16 rows: ROW 1: Work 1 double crochet in each row (= 16 stitches). Turn. ROW 2: Work 1 chain stitch, work together the next 2 double crochets, double crochet in each stitch until there are 2 stitches left and work together the last 2 double crochets (= 2 stitches decreased). Turn. Work ROWS 1 and 2 until you have 12 rows and 4 stitches left. Cut and fasten the strands. BACK: Use hook size 8 mm and 2 strands sea green. Work 1 row of double crochets along the opening for the back, starting at the tail (work 1 side at a time) as follows: ROW 1: Work 1 stitch in each row/stitch – from the tail to the top of the head, then back again along the other side. Approx. 45 stitches on each side, 90 stitches in total. Turn. Fill the dinosaur with wadding. ROW 2: Fold the back double and work double crochets through both layers from the tail to the top, closing the opening = 45 stitches. Cut and fasten the strands. SPINES: Use hook size 8 mm and 2 strands curry. Start at the tip of the tail: * Work 1 double crochet, skip 1 stitch, in the next stitch work: 2 treble crochets, 1 double-treble crochet, 2 chain stitches, 1 double-treble crochet and 2 treble crochets. Skip 1 stitch and work 1 double crochet in the next stitch *, work from *-* a total of 2 times then repeat *-* up the back but skipping 2 stitches instead of 1. When there are too few stitches for a spine on the head, finish the row with double crochets. Cut and fasten the strands. |
|
|
|
|
Have you made this or any other of our designs? Tag your pictures in social media with #dropsdesign so we can see them! Do you need help with this pattern?You'll find tutorial videos, a Comments/Questions area and more by visiting the pattern on garnstudio.com. © 1982-2024 DROPS Design A/S. We reserve all rights. This document, including all its sub-sections, has copyrights. Read more about what you can do with our patterns at the bottom of each pattern on our site. |
|


With over 40 years in knitting and crochet design, DROPS Design offers one of the most extensive collections of free patterns on the internet - translated to 17 languages. As of today we count 304 catalogues and 11422 patterns - 11422 of which are translated into English (UK/cm).
We work hard to bring you the best knitting and crochet have to offer, inspiration and advice as well as great quality yarns at incredible prices! Would you like to use our patterns for other than personal use? You can read what you are allowed to do in the Copyright text at the bottom of all our patterns. Happy crafting!
Comments / Questions (35)
👍❤️🧶
10.02.2024 - 07:25Hi, I have tried this neck part like 8 times and still not getting it right. This pattern really needs pictures to follow. As much as I’ve tried to make sense from the kid holding the dino, I still can’t make sense of first, where to do 8 extra rows, then the next part saying do all these other rows ending up with 26. I’ve been crocheting for a good while and this pattern has me so lost!! About to frog the lot for good. About to pull my hair out!
31.01.2024 - 11:24DROPS Design answered:
Dear Chrissi, for the head you worked 8 rows back and forth, to work the neck you will now work along the both sides of these 8 rows, ie 16 rows in total., increasing as stated under row 1 to get 22 sts, then increase 2 sts on every other row until you have worked 6 rows and you get 26 sts. Happy crocheting!
01.02.2024 - 07:40Is it ok if I sell the finished product of this pattern? I recently made one for my son's 2nd birthday and he absolutely adores it. But even moreso, I loved making it. It was one of the quickest, easiest patterns I've ever followed and I love the fact that I don't have to stitch pieces together at the end of it. I'd love to make more, and thought it might be a good way to earn a little side money, as long as that's approved by the author of the pattern.
15.12.2023 - 15:50DROPS Design answered:
Dear Ana, the sale of garments based on DROPS patterns is permitted as long as they are sold as single items or per order. Further commercial use of the patterns is not permitted. It has to be clearly stated that the garment is made based on a design from DROPS DESIGN. The use of DROPS photos for marketing purposes/sales is only permitted in connection with the use/sale of DROPS products. The photos may not be cut or edited and the logo should be clearly visible. You can see more information in the Copyright section at the bottom of our webpage, after the "Post a comment section". Happy crochetting!
17.12.2023 - 18:06Kan iemand mij svp helpen met het patroon vanaf de nek. Ik heb van alles geprobeerd maar kom er niet uit! Vr groet, Nel
15.10.2023 - 10:25DROPS Design answered:
Dag Nel,
Kan je aangeven waar je precies tegenaan loopt bij het haken van de nek? Op welk punt loop je vast? Wellicht kunnen we je dan beter helpen...
15.10.2023 - 17:20I have only been crocheting for a month. I found this pattern fairly easy to follow.. there are times I had to re-read something to figure it out… but trust the process .. it all comes together!!
19.09.2023 - 06:07"BODY: Now the 2 front legs are attached to the body." Uhh? No. No they are not. At no point yet has it said to attach them and we've worked the nose, face, and neck, but not the body yet so where do they even go?? Whoever said this was the easiest pattern was the biggest liar after Trump.
11.09.2023 - 23:08DROPS Design answered:
Dear Lisamarie, with this sentence we mean that the front legs will be now attached on to the body while crocheting the ROW 1, you will crochet around the body and crochet at the same time the front legs working into the 3 layers (2 layers from the front leg folded double + the stitch on the next row on body). Hope it can help. Happy crocheting!
12.09.2023 - 09:16I dont understand how im supposed to do the neck. am i still going around the circle or am i only going across so many stitches? am i supposed o be going down the neck in the rows ive done before instead of the circle like i have been? if i do how do i continue working in a circle if im going down the rows instead of around in the stiches. am i not working in the stiches around anymore? the neck is really confusing me
17.08.2023 - 16:37DROPS Design answered:
Dear Courtney, you worked 8 rows for the head, you will now work the first row of neck crocheting in both ends of head, ie in the beg/end of the 8 rows of the head (on both sides = 16 rows). Neck is then worked back and forth (you turn at the end of each row) increasing on every other row. Happy crocheting!
18.08.2023 - 08:03Er staat dat er met 2 draden wordt gehaakt. Is het aantal gram gebaseerd op die 2 draden? Nel
09.08.2023 - 15:25DROPS Design answered:
Dag Nel,
Ja hoor, de benodigde hoeveelheid garen is gebaseerd op 2 draden.
10.08.2023 - 20:54Hej igen...det er de efterfølgende omgange jeg mener... 2...3...4 osv er det den første luftmaske der menes og erstatter den en fastmaske?..
19.06.2023 - 13:48DROPS Design answered:
Hej Annette, du hækler luftmasken for at komme op i højde. I denne opskrift erstatter luftmasken ikke fastmasken
22.06.2023 - 13:45Når I skriver...kædemaske i den første fastmaske...er det så luftmasken der menes? På forhånd tak...
19.06.2023 - 07:02DROPS Design answered:
Hei Annette. Nei, det menes fastmaske, slik det står. Under FORBEIN hekler man 2 luftmasker, deretter hekler man 5 fastmasker i den første luftmasken og for å avslutte sirkelen hekler man en kjedemaske i den første fastmasken (av de 5 fastmaskene). mvh DROPS Design
19.06.2023 - 12:52