DROPS Kid-Silk uni colour 75% Mohair, 25% Silk |
5.05 € /25g |
Order |
Clicking the ORDER button will redirect you to Mallia Kouvaria - pleko.gr. website
The yarn cost is calculated from the pattern’s smallest size and the yarn’s cheapest product type. Looking for an even better price? You might find it on the DROPS Deals!
-------------------------------------------------------
Alternative Yarn – See how to change yarns here
Yarn Groups A to F – Use the same pattern and change the yarn here
Yarn usage using an alternative yarn – Use our yarn converter here
-------------------------------------------------------
DROPS Kid-Silk uni colour 75% Mohair, 25% Silk 5.05 € /25g Order |
Clicking the ORDER button will redirect you to Mallia Kouvaria - pleko.gr. website
The yarn cost is calculated from the pattern’s smallest size and the yarn’s cheapest product type. Looking for an even better price? You might find it on the DROPS Deals!
Each of our patterns has specific tutorial videos to help you.
These step-by-step tutorials might also help you:
Why is the knitting/crochet tension so important?
Knitting tension is what determines the final measurements of your work, and is usually measured per 10 x 10 cm. It is provided like so: number of stitches in width x number of rows in height - eg: 19 stitches x 26 rows = 10 x 10 cm.
The knitting tension is very individual; some people knit/crochet loosely while others work tightly. You adjust the knitting tension with the needle size, which is why the suggested needle size is only meant as a guide! You need to adjust this (up or down) to ensure that YOUR knitting tension matches the knitting tension provided in the pattern. If you work with a different knitting tension than provided you will have a different yarn consumption, and your work will have different measurements than what the pattern suggests.
The knitting tension also determines which yarns can replace each other. As long as you achieve the same knitting tension you can replace one yarn with another.
See DROPS lesson: How to measure your tension/gauge
See DROPS video: How to make a gauge tension swatch
How do I know how many balls of yarn I need?
The required amount of yarn is provided in grams, eg: 450 g. To calculate how many balls you’ll need you first need to know how many grams are in 1 ball (25g, 50g or 100g). This information is available if you click on the individual yarn quality on our pages. Divide the amount required with the amount of each ball. For example, if each ball is 50g (the most common amount), the calculation will be as follows: 450 / 50 = 9 balls.
Can I use a different yarn than what the pattern suggests?
The important thing when changing from one yarn to another is that the knitting/crochet tension remains the same. This is so that the measurements of the finished piece will be the same as on the sketch provided. It is easier to achieve the same knitting tension using yarns from the same yarn group. It is also possible to work with multiple strands of a thinner yarn to achieve the knitting tension of a thicker one. Please try our yarn converter. We recommend you to always work a test swatch.
Please NOTE: when changing yarn the garment might have a different look and feel to the garment in the photo, due to individual properties and qualities of each yarn.
See DROPS lesson: Can I use a different yarn than the one mentioned in the pattern?
What are the yarn groups?
All our yarns are categorised into yarn groups (from A to F) according to thickness and knitting tension – group A contains the thinnest yarns and group F the thickest. This makes it easier for you to find alternative yarns to our patterns, should you wish to switch yarn. All yarns within the same group have a similar knitting tension and can easily replace each other. However, different yarn qualities have different structures and properties which will give the finished work a unique look and feel.
How do I use the yarn calculator?
At the top of all our patterns you’ll find a link to our yarn calculator, which is a helpful tool should you wish to use a different yarn than suggested. By filling in the yarn quality you wish to replace, the amount (in your size) and number of strands, the calculator will present good alternative yarns with the same knitting tension. Additionally it will tell you how much you’ll require in the new qualities and whether you’ll need to work with multiple strands. Most skeins are 50g (some are 25g or 100g).
If the pattern is worked with multiple colours, every colour will have to be calculated separately. Similarly, if the pattern is worked with several strands of different yarns (for example 1 strand Alpaca and 1 strand Kid-Silk) you will have to find alternatives for each, individually.
Why do you show discontinued yarns in the patterns?
Since different yarns have different qualities and textures we have chosen to keep the original yarn in our patterns. However, you can easily find options among our available qualities by using our yarn calculator, or simply pick a yarn from the same yarn group.
It is possible that some retailers still have discontinued yarns in stock, or that someone has a few skeins at home that they would like to find patterns for.
The yarn calculator will provide both alternative yarn as well as required amount in the new quality.
What size should I knit?
If you think it's hard to decide what size to make, it can be a good idea to measure a garment you own already and like the size of. Then you can pick the size by comparing those measures with the ones available in the pattern's size chart.
You'll find the size chart at the bottom of the pattern.
See DROPS lesson: How to read size chart
Why do I get the wrong knitting tension with the suggested needle size?
The needle size provided in the pattern serves only as a guide, the important thing is to follow the knitting tension. And since knitting tension is very individual, you will have to adjust the needle size to ensure that YOUR tension is the same as in the pattern – maybe you’ll have to adjust 1, or even 2 needle sizes, up or down to achieve the correct tension. For this, we recommend that you work test swatches.
Should you work with a different knitting tension than the one provided, the measurements of the finished garment might deviate from the measurement sketch.
See DROPS lesson: How to measure your tension/gauge
See DROPS video: How to make a tension/gauge swatch
Why is the pattern worked top-down?
Working a garment top-down provides more flexibility and room for personal adjustment. For example it is easier to try the garment on while working, as well as making adjustments to length of yoke and shoulder caps.
The instructions are carefully explaining every step, in the correct order. Diagrams are adjusted to the knitting direction and are worked as usual.
How do I work according to a knitting diagram?
The diagram depicts all rows/rounds, and every stitch seen from the right side. It is read from bottom to top, from right to left. 1 square = 1 stitch.
When working back and forth, every other row is worked from the right side and every other row is worked from the wrong side. When working from the wrong side, the diagram will have to be worked reversed: from left to right, knit stitches are purled, purl stitches are knit etc.
When working in the round every round is worked from the right side and the diagram are worked from right to left on all rounds.
See DROPS lesson: How to read knitting diagrams
How do I work according to a crochet diagram?
The diagram depicts all rows/rounds, and every stitch seen from the right side. It is worked from bottom to top, from right to left.
When working back and forth every other row is worked from the right side: from right to left and every other row is worked from the wrong side: from left to right.
When working in the round, every row in the diagram are worked from the right side, from right to left.
When working a circular diagram you start in the middle and work your way outwards, counter clockwise, row by row.
The rows usually start with a given number of chain stitches (equivalent to the height of the following stitch), this will either be depicted in the diagram or explained in the pattern.
See DROPS lesson: How to read crochet diagrams
How do I work several diagrams simultaneously on the same row/round?
Instructions for working several diagrams after each other on the same row/round, will often be written like so: “work A.1, A.2, A.3 a total of 0-0-2-3-4 times". This means you work A.1 once, then A.2 is worked once, and A.3 is repeated (in width) the number of times provided for your size – in this case like so: S = 0 times, M = 0 times, L=2 times, XL= 3 times and XXL = 4 times.
The diagrams are worked as usual: begin with the first row in A.1, then work the first row in A.2 etc.
See DROPS lesson: How to read knitting diagrams
See DROPS lesson: How to read crochet diagrams
Why are the sleeves shorter in larger sizes?
The total width of the garment (from wrist-to-wrist) will be larger in the larger sizes, despite the actual sleeves being shorter. The larger sizes have longer sleeve caps and wider shoulders, so there will be a good fit in all sizes.
Where on the garment is the length measured?
The measurement sketch/schematic drawing provides information regarding the full length of the garment. If it’s a jumper or a jacket the length is measured from the highest point on the shoulder closest to the neckline, and straight down to the bottom of the garment. It is NOT measured from the tip of shoulder. Similarly, the length of yoke is measured from the highest point on the shoulder and down to where yoke is split into body and sleeves.
On a jacket measures are never taken along bands, unless specifically stated. Always measure inside band stitches when measuring the length.
See DROPS lesson: How to read a schematic drawing
What is a repeat?
Diagrams are often repeated on the round or in height. 1 repeat is the diagram the way it appears in the pattern. If it says to work 5 repeats of A.1 in the round, then you work A.1 a total of 5 times after/next to each other in the round. If it says to work 2 repeats of A.1 vertically/in height you work the entire diagram once, then begin again at the start and work the entire diagram one more time.
Why does the piece start with more chain stitches than it’s worked with?
Chain stitches are slightly narrower than other stitches and to avoid working the cast-on edge too tight, we simply chain more stitches to begin with. The stitch count will be adjusted on the following row to fit the pattern and measurement sketch.
Why increase before the rib edge when the piece is worked top-down?
The rib edge is more elastic and will contract slightly compared to, for example, stocking stitch. By increasing before the rib edge, you avoid a visible difference in width between the rib edge and the rest of the body.
Why increase in the cast-off edge?
It’s very easy to cast off too tightly, and by making yarn overs while casting off (and simultaneously casting these off) you avoid a too tight cast off edge.
See DROPS video: How to bind off with yarn overs (yo)
How do I increase/decrease on every 3rd and 4th row/round alternately?
To achieve an even increase (or decrease) you can increase on, for example: every 3rd and 4th row alternately, like so: work 2 rows and increase on the 3rd row, work 3 rows and increase on the 4th. Repeat this until the increase is complete.
See DROPS lesson: Increase or decrease 1 st on every 3rd and 4th row alternately
How can I work a jacket in the round instead of back and forth?
Should you prefer to work in the round instead of back and forth, you may of course adjust the pattern. You’ll need to add steeks mid-front (usually 5 stitches), and follow the instructions. When you would normally turn and work from the wrong side, simply work across the steek and continue in the round. At the end you’ll cut the piece open, pick up stitches to work bands, and cover the cut edges.
See DROPS video: How to knit steeks and cut open
Can I work a jumper back and forth instead of in the round?
Should you prefer to work back and forth instead of in the round, you may of course adjust the pattern so you work the pieces separately and then assemble them at the end. Divide the stitches for the body in 2, add 1 edge stitch in each side (for sewing) and work the front and back pieces separately.
See DROPS lesson: Can I adapt a pattern for circular needles into straight needles?
Why is the pattern slightly different than what I see in the photo?
Pattern repeats can vary slightly in the different sizes, in order to get the correct proportions. If you’re not working the exact same size as the garment in the photo, yours might deviate slightly. This has been carefully developed and adjusted so that the complete impression of the garment is the same in all sizes.
Make sure to follow instructions and diagrams for your size!
How do I make a women’s size garment into a men’s size one?
If you have found a pattern you like which is available in women’s size it’s not very difficult to convert it to men’s size. The biggest difference will be the length of sleeves and body. Start working on the women size that you think would fit across the chest. The additional length will be worked right before you cast off for the armhole/sleeve cap. If the pattern is worked top-down you can add the length right after the armhole or before the first decrease on sleeve.
Regarding additional yarn amount, this will depend on how much length you add, but it is better with a skein too many than too few.
How do I prevent a hairy garment from shedding?
All yarns will have excess fibres (from production) that might come off as lint or shedding. Brushed yarns (ie hairier yarns) have more of these loose, excess fibres, causing more shedding.
Shedding also depends on what is worn under or over the garment, and whether this pulls at the yarn fibres. It’s therefore not possible to guarantee that there will be no shedding
Below are some tips on how to get the best result when working with hairier yarns:
1. When the garment is finished (before you wash it) shake it vigorously so the looser hairs come off. NOTE: do NOT use a lint roller, brush or any method that pulls at the yarn.
2. Place the garment in a plastic bag and put it in your freezer - the temperature will cause the fibres to become less attached to each other, and excess fibres will come off easier.
3. Leave in the freezer for a few hours before taking it out and shaking it again.
4. Wash the garment according to the instructions on the yarn label.
Why does my garment pill?
Pilling is a natural process that happens to even the most exclusive of fibers. It's a natural sign of wear and tear that is hard to avoid, and that is most visible in high friction areas of your garment like a sweater's arms and cuffs.
You can make your garment look as new by removing the pilling, using a fabric comb or a pill/lint remover.
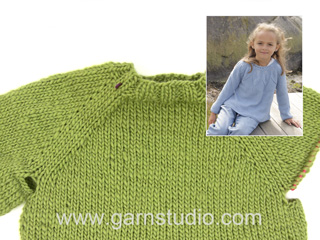
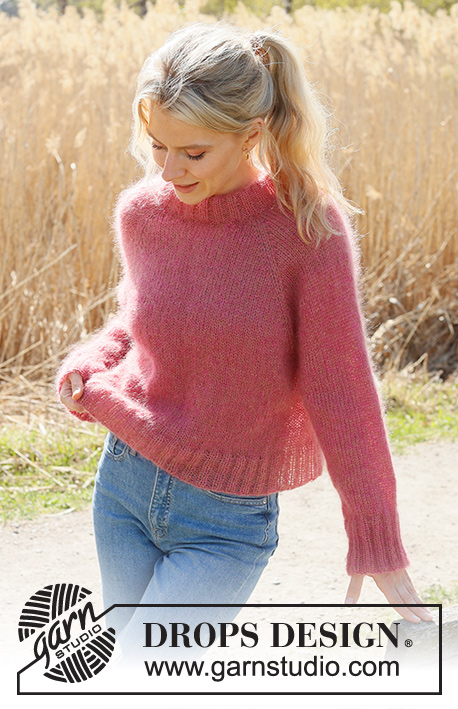
Cranberry Kiss Sweater |
|
|
|
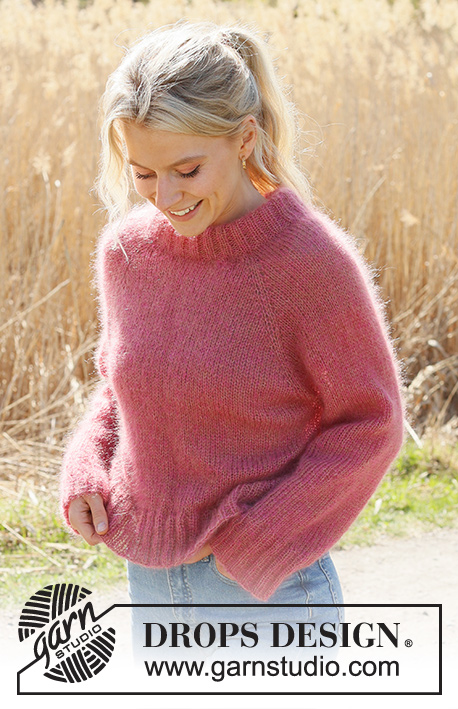
Knitted jumper in 2 strands DROPS Kid-Silk. The piece is worked top down with raglan, stocking stitch and double neck. Sizes S - XXXL.
DROPS 235-8 |
|
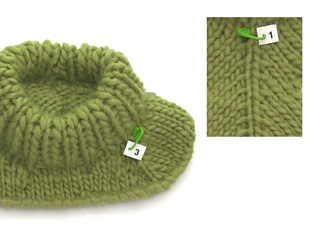
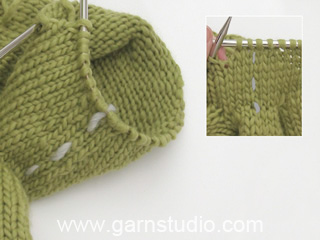
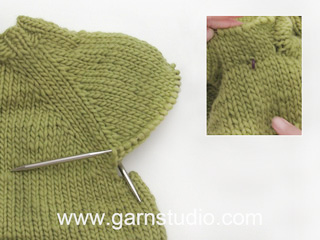
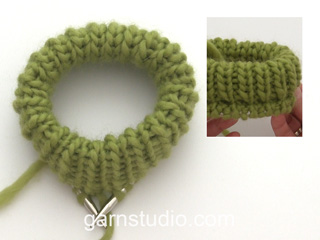
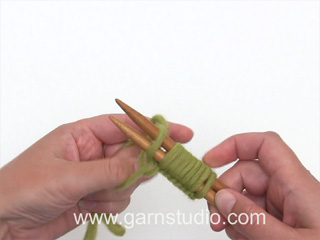
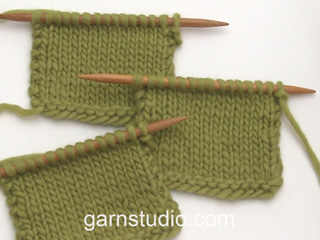
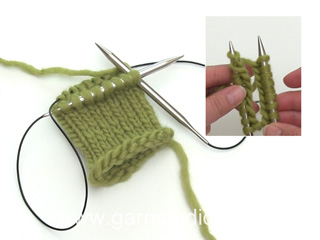
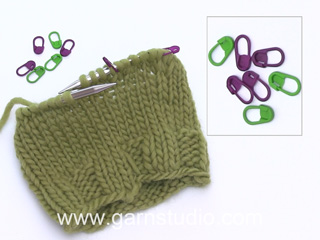
------------------------------------------------------- EXPLANATIONS FOR THE PATTERN: ------------------------------------------------------- RAGLAN: Increase 1 stitch on both sides of 2 stitches in each transition between the body and sleeves; the marker sits between these 2 stitches (8 increases on the round). Increase 1 stitch by making 1 yarn over, which is then worked twisted on the next round to avoid holes. Work the new stitches in stocking stitch. DECREASE TIP (for sleeves): Start 3 stitches before the marker, knit 2 together, knit 2 (marker sits between these 2 stitches), slip 1 stitch as if to knit, knit 1 and pass the slipped stitch over the knitted stitch. ------------------------------------------------------- START THE PIECE HERE: ------------------------------------------------------- JUMPER – SHORT OVERVIEW OF THE PIECE: The neck and yoke are worked in the round with circular needle, from mid back and top down. The yoke is divided for body and sleeves and the body is continued in the round with circular needle. The sleeves are worked in the round with short circular needle/double pointed needles. DOUBLE NECK: Cast on 80-80-88-96-96-104 stitches with one strand of each colour DROPS Kid-Silk, using short circular needles size 3.5 and size 5 mm held together. Remove the needle size 5 mm keeping the stitches on the needle size 3,5 mm (doing this gives you an elastic cast-on edge). Knit 1 round then work rib (knit 2, purl 2) for 12 cm. Fold the neck double to the inside and knit 1 round, where every 2nd stitch is knitted together with its corresponding stitch on the cast-on edge. This gives a double neck. Change to circular needle size 5 mm. Insert 4 markers without working the stitches; these are used when increasing for raglan and each marker is inserted between 2 stitches: Count 9-9-13-13-13-17 stitches (half back piece), insert marker-1, count 20 stitches (sleeve), insert marker-2, count 20-20-24-28-28-32 stitches (front piece), insert marker-3, count 20 stitches (sleeve), insert marker-4, there are 11-11-11-15-15-15 stitches left after marker-4 (half back piece). Cut the strand. NECK-LINE: Now work a neck-line with short rows: Start from the right side, 3 stitches before marker-3 (front left-hand side of neck when garment is worn). Work stocking stitch and increase for RAGLAN – read description above, until you are 3 stitches past marker-2 (front right-hand side of neck). Turn, tighten the strand and work back to 7 stitches past marker-3. Turn, tighten the strand and work back to 7 stitches past marker-2 – remember to increase for raglan. Turn, tighten the strand and work back to 3 stitches past marker-3. Cut the strand. YOKE: = 96-96-104-112-112-120 stitches. Start mid-back and continue to increase for raglan every 2nd round a total of 12-14-16-17-15-13 times (including the increases on the short rows) = 176-192-216-232-216-208 stitches. Continue with stocking stitch and increases for raglan, but every 2nd increase is only on the body; i.e. you increase on the body every 2nd round and on the sleeves every 4th round. Increase like this 12-12-12-12-18-22 times on the body (6-6-6-6-9-11 times on the sleeves), a total of 24-26-28-29-33-35 times on the body and 18-20-22-23-24-24 times on the sleeves. After the last increase there are 248-264-288-304-324-340 stitches and the yoke measures approx. 22-25-26-27-30-32 cm measured mid-front and from after the neck. If necessary continue working without increasing to the correct measurement. Divide the yoke for the body and sleeves as follows: Work the first 36-38-44-45-49-55 stitches (half back piece), place the next 50-54-58-60-62-62 stitches on a thread for the sleeve, cast on 8-10-10-12-14-16 stitches (in side under sleeve), work 74-78-86-92-100-108 stitches (front piece), place the next 50-54-58-60-62-62 stitches on a thread for the sleeve, cast on 8-10-10-12-14-16 stitches (in side under sleeve), work the remaining 38-40-42-47-51-53 stitches (half back piece). BODY: = 164-176-192-208-228-248 stitches. Continue with stocking stitch in the round for a further 17-16-17-18-17-17 cm. Knit 1 round and increase 16-16-20-20-24-24 stitches evenly spaced =180-192-212-228-252-272 stitches. Change to circular needle size 3.5 mm. Work rib (knit 2, purl 2) for 8 cm. Cast off. The jumper measures approx. 52-54-56-58-60-62 cm from the shoulder down. SLEEVES: Place the 50-54-58-60-62-62 stitches from the thread on the one side of the piece on short circular needle/double pointed needles size 5 mm and knit up 1 stitch in each of the new stitches cast on under the sleeve = 58-64-68-72-76-78 stitches. Insert a marker thread in the middle of the new stitches mid-under the sleeve. Continue in the round with stocking stitch for 4 cm. Now decrease 2 stitches under the sleeve – read DECREASE TIP. Decrease like this every 5-3½-2½-2½-2-1½ cm a total of 6-8-9-10-11-11 times = 46-48-50-52-54-56 stitches. Continue working until the sleeve measures 32-30-29-28-26-24 cm. Knit 1 round where you increase 6-4-6-4-6-4 stitches evenly spaced = 52-52-56-56-60-60 stitches. Change to double pointed needles size 3.5 mm and work rib (knit 2, purl 2) for 10 cm. Cast off. The sleeve measures approx. 42-40-39-38-36-34 cm from the division. Work the other sleeve in the same way. |
|
Have you made this or any other of our designs? Tag your pictures in social media with #dropsdesign so we can see them! Do you need help with this pattern?You'll find tutorial videos, a Comments/Questions area and more by visiting the pattern on garnstudio.com. © 1982-2024 DROPS Design A/S. We reserve all rights. This document, including all its sub-sections, has copyrights. Read more about what you can do with our patterns at the bottom of each pattern on our site. |
With over 40 years in knitting and crochet design, DROPS Design offers one of the most extensive collections of free patterns on the internet - translated to 17 languages. As of today we count 304 catalogues and 11422 patterns - 11422 of which are translated into English (UK/cm).
We work hard to bring you the best knitting and crochet have to offer, inspiration and advice as well as great quality yarns at incredible prices! Would you like to use our patterns for other than personal use? You can read what you are allowed to do in the Copyright text at the bottom of all our patterns. Happy crafting!
Comments / Questions (50)
Nina wrote:
Bonjour, J'ai tricoté le col (et doublé) et m'apprête à commencer le raglan. Il est dit de passer de l'aiguille 3,5 à l'aiguille 5... Mais me voilà face à un os : l'aiguille 5 ne passe pas dans les mailles de l'aiguille de 3,5. Qu'est-ce que je n'ai pas compris ou quelle étape ai-je raté ? Merci d'avance !
19.01.2023 - 16:40DROPS Design answered:
Bonjour Nina, tricotez simplement votre tour suivant avec l'aiguille 5, autrement dit, placez vos marqueurs avec les mailles encore sur l'aiguille 3,5 et au 1er rang de l'encolure, vous prendrez l'aiguille 5. Bon tricot!
19.01.2023 - 18:46Daria wrote:
Czy można wiedzieć jaki rozmiar swetra ma modelka na zdjęciu? Byłby to dla mnie dobry punkt odniesienia. Pozdrawiam serdecznie!
13.01.2023 - 22:02DROPS Design answered:
Witaj Dario, modelka na zdjęciu nosi rozmiar S lub M. Aby wybrać rozmiar kieruj się wskazówkami z kursu, który znajdziesz TUTAJ. Pamiętaj, że Twoja robótka będzie miała odpowiednie wymiary, tylko wtedy jeśli Twoja próbka będzie zgodna z próbką podaną we wzorze. Powodzenia!
16.01.2023 - 19:00Alicja wrote:
Ile motków wełny KID-SILK ( ile mn) muszę kupić na ten model w jednym kolorze rozmiar S
11.01.2023 - 11:02DROPS Design answered:
Witaj Alu, dla rozmiaru S musisz kupić 200 g włóczki w wybranym kolorze, czyli 8 motków. Pozdrawiamy!
11.01.2023 - 11:14Mischa wrote:
Ik heb de dubbele hals gebreid en zit nu al een tijdje gefrustreerd op de bank. Al een paar keer het werk uitgehaald en dat is niet makkelijk met kid silk. Ik weet niet of dit garen dit aankan. Ik heb de markeerdraden netjes erin gezet, maar de uitleg over de raglan begrijp ik niet. Waar meerder je nu? Volgens mij kan het makkelijker worden uitgelegd. Zoveel steken (hoeveel nu) meerderen en waar en dan weer een aantal steken en waar zit nu die markeerdraad in dit verhaal? Dank
29.12.2022 - 23:04DROPS Design answered:
Dag Mischa,
Kid-Silk is inderdaad heel lastig om uit te halen, dus dat wil je liever voorkomen. Het hangt er een beetje vanaf welke maat je breit, maar tussen iedere markeerdraad zitten hetzelfde aantal steken. Je meerdert voor de raglan op iedere tweede naald. Dus de ene naald wel en de andere naald niet en je meerdert aan beide kanten van de markeerdraden tot je 176-192-216-232-216-208 steken op de naald hebt. Daarna meerder je alleen voor de raglan op het lijf, dus op het voorpand en het achterpand en niet op de mouwen. Bovenaan bij uitleg voor hete patroon staat beschreven hoe je de meerderingen voor de raglan maakt.
01.01.2023 - 11:23Claire wrote:
C'est encore moi, merci pour votre réponse précédente, j'avais mal lu. J'ai un autre hic... Pour la première partie de l'empiècement TS, je pars donc avec 96 mailles. Si j'augmente 12x8 mailles, je rajoute 96 mailles ce qui me donnera un total de 192 mailles (soit l'équivalent de la Taille M). Pour arriver à un total de 176 mailles, ne faut il pas augmenter 10 fois seulement le raglan ? Merci pour votre patience
24.10.2022 - 12:00DROPS Design answered:
Bonjour Claire, effectivement, vous devez augmenter 12 fois au total, y compris les augmentations des rangs raccourcis, autrement dit, lorsque vous avez tricoté les rangs raccourcis, vous avez augmenté 2 fois, quand vous tricotez de nouveau en rond, vous augmentez encore 10 fois (= 12 fois au total) soit: 80 (avant les rangs raccourcis) + (8x12) =176 mailles ou bien 96 (après les rangs raccourcis) + (8*10)=176 mailles. Bon tricot!
24.10.2022 - 16:19Claire wrote:
Et pour le raglan, si le marqueur est entre les 2 mailles autour desquelles il faut augmenter en jeté, comment tricoter les 2 jetés de chaque côté du marqueur ? Pour moi ça fait juste un grand jeté au lieu de faire 2 nouvelles mailles ... Je ne suis pas sûre d\'avoir bien saisi.
23.10.2022 - 22:23DROPS Design answered:
Bonjour Claire, les rangs raccourcis sont ceux décrits sous ENCOLURE et permettent à l'encolure dos d'être plus haute que l'encolure devant - Cette vidéo montre comment procéder (avec des jetés tricotés différemment); les jetés des raglans sont faits et tricotés dans ce modèle comme dans cette leçon. Bon tricot!
24.10.2022 - 08:54Claire wrote:
Bonjour, je ne comprends pas l,eMPIÈCEMENt \"En commençant au milieu dos, continuer à augmenter pour le raglan 12 fois au total (y compris les augmentations des rangs raccourcis)\" qu\'est qu\'un rang raccourci ?
23.10.2022 - 22:23Heike Wehmeyer wrote:
Für den Halsausschnitt muss ich wenden. Heißt das, dass ich eine Rückreihe (linke Maschen) stricken muss? Gruß Heike
15.10.2022 - 16:23DROPS Design answered:
Liebe F rau Wehmeyer, dieses Video zeigt, wie die doppelte Halsblende hier gestrickt wird. Viel Spaß beim stricken!
17.10.2022 - 09:19Käthe Mohr wrote:
Hej, jeg strikker størrelse nr. L. Bærestykkets maskeantal ender forkert? Jeg starter med 104 m og skal tage ud i alt 16 gange (=128m). Det giver samlet 232 masker. I opskriften står der, at jeg skal ende med 216 m, hvilket jeg ikke forstår? Jeg har gennemgået alle størrelserne, og det er forkert i allesammen. Der er en forskel på 16 m i dem alle, dvs. = 2 omg indtagninger. Hvad er der galt, og hvad skal jeg gøre? Venlig hilsen Käthe Mohr
12.10.2022 - 12:27DROPS Design answered:
Hei Käthe. Under BÆRESTYKKE står det: (inklusive udtagningerne i de forkortede pinde). Altså, når du er ferdig med halskanten har du 88 masker ( i str. L), så strikker du Halsringning og her økes det til raglan samtidig som det strikkes forkortete pinner (det økes ved 2 omganger = 16 økte masker) = 88 + 16 = 104 masker. Deretter økes det på hver 2.omgang til det er økt totalt 16 ganger (du har allerede økte 2 ganger når de forkortete pinnene ble strikket), så da økes det 14 ganger x 8 masker 112 økte masker. Da blir det 104 + 112 = 216 masker, slik det står i oppskriften. mvh DROPS Design
17.10.2022 - 13:04Becca wrote:
I have a question for the increases in the yoke- the pattern says "Continue with stockinette stitch and increases for raglan, but every 2nd increase is only on the body; i.e. you increase on the body every 2nd round and on the sleeves every 4th round..." Does that mean that you only do one increase at each stitch marker on the body side every second round, and then a normal raglan increase on both sides every 4th round? I'm not sure what it means here by "body" and "sleeve". Thank you :)
01.10.2022 - 22:51DROPS Design answered:
Dear Becca, this means that every 2nd row you increase on each side of the front and each side of the back (4 increases). In the next 2nd row (which would be the 4th one), increase on each side of every marker (8 increases). Repeat this as many times as needed. Happy knitting!
03.10.2022 - 00:48