Clicking the ORDER button will redirect you to Mallia Kouvaria - pleko.gr. website
The yarn cost is calculated from the pattern’s smallest size and the yarn’s cheapest product type. Looking for an even better price? You might find it on the DROPS Deals!
-------------------------------------------------------
Alternative Yarn – See how to change yarns here
Yarn Groups A to F – Use the same pattern and change the yarn here
Yarn usage using an alternative yarn – Use our yarn converter here
-------------------------------------------------------
Clicking the ORDER button will redirect you to Mallia Kouvaria - pleko.gr. website
The yarn cost is calculated from the pattern’s smallest size and the yarn’s cheapest product type. Looking for an even better price? You might find it on the DROPS Deals!
This pattern has been corrected. Click here to see the correction/s.
= K from RS, P from WS | |
= P from RS, K from WS | |
= YO | |
= K2 tog |
Each of our patterns has specific tutorial videos to help you.
These step-by-step tutorials might also help you:
Why is the knitting/crochet tension so important?
Knitting tension is what determines the final measurements of your work, and is usually measured per 10 x 10 cm. It is provided like so: number of stitches in width x number of rows in height - eg: 19 stitches x 26 rows = 10 x 10 cm.
The knitting tension is very individual; some people knit/crochet loosely while others work tightly. You adjust the knitting tension with the needle size, which is why the suggested needle size is only meant as a guide! You need to adjust this (up or down) to ensure that YOUR knitting tension matches the knitting tension provided in the pattern. If you work with a different knitting tension than provided you will have a different yarn consumption, and your work will have different measurements than what the pattern suggests.
The knitting tension also determines which yarns can replace each other. As long as you achieve the same knitting tension you can replace one yarn with another.
See DROPS lesson: How to measure your tension/gauge
See DROPS video: How to make a gauge tension swatch
How do I know how many balls of yarn I need?
The required amount of yarn is provided in grams, eg: 450 g. To calculate how many balls you’ll need you first need to know how many grams are in 1 ball (25g, 50g or 100g). This information is available if you click on the individual yarn quality on our pages. Divide the amount required with the amount of each ball. For example, if each ball is 50g (the most common amount), the calculation will be as follows: 450 / 50 = 9 balls.
Can I use a different yarn than what the pattern suggests?
The important thing when changing from one yarn to another is that the knitting/crochet tension remains the same. This is so that the measurements of the finished piece will be the same as on the sketch provided. It is easier to achieve the same knitting tension using yarns from the same yarn group. It is also possible to work with multiple strands of a thinner yarn to achieve the knitting tension of a thicker one. Please try our yarn converter. We recommend you to always work a test swatch.
Please NOTE: when changing yarn the garment might have a different look and feel to the garment in the photo, due to individual properties and qualities of each yarn.
See DROPS lesson: Can I use a different yarn than the one mentioned in the pattern?
What are the yarn groups?
All our yarns are categorised into yarn groups (from A to F) according to thickness and knitting tension – group A contains the thinnest yarns and group F the thickest. This makes it easier for you to find alternative yarns to our patterns, should you wish to switch yarn. All yarns within the same group have a similar knitting tension and can easily replace each other. However, different yarn qualities have different structures and properties which will give the finished work a unique look and feel.
How do I use the yarn calculator?
At the top of all our patterns you’ll find a link to our yarn calculator, which is a helpful tool should you wish to use a different yarn than suggested. By filling in the yarn quality you wish to replace, the amount (in your size) and number of strands, the calculator will present good alternative yarns with the same knitting tension. Additionally it will tell you how much you’ll require in the new qualities and whether you’ll need to work with multiple strands. Most skeins are 50g (some are 25g or 100g).
If the pattern is worked with multiple colours, every colour will have to be calculated separately. Similarly, if the pattern is worked with several strands of different yarns (for example 1 strand Alpaca and 1 strand Kid-Silk) you will have to find alternatives for each, individually.
Why do you show discontinued yarns in the patterns?
Since different yarns have different qualities and textures we have chosen to keep the original yarn in our patterns. However, you can easily find options among our available qualities by using our yarn calculator, or simply pick a yarn from the same yarn group.
It is possible that some retailers still have discontinued yarns in stock, or that someone has a few skeins at home that they would like to find patterns for.
The yarn calculator will provide both alternative yarn as well as required amount in the new quality.
What size should I knit?
If you think it's hard to decide what size to make, it can be a good idea to measure a garment you own already and like the size of. Then you can pick the size by comparing those measures with the ones available in the pattern's size chart.
You'll find the size chart at the bottom of the pattern.
See DROPS lesson: How to read size chart
Why do I get the wrong knitting tension with the suggested needle size?
The needle size provided in the pattern serves only as a guide, the important thing is to follow the knitting tension. And since knitting tension is very individual, you will have to adjust the needle size to ensure that YOUR tension is the same as in the pattern – maybe you’ll have to adjust 1, or even 2 needle sizes, up or down to achieve the correct tension. For this, we recommend that you work test swatches.
Should you work with a different knitting tension than the one provided, the measurements of the finished garment might deviate from the measurement sketch.
See DROPS lesson: How to measure your tension/gauge
See DROPS video: How to make a tension/gauge swatch
Why is the pattern worked top-down?
Working a garment top-down provides more flexibility and room for personal adjustment. For example it is easier to try the garment on while working, as well as making adjustments to length of yoke and shoulder caps.
The instructions are carefully explaining every step, in the correct order. Diagrams are adjusted to the knitting direction and are worked as usual.
How do I work according to a knitting diagram?
The diagram depicts all rows/rounds, and every stitch seen from the right side. It is read from bottom to top, from right to left. 1 square = 1 stitch.
When working back and forth, every other row is worked from the right side and every other row is worked from the wrong side. When working from the wrong side, the diagram will have to be worked reversed: from left to right, knit stitches are purled, purl stitches are knit etc.
When working in the round every round is worked from the right side and the diagram are worked from right to left on all rounds.
See DROPS lesson: How to read knitting diagrams
How do I work according to a crochet diagram?
The diagram depicts all rows/rounds, and every stitch seen from the right side. It is worked from bottom to top, from right to left.
When working back and forth every other row is worked from the right side: from right to left and every other row is worked from the wrong side: from left to right.
When working in the round, every row in the diagram are worked from the right side, from right to left.
When working a circular diagram you start in the middle and work your way outwards, counter clockwise, row by row.
The rows usually start with a given number of chain stitches (equivalent to the height of the following stitch), this will either be depicted in the diagram or explained in the pattern.
See DROPS lesson: How to read crochet diagrams
How do I work several diagrams simultaneously on the same row/round?
Instructions for working several diagrams after each other on the same row/round, will often be written like so: “work A.1, A.2, A.3 a total of 0-0-2-3-4 times". This means you work A.1 once, then A.2 is worked once, and A.3 is repeated (in width) the number of times provided for your size – in this case like so: S = 0 times, M = 0 times, L=2 times, XL= 3 times and XXL = 4 times.
The diagrams are worked as usual: begin with the first row in A.1, then work the first row in A.2 etc.
See DROPS lesson: How to read knitting diagrams
See DROPS lesson: How to read crochet diagrams
Why are the sleeves shorter in larger sizes?
The total width of the garment (from wrist-to-wrist) will be larger in the larger sizes, despite the actual sleeves being shorter. The larger sizes have longer sleeve caps and wider shoulders, so there will be a good fit in all sizes.
Where on the garment is the length measured?
The measurement sketch/schematic drawing provides information regarding the full length of the garment. If it’s a jumper or a jacket the length is measured from the highest point on the shoulder closest to the neckline, and straight down to the bottom of the garment. It is NOT measured from the tip of shoulder. Similarly, the length of yoke is measured from the highest point on the shoulder and down to where yoke is split into body and sleeves.
On a jacket measures are never taken along bands, unless specifically stated. Always measure inside band stitches when measuring the length.
See DROPS lesson: How to read a schematic drawing
What is a repeat?
Diagrams are often repeated on the round or in height. 1 repeat is the diagram the way it appears in the pattern. If it says to work 5 repeats of A.1 in the round, then you work A.1 a total of 5 times after/next to each other in the round. If it says to work 2 repeats of A.1 vertically/in height you work the entire diagram once, then begin again at the start and work the entire diagram one more time.
Why does the piece start with more chain stitches than it’s worked with?
Chain stitches are slightly narrower than other stitches and to avoid working the cast-on edge too tight, we simply chain more stitches to begin with. The stitch count will be adjusted on the following row to fit the pattern and measurement sketch.
Why increase before the rib edge when the piece is worked top-down?
The rib edge is more elastic and will contract slightly compared to, for example, stocking stitch. By increasing before the rib edge, you avoid a visible difference in width between the rib edge and the rest of the body.
Why increase in the cast-off edge?
It’s very easy to cast off too tightly, and by making yarn overs while casting off (and simultaneously casting these off) you avoid a too tight cast off edge.
See DROPS video: How to bind off with yarn overs (yo)
How do I increase/decrease on every 3rd and 4th row/round alternately?
To achieve an even increase (or decrease) you can increase on, for example: every 3rd and 4th row alternately, like so: work 2 rows and increase on the 3rd row, work 3 rows and increase on the 4th. Repeat this until the increase is complete.
See DROPS lesson: Increase or decrease 1 st on every 3rd and 4th row alternately
How can I work a jacket in the round instead of back and forth?
Should you prefer to work in the round instead of back and forth, you may of course adjust the pattern. You’ll need to add steeks mid-front (usually 5 stitches), and follow the instructions. When you would normally turn and work from the wrong side, simply work across the steek and continue in the round. At the end you’ll cut the piece open, pick up stitches to work bands, and cover the cut edges.
See DROPS video: How to knit steeks and cut open
Can I work a jumper back and forth instead of in the round?
Should you prefer to work back and forth instead of in the round, you may of course adjust the pattern so you work the pieces separately and then assemble them at the end. Divide the stitches for the body in 2, add 1 edge stitch in each side (for sewing) and work the front and back pieces separately.
See DROPS lesson: Can I adapt a pattern for circular needles into straight needles?
Why is the pattern slightly different than what I see in the photo?
Pattern repeats can vary slightly in the different sizes, in order to get the correct proportions. If you’re not working the exact same size as the garment in the photo, yours might deviate slightly. This has been carefully developed and adjusted so that the complete impression of the garment is the same in all sizes.
Make sure to follow instructions and diagrams for your size!
How do I make a women’s size garment into a men’s size one?
If you have found a pattern you like which is available in women’s size it’s not very difficult to convert it to men’s size. The biggest difference will be the length of sleeves and body. Start working on the women size that you think would fit across the chest. The additional length will be worked right before you cast off for the armhole/sleeve cap. If the pattern is worked top-down you can add the length right after the armhole or before the first decrease on sleeve.
Regarding additional yarn amount, this will depend on how much length you add, but it is better with a skein too many than too few.
How do I prevent a hairy garment from shedding?
All yarns will have excess fibres (from production) that might come off as lint or shedding. Brushed yarns (ie hairier yarns) have more of these loose, excess fibres, causing more shedding.
Shedding also depends on what is worn under or over the garment, and whether this pulls at the yarn fibres. It’s therefore not possible to guarantee that there will be no shedding
Below are some tips on how to get the best result when working with hairier yarns:
1. When the garment is finished (before you wash it) shake it vigorously so the looser hairs come off. NOTE: do NOT use a lint roller, brush or any method that pulls at the yarn.
2. Place the garment in a plastic bag and put it in your freezer - the temperature will cause the fibres to become less attached to each other, and excess fibres will come off easier.
3. Leave in the freezer for a few hours before taking it out and shaking it again.
4. Wash the garment according to the instructions on the yarn label.
Why does my garment pill?
Pilling is a natural process that happens to even the most exclusive of fibers. It's a natural sign of wear and tear that is hard to avoid, and that is most visible in high friction areas of your garment like a sweater's arms and cuffs.
You can make your garment look as new by removing the pilling, using a fabric comb or a pill/lint remover.
Havsbris |
|||||||||||||
|
|
||||||||||||
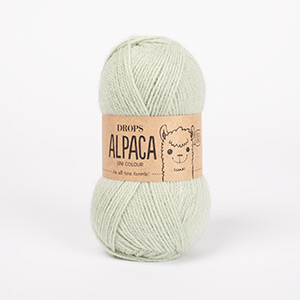
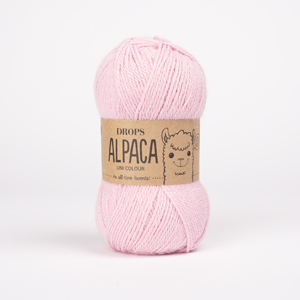
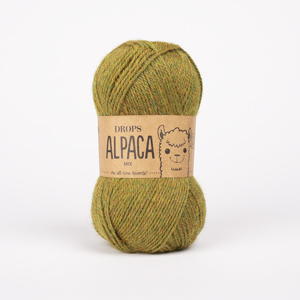
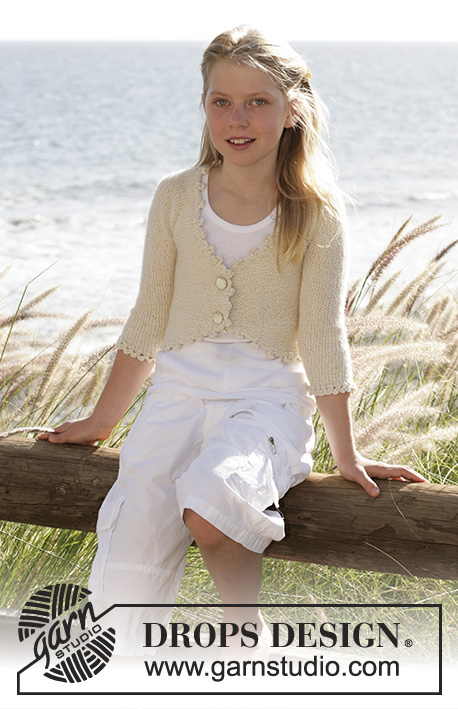
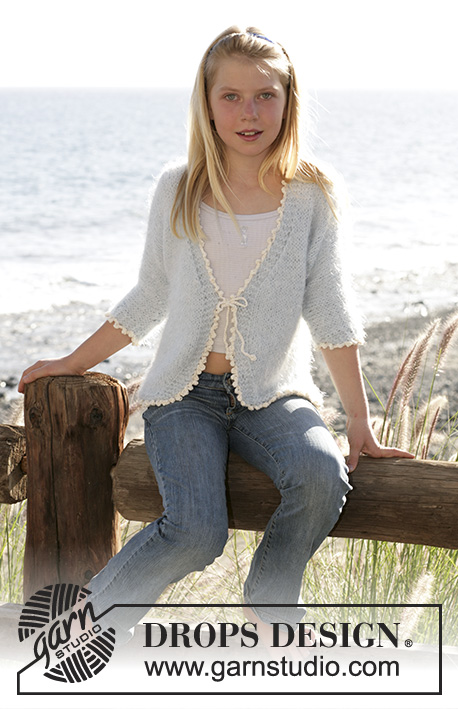
Knitted cardigan in DROPS Alpaca with 3/4 sleeves, wave pattern and crochet buttons. Size children 5 to 14 years.
DROPS Children 15-10 |
|||||||||||||
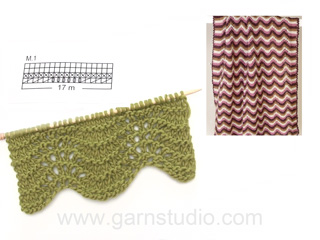
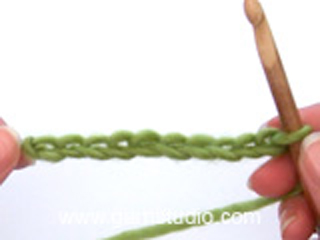
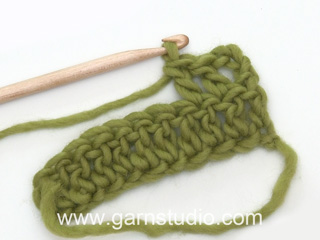
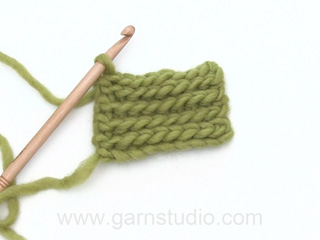
Knitting tension: 23 sts x 46 rows on needles size 3.5 mm with Alpaca in garter sts = 10 x 10 cm and 28 sts wave pattern =10 cm in width. Front band: Purl 6 sts on all rows for the front band. Wave pattern: See diagram M.1 and M.2. Diagrams are seen from RS. Note: K1 between YO. Garter st back and forth: Knit all rows. Wide garter st: *1st row: K from RS 2nd row: K from WS. 3rd row: K from RS 4th row: P from WS*. Repeat from *-*. Buttonhole: 1 buttonhole = Cast off 3rd and 4th front band sts and cast on 2 new sts over the cast off sts on next row. Cast off for buttonhole when piece measures: Size 5/6 years: 1, 8, 15, 22 and 29 cm. Size 7/8 years: 2, 10, 17, 24 and 32 cm. Size 9/10 years: 2, 10, 18, 26 and 34 cm. Size 11/12 years: 2, 9, 16, 23, 30 and 37 cm. Size 13/14 years: 2, 9, 17, 25, 33 and 40 cm. Back and front pieces: Knit piece back and forth on circular needles from mid front. Cast on 220-230-249-259-264 sts on circular needles size 3.5 mm with DROPS Alpaca. Knit 1st row as follows: * K4, K2 tog *, repeat from *-* and finishing off K 4-2-3-1-0 = 184-192-208-216-220 sts up(incl 6 front band sts - see above - on each side), this is done so cast on sts will not be tight. Knit garter st – see explanation above - until piece measures 16-18-19-20-22 cm (ensure next row is on WS). Note: Cast off for buttonhole on right front band – see explanation above. Continue with 1 row garter st from WS at the same time as inc 32-32-44-36-40 sts evenly (i.e. inc approx every 5th-6th sts) = 216-224-252-252-260 sts (do not inc over the 6 front edge sts on each side). Insert 1 marking thread (MT) after 57-59-66-66-68 sts from each side (= mid sides) = 102-106-120-120-124 sts on back piece. Knit next row as follows: Size 5/6 years: 6 front edge sts, chart M.1 (= 17 sts) repeat 12 times and finish off with 6 front edge sts. Size 7/8 years: 6 front edge sts, chart M.1 (= 17 sts) repeat 3 times, 4 sts Wide garter sts – see explanation above – (MT is placed in middle between these sts), chart M.1 (= 17 sts) repeat 6 times, 4 sts Wide garter st (MT is placed in middle between these sts), chart M.1 (= 17 sts) repeat 3 times, finish off with 6 front edge sts. Sizes 9/10 + 11/12 years: 6 front edge sts, chart M.2 (= 20 sts) repeat 12 times and finish off with 6 front edge sts. Size 13/14 years: 6 front edge sts, chart M.2 (= 20 sts) repeat 3 times, 4 sts Wide garter sts – see explanation above – (MT is placed in middle between these sts), chart M.2 (= 20 sts) repeat 6 times, 4 sts Wide garter st (MT is placed in middle between these sts), chart M.2 (= 20 sts) repeat 3 times, finish off with 6 front edge sts. All sizes: Continue like this until piece measures 22-24-26-28-30 cm. Now cast off 6 sts on each side for armhole (i.e. 3 sts on each side of MT). Continuing, knit front and back pieces separately. Back piece: = 96-100-114-114-118 sts. Continue with Wide garter sts over 14-16-17-17-19 sts on each side (knit remaining sts as before). At the same time cast off for armhole on each side on every other row: 2 sts 3-4-5-5-5 times and 1 st 3-3-5-4-4 times = 78-78-84-86-90 sts. When piece measures 36-39-42-45-48 cm cast off middle 20-20-26-26-28 sts for neckline. Continuing knit like before but knit Wide garter st over remaining sts in pattern repeat at neckline. At the same time cast off 1 st to shape neckline on every other row 4 times = 25-25-25-26-27 sts again on each shoulder. Knit until piece measures 38-41-44-47-50 cm. Cast off loosely. Left front piece: = 54-56-63-63-65 sts. Continue with Wide garter sts over 14-16-17-17-19 sts in the side (knit remaining sts as before). At the same time cast off for armhole on side as on back piece = 45-45-48-49-51 sts. Continue until piece measures 30-33-35-38-41 cm. Now slip 14 sts mid front onto 1 thread or stitch holder for neck. Cast off for neckline on every other row 2 sts 1 time and 1 st 4-4-7-7-8 times = 25-25-25-26-27 sts left on shoulder. Continue until piece measures 38-41-44-47-50 cm. Cast off loosely. Right front piece: Knit like left reversed. Remember buttonhole on front band – see explanation above. Sleeve: Cast on 84-84-98-98-98 sts on needle size 3.5 mm with DROPS Alpaca. Knit 1st row as follows: * K4, K2 tog *, repeat from *-* and finish off K 0-0-2-2-2 = 70-70-82-82-82 sts up (incl 1 edge st on each side), this is done to avoid cast on edge being too tight. Knit next row as follows: Sizes 5/6 +7/8 years: 1 front edge sts, chart M.1 (= 17 sts) repeat 4 times and finish off with 1 edge sts. Sizes 9/10 + 11/12 + 13/14 years: 1 front edge sts, chart M.2 (= 20 sts) repeat 4 times and finish off with 1 edge sts. Continue as follows until M.1/M.2 have been knit 3 times in height. Continue with 1 row garter st from RS at the same time as dec (K2 sts tog) 12-12-14-14-14 sts evenly (i.e. knit approx 5th and 6th sts tog) = 58-58-68-68-68 sts. K 1 row from WS. Continue in Wide garter st – see explanation above, until complete measurement. At the same time when piece measures 5-5-5-5-7 cm inc 1 st on each side on every 2.5 -2.5 -4 -4 -2.5 cm 7-9-6-7-10 times in total = 72-76-80-82-88 sts. When piece measures 23-28-29-31-33 cm cast off to shape sleeve cap as follows: 4 sts 2 times, 2 sts 3-3-3-3-4 times and 1 st 0-1-5-5-3 times. Continuing cast off 2 sts on each side until piece measures 28-34-37-39-41 cm, then cast off 4 sts 1 time on each side. Cast off remaining sts, piece measures approx 29-35-38-40-42 cm. Assembly: Sew shoulder seams. Sew sleeve seams within 1 edge st and sew in sleeves. Neck: Pick up 76 to 92 sts (incl sts on thread or stitch holder) round neckline (also on front edge). Knit 6 rows garter sts. Cast off loosely. Crochet buttons: Crochet cover for 5-5-5-6-6 buttons on crochet hook size 2 mm with Alpaca as follows: Crochet 2 ch, then crochet 16 trc in the first of the 2 ch, finish off with 1 sl st in first tr of round (= 1st round). 2nd round: Crochet 1 dc in each tr and finish off with 1 sl st in first dc of round (= 16 dc). 3rd round: Crochet first 3 ch and then 1 tr in every other dc and finish off with 1 sl st in 3rd ch of round = 8 tr. Slip button inside cover, sew around edge and pull tog. Assembly: Sew in buttons on left front piece. |
|||||||||||||
Diagram explanations |
|||||||||||||
|
|||||||||||||
Have you made this or any other of our designs? Tag your pictures in social media with #dropsdesign so we can see them! Do you need help with this pattern?You'll find tutorial videos, a Comments/Questions area and more by visiting the pattern on garnstudio.com. © 1982-2024 DROPS Design A/S. We reserve all rights. This document, including all its sub-sections, has copyrights. Read more about what you can do with our patterns at the bottom of each pattern on our site. |
With over 40 years in knitting and crochet design, DROPS Design offers one of the most extensive collections of free patterns on the internet - translated to 17 languages. As of today we count 304 catalogues and 11422 patterns - 11422 of which are translated into English (UK/cm).
We work hard to bring you the best knitting and crochet have to offer, inspiration and advice as well as great quality yarns at incredible prices! Would you like to use our patterns for other than personal use? You can read what you are allowed to do in the Copyright text at the bottom of all our patterns. Happy crafting!
Comments / Questions (25)
Brault wrote:
Bonjour, j'aurais aimé faire les modèles enfants 23-50 et 15-10 , mais je ne vois pas les explications du diagramme. Merci
01.04.2021 - 12:19DROPS Design answered:
Bonjour Mme Brault, tout est regle. Les explications du diagramme sont deja visibles. Bon travail!
01.04.2021 - 13:31Mary wrote:
I have reached the shoulder and I am confused. The pattern says bind off 26 sts in the center. Then bind off 1 stitch 2 times from the neck leaving a total of 26 stitches. If I bind off I only on the neck side, it will leave 28 stitches. Am I to bind off 1 stitch on each side of the shoulder?
20.10.2020 - 19:48DROPS Design answered:
Dear Mary, oh there is a mistake in the US-English pattern sorry and thanks for noticing, you should bind off at the beg of every row from neck a total of 4 times not 2 times, pattern will be updated asap, thank you! Happy knitting!
21.10.2020 - 08:06Mary wrote:
This pattern says to work the back and sides separately but does not provide direction for how to do this. Would it be correct to put the sides on scrap yarn while knitting the back then putting each side back on the needle as needed when the back is completed? Also, it says for the back to work Wide garter over 17 sts and work remaining as before. Does that mean follow the M.2 chart over the rest?
13.10.2020 - 15:31DROPS Design answered:
Dear Mary, when working each piece you can slip the stitches for other pieces on a thread or on a stitch holder - as your rather like it to do. Correct, you continue working M.2 over the middle stitches (between the wide garter st on each side). Happy knitting!
13.10.2020 - 16:12Jorid wrote:
Hei. Oppfølging til svaret på mitt spørsmål fra i går: Når ermehullet er mye høyere på bolen enn på ermene (19 vs 9 cm i str 11/12) så blir det jo svært ulik omkrets på delene som skal sys sammen? Eller har jeg gjort noe feil? Skal det felles 2 m i hver side bare en gang, eller på hver 2. pinne der det står at det skal felles 2 m i hver side til arb. måler 28-34-37-39-41 cm (og deretter 4 m i hver side 1 gang før felling av de resterende m)?
29.04.2020 - 09:31DROPS Design answered:
Hej Jorid, Nej for det er stadigvæk hele omkredsen på ærmegabet som skal modsvare omkredsen på ærmekuplen. Du feller 2 masker i hver side til du når målet i din størrelse (antal gange kommer an på din strikkefasthed). :)
29.04.2020 - 09:35Jorid wrote:
Jeg strikker denne i str. 11/12 år. Oppskriften oppgir helt ulik størrelse på ermeåpningen på bolen og på ermene. På bolen står det at det skal være 19 cm fra starten på fellingen på bolen og 9 cm på ermene. Er dette feil eller er det meningen at ermeåpningen på bolen skal strammes/rynkes når den sys sammen med ermet?
28.04.2020 - 21:12DROPS Design answered:
Hej Jorid, det er hele omkredsen som skal syes på ærmet i ærmegabet. Helt fra der hvor du begynder at lukke af, langs med indtagningerne, aflukningen og samme i den anden side. Det er ikke selve højden på de 9 cm som du kan læse i måleskitsen, det er kun selve højden på ærmekuplen. God fornøjelse!
29.04.2020 - 08:55Vera MIerop wrote:
23 steken en 46 nld is 10x10 dat klopt. Voor voor en achterpanden moet ik 230 steken opzetten dat is 100 cm, veel te groot voor maat 122. Ze heft een omvang van 55 cm. Is dit een fout in het patroon of begrijp ik iets niet.
16.02.2020 - 14:21DROPS Design answered:
Dag Vera,
Na het opzetten minder je steken om de onderrand soepel te maken. Het golfjespatroon heeft een stekenverhouding van 28 st.= 10 cm in de breedte. Op die manier zou de maat wel moeten kloppen met hetaangegeven aantal cm's die onderaan bij de tekening is aangegeven.
23.02.2020 - 19:37Uyter Hoeven Nancy wrote:
Hallo, Heeft u ook het patroon om met 2 breinaalden te breien. Met een rondbreinaald kan ik niet overweg. Bedankt alvast. Groetjes, Nancy
03.11.2019 - 10:53DROPS Design answered:
Hi :) Please send us your question in English :)
05.11.2019 - 09:44Marilyn wrote:
Appeals that the correction for the back (size 9/10) has not been corrected as far as I can see. However, there appears to be a second error, this time for the instructions for the left side ( which will affect the right one as well). Your instructions - "Continue with Wide garter sts over 14-16-17-17-19 sts on each side". I believe you mean - ... on the armhole side.
21.09.2019 - 19:56Marilyn wrote:
I'm about to finish the back (Havsbris - size 9/10). The back has 84 sts. If I bind off 26 in the center, I will have 58/2 = 29 sts left for each shoulder minus 2 to shape the neckline leaving 27 nog 25 as indicated in the pattern. To get 27 for each shoulder before shaping, I would need to bind off 30 sts in the middle for the neckline or 27 not 25 for the shoulder (which also means changing the 2 front panels. What's the correct number of sts for the center bindoff and the shoulders. Thanks
20.09.2019 - 00:04DROPS Design answered:
Dear Marilyn, there is actually a mistake in the English pattern, you are supposed to decrease 1 stitch for neck a total of 4 times (not a total of 2 times), pattern will be edited asap, thanks for your feedback. Happy knitting!
20.09.2019 - 08:56Marilyn wrote:
Thanks for the quick reply, however, reading charts is not a problem. I've made a number of sweaters using charts much more complicated than this one. Since my granddaughter is very slender, I already dropped down one size to 9/10 and am using a smaller needle, but am puzzled why you don't adjust the pattern to reduce the sts increase from 44, the largest increase for any size; does it really need more than 2 extra wave patterns, especially since Wide garter stitch is used as a fill in anyway.
09.09.2019 - 18:06DROPS Design answered:
Dear Marilyn, you need more stitches in width when working the wave pattern than when working garter stitch for the same width, that's the reason why you have to increase 44 sts in the 3rd size. Happy knitting!
10.09.2019 - 09:48