DROPS Cotton Light uni colour 50% Cotton, 50% Polyester |
1.40 € /50g |
Order |
Clicking the ORDER button will redirect you to Mallia Kouvaria - pleko.gr. website
The yarn cost is calculated from the pattern’s smallest size and the yarn’s cheapest product type. Looking for an even better price? You might find it on the DROPS Deals!
-------------------------------------------------------
Alternative Yarn – See how to change yarns here
Yarn Groups A to F – Use the same pattern and change the yarn here
Yarn usage using an alternative yarn – Use our yarn converter here
-------------------------------------------------------
DROPS Cotton Light uni colour 50% Cotton, 50% Polyester 1.40 € /50g Order |
Clicking the ORDER button will redirect you to Mallia Kouvaria - pleko.gr. website
The yarn cost is calculated from the pattern’s smallest size and the yarn’s cheapest product type. Looking for an even better price? You might find it on the DROPS Deals!
This pattern has been corrected. Click here to see the correction/s.
= K from RS, P from WS with off white | |
= K from RS, P from WS with denim blue | |
= K from WS, P from RS with off white | |
= K 5 tog - READ KNITTING TIP in pattern | |
= K 5 twisted tog - READ KNITTING TIP in pattern | |
= K 2 tog | |
= slip 1 st as if to K, K 1, psso | |
= 1 YO between 2 sts, do not K YO twisted on next row, it should make hole | |
= 1 YO between 2 sts, K YO twisted on next row, it should not make hole | |
= K 3 tog | |
= K 3 twisted tog | |
= inc/dec row - see pattern |
Each of our patterns has specific tutorial videos to help you.
These step-by-step tutorials might also help you:
Why is the knitting/crochet tension so important?
Knitting tension is what determines the final measurements of your work, and is usually measured per 10 x 10 cm. It is provided like so: number of stitches in width x number of rows in height - eg: 19 stitches x 26 rows = 10 x 10 cm.
The knitting tension is very individual; some people knit/crochet loosely while others work tightly. You adjust the knitting tension with the needle size, which is why the suggested needle size is only meant as a guide! You need to adjust this (up or down) to ensure that YOUR knitting tension matches the knitting tension provided in the pattern. If you work with a different knitting tension than provided you will have a different yarn consumption, and your work will have different measurements than what the pattern suggests.
The knitting tension also determines which yarns can replace each other. As long as you achieve the same knitting tension you can replace one yarn with another.
See DROPS lesson: How to measure your tension/gauge
See DROPS video: How to make a gauge tension swatch
How do I know how many balls of yarn I need?
The required amount of yarn is provided in grams, eg: 450 g. To calculate how many balls you’ll need you first need to know how many grams are in 1 ball (25g, 50g or 100g). This information is available if you click on the individual yarn quality on our pages. Divide the amount required with the amount of each ball. For example, if each ball is 50g (the most common amount), the calculation will be as follows: 450 / 50 = 9 balls.
Can I use a different yarn than what the pattern suggests?
The important thing when changing from one yarn to another is that the knitting/crochet tension remains the same. This is so that the measurements of the finished piece will be the same as on the sketch provided. It is easier to achieve the same knitting tension using yarns from the same yarn group. It is also possible to work with multiple strands of a thinner yarn to achieve the knitting tension of a thicker one. Please try our yarn converter. We recommend you to always work a test swatch.
Please NOTE: when changing yarn the garment might have a different look and feel to the garment in the photo, due to individual properties and qualities of each yarn.
See DROPS lesson: Can I use a different yarn than the one mentioned in the pattern?
What are the yarn groups?
All our yarns are categorised into yarn groups (from A to F) according to thickness and knitting tension – group A contains the thinnest yarns and group F the thickest. This makes it easier for you to find alternative yarns to our patterns, should you wish to switch yarn. All yarns within the same group have a similar knitting tension and can easily replace each other. However, different yarn qualities have different structures and properties which will give the finished work a unique look and feel.
How do I use the yarn calculator?
At the top of all our patterns you’ll find a link to our yarn calculator, which is a helpful tool should you wish to use a different yarn than suggested. By filling in the yarn quality you wish to replace, the amount (in your size) and number of strands, the calculator will present good alternative yarns with the same knitting tension. Additionally it will tell you how much you’ll require in the new qualities and whether you’ll need to work with multiple strands. Most skeins are 50g (some are 25g or 100g).
If the pattern is worked with multiple colours, every colour will have to be calculated separately. Similarly, if the pattern is worked with several strands of different yarns (for example 1 strand Alpaca and 1 strand Kid-Silk) you will have to find alternatives for each, individually.
Why do you show discontinued yarns in the patterns?
Since different yarns have different qualities and textures we have chosen to keep the original yarn in our patterns. However, you can easily find options among our available qualities by using our yarn calculator, or simply pick a yarn from the same yarn group.
It is possible that some retailers still have discontinued yarns in stock, or that someone has a few skeins at home that they would like to find patterns for.
The yarn calculator will provide both alternative yarn as well as required amount in the new quality.
What size should I knit?
If you think it's hard to decide what size to make, it can be a good idea to measure a garment you own already and like the size of. Then you can pick the size by comparing those measures with the ones available in the pattern's size chart.
You'll find the size chart at the bottom of the pattern.
See DROPS lesson: How to read size chart
Why do I get the wrong knitting tension with the suggested needle size?
The needle size provided in the pattern serves only as a guide, the important thing is to follow the knitting tension. And since knitting tension is very individual, you will have to adjust the needle size to ensure that YOUR tension is the same as in the pattern – maybe you’ll have to adjust 1, or even 2 needle sizes, up or down to achieve the correct tension. For this, we recommend that you work test swatches.
Should you work with a different knitting tension than the one provided, the measurements of the finished garment might deviate from the measurement sketch.
See DROPS lesson: How to measure your tension/gauge
See DROPS video: How to make a tension/gauge swatch
Why is the pattern worked top-down?
Working a garment top-down provides more flexibility and room for personal adjustment. For example it is easier to try the garment on while working, as well as making adjustments to length of yoke and shoulder caps.
The instructions are carefully explaining every step, in the correct order. Diagrams are adjusted to the knitting direction and are worked as usual.
How do I work according to a knitting diagram?
The diagram depicts all rows/rounds, and every stitch seen from the right side. It is read from bottom to top, from right to left. 1 square = 1 stitch.
When working back and forth, every other row is worked from the right side and every other row is worked from the wrong side. When working from the wrong side, the diagram will have to be worked reversed: from left to right, knit stitches are purled, purl stitches are knit etc.
When working in the round every round is worked from the right side and the diagram are worked from right to left on all rounds.
See DROPS lesson: How to read knitting diagrams
How do I work according to a crochet diagram?
The diagram depicts all rows/rounds, and every stitch seen from the right side. It is worked from bottom to top, from right to left.
When working back and forth every other row is worked from the right side: from right to left and every other row is worked from the wrong side: from left to right.
When working in the round, every row in the diagram are worked from the right side, from right to left.
When working a circular diagram you start in the middle and work your way outwards, counter clockwise, row by row.
The rows usually start with a given number of chain stitches (equivalent to the height of the following stitch), this will either be depicted in the diagram or explained in the pattern.
See DROPS lesson: How to read crochet diagrams
How do I work several diagrams simultaneously on the same row/round?
Instructions for working several diagrams after each other on the same row/round, will often be written like so: “work A.1, A.2, A.3 a total of 0-0-2-3-4 times". This means you work A.1 once, then A.2 is worked once, and A.3 is repeated (in width) the number of times provided for your size – in this case like so: S = 0 times, M = 0 times, L=2 times, XL= 3 times and XXL = 4 times.
The diagrams are worked as usual: begin with the first row in A.1, then work the first row in A.2 etc.
See DROPS lesson: How to read knitting diagrams
See DROPS lesson: How to read crochet diagrams
Why are the sleeves shorter in larger sizes?
The total width of the garment (from wrist-to-wrist) will be larger in the larger sizes, despite the actual sleeves being shorter. The larger sizes have longer sleeve caps and wider shoulders, so there will be a good fit in all sizes.
Where on the garment is the length measured?
The measurement sketch/schematic drawing provides information regarding the full length of the garment. If it’s a jumper or a jacket the length is measured from the highest point on the shoulder closest to the neckline, and straight down to the bottom of the garment. It is NOT measured from the tip of shoulder. Similarly, the length of yoke is measured from the highest point on the shoulder and down to where yoke is split into body and sleeves.
On a jacket measures are never taken along bands, unless specifically stated. Always measure inside band stitches when measuring the length.
See DROPS lesson: How to read a schematic drawing
What is a repeat?
Diagrams are often repeated on the round or in height. 1 repeat is the diagram the way it appears in the pattern. If it says to work 5 repeats of A.1 in the round, then you work A.1 a total of 5 times after/next to each other in the round. If it says to work 2 repeats of A.1 vertically/in height you work the entire diagram once, then begin again at the start and work the entire diagram one more time.
Why does the piece start with more chain stitches than it’s worked with?
Chain stitches are slightly narrower than other stitches and to avoid working the cast-on edge too tight, we simply chain more stitches to begin with. The stitch count will be adjusted on the following row to fit the pattern and measurement sketch.
Why increase before the rib edge when the piece is worked top-down?
The rib edge is more elastic and will contract slightly compared to, for example, stocking stitch. By increasing before the rib edge, you avoid a visible difference in width between the rib edge and the rest of the body.
Why increase in the cast-off edge?
It’s very easy to cast off too tightly, and by making yarn overs while casting off (and simultaneously casting these off) you avoid a too tight cast off edge.
See DROPS video: How to bind off with yarn overs (yo)
How do I increase/decrease on every 3rd and 4th row/round alternately?
To achieve an even increase (or decrease) you can increase on, for example: every 3rd and 4th row alternately, like so: work 2 rows and increase on the 3rd row, work 3 rows and increase on the 4th. Repeat this until the increase is complete.
See DROPS lesson: Increase or decrease 1 st on every 3rd and 4th row alternately
How can I work a jacket in the round instead of back and forth?
Should you prefer to work in the round instead of back and forth, you may of course adjust the pattern. You’ll need to add steeks mid-front (usually 5 stitches), and follow the instructions. When you would normally turn and work from the wrong side, simply work across the steek and continue in the round. At the end you’ll cut the piece open, pick up stitches to work bands, and cover the cut edges.
See DROPS video: How to knit steeks and cut open
Can I work a jumper back and forth instead of in the round?
Should you prefer to work back and forth instead of in the round, you may of course adjust the pattern so you work the pieces separately and then assemble them at the end. Divide the stitches for the body in 2, add 1 edge stitch in each side (for sewing) and work the front and back pieces separately.
See DROPS lesson: Can I adapt a pattern for circular needles into straight needles?
Why is the pattern slightly different than what I see in the photo?
Pattern repeats can vary slightly in the different sizes, in order to get the correct proportions. If you’re not working the exact same size as the garment in the photo, yours might deviate slightly. This has been carefully developed and adjusted so that the complete impression of the garment is the same in all sizes.
Make sure to follow instructions and diagrams for your size!
How do I make a women’s size garment into a men’s size one?
If you have found a pattern you like which is available in women’s size it’s not very difficult to convert it to men’s size. The biggest difference will be the length of sleeves and body. Start working on the women size that you think would fit across the chest. The additional length will be worked right before you cast off for the armhole/sleeve cap. If the pattern is worked top-down you can add the length right after the armhole or before the first decrease on sleeve.
Regarding additional yarn amount, this will depend on how much length you add, but it is better with a skein too many than too few.
How do I prevent a hairy garment from shedding?
All yarns will have excess fibres (from production) that might come off as lint or shedding. Brushed yarns (ie hairier yarns) have more of these loose, excess fibres, causing more shedding.
Shedding also depends on what is worn under or over the garment, and whether this pulls at the yarn fibres. It’s therefore not possible to guarantee that there will be no shedding
Below are some tips on how to get the best result when working with hairier yarns:
1. When the garment is finished (before you wash it) shake it vigorously so the looser hairs come off. NOTE: do NOT use a lint roller, brush or any method that pulls at the yarn.
2. Place the garment in a plastic bag and put it in your freezer - the temperature will cause the fibres to become less attached to each other, and excess fibres will come off easier.
3. Leave in the freezer for a few hours before taking it out and shaking it again.
4. Wash the garment according to the instructions on the yarn label.
Why does my garment pill?
Pilling is a natural process that happens to even the most exclusive of fibers. It's a natural sign of wear and tear that is hard to avoid, and that is most visible in high friction areas of your garment like a sweater's arms and cuffs.
You can make your garment look as new by removing the pilling, using a fabric comb or a pill/lint remover.
Nautical Waves |
|||||||||||||||||||||||||||||||||||||
|
|
||||||||||||||||||||||||||||||||||||
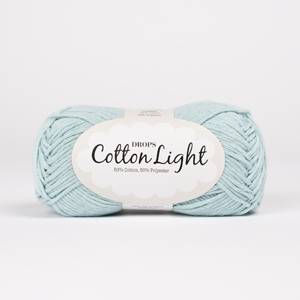
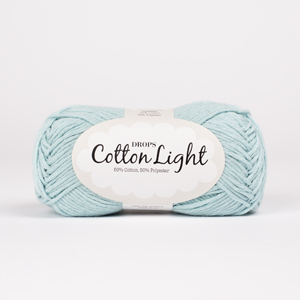
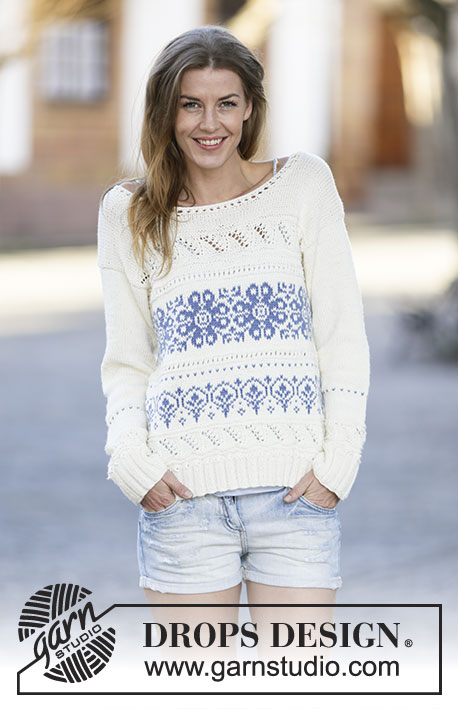
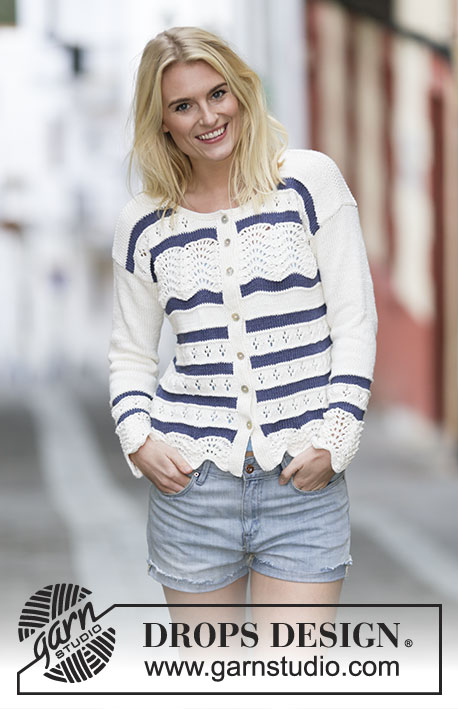
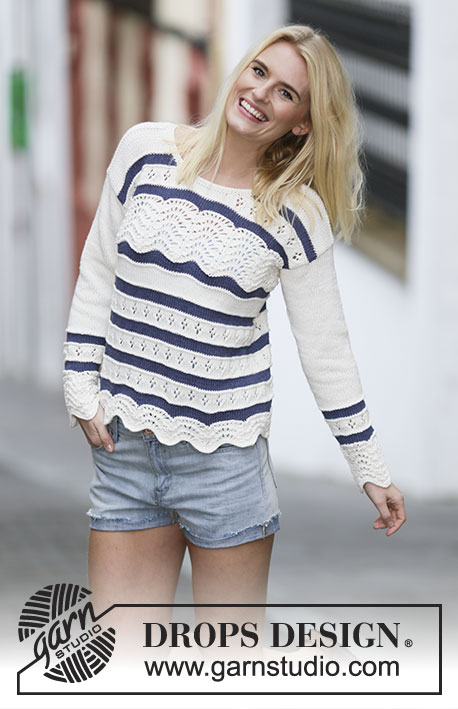
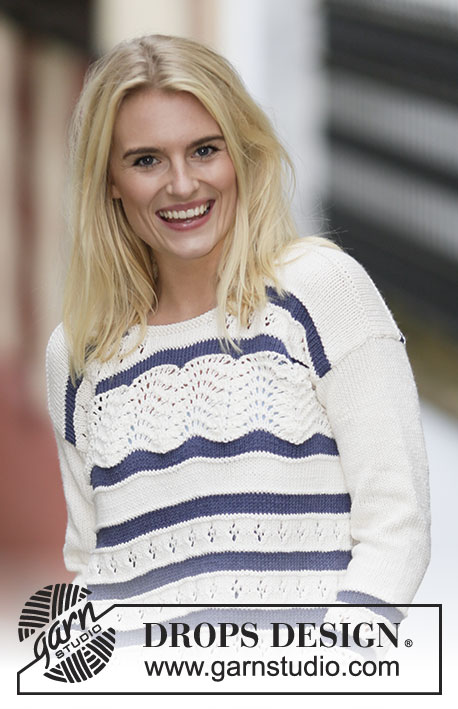
Knitted DROPS jumper with lace pattern and stripes in ”Cotton Light”. Size: S - XXXL.
DROPS 161-31 |
|||||||||||||||||||||||||||||||||||||
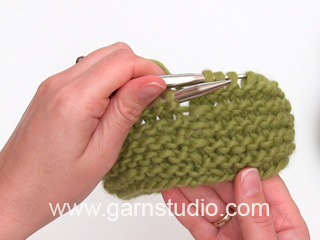
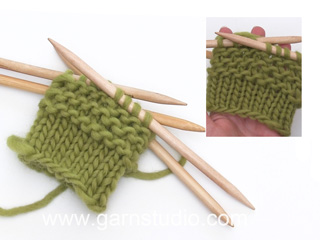
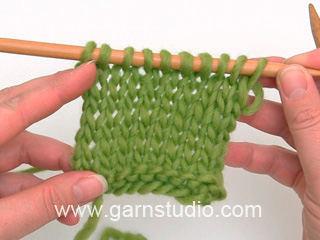
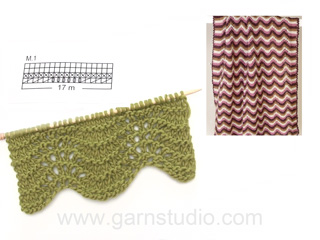
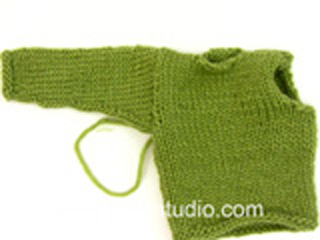
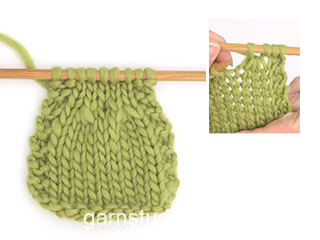
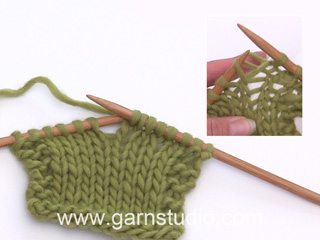
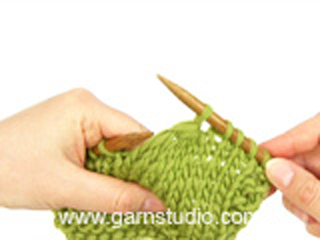
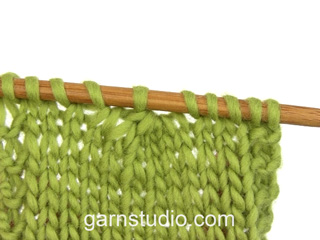
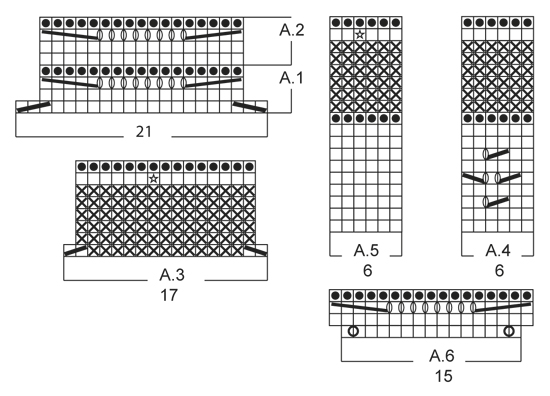
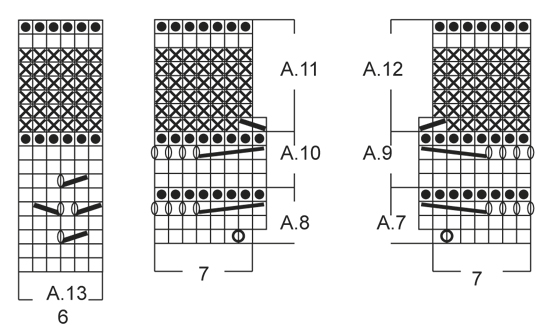
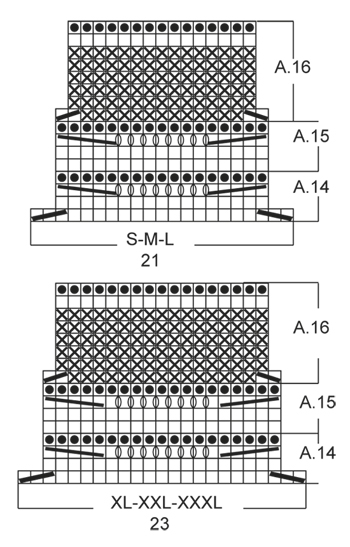
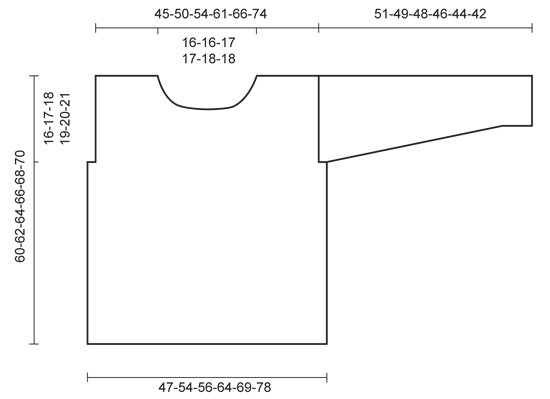
GARTER ST (back and forth): K all rows. 1 ridge = 2 rows K. GARTER ST (worked in the round): * K 1 round and P 1 round *, repeat from *-*. 1 ridge = 2 rounds. PATTERN: See diagrams A.1-A.16. The diagrams show all rows in pattern seen from RS. KNITTING TIP: K 5 twisted tog as follows: K 5, pass next to last st worked over the last so that this st is around the last st, repeat until all 4 sts have been passed over (= 4 sts dec). K 5 tog as follows: K 5, pass them back on left needle, pass the next to last st over the last so that this st is around the last st, repeat until all 4 sts have been passed over (= 4 sts dec), pass the last st worked back on right needle. INCREASE TIP: Work until 1 st remains before marker, 1 YO, K 2 (marker is in the middle of these), 1 YO = 2 sts inc. On next round K YO twisted to avoid holes. ---------------------------------------------------------- BODY: Worked in the round on circular needle. Cast on 273-315-336-378-399-462 sts on circular needle size 4 mm with off white. Work 1 ridge in GARTER ST - see explanation above. Switch to circular needle size 4.5 mm. Work A.1 (= 21 sts) 13-15-16-18-19-22 times in total. After A.1, there are 221-255-272-306-323-374 sts on needle. Then work A.2 (= 17 sts) over A.1. Repeat A.2 2-2-2-3-3-3 times in total vertically. Work A.3 over A.2. After first round of A.3, there are 195-225-240-270-285-330 sts on needle. On last round in A.3 (see star in diagram) dec or inc differently in the different sizes: Size S and XXL: Inc 4 sts evenly = 199-289 sts. Size M-L-XL-XXXL: Dec 2-5-5-5 sts evenly = 223-235-265-325 sts. REMEMBER THE KNITTING TENSION Then work as follows: A.4 (= 6 sts) 33-37-39-44-48-54 times in total, finish with 1st sts in the diagram. Repeat A.4 3-3-3-3-4-4 times in total vertically. Then work A.5 1 time vertically. On last round in A.5 (see star in diagram), dec 3-3-1-1-3-5 sts evenly = 196-220-234-264-286-320 sts. After last round in A.5 continue as follows: 4-10-6-6-4-5 sts in stocking st, A.6 6-6-7-8-9-10 times in width, 8-20-12-12-8-10 sts in stocking st, A.6 6-6-7-8-9-10 times in width, 4-10-6-6-4-5 sts in stocking st. NOTE: P the sts in stocking st in the sides when working P in A.6. After A.6, there are 220-244-262-296-322-360 sts on needle. Work A.2 over A.6, P the sts in stocking st when working P in A.2. Repeat A.2 5-5-6-5-5-6 times in total vertically. AT THE SAME TIME when piece measures 44-45-46-47-48-49 cm, cast off for armhole as follows: Cast off the first 2-3-1-2-2-2 sts, 2-7-5-4-2-3 sts in stocking st, A.2 6-6-7-8-9-10 times in width as before, 2-7-5-4-2-3 sts in stocking st, cast off the next 4-6-2-4-4-4 sts, 2-7-5-4-2-3 sts in stocking st, A.2 6-6-7-8-9-10 times in width as before, 2-7-5-4-2-3 sts in stocking st, cast off the last 2-3-1-2-2-2 sts = 106-116-129-144-157-176 sts on front piece and 106-116-129-144-157-176 sts on back piece. Now finish each part separately. Fasten off. BACK PIECE: = 106-116-127-144-157-176 sts. When A.2 has been worked 5-5-6-5-5-6 times vertically, work A.3 over A.2. When A.3 has been worked 1 time vertically, there are 94-104-115-128-139-156 sts on needle. Then work as follows from RS: 2-1-5-1-2-3 sts in stocking st, A.4 6-7-7-9-9-11 times in total, 18-18-21-18-27-18 sts in stocking st, A.13 6-7-7-9-9-11 times in total, 2-1-5-1-2-3 sts in stocking st. When the first 4 rows of A.4/A.13 have been worked, slip the middle 12-12-13-14-15-16 sts on a stitch holder for neck and finish each shoulder separately (= 41-46-51-57-62-70 sts). Continue to cast off for neck on every row from neck as follows: Cast off 3 sts 1 time, 2 sts 2 times, 1 st 4-4-5-4-5-4 times = 30-35-39-46-50-59 sts remain for shoulder. When A.4/A.13 have been worked 1 time vertically, work piece in off white and stocking st until finished measurements. Work 1 ridge over all sts when piece measures 59-61-63-65-67-69 cm. Cast off. Work the other shoulder the same way. FRONT PIECE: Work as on back piece. SLEEVE: Worked in the round on double pointed needles. Cast on 63-63-63-69-69-69 sts on double pointed needle size 4 mm with off white. Work 1 ridge in GARTER ST - see explanation above. Insert 1 marker at the beg of the round. Switch to double pointed needles size 4.5 mm. Work A.14 (= 3 times in width) – see diagram for correct size. Work A.15 over A.14 5 times in total. Then work A.16 over A.15. When A.16 has been worked 1 time vertically, there are 45-45-45-51-51-51 sts on needle. Then work as follows: K 2, A.13 7-7-7-8-8-8 times in total in width, finish with K 1. AT THE SAME TIME when piece measures 12-10-10-10-10-10 cm, inc 1 st on each side of marker – see INCREASE TIP. Repeat inc every 3½-3-2½-2½-2-1½ cm 10-12-14-13-16-18 more times = 67-71-75-79-85-89 sts. When A.13 has been worked 1 time vertically, work piece in off white and stocking st until finished measurements. Cast off when piece measures 51-49-48-46-44-42 cm (shorter measurements in the larger sizes because of longer sleeve cap and wider shoulders). Knit another sleeve the same way. ASSEMBLY: Sew the shoulder seam. Sew in the sleeves inside 1 edge st. NECK EDGE: Work piece in the round on circular needle size 4 mm with off white, pick up 100-120 sts around the entire neck incl sts from stitch holders. Work 2 ridges. Cast off. |
|||||||||||||||||||||||||||||||||||||
Diagram explanations |
|||||||||||||||||||||||||||||||||||||
|
|||||||||||||||||||||||||||||||||||||
Have you made this or any other of our designs? Tag your pictures in social media with #dropsdesign so we can see them! Do you need help with this pattern?You'll find tutorial videos, a Comments/Questions area and more by visiting the pattern on garnstudio.com. © 1982-2024 DROPS Design A/S. We reserve all rights. This document, including all its sub-sections, has copyrights. Read more about what you can do with our patterns at the bottom of each pattern on our site. |
With over 40 years in knitting and crochet design, DROPS Design offers one of the most extensive collections of free patterns on the internet - translated to 17 languages. As of today we count 304 catalogues and 11422 patterns - 11422 of which are translated into English (UK/cm).
We work hard to bring you the best knitting and crochet have to offer, inspiration and advice as well as great quality yarns at incredible prices! Would you like to use our patterns for other than personal use? You can read what you are allowed to do in the Copyright text at the bottom of all our patterns. Happy crafting!
Comments / Questions (71)
Sabine wrote:
Bonjour, je bloque sur le premier diagramme… je ne finis pas sur le bon nombre de maille! Pourriez-vous me donner le détail du rang 3 et 4 du diagramme A1 ? Merci d’avance pour votre aide
19.04.2022 - 15:46DROPS Design answered:
Bonjour Sabine, Tricotez A.1 d'abord sur 21 mailles au 1er rang soit: *3 m ens torse à l'end, 15 m end, 3 m ens à l'end*, répétez de *à* tout le tour (il reste 17 mailles dans chaque A.1 après ce 1er rang). Tricotez ensuite le 3ème tour ainsi: *5 m ens à l'end, (1 jeté, 1 m end) x 7, 1 m end, 5 m ens torse à l'end* (= 17 m). Au 4ème tour, tricotez toutes les mailles à l'envers. Bon tricot! Bon tricot!
19.04.2022 - 15:59Petra wrote:
Hallo, ich bin jetzt am Ärmel und stricke in Gr. L. 45 M sind auf dem Magic Loop. Von A.13 habe ich die ersten zwei Reihen gestrickt. Meine Frage: Die erste Zunahme soll bei einer Gesamtlänge von 10 cm erfolgen. (Jetzt habe ich bereits 14 cm gestrickt.) Bedeutet 10 cm ab A.13 ?
25.08.2021 - 19:07DROPS Design answered:
Liebe Petra, diese 10 cm messen Sie von der Anschlagskante. Viel Spaß beim stricken!
26.08.2021 - 08:31Petra wrote:
Liebes Drops-Team, meine Frage war.... wie ich die M abnehmen muss? Wenn ich in der 5. R beginne, komme ich mit der Abnahme nicht hin, da nur noch 10 Reihen vor mir liegen. LG Petra
20.08.2021 - 07:27DROPS Design answered:
Liebe Petra, Entschuldigung für das Mißverständnis... Diese Maschen werden am Anfang jeder Reihe von Halsausschnitt (Richtung Schulter) abgekettet (nicht abgenommen), dh beim rechten Schulter/Rückenteil: am Anfang einer Rückreihe und beim linken Schulter/Rückenteil: am Anfang einer Hinreihe. Viel Spaß beim stricken!
20.08.2021 - 13:52Petra wrote:
Hallo, es ist mir zwar unangenehm, aber ich komme wieder nicht weiter. Ich stricke in Größe L. und habe nachdem ich in A.4/A.13 die 4.Reihe gestrickt habe, den Halsauschnitt stillgelegt. Auf beiden Seiten habe ich je 51 M. Jetzt wollte ich mit dem Abketten des Halsausschnittes beginnen. Laut Beschreibung, muss ich 3x1M, 2x2M und 5x1M abnehmen. Mir verbleiben allerdings nur 10 R, bis A4 beendet ist. Wie gehe ich nun vor? LG Petra
19.08.2021 - 19:32DROPS Design answered:
Liebe Petra, wenn A.4/A.13 fertig sind, dann stricken Sie glatt rechts mit Natur bis die Arbeit 63 cm misst, dann stricken Sie eine Krausrippe über alle Maschen und ketten die Maschen ab. Viel Spaß beim stricken!
20.08.2021 - 07:20Petra Pilgram-Melchert wrote:
Dann habe ich ja korrekt gestrickt. Dennoch komme ich auch bei 129 M nicht mit A3 hin. ??? Ich hoffe, dass die Strickanleitung rasch korrigiert werden kann, denn sonst komme ich leider nicht weiter😒 LG Petra
16.08.2021 - 17:53DROPS Design answered:
Liebe Petra, bei der 1. Reihe in A .3 werden jeweils 2 Maschen abgenommen, dh so stricken Sie A.3: 5 M glatt rechts, A.3 x 7 Mal wiederholen (= 7 x 17 M) und 5 M glatt rechts = 129 M; nach der 1. Reihe sind es nur noch 15 M in jedem A.3 = 5 M glatt rechts, A.3 x 7 (= 7x 15 M), 5 M glatt rechts = 115 M sind noch übrig. Kann es Ihnen helfen?
17.08.2021 - 10:03Petra wrote:
Liebes Drops Team, nun muss ich Sie leider erneut kontaktieren. Ich stricke den Pullover in Gr. L und habe die Abnahme für die Ärmelausschnitte gemacht und wie beschrieben, für das Rückenteil und das Vorderteil je 129 M. Dann geht es mit dem Rückenteil weiter...mit 127 M. Wo sind die beiden Maschen geblieben? Muss ich nochmals zwei Maschen pro Strickstück abketten? Dies steht allerdings nicht beschrieben. LG Petra
15.08.2021 - 19:57DROPS Design answered:
Liebe Petra, es sieht so aus, daß es sich hier um ein Typo handelt, es sollten 129 Maschen für L sein. Danke für den Hinweis, Anleitung wird korrigiert, Viel Spaß beim stricken!
16.08.2021 - 08:23Petra Pilgram-Melchert wrote:
Hallo, ich stricke den Pullover in der Gr. L. Jetzt bin ich mir unsicher, ob ich in A5 ab Stern... 1 oder 3 M gleichmäßig verteilt abnehmen muss? ( mit dem Ergebnis 220 oder 234 M?) Lieben Dank für eure Hilfe
11.08.2021 - 16:38DROPS Design answered:
Liebe Frau Pilgram-Melchert, in L nehmen Sie 1 Masche bei der letzen Runde in A.5 = jetzt sind es nur noch 234 Maschen übrig. Viel Spaß beim stricken!
12.08.2021 - 08:33Lene Lund-Hansen wrote:
Hej Jeg forstår ikke jeres udregninger. Jeg skal strikke efter brystmål 112. dvs at der efter jeres anvisning skal bruges 235 m. I skriver dog 273 m på den mindste størrelse, hvor i angiver brystmål til 94 cm???? Hvordan hønger det sammen
05.05.2021 - 22:53DROPS Design answered:
Hej Lene. I storlek L har du 235 m och storlek S har 199 m etter A.3 är stickat, så det ska var riktigt. Mvh DROPS Design
06.05.2021 - 09:31Christiane wrote:
Bonjour Je réalise le dessin A1 j en suis donc au 5 mailles ensemble torse a l endroit et 5 mailles ensemble a l endroit En suivant la vidéo je ne vois aucune différence entre les mailles ensembles torses ou normales Pouvez vous m expliquer svp Dans l attente de vous lire
13.04.2021 - 16:02DROPS Design answered:
Bonjour Christiane, effectivement, la vidéo doit être corrigée, merci pour l'info; procédez comme indiqué sous le texte; cette vidéo montre comment tricoter 4 m ensemble à l'endroit, c'est la même technique pour 5 m, tricotez juste 5 m au lieu de 4 et passez les 5 m sur l'aiguille gauche puis diminuez jusqu'à ce qu'il en reste 1. Bon tricot!
15.04.2021 - 10:08Coco wrote:
Bonjour sur le rang envers de A6 il faut tricoter les 6 mailles jersey des côtés envers mais comment tricoter les 12 mailles jersey du milieu endroit où envers ? Merci beaucoup pour votre réponse
26.11.2020 - 13:55DROPS Design answered:
Bonjour Coco, quand vous tricotez A.6 e n rond, tricotez les 2 premiers tours à l'endroit, le 3ème (diminutions/jetés et les m à l'end) et le 4ème à l'envers. Quand/Si vous tricotez A.6 en rangs, tricotez le 1er rang à l'endroit sur l'endroit, le 2ème rang à l'envers sur l'envers et le 4ème rang à l'endroit sur l'envers. Bon tricot!
26.11.2020 - 16:47