
Popular categories
Looking for a yarn?


|
|||||||||||||||||||||||||||||||||||||||||||
Miami Chill |
|||||||||||||||||||||||||||||||||||||||||||
 |
 |
||||||||||||||||||||||||||||||||||||||||||
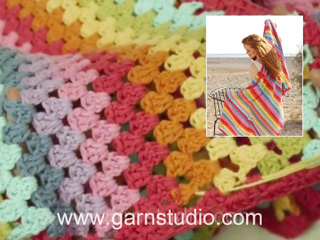
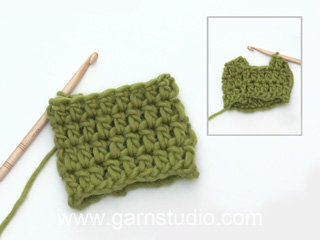
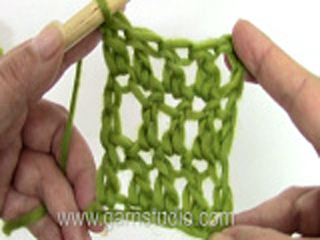
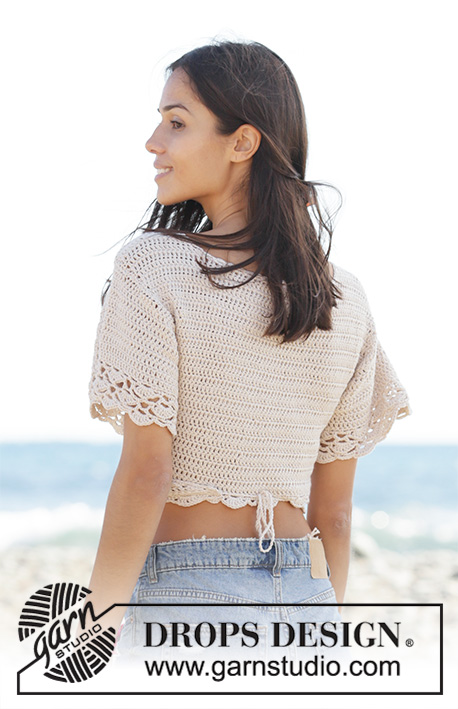
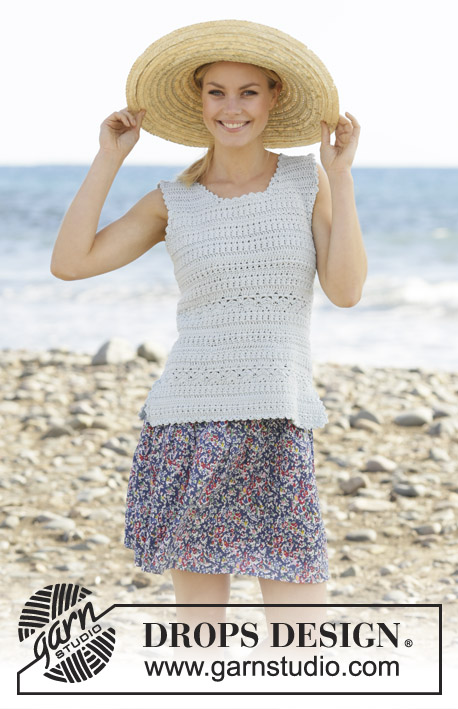
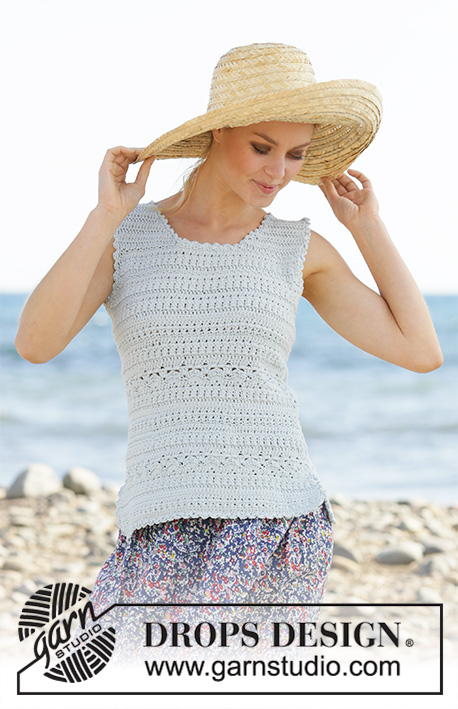
Crocheted top in DROPS Muskat. Piece is crocheted with texture pattern. Size: S - XXXL
DROPS 199-52 |
|||||||||||||||||||||||||||||||||||||||||||
|
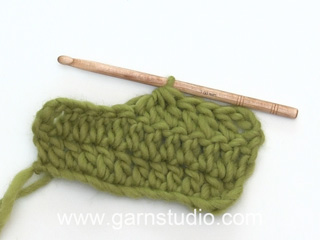
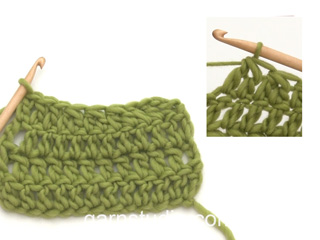
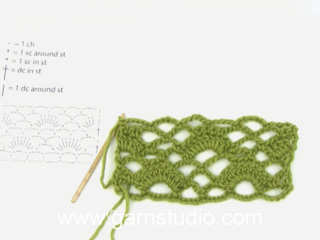
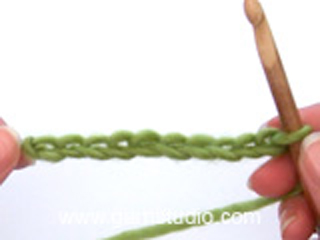
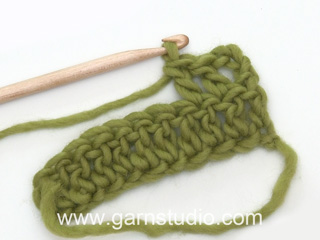
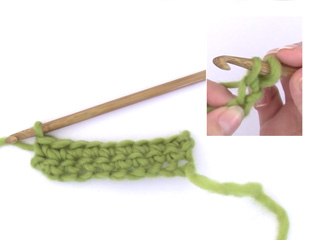
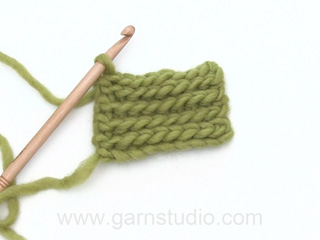
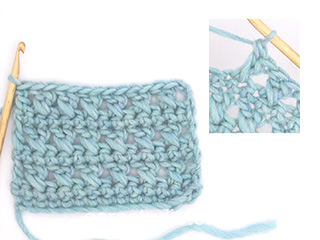
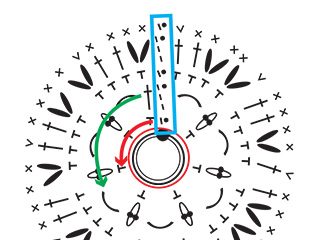
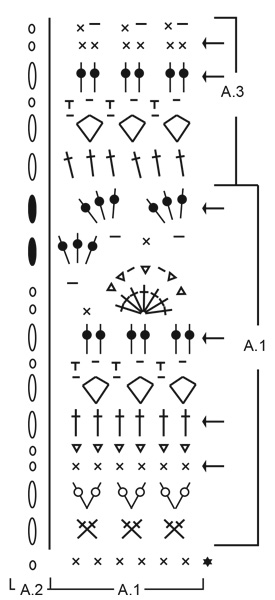
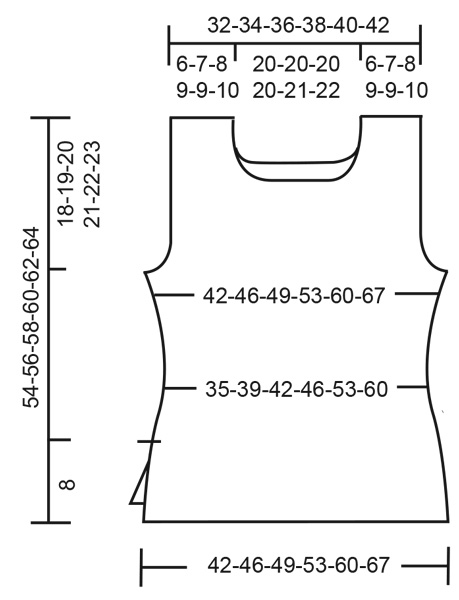
---------------------------------------------------------- EXPLANATION FOR THE PATTERN: ---------------------------------------------------------- PATTERN: See diagrams A.1 to A.3. (A.2 shows how round begins/ends when working in the round.) CROCHET INFO (applies when working back and forth): At beginning of every round with treble crochet work 3 chain stitches (these chain stitches do not replace first treble crochet). At beginning of every round with double crochet work 1 chain stitch (this chain stitch does not replace first double crochet). DECREASE TIP-1: TREBLE CROCHET: Decrease 1 treble crochet by working 2 treble crochets together as follows: Work 1 treble crochet in first stitch, but wait with last yarn over and pull through (= 2 loops on hook), work 1 treble crochet in next stitch/around chain stitch, but on last pull through pull yarn through all 3 loops on hook (= 1 treble crochet decreased). DOUBLE CROCHET: Decrease 1 double crochet by working 2 double crochets together as follows: Work 1 double crochet but wait with last yarn over and pull through (= 2 loops on hook), then work next double crochet but on last pull through, pull yarn through all 3 loops on hook (= 1 double crochet decreased) DECREASE TIP-2 (evenly): To calculate how to decrease evenly, use the total number of stitches (e.g. 144 stitches) and divide stitches by number of decreases to be done (e.g. 6) = 24. In this example work approx. every 23rd and 24th stitch together. ---------------------------------------------------------- START THE PIECE HERE: ---------------------------------------------------------- TOP - SHORT OVERVIEW OF THE PIECE: There is a 8 cm vent at the bottom of top, first work piece back and forth until vent is done, then work piece in the round but turn on every round and work back on round to make the texture the same all the way. When piece is divided at the armhole, work back and forth again. BACK PIECE: Work 83-90-97-104-118-132 chain stitches on hook size 4 mm with Muskat. Continue with 1 double crochet in 2nd chain stitch from hook, then 1 double crochet in each of the next 4 chain stitches, * skip 1 chain stitch, 1 double crochet in each of the next 6 chain stitches *, repeat from *-* the entire row = 72-78-84-90-102-114 double crochets (chain stitch to turn with is also counted as 1 double crochet). Turn and work 1 double crochet in every double crochet. Now work according to diagram A.1 - read CROCHET INFO and REMEMBER CROCHET TENSION! After 8 cm put piece aside and work the front piece. FRONT PIECE: Work 83-90-97-104-118-132 chain stitches on hook size 4 mm with Muskat. Continue with 1 double crochet in 2nd chain stitch from hook, then 1 double crochet in each of the next 4 chain stitches, * skip 1 chain stitch, 1 double crochet in each of the next 6 chain stitches *, repeat from *-* the entire row = 72-78-84-90-102-114 double crochets (chain stitch to turn with is also counted as 1 double crochet). Turn and work 1 double crochet in every double crochet. Now work according to diagram A.1. Continue until piece measures 8 cm - finish on the same row as on back piece. TOP after vent: Continue pattern like this - first work stitches over back piece, then work stitch over front piece, then work round together with a slip stitch in 1st/3rd stitch at beginning of round, work chain stitch/chain stitches in A.2, turn piece and work back, finish with 1 slip stitch in 1st/3rd/4th chain stitch at beginning of round. Insert 1 marker thread in transitions between front and back piece = sides. Continue like this back and forth with pattern according to diagram A.1 and A.2. On rounds with treble crochets or double crochets there are now 144-156-168-180-204-228 stitches on round (A.2 is not counted in number of stitches). When piece measures approx. 10-11-12-13-14-15 cm - adjust so that next round is a round with treble crochets or double crochets (marked on diagram with arrow), decrease 6 stitches evenly - read DECREASE TIP-1 and DECREASE TIP-2 (evenly). Decrease like this 4 times in total on the marked rounds with treble crochets or double crochets = 120-132-144-156-180-204 stitches on a round with treble crochets or double crochets. After last decrease round work pattern as before for approx. 3 cm – adjust so that next round is a round marked with arrow (piece now measures approx. 22-23-24-25-26-27 cm). Now increase 6 stitches evenly on round by working 2 stitches in 1 stitch. Increase like this 4 times in total vertically at the rounds marked in diagram = 144-156-168-180-204-228 stitches on a round with treble crochets or double crochets after last increase. When piece measures approx. 34-35-36-37-38-39 cm – adjust after a round marked with arrow, finish top according to diagram A.3 (turn as before with diagram A.2). When piece measures 36-37-38-39-40-41 cm, divide the piece for back and front piece at the armholes. BACK PIECE: Work slip stitches over the first 4-5-4-5-6-7 stitches, then work until 4-5-4-5-6-7 stitches remain before marker thread in the other side, turn piece. On next row work the 4 outermost stitches in each side together 2 by 2 – remember DECREASE TIP! Repeat decrease on every row 0-0-1-1-2-3 more times. On next row work the 2 outermost stitches in each side together, repeat decrease on every row 2-2-2-3-4-5 more times. After all decreases are done, 54-58-62-64-68-72 stitches remain on row. When piece measures 48-49-50-51-52-53 cm, finish each shoulder separately. SHOULDER: Continue with treble crochets over the first 17-19-21-22-23-24 stitches from right side, turn and work the first 4 stitches together 2 by 2 for neck, then work the rest of row. Turn and work until 4 stitches remain before neck, work these together 2 by 2, turn. On next row work the first 2 stitches together, then work the rest of row. Turn and work until 2 stitches remain, work these together. Turn, work the first 2 stitches together, work the rest of row = 10-12-14-15-16-17 stitches on shoulder. Continue until piece measures 54-56-58-60-62-64 cm, fasten off. Work the other shoulder the same way but reversed. I.e.: Begin from right side, decreases for neck are done at the end of rows from wrong side. FRONT PIECE: Work slip stitches over the first 4-5-4-5-6-7 stitches, then work until 4-5-4-5-6-7 stitches remain before marker thread in the other side, turn piece. On next row work the 4 outermost stitches in each side together 2 by 2 – remember DECREASE TIP! Repeat decrease on every row 0-0-1-1-2-3 more times. On next row work the 2 outermost stitches together, repeat decrease on every row 2-2-2-3-4-5 more times. After all decreases are done, 54-58-62-64-68-72 stitches remain on row. When piece measures 44-45-46-47-48-49 cm, finish each shoulder separately. Work shoulder as on back piece. ASSEMBLY: Sew shoulder seams edge to edge to avoid a chunky seam. DECORATING EDGE: Work a decorating edge around the neck, each armhole and at the bottom of body - as well as up and down each vent. Work decorating edge as follows: 1 double crochet, * 3 chain stitches, 1 treble crochet in 3rd chain stitch from hook, skip approx. 1 cm and make 1 double crochet *, repeat from *-* the entire round, finish with 1 slip stitch in first double crochet at beginning of round. |
|||||||||||||||||||||||||||||||||||||||||||
Diagram explanations |
|||||||||||||||||||||||||||||||||||||||||||
|
|||||||||||||||||||||||||||||||||||||||||||
|
|||||||||||||||||||||||||||||||||||||||||||
|
|||||||||||||||||||||||||||||||||||||||||||
|
Have you made this or any other of our designs? Tag your pictures in social media with #dropsdesign so we can see them! Do you need help with this pattern?You'll find tutorial videos, a Comments/Questions area and more by visiting the pattern on garnstudio.com. © 1982-2024 DROPS Design A/S. We reserve all rights. This document, including all its sub-sections, has copyrights. Read more about what you can do with our patterns at the bottom of each pattern on our site. |
|||||||||||||||||||||||||||||||||||||||||||


With over 40 years in knitting and crochet design, DROPS Design offers one of the most extensive collections of free patterns on the internet - translated to 17 languages. As of today we count 304 catalogues and 11422 patterns - 11422 of which are translated into English (UK/cm).
We work hard to bring you the best knitting and crochet have to offer, inspiration and advice as well as great quality yarns at incredible prices! Would you like to use our patterns for other than personal use? You can read what you are allowed to do in the Copyright text at the bottom of all our patterns. Happy crafting!
Comments / Questions (39)
This top is so gorgeous in reality now that I’ve finished crocheting it. I really enjoyed the challenge of making it.😁
17.04.2024 - 02:40Thank you. You’ve been most helpful.😀
18.03.2024 - 14:29Hello. How am I supposed to end up with 156 stitches after crocheting the shell stitch round? I get more than 156 stitches after doing so. Please let me know what I’m doing incorrectly.
17.03.2024 - 00:36DROPS Design answered:
Dear April, there should be 156 sts on rows with single/double crochets only, over 156 sts in size M, you will repeat A.1 a total of 26 times (each A.1 is worked over 6 sts), this means you will have 26 shells on 9th row in A.1. Happy knitting!
18.03.2024 - 09:05Thank you for your help.😊
26.02.2024 - 17:11Hello. After the first row of working 3 double crochets together, according to the chart, do I do anything else before crocheting the second row of working 3 double crochets together? Please tell me how the chart in this section reads correctly.
24.02.2024 - 18:59DROPS Design answered:
Dear April, on the 5th row in A.1 work as follows (3 double crochets together in the next stitch, 1 chain stitch, skip 1 stitch) repeat from (to) all the row. Then on next row (6th row), work 1 single crochet around each chain stitch and crochet 1 chain stitch between each single crochet (over the 3 double crochets together). Happy crocheting!
26.02.2024 - 08:36Thank you for the clarification.🙂
19.02.2024 - 19:25In this pattern where it says to work three double crochets together, is the intended outcome a 3 dc bobble? If so, I’m confused by the wording. Is the pattern stating: Make two partial double crochets, stop, pull through both of their loops, then make another double crochet— all within one stitch? If I follow the pattern according to how I’m thinking, I end up with only three loops to pull through, not four. Please, what’s correct?
17.02.2024 - 20:36DROPS Design answered:
Dear April, it says: wait with last yarn over AND pull through on both these double crochets. So you DON'T pull through these stitches either. So you actually make 3 partial double crochets and pull through the 3 double crochet loops and the loop from the previous stitch, so 4 loops in total. Happy crochetting!
18.02.2024 - 23:21Bonjour, j'allais commencer le A3 quand j'ai remarqué qu'il y a 2 rangs avec une flèche. C'est pour une augmentation ou une diminution? Ensuite, une fois que j'ai divisé l'ouvrage en deux aux emmanchures, j'utilise quel diagramme pour le dos, le devant et les épaules? Ce n'est pas indiqué dans les instructions. Merci
04.03.2022 - 04:26DROPS Design answered:
Bonjour Diane, si vos augmentations (4 fois 6 mailles à intervalles réguliers) ne sont pas terminées quand vous commencez A.3, alors augmentez aux tours avec une flèche, sinon, suivez simplement A.3 sans augmenter. Bon crochet!
04.03.2022 - 11:07Bonjour, je viens de finir le rang où j'augmentais pour la 4e fois de 6 mailles pour revenir à 180 mailles(taille XL) au total. Mon ouvrage mesure 34 cm et j'imagine que je dois continuer jusqu'à env 37 cm. Quand ça dit "d'ajuster après un tour avec une flèches", est-ce que je dois finir après le rang suivant avec flèche mais sans augmenter? Si oui, ensuite est-ce que je dois continuer avec seulement A3 et A2 jusqu'à avoir un total d'environ 39 cm? Merci d'avance
02.03.2022 - 03:55DROPS Design answered:
Bonjour Diane, ajustez les 37 cm en fonction du nombre de rangs à faire pour que votre dernier rang de A.1 soit un de ceux avec une flèche: crochetez quelques rangs supplémentaires ou en moins en fonction de votre tension pour que le dernier rang de A.1 soit un de ceux avec une flèche, ainsi, vous pouvez commencer A.3 au rang suivant (= 1 bride dans chaque bride). Vous crochetez A.3 jusqu'à ce que l'ouvrage mesure 39 cm et vous divisez l'ouvrage pour terminer le dos et le devant séparément. Bon crochet!
02.03.2022 - 09:57Bonjour, je viens de faire le rang alternant la maille serrée et la maille en l'air qui ferme les fentes. Il est mentionné de continuer en allers et retours mais dans la 1re page au "point de fantaisie" il est mentionné un crochetage en rond. C'est lequel qu'il faut faire? Le 2e rang après les fentes est un rang où il y a la flèche de diminution mais je n'ai pas encore les 12cm de haut. Est-ce que je diminue ou j'attends? Ensuite, après le A1 je le recommence ou passe au A3? Merci
22.02.2022 - 02:56DROPS Design answered:
Bonjour Diane, une fois que vous avez réuni les 2 pièces, vous continuez en rond, mais alternativement sur l'endroit et sur l'envers, chaque rang se termine par une maille coulée, mais vous crochetez alternativement sur l'endroit et sur l'envers, on a ainsi la même texture qu'avant d'avoir réuni les 2 parties. Vous commencer à diminuer quand l'ouvrage mesure environ 12 cm (en taille L), ajustez juste pour que le tour suivant soit un de ceux avec des brides ou mailles serrées (autrement dit, crochetez un peu moins ou un peu plus en fonction). Vous crochèterez A.3 plus tard, quand ce sera indiqué (= 36 cm en L). Bon crochet!
22.02.2022 - 09:35