
Popular categories
Looking for a yarn?


|
|||||||||||||||||||||||||||||||
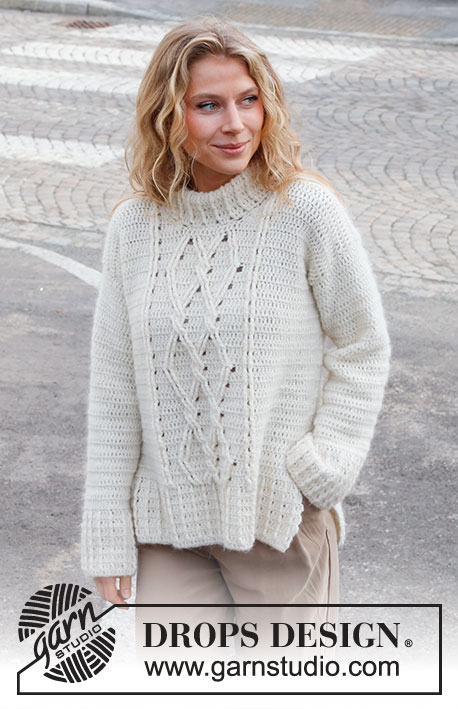
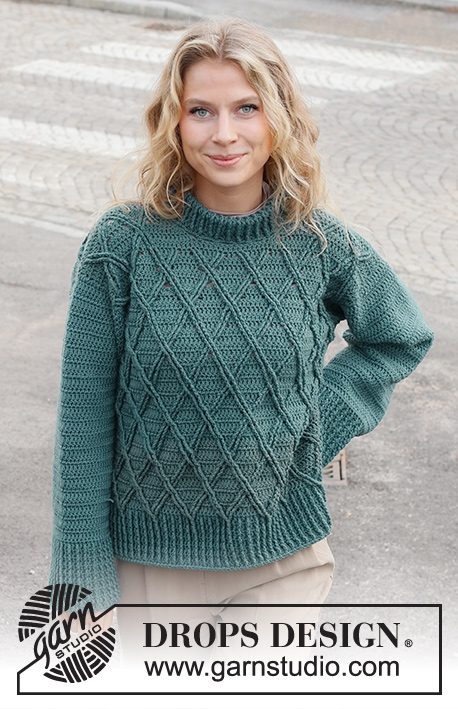
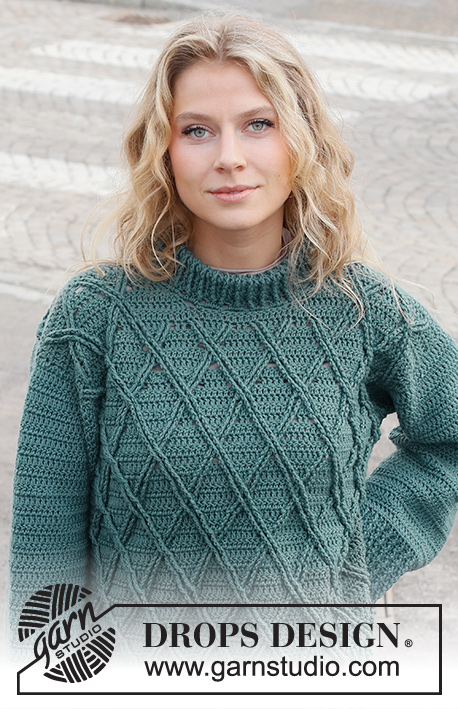
Teal Crossover Sweater |
|||||||||||||||||||||||||||||||
 |
 |
||||||||||||||||||||||||||||||
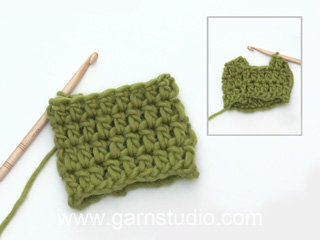
Crocheted sweater in DROPS Merino Extra Fine. The piece is worked with cables, relief-stitches and single neck. Sizes S - XXXL.
DROPS 227-29 |
|||||||||||||||||||||||||||||||
|
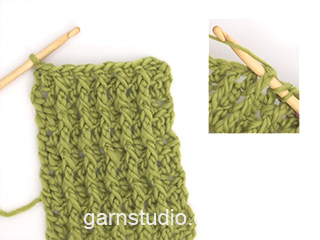
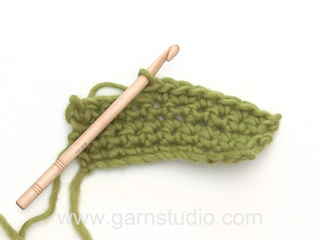
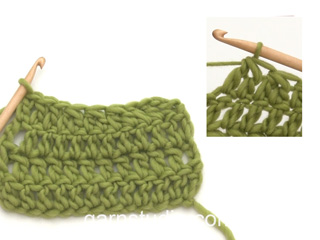
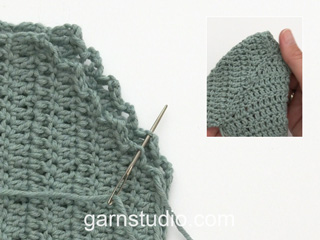
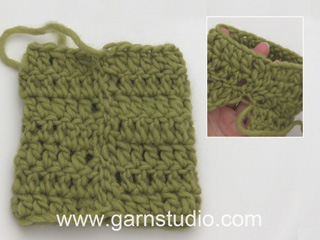
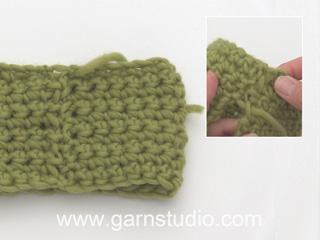
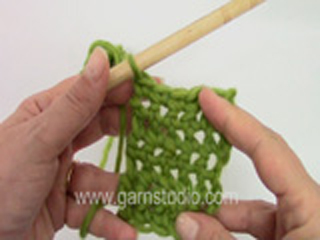
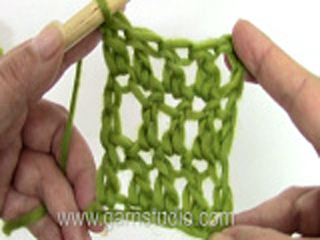
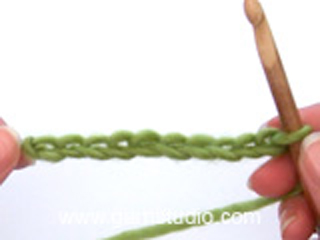
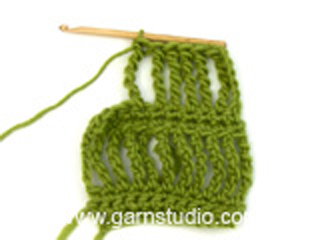
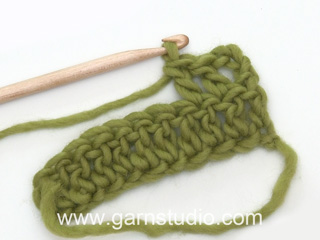
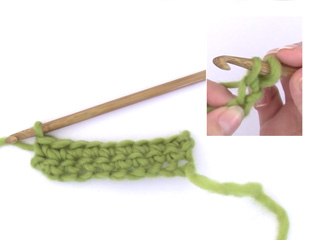
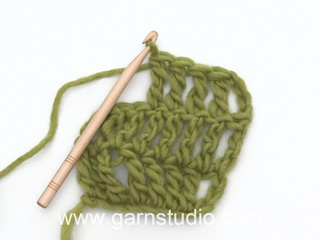
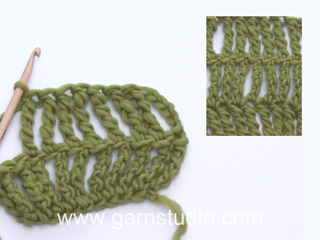
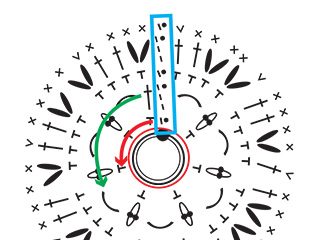
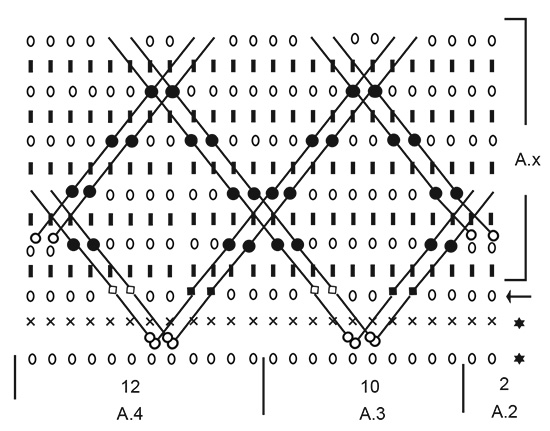
------------------------------------------------------- EXPLANATIONS FOR THE PATTERN: ------------------------------------------------------- CHAIN STITCH: If you work outermost on the hook the chain stitch will often be too tight; 1 chain stitch should be as long as 1 single/double crochet is wide. CROCHET INFORMATION: When working back and forth. At the beginning of each row of double crochets work 3 chain stitches, which do not replace the first double crochet but are worked in addition. At the beginning of each row of single crochets work 1 chain stitch, which does not replace the first single crochet but is worked in addition. When working in the round: At the beginning of each round of double crochets work 3 chain stitches, which do not replace the first double crochet but are worked in addition. Finish the round with 1 slip stitch in the 3rd chain stitch from the beginning of the round. PATTERN: See diagrams A.1 to A.4. TIP FOR RELIEF-STITCHES: When working the relief-pattern it is important that the relief-stitches are neither too tight nor too loose. If the stitches are too tight when working relief-triple-double crochets, work relief-quadruple-treble crochets instead. If the stitches are too loose, work relief-double-treble crochets instead. DECREASE TIP: Decrease 1 single crochet by working 2 single crochets together: Insert the hook through the first stitch and pick up the strand, insert the hook through the next stitch and pick up the strand (= 3 loops on hook), make 1 yarn over and pull it through all 3 loops (1 stitch decreased). Decrease 1 double crochet by working 2 double crochets together: * Make 1 yarn over, insert the hook through the next stitch, pick up the strand, 1 yarn over and pull it through the first 2 loops on the hook *, work from *-* 1 more time, make 1 yarn over and pull it through all 3 loops on the hook (1 stitch decreased). INCREASE TIP (sleeves): Work 2 double crochets in the 3rd stitch on the round, work until there are 3 stitches left and work 2 double crochets in the next stitch (= 2 stitches increased). ------------------------------------------------------- START THE PIECE HERE: ------------------------------------------------------- SWEATER – SHORT OVERVIEW OF THE PIECE: The front and back pieces are worked separately, back and forth. Relief-pattern is worked on the front and back pieces – read TIP FOR RELIEF-PATTERN. The sleeves are worked in the round, turning after each round so the texture matches the body. The pieces are sewn together and the neck is worked to finish. BACK PIECE: Work 84-87-96-105-114-123 chain stitches – read CHAIN STITCH, with hook size 4.5 MM = US 7 and DROPS Merino Extra Fine. Turn and work 1 double crochet in the 4th chain stitch from the hook, work 1 double crochet in each of the other 80-83-92-101-110-119 chain stitches = 81-84-93-102-111-120 double crochets + 3 chain stitches to turn. Now work as follows: 3 chain stitches – read CROCHET INFORMATION, A.1 to end of the row. Continue this pattern back and forth for 8 cm = 3⅛" – adjust so the last row is a row of single crochets from the wrong side, and decrease 1-0-1-0-1-0 single crochets on this row – read DECREASE TIP = 80-84-92-102-110-120 single crochets + 1 chain stitch to turn. Work from the right side as follows: 1 double crochet in each of the first 3-5-9-9-13-18 stitches, A.2 over the next 2 stitches, A.3 over the next 60-60-60-70-70-70 stitches (= 6-6-6-7-7-7 repeats of 10 stitches), A.4 over the next 12 stitches, 1 double crochet in each of the last 3-5-9-9-13-18 stitches. Continue this pattern. REMEMBER THE CROCHET GAUGE! When the diagrams are finished in height, repeat A.X onwards. When the piece measures 38-39-40-41-42-43 cm = 15"-15¼"-15¾"-16⅛"-16½"-17", bind off for the armholes as follows: Work 1 slip stitch in each of the first 2-3-5-7-8-10 stitches, pattern as before over the next 76-78-82-88-94-100 stitches (2-3-5-7-8-10 stitches left), turn. Sizes S, M and L go to ALL SIZES below. Sizes XL, XXL and XXXL continue back and forth with pattern and decrease 1 double crochet on each side by working 2 double crochets together – read DECREASE TIP. Decrease like this each row (both from the right and wrong side) a total of 1-2-4 times. ALL SIZES: = 76-78-82-86-90-92 stitches. Continue with pattern over the middle 74-74-74-84-84-84 stitches and 1 double crochet in each of the 1-2-4-1-3-4 stitches on each side. When the piece measures 54-56-58-60-62-64 cm = 21¼"-22"-22¾"-23⅝"-24⅜"-25¼", work as many stitches in the relief-pattern as there is room for, the other stitches are worked with double crochets. AT THE SAME TIME, work the next row as follows: Work the first 28-29-31-32-34-35 stitches, work 2 double crochets together = 25-26-28-29-31-32 stitches on the shoulder. Turn and work back from the wrong side. Cut the strand. The piece measures approx. 56-58-60-62-64-66 cm = 22"-22¾"-23⅝"-24⅜"-25¼"-26". Skip the middle 24-24-24-26-26-26 stitches (= neck). Continue from the right side as follows: Work 2 double crochets together and work as before to the end of the row = 25-26-28-29-31-32 stitches on the shoulder. Turn and work back from the wrong side. Cut the strand. The piece measures approx. 56-58-60-62-64-66 cm = 22"-22¾"-23⅝"-24⅜"-25¼"-26". FRONT PIECE: Work in the same way as the back piece until the piece measures 38-39-40-41-42-43 cm = 15"-15¼"-15¾"-16⅛"-16½"-17", then bind off for the armholes in the same way as the back piece = 76-78-82-86-90-92 stitches. Continue with pattern as before over the middle 74-74-74-84-84-84 stitches and 1 double crochet in each of the 1-2-4-1-3-4 stitches on each side. When the piece measures 49-51-53-54-56-58 cm = 19¼"-20"-21"-21¼"-22"-22¾", work as follows from the right side: As before over the first 27-28-30-31-33-34 stitches, decrease 2 double crochets by working 2 and 2 double crochets together over the next 4 stitches. Turn and work 2 and 2 double crochets together over the first 4 stitches, work pattern to the end of the row. Turn and work pattern until there are 4 stitches left and work 2 and 2 double crochets together over these 4 stitches = 25-26-28-29-31-32 stitches on the shoulder. Continue working until the piece measures 56-58-60-62-64-66 cm = 22"-22¾"-23⅝"-24⅜"-25¼"-26". Cut the strand. Skip the middle 14-14-14-16-16-16 stitches on the row = neck. Continue from the right side as follows: Decrease 2 double crochets by working 2 and 2 double crochets together over the first 4 stitches, work pattern as before to the end of the row = 27-28-30-31-33-34 stitches. Turn and work pattern until there are 4 stitches left and work 2 and 2 double crochets together over these 4 stitches. Turn and work 2 and 2 double crochets together over the first 4 stitches, work pattern to the end of the row = 25-26-28-29-31-32 stitches on the shoulder. Continue working until the piece measures 56-58-60-62-64-66 cm = 22"-22¾"-23⅝"-24⅜"-25¼"-26". Cut the strand. SLEEVES: Work 52-55-55-58-58-61 chain stitches – remember CHAIN STITCH, with hook size 4.5 MM = US 7 and DROPS Merino Extra Fine. Form them into a ring with 1 slip stitch in the first chain stitch worked. Work 3 chain stitches, then 1 double crochet in each chain stitch, finish the round with 1 slip stitch in the 3rd chain stitch at the beginning of the round = 51-54-54-57-57-60 double crochets + 3 chain stitches to turn. Work A.1 in the round – turning after each round so you work alternately from the right and wrong side. The relief-stitches are always worked from the right side. Repeat the last 4 rows in the diagram until the piece measures 11 cm = 4⅜". Continue with double crochets. When the piece measures 19-20-20-20-20-20 cm = 7½"-8"-8"-8"-8"-8", increase 2 double crochets under the sleeve – read INCREASE TIP. Increase like this every 12-10½-5-4½-3-2½ cm = 4¾"-4⅛"-2"-1⅝"-1⅛"-1" a total of 3-3-5-5-7-7 times = 57-60-64-67-71-74 double crochets. When the sleeve measures 47-45-45-43-42-39 cm = 18½"-17¾"-17¾"-17"-16½"-15¼" work the sleeve cap back and forth to finished length as follows in the different sizes: SIZES S, M AND L: Continue working for 1-3-3 cm = ⅜"-1⅛"-1⅛". SIZES XL, XXL AND XXXL: Continue working for 4-5-8 cm = 1½"-2"-3⅛". The next row is worked as follows: Decrease 1-2-4 stitches by working 2 and 2 double crochets together over the first 2-4-8 stitches, work 1 double crochet in each stitch until there are 2-4-8 stitches left, work 2 and 2 double crochets together over the last 2-4-8 stitches = 65-67-66 stitches. ALL SIZES: The sleeve measures approx. 48 cm = 19" in all sizes, with a split of approx 1-3-3-5-6-9 cm = ⅜"-1⅛"-1⅛"-2"-2⅜"-3½" at the top. Cut and fasten the strand. Work the other sleeve in the same way. ASSEMBLY: Sew the shoulder seams together in each and every stitch. Sew the sleeve cap to the armhole, then sew the split to the bottom of the armhole – see sketch. Sew the side seams, inside the outermost stitch. SINGLE NECK: Start at one shoulder seam with hook size 4.5 MM = US 7 and DROPS Merino Extra Fine. Work 1 single crochet, * 2 chain stitches, skip 1 cm = ⅜", 1 single crochet *, work from *-* a total of 24-24-24-28-28-28 times around the neck, finish with 1 slip stitch in the first single crochet on the round. The next round is worked as follows: 3 chain stitches – remember CROCHET INFORMATION, work 3 double crochets around each of the 24-24-24-28-28-28 chain-spaces, finish with 1 slip stitch in the 3rd chain stitch at the beginning of the round = 72-72-72-84-84-84 stitches. Work A.1 until the neck measures 11 cm = 4⅜" from the chain-spaces, at the same time on the last round work 1 extra chain stitch after each 6th stitch (to avoid the neck being tight). Cut the strand, leaving a length of 50 cm = 19¾" for assembly. Fold the neck single to the inside and sew down. To avoid the neck being tight and rolling outwards, it is important that the seam is elastic. |
|||||||||||||||||||||||||||||||
Diagram explanations |
|||||||||||||||||||||||||||||||
|
|||||||||||||||||||||||||||||||
|
|||||||||||||||||||||||||||||||

|
|||||||||||||||||||||||||||||||
|
Have you made this or any other of our designs? Tag your pictures in social media with #dropsdesign so we can see them! Do you need help with this pattern?You'll find tutorial videos, a Comments/Questions area and more by visiting the pattern on garnstudio.com. © 1982-2024 DROPS Design A/S. We reserve all rights. This document, including all its sub-sections, has copyrights. Read more about what you can do with our patterns at the bottom of each pattern on our site. |
|||||||||||||||||||||||||||||||


With over 40 years in knitting and crochet design, DROPS Design offers one of the most extensive collections of free patterns on the internet - translated to 17 languages. As of today we count 304 catalogs and 11422 patterns - 11417 of which are translated into English (US/in).
We work hard to bring you the best knitting and crochet have to offer, inspiration and advice as well as great quality yarns at incredible prices! Would you like to use our patterns for other than personal use? You can read what you are allowed to do in the Copyright text at the bottom of all our patterns. Happy crafting!
Comments / Questions (11)
Witam. Robię sweterek teal crossover Sweater i utknęłam w "tył" i z powrotem 8 cm , dopasować,aby ostatni rząd był rzędem oczek ścisłych na lewej stronie robótki, i zamknąć 1-0-1-0-1-0 (nie wiem o co w tym chodzi? ) Pozdrawiam
06.01.2024 - 14:49DROPS Design answered:
Witaj Izo, ostatni przerobiony rząd powinien być rzędem oczek ścisłych w schemacie A.1 - w tym rzędzie zamknij 1 oczko w którymś miejscu, ale tylko jeśli przerabiasz rozmiary S, L lub XXL. Aby zamknąć 1 oczko ścisłe należy przerobić 2 oczka ścisłe razem (wbić szydełko w pierwsze oczko i przeciągnąć nitkę, wbić szydełko w następne oczko i przeciągnąć nitkę (= 3 pętelki na szydełku), wykonać 1 narzut i przeciągnąć go przez 3 pętelki (zamknięte 1 oczko). Pozdrawiamy!
07.01.2024 - 18:02Voor een trui maat M zou ik 87 lossen moeten opzetten. Dit zijn er heel veel. En ik vind dit cijfer ook niet terug in het diagram. Wordt de trui verticaal of horizontaal gehaakt?
19.12.2023 - 08:31DROPS Design answered:
Dag Mien,
De trui wordt verticaal gehaakt. Als je proeflapje overeenkomt met de stekenverhouding in het patroon (16 stokjes = 10 cm), dan kun je gewoon het patroon volgen en 87 steken opzetten voor maat M. 87 gedeeld door 1,6 is 54 cm en dat komt ongeveer overeen met de afmetingen zoals aangegeven in de maattekening.
20.12.2023 - 19:07Het patroon begint met telpatroon A.1 maar ik kan dit niet vinden. Het begint vanaf A.2
19.12.2023 - 08:13DROPS Design answered:
Dag Mien,
Telpatroon A.1 vindt je rechts onder de maattekening, onderaan het patroon.
20.12.2023 - 19:03Beste, ik haak maat XL en begrijp onderstaande uitleg niet:\r\n\"Haak de eerste 28-29-31-32-34-35 steken, haak 2 stokjes samen = 25-26-28-29-31-32 steken op de schouder. \"\r\n32 steken haken en 2 stokjes samen haken is toch samen 33 steken en niet 29? Hoe kom ik van 32 steken naar 29 steken door 2 stokjes samen te haken?\r\nBedankt!
27.12.2022 - 17:07Als ik tot bovenaan heb gehaakt tot en met ax en heb 2 stokjes gehaakt hoeveel stokjes moet ik dan haken en vanaf waar moet ik dan beginnen want het komt bij mij niet uit
23.12.2022 - 09:59DROPS Design answered:
Dag Sylvia,
Als je klaar bent met A.x in de hoogte, begin je opnieuw met A.x, dus niet de toer met de pijl, maar de toer daarboven.
22.03.2023 - 20:27Hejsa, Jeg er lige begyndt på denne opskrift og der ser ud til at være en fejl med starten af borten på rygstykket. I A1 mønsteret er en 3-maske sekvens mens det på billederne ser ud til at være en 2-maske sekvens. A1 mønsteret med en 3-maske sekvens passer ikke sammen med A3 mønsteret, som er en 10-maske sekvens. Hvad er korrekt, 2-maske eller 3-maske sekvensen for borten? MVH, Nete
11.09.2022 - 18:54DROPS Design answered:
Hei Nete. Det er en 3-maske sekvens, men trekker seg sammen (og kan se ut som en 2-maske sekvens). Når arbeidet måler 8 cm felles det 1-0-1-0-1-0 masker, slik at A.3 passer til en 10-maske sekvens. mvh DROPS Design
12.09.2022 - 14:08In der deutschen Anleitung steht am Ende des Relief vierfach Stäbchen und ein Stäbchen man soll 2 Maschen überspringen. Das passt aber nicht weil dann am Ende Maschen fehlen und in der englischen Version steht nichts von 2 Maschen überspringen. Wie ist das zu verstehen?
24.02.2022 - 00:49DROPS Design answered:
Liebe Bianke, danke für den Hinweis, deutsche Anleitung wurde korrigiert. Viel Spaß beim stricken!
24.02.2022 - 11:22Ich bin beim Rückenteil und sollte A1 bis zum reihenende häkeln und dann hin und zurück bis 8 cm erreicht sind. Feste Maschen und eine Abnahme folgen dann.Das habe ich geschafft. Nun soll ich jeweils 1 Stäbchen in die ersten 3 festen Maschen häkeln. Geschafft. Nun soll ich A2 und anschließend A3 häkeln und komme absolut nicht weiter mit den vierfach reliefstäbchen um vierfach oder um dreifach reliefstäbchen der vorherigen Reihe häkeln, da in A1 keine dieser Stäbchen gehäkelt wird.
11.02.2022 - 00:14DROPS Design answered:
Liebe Bianka, nach A.1 häkeln Sie: 3 Stäbchen, A.2 (= 2 M), A.3 (= 10 M x 10), A.4 (= 12 M), 3 Stb. Die Reliefstäbchen der 1. Reihe in A.2-A.4 häkeln Sie um die Stäbchen von A.1 - die untere Reihe mit dem Stern zeigt, um welchen Stäbchen (entweder Relief oder Stb von A.1) Sie häkeln Sollen. Viel Spaß beim häkeln!
11.02.2022 - 11:09I can't find pattern A1?
10.12.2021 - 19:34DROPS Design answered:
Dear Merethe, pattern A.1 is below the sleeve in the measurements chart. Happy crochetting!
11.12.2021 - 20:06Bonjour, sur le modèle châle 165-4 on tricote avec combien de fils svp merci
14.08.2021 - 18:10