DROPS Sky
DROPS Sky
74% Alpaca, 18% Polyamide, 8% Wool
from 7.20 $ /50g
Get the yarn to make this pattern from 14.40$.

The yarn cost is calculated from the pattern’s smallest size and the yarn’s cheapest product type. Looking for an even better price? You might find it on the DROPS Deals!

DROPS SS24

Sweet Gleam

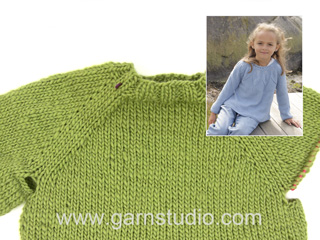
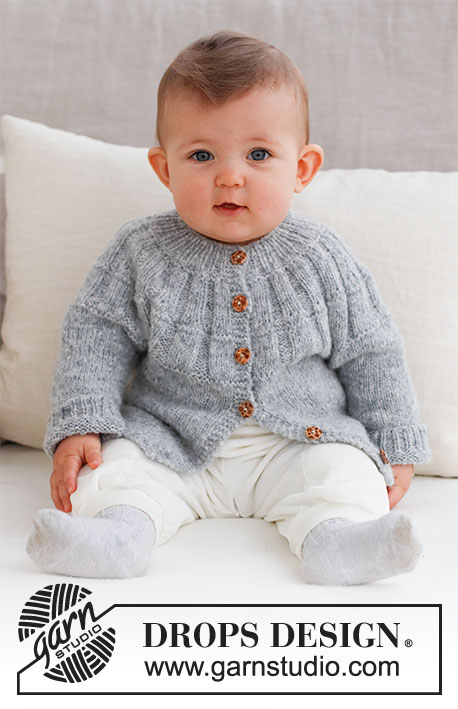
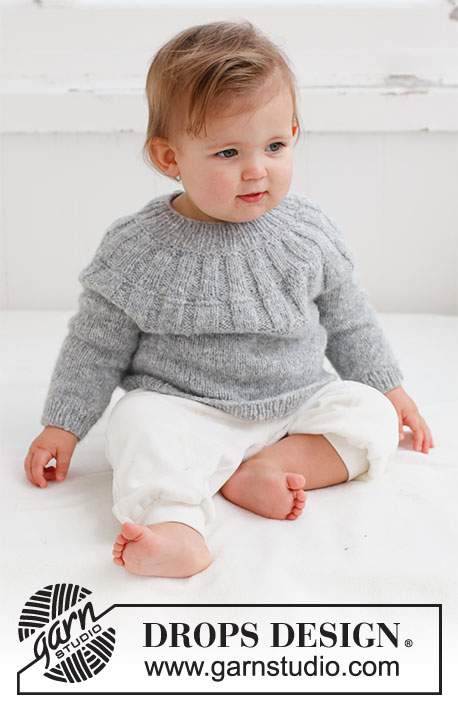
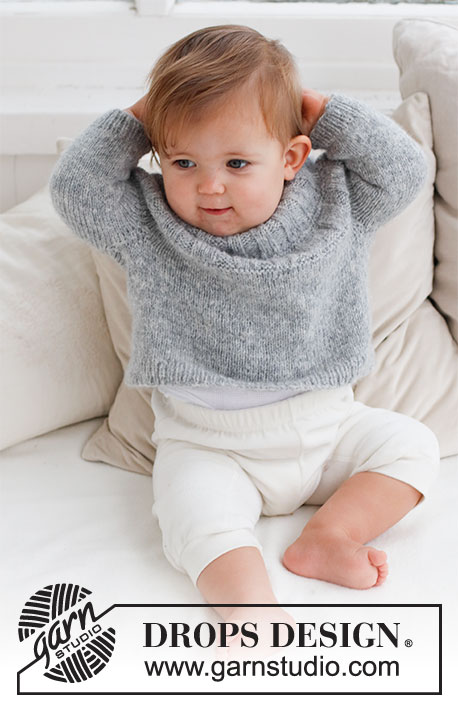
Knitted sweater for baby in DROPS Sky. The piece is worked top down, with round yoke and ribbing on the yoke. Sizes: Premature to 2 years.

DROPS Baby 43-5
DROPS Design: Pattern sk-007-by
Yarn group B
-------------------------------------------------------

SIZES:
(<0) 0/1 - 1/3 - 6/9 - 12/18 months (2 years)
Child’s height in cm:
(40/44) 48/52 - 56/62 - 68/74 - 80/86 (92)
Child’s height in feet:
(1ft4/1ft5) 1ft/1ft8 - 1ft 10/2ft - 2ft3/2ft5 - 2ft7/2ft9 - (3ft)

Finished measurements:
Chest measurements: (38) 44-50-54-58 (62) cm = (15") 17¼"-19¾"-21¼"-22¾" (24⅜")
Full length: (20) 24-28-30-34 (36) cm = (8") 9½"-11"-11¾"-13⅜" (14¼")
All measurements in charts are in cm.

MATERIALS:
DROPS SKY from Garnstudio (belongs to yarn group B)
(100) 100-100-100-150 (150) g color 02, pearl grey

DROPS BUTTONS NO 628: 3 items (if you work a split mid-back).

NEEDLES:
DROPS CIRCULAR NEEDLE SIZE 4 MM = US 6: Length 40 cm = 16".
DROPS CIRCULAR NEEDLE SIZE 3 MM = US 2.5: Length 40 cm = 16".
DROPS DOUBLE POINTED NEEDLES SIZE 4 MM = US 6.
DROPS DOUBLE POINTED NEEDLES SIZE 3 MM = US 2.5.
The technique MAGIC LOOP can be used – you then only need circular needle of 80 cm = 32" in each size.

KNITTING GAUGE:
21 stitches in width and 28 rows in height with stockinette stitch = 10 x 10 cm = 4" x 4".
NOTE: Needle size is only a guide. If you get too many stitches on 10 cm = 4", change to a larger needle size. If you get too few stitches on 10 cm = 4", change to a smaller needle size.

-------------------------------------------------------

Alternative Yarn – See how to change yarns here
Yarn Groups A to F – Use the same pattern and change the yarn here
Yarn usage using an alternative yarn – Use our yarn converter here

-------------------------------------------------------

DROPS Sky
DROPS Sky
74% Alpaca, 18% Polyamide, 8% Wool
from 7.20 $ /50g
Get the yarn to make this pattern from 14.40$.

The yarn cost is calculated from the pattern’s smallest size and the yarn’s cheapest product type. Looking for an even better price? You might find it on the DROPS Deals!

Pattern instructions

NOTE: This pattern is written in American English. All measurements in charts are in cm. For conversion from inches to cm - click here. There are different terms for crocheting in American and British English. If this pattern includes crochet, click for "crochet terms" here. For this pattern in British English, please click here.
-------------------------------------------------------

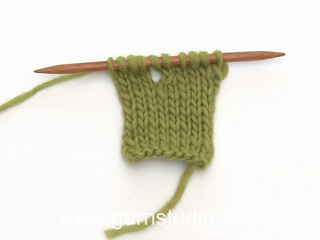
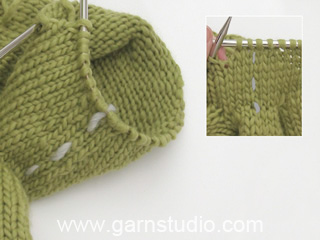
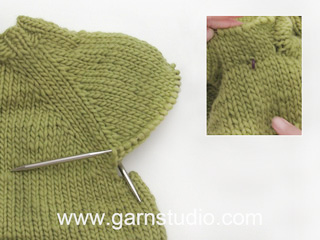
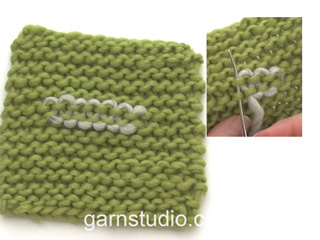
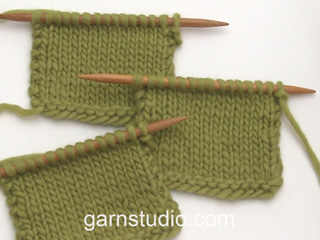
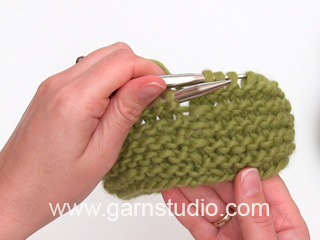
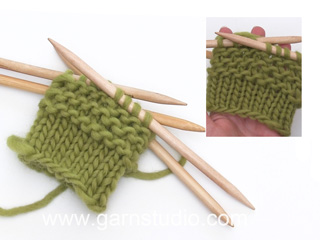
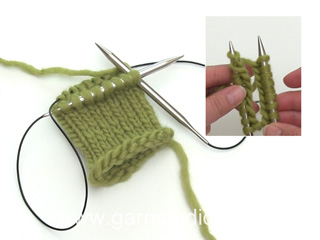
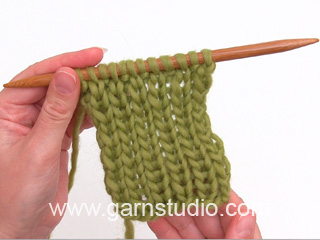
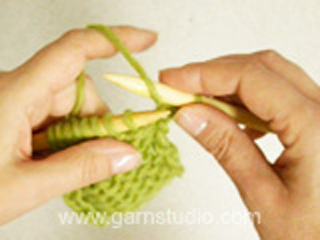
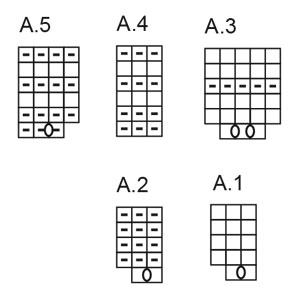
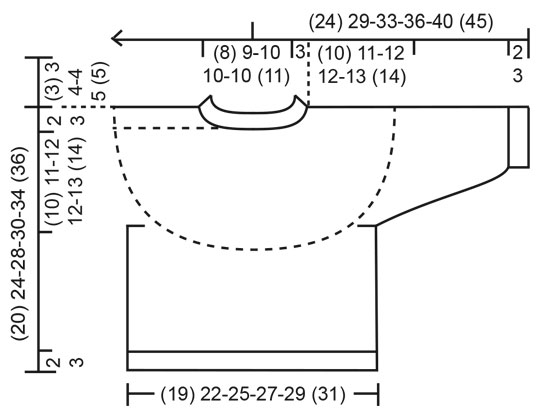
EXPLANATIONS FOR THE PATTERN:

-------------------------------------------------------

RIDGE/GARTER STITCH (worked in the round):
1 ridge in height = 2 rounds; Knit 1 round and purl 1 round.

RIDGE/GARTER STITCH (worked back and forth):
Knit all rows.
1 ridge = knit 2 rows.

PATTERN:
See diagrams A.1 to A.5. The diagrams show all rows in the pattern from the right side.

DECREASE TIP (for sleeves):
Start 3 stitches left before the marker, knit 2 together, knit 2 (marker sits between these 2 stitches), slip 1 stitch as if to knit, knit 1 and pass the slipped stitch over the knitted stitch.

BUTTONHOLES: (if you work a split mid-back).
Work the buttonholes at the beginning of the row from the right side as follows: Knit 2 make 1 yarn over and knit the next 2 stitches together. On the next row (wrong side) knit the yarn over to leave a hole.
The first buttonhole is worked when the neck measures 1½ cm = ½", the other 2 buttonholes are worked with (2½) 2½-3-3-4 (4) cm = (1") 1"-1⅛"-1⅛"-1½" (1½") between each one.

-------------------------------------------------------

START THE PIECE HERE:

-------------------------------------------------------

SWEATER – SHORT OVERVIEW OF THE PIECE:
The neck and yoke are worked in the round with circular needle, from mid back and top down. If you work a split mid-back, you start the piece working back and forth before it is joined and continued in the round.
The yoke is divided for body and sleeves and the body is continued in the round with circular needle. The sleeves are worked with double pointed needles.

SWEATER WITHOUT SPLIT MID-BACK:
Cast on (52) 56-60-64-68 (72) stitches with short circular needle size 3 MM = US 2.5 and DROPS Sky.
Knit 1 round. Then work rib (knit 1, purl 1) for (2) 2-3-3-4 (4) cm = (3/4") ¾"-1⅛"-1⅛"-1½" (1½").
On the next round increase every other purl-1 to purl-2 by making 1 yarn over (on the next round purl the yarn overs twisted to avoid holes) = (13) 14-15-16-17 (18) increased stitches and (65) 70-75-80-85 (90) stitches. Continue the new rib until the neck measures (3) 3-4-4-5 (5) cm = (1⅛") 1⅛"-1½"-1½"-2" (2").
Insert 1 marker at the beginning of the round; the yoke is measured from this marker.

Change to circular needle size 4 MM = US 6. Work 1 RIDGE over all stitches – read description above. AT THE SAME TIME on the first round adjust the number of stitches to (64) 68-76-80-84 (88) stitches.
After the ridge work the next round as follows: * A.1, A.2 *, work from *-* to the end of the round = (96) 102-114-120-126 (132) stitches.
Complete A.1 and A.2, then continue with knit 3 / purl 3 until the yoke measures (4) 5-5-5-6 (6) cm = (1½") 2"-2"-2"-2⅜" (2⅜") from the marker on the neck.
Work the next round as follows:
SIZE (<0):
* A.3, A.4 *, work from *-* to the end of the round.
SIZES 0/1 – 1/3 – 6/9 – 12/18 months (2 years):
* A.3, A.5 *, work from *-* to the end of the round.

After the first round, there are (128) 153-171-180-189 (198) stitches. Complete A.3 and A.4/A.5, then continue with knit 5 / purl 3 in size (<0) and knit 5 / purl 4 in the other sizes and until the yoke measures (8) 10-10-10-12 (12) cm = (3⅛") 4"-4"-4"-4¾" (4¾") from the marker.
Continue from SWEATER below.

SWEATER WITH SPLIT MID-BACK:
Cast on (57) 61-65-69-73 (77) stitches with short circular needle size 3 MM = US 2.5 and DROPS Sky.
Purl 1 row from the wrong side. Then work the next row as follows (from mid-back): 4 stitches in GARTER STITCH – read description above, * knit 1, purl 1 *, work from *-* until there are 5 stitches left, knit 1 and 4 stitches in garter stitch. Continue this rib for (2) 2-3-3-4 (4) cm = (3/4") ¾"-1⅛"-1⅛"-1½" (1½") – remember the BUTTONHOLES on the band – read description above.
On the next row from the right side increase every other purl-1 to purl 2 by making 1 yarn over (on the next row knit the yarn overs twisted to avoid holes) = (12) 13-14-15-16 (17) stitches increased and (69) 74-79-84-89 (94) stitches. Continue the new rib until the neck measures (3) 3-4-4-5 (5) cm = (1⅛") 1⅛"-1½"-1½"-2" (2").
Insert 1 marker after the band; the yoke is measured from this marker!
Change to circular needle size 4 MM = US 6. Work 1 ridge over all stitches – AT THE SAME TIME on the first row increase (1) 0-3-2-1 (0) stitches evenly spaced = (70) 74-82-86-90 (94) stitches.
After the ridge, work the next row as follows from the right side: 4 stitches in garter stitch, * A.1, A.2 *, work from *-* until there are 6 stitches left, A.1 and 4 stitches in garter stitch = (101) 107-119-125-131 (137) stitches.
Complete A.1 and A.2, then continue with knit 3 /purl 3 until the yoke measures (4) 5-5-5-6 (6) cm = (1½") 2"-2"-2"-2⅜" (2⅜") from the marker on the neck. Now join the piece as follows:
Lay the button-band at the beginning of the row on top of the 4 last stitches, so that the band with the buttonholes are on the top. Knit the stitches from both bands together 2 and 2 (= 4 stitches decreased) = (97) 103-115-121-127 (133) stitches.
Then continue the rest of the round as follows (after the 4 band stitches):
SIZE (<0):
* A.3, A.4 *, work from *-* until there are 3 stitches left before the band, work A.3, purl 2 (the first 2 stitches on band).
SIZES 0/1 – 1/3 – 6/9 – 12/18 months (2 years):
* A.3, A.5 *, work from *-* until there are 3 stitches left before the band, work A.3, purl 2 (the first 2 stitches on band).

The round now begins in the middle of the 4 band stitches and after the first round, there are (129) 153-171-180-189 (198) stitches. Complete A.3 and A.4/A.5 (the 4 band stitches are now worked as shown in A.4), then continue with knit 5 / purl 3 over the other stitches in size (<0) and knit 5 / purl 4 in the other sizes and until the yoke measures (8) 10-10-10-12 (12) cm = (3⅛") 4"-4"-4"-4¾" (4¾") from the marker.
Continue from SWEATER below.

SWEATER:
Knit 1 round and adjust the number of stitches to (132) 152-164-180-184 (200) stitches. Purl 1 round.
Continue with stockinette stitch until the yoke measures (10) 11-12-12-13 (14) cm = (4") 4⅜"-4¾"-4¾"-5⅛" (5½") from the marker.
On the next round divide for the body and sleeves as follows from mid-back: Work the first (18) 21-23-25-26 (29) stitches, place the next (30) 34-36-40-40 (42) stitches on a thread for the sleeve, cast on (4) 4-6-6-8 (8) stitches (in side under sleeve), work (36) 42-46-50-52 (58) stitches, place the next (30) 34-36-40-40 (42) stitches on a thread for the sleeve, cast on (4) 4-6-6-8 (8) stitches (in side under sleeve), work the last (18) 21-23-25-26 (29) stitches. The body and sleeves are finished separately. The piece is now measured from here!

BODY:
= (80) 92-104-112-120 (132) stitches. Continue with stockinette stitch in the round for a further (6) 9-12-12-15 (16) cm = (2⅜") 3½"-4¾"-4¾"-6" (6¼"). Knit 1 round where you increase (12) 14-16-16-18 (20) stitches evenly spaced = (92) 106-120-128-138 (152) stitches.
Change to circular needle size 3 MM = US 2.5. Work rib (knit 1, purl 1) for (2) 2-2-3-3 (3) cm = (3/4") ¾"-¾"-1⅛"-1⅛" (1⅛"). Bind off a little loosely.
The sweater measures approx. (20) 24-28-30-34 (36) cm = (8") 9½"-11"-11¾"-13⅜" (14¼") from the shoulder down

SLEEVES:
Place the (30) 34-36-40-40 (42) stitches from the thread on the one side of the piece on double pointed needles size 4 MM = US 6 and knit up 1 stitch in each of the (4) 4-6-6-8 (8) stitches cast on under the sleeve = (34) 38-42-46-48 (50) stitches. Insert a marker in the middle of the (4) 4-6-6-8 (8) stitches under the sleeve. Start at the marker and work stockinette stitch in the round for 1 cm = ⅜". Now decrease 2 stitches under the sleeve (does not apply to sizes <0 and 0/1 month) – read DECREASE TIP. Decrease like this every 4th round a total of (0) 0-1-1-1 (2) times = (34) 38-40-44-46 (46) stitches. Continue working until the sleeve measures (5) 8-10-13-15 (19) cm = (2") 3⅛"-4"-5⅛"-6" (7½") from the division. There is approx. (2) 2-2-3-3 (3) cm = (3/4") ¾"-¾"-1⅛"-1⅛" (1⅛") to finished length; try the sweater on and work to desired length.
Knit 1 round where you decrease (0) 0-0-4-4 (2) stitches evenly spaced = (34) 38-40-40-42 (44) stitches. Change to double pointed needles size 3 MM = US 2.5 and work rib (knit 1, purl 1) for (2) 2-2-3-3 (3) cm = (3/4") ¾"-¾"-1⅛"-1⅛" (1⅛"). Bind off a little loosely The sleeve measures approx. (7) 10-12-16-18 (22) cm = (2¾") 4"-4¾"-6¼"-7" (8¾") from the division.
Work the other sleeve in the same way.

ASSEMBLY:
If you have worked a split mid-back, sew the buttons onto the band without the buttonholes.

This pattern has been corrected.

Updated online: 09.09.2022
SWEATER WITH SPLIT MID-BACK:...Knit the stitches from both bands together 2 and 2 (= 4 stitches decreased) = (97) 103-115-121-127 (133) stitches.

Diagram

All measurements in charts are in cm.

symbols = knit from right side, purl from wrong side
symbols = purl from right side, knit from wrong side
symbols = between 2 stitches make 1 yarn over; on the next row work the yarn over twisted as shown in the diagram (no hole)
diagram
diagram

Each of our patterns has specific tutorial videos to help you.

Do you have a question? See a list of frequently asked questions (FAQ)

Knitting tension is what determines the final measurements of your work, and is usually measured per 10 x 10 cm. It is provided like so: number of stitches in width x number of rows in height - eg: 19 stitches x 26 rows = 10 x 10 cm.

The knitting tension is very individual; some people knit/crochet loosely while others work tightly. You adjust the knitting tension with the needle size, which is why the suggested needle size only serve as a guide! You need to adjust this (up or down) to ensure that YOUR knitting tension matches the knitting tension provided in the pattern. If you work with a different knitting tension than provided you will have a different yarn consumption, and your work will have different measurements than what the pattern suggests.

The knitting tension also determines which yarns can replace each other. As long as you achieve the same knitting tension you can replace one yarn with another.

See DROPS lesson: How to measure your tension/gauge

See DROPS video: How to make a gauge tension swatch

The required amount of yarn is provided in grams, eg: 450 g. To calculate how many balls you’ll need you first need to know how many grams are in 1 ball (25g, 50g or 100g). This information is available if you click on the individual yarn quality on our pages. Divide the amount required with the amount of each ball. For example, if each ball is 50g (the most common amount), the calculation will be as follows: 450 / 50 = 9 balls.

The important thing when changing from one yarn to another is that the knitting/crochet tension remains the same. This is so that the measurements of the finished piece will be the same as on the sketch provided. It is easier to achieve the same knitting tension using yarns from the same yarn group. It is also possible to work with multiple strands of a thinner yarn to achieve the knitting tension of a thicker one. Please try our yarn converter. We recommend you to always work a test swatch.

Please NOTE: when changing yarn the garment might have a different look and feel to the garment in the photo, due to individual properties and qualities of each yarn.

See DROPS lesson: Can I use a different yarn than the one mentioned in the pattern?

All our yarns are categorised into yarn groups (from A to F) according to thickness and knitting tension – group A contains the thinnest yarns and group F the thickest. This makes it easier for you to find alternative yarns to our patterns, should you wish to switch yarn. All yarns within the same group have a similar knitting tension and can easily replace each other. However, different yarn qualities have different structures and properties which will give the finished work a unique look and feel.

Click here for an overview of the yarns in each yarn group

At the top of all our patterns you’ll find a link to our yarn converter, which is a helpful tool should you wish to use a different yarn than suggested. By filling in the yarn quality you wish to replace, the amount (in your size) and number of strands, the converter will present good alternative yarns with the same knitting tension. Additionally it will tell you how much you’ll require in the new qualities and whether you’ll need to work with multiple strands. Most skeins are 50g (some are 25g or 100g).

If the pattern is worked with multiple colours, every colour will have to be converted separately. Similarly, if the pattern is worked with several strands of different yarns (for example 1 strand Alpaca and 1 strand Kid-Silk) you will have to find alternatives for each, individually.

Click here to see our yarn converter

Since different yarns have different qualities and textures we have chosen to keep the original yarn in our patterns. However, you can easily find options among our available qualities by using our yarn converter, or simply pick a yarn from the same yarn group.

It is possible that some retailers still have discontinued yarns in stock, or that someone has a few skeins at home that they would like to find patterns for.

The yarn converter will provide both alternative yarn as well as required amount in the new quality.

If you think it's hard to decide what size to make, it can be a good idea to measure a garment you own already and like the size of. Then you can pick the size by comparing those measures with the ones available in the pattern's size chart.

You'll find the size chart at the bottom of the pattern.

See DROPS lesson: How to read size chart

The needle size provided in the pattern serves only as a guide, the important thing is to follow the knitting tension. And since knitting tension is very individual, you will have to adjust the needle size to ensure that YOUR tension is the same as in the pattern – maybe you’ll have to adjust 1, or even 2 needle sizes, up or down to achieve the correct tension. For this, we recommend that you work test swatches.

Should you work with a different knitting tension than the one provided, the measurements of the finished garment might deviate from the measurement sketch.

See DROPS lesson: How to measure your tension/gauge

See DROPS video: How to make a gauge tension swatch

Working a garment top-down provides more flexibility and room for personal adjustment. For example it is easier to try the garment on while working, as well as making adjustments to length of yoke and shoulder caps.

The instructions are carefully explaining every step, in the correct order. Diagrams are adjusted to the knitting direction and are worked as usual.

The diagram depicts all rows/rounds, and every stitch seen from the right side. It is read from bottom to top, from right to left. 1 square = 1 stitch.

When working back and forth, every other row is worked from the right side and every other row is worked from the wrong side. When working from the wrong side, the diagram will have to be worked reversed: from left to right, knit stitches are purled, purl stitches are knit etc.

When working in the round every round is worked from the right side and the diagram are worked from right to left on all rounds.

See DROPS lesson: How to read knitting diagrams

The diagram depicts all rows/rounds, and every stitch seen from the right side. It is worked from bottom to top, from right to left.

When working back and forth every other row is worked from the right side: from right to left and every other row is worked from the wrong side: from left to right.

When working in the round, every row in the diagram are worked from the right side, from right to left.

When working a circular diagram you start in the middle and work your way outwards, counter clockwise, row by row.

The rows usually start with a given number of chain stitches (equivalent to the height of the following stitch), this will either be depicted in the diagram or explained in the pattern.

See DROPS lesson: How to read crochet diagrams

Instructions for working several diagrams after each other on the same row/round, will often be written like so: “work A.1, A.2, A.3 a total of 0-0-2-3-4 times". This means you work A.1 once, then A.2 is worked once, and A.3 is repeated (in width) the number of times provided for your size – in this case like so: S = 0 times, M = 0 times, L=2 times, XL= 3 times and XXL = 4 times.

The diagrams are worked as usual: begin with the first row in A.1, then work the first row in A.2 etc.

See DROPS lesson: How to read knitting diagrams

See DROPS lesson: How to read crochet diagrams

The total width of the garment (from wrist-to-wrist) will be larger in the larger sizes, despite the actual sleeves being shorter. The larger sizes have longer sleeve caps and wider shoulders, so there will be a good fit in all sizes.

The measurement sketch/schematic drawing provides information regarding the full length of the garment. If it’s a jumper or a jacket the length is measured from the highest point on the shoulder (usually closest to the neckline), and straight down to the bottom of the garment. It is NOT measured from the tip of shoulder. Similarly, the length of yoke is measured from the highest point on the shoulder and down to where yoke is split into body and sleeves.

See DROPS lesson: How to read a schematic drawing

Diagrams are often repeated on the round or in height. 1 repeat is the diagram the way it appears in the pattern. If it says to work 5 repeats of A.1 in the round, then you work A.1 a total of 5 times after/next to each other in the round. If it says to work 2 repeats of A.1 vertically/in height you work the entire diagram once, then begin again at the start and work the entire diagram one more time.

Chain stitches are slightly narrower than other stitches and to avoid working the cast-on edge too tight, we simply chain more stitches to begin with. The stitch count will be adjusted on the following row to fit the pattern and measurement sketch.

The rib edge is more elastic and will contract slightly compared to, for example, stocking stitch. By increasing before the rib edge, you avoid a visible difference in width between the rib edge and the rest of the body.

It’s very easy to cast off too tightly, and by making yarn overs while casting off (and simultaneously casting these off) you avoid a too tight cast off edge.

See DROPS video: How to bind off with yarn overs (yo)

To achieve an even increase (or decrease) you can increase on, for example: every 3rd and 4th row alternately, like so: work 2 rows and increase on the 3rd row, work 3 rows and increase on the 4th. Repeat this until the increase is complete.

See DROPS lesson: Increase or decrease 1 st on every 3rd and 4th row alternately

Should you prefer to work in the round instead of back and forth, you may of course adjust the pattern. You’ll need to add steeks mid-front (usually 5 stitches), and follow the instructions. When you would normally turn and work from the wrong side, simply work across the steek and continue in the round. At the end you’ll cut the piece open, pick up stitches to work bands, and cover the cut edges.

See DROPS video: How to knit steeks and cut open

Should you prefer to work back and forth instead of in the round, you may of course adjust the pattern so you work the pieces separately and then assemble them at the end. Divide the stitches for the body in 2, add 1 edge stitch in each side (for sewing) and work the front and back pieces separately.

See DROPS lesson: Can I adapt a pattern for circular needles into straight needles?

Pattern repeats can vary slightly in the different sizes, in order to get the correct proportions. If you’re not working the exact same size as the garment in the photo, yours might deviate slightly. This has been carefully developed and adjusted so that the complete impression of the garment is the same in all sizes.

Make sure to follow instructions and diagrams for your size!

If you have found a pattern you like which is available in women’s size it’s not very difficult to convert it to men’s size. The biggest difference will be the length of sleeves and body. Start working on the women size that you think would fit across the chest. The additional length will be worked right before you cast off for the armhole/sleeve cap. If the pattern is worked top-down you can add the length right after the armhole or before the first decrease on sleeve.

Regarding additional yarn amount, this will depend on how much length you add, but it is better with a skein too many than too few.

All yarns will have excess fibres (from production) that might come off as lint or shedding. Brushed yarns (ie hairier yarns) have more of these loose, excess fibres, causing more shedding.

Shedding also depends on what is worn under or over the garment, and whether this pulls at the yarn fibres. It’s therefore not possible to guarantee that there will be no shedding

Below are some tips on how to get the best result when working with hairier yarns:

1. When the garment is finished (before you wash it) shake it vigorously so the looser hairs come off. NOTE: do NOT use a lint roller, brush or any method that pulls at the yarn.

2. Place the garment in a plastic bag and put it in your freezer - the temperature will cause the fibres to become less attached to each other, and excess fibres will come off easier.

3. Leave in the freezer for a few hours before taking it out and shaking it again.

4. Wash the garment according to the instructions on the yarn label.

Pilling is a natural process that happens to even the most exclusive of fibers. It's a natural sign of wear and tear that is hard to avoid, and that is most visible in high friction areas of your garment like a sweater's arms and cuffs.

You can make your garment look as new by removing the pilling, using a fabric comb or a pill/lint remover.

Still can't find the answer you need? Then scroll down and leave your question so one of our experts can try to help you. This will be done normally within 5 to 10 working days.
In the meantime, you can read the questions and answers that others have left to this pattern or join the DROPS Workshop on Facebook to get help from fellow knitters/crocheters!

You might also like...

Sweet Gleam

Gabriela, Germany

Sweet Gleam

HEPcrafty1

Sweet Gleam

HEPcrafty1

Post a comment to pattern DROPS Baby 43-5

We would love to hear what you have to say about this pattern!

If you want to leave a question, please make sure you select the correct category in the form below, to speed up the answering process. Required fields are marked *.

Comments / Questions (33)

country flag Loly Aguilar Araujo wrote:

Por favor me podríais explicar bien como se une la cenefa para continuar tejiendo en circular gracias

19.11.2022 - 01:48

DROPS Design answered:

Hola Loly, para unir la labor: colocar los 4 puntos de la cenefa con los ojales sobre los 4 puntos de la cenefa con los botones. Se trabajan juntos el 1º punto de la cenefa de los ojales con el 4º punto de la cenefa de los botones; el 2º de los ojales con el 3º de los botones; el 3º de los ojales con el 2º de los botones y el 4º de los ojales con el 1º de los botones.

20.11.2022 - 23:20

country flag Loly wrote:

Hola cuando decís, en el jersey con abertura 4 puntos en punto musgo 1 derecho 1 revés trabajar de *a* hasta que queden5 puntos 1 derecho y 4 puntos en punto elástico quisiera saber si es equivocación y hay que tejerlos en punto musgo como al comenzar gracias

17.11.2022 - 13:35

DROPS Design answered:

Hola Loly, sí, se trata de punto musgo, es una errata. Lo corregiremos lo antes posible.

20.11.2022 - 23:15

country flag Anja wrote:

Når man strikke etter diagrammet, skal man begynne oppe eller nede på A1 og A2? Om man skal begynne med å kunn strikke 3 rett og 3 vrang eller at man skal begynne med å strikke 1 rett øke 1, 2 rett, 1 vrang øke 1 så strikke to vrang?

12.11.2022 - 20:39

DROPS Design answered:

Hei Anja, Diagrammene er lest fra bunnen oppover og fra høyre til venstre, Så da er det 1 rett, 1 kast, 1 rett på både A.1 og A.2, og dette er gjentatt på omgangen. God fornøyelse!

14.11.2022 - 06:57

country flag Loly Aguilar Araujo wrote:

Tampoco entiendo cuando decís los 4 puntos de las cenefas ahora se trabajan como se muestra en A4 si en A4 solo hay 3 puntos

09.11.2022 - 17:16

DROPS Design answered:

Hola Loly, lo que quiere decir es que los puntos de las cenefa se trabajan como el resto de los puntos, siguiendo el patrón A.4 (serían todos de derecho o todos de revés, dependiendo de la fila que estés trabajando).

14.11.2022 - 00:18

country flag Loly Aguilar Araujo wrote:

El el jerseycon abertura en el centro de la espalda, a que os referís cuando decís al principio de comenzar la labor trabajar1 fila de reves por el lado reves de derecho gracias

09.11.2022 - 14:30

DROPS Design answered:

Hola Loly, se trata de una errata, trabajas 1 fila de revés por el lado revés.

14.11.2022 - 00:15

country flag Hanne wrote:

Hvor finder man diagram A1 - A5 i opskriften? ?

25.09.2022 - 18:41

DROPS Design answered:

Hei Hanne. De finner du rett over målskissen helt nederst på oppskriften. Om du ikke ser de, er det mulig nettet ditt ikke greier å laste det ned. Sjekk da med et hurtigere nett. mvh DROPS Design

26.09.2022 - 11:54

country flag Catherine wrote:

I’m knitting this jumper and I’m a bit confused - I’ve just completed the yoke but have far more stitches than the pattern suggests I ought to have. I have 207 stitches and I’m knitting size 1-3m. The pattern says to “adjust to 164 stitches”, which seems a considerable decrease. Is this correct? Thank you!

19.09.2022 - 23:37

DROPS Design answered:

Dear Catherine, it looks like you have too many stitches in this size, you should have only 171 sts before starting the section and the round adjusting to 164 - where you are just supposed to decrease 7 sts evenly on the round (see here). Happy knitting!

20.09.2022 - 09:57

country flag Barbara wrote:

🤣Und bei mir auch, nicht Feuerteufel, natürlich Fehlerteufel

27.08.2022 - 13:48

country flag Barbara wrote:

Das erstmal vorweg, eure Anleitungen und Garne sind super, stricke gerade den Sweet Gleam Pulli mit Schlitz in Größe 80/86, und da hat sich, glaube ich, ein Feuerteufel eingeschlichen, bei der Zusammenführung der Knopfleiste werden 4 Maschen zusammen gestrickt, ich hatte vorher 131 - 4=127 und nicht 137 Liebe Grüße

27.08.2022 - 13:45

country flag Ana Montoya wrote:

Buenos días: En el patrón 43/5, jersey con abertura en la espalda, no entiendo cómo unir los 4 puntos musgo de la cenefa, con los otros 4 puntos musgo de la otra cenefa, para continuar tejiendo en redondo. Tienen un video? o mejor explicación ? Mil gracias. Ana.

21.08.2022 - 18:22

DROPS Design answered:

Hola Ana, colocamos los 4 puntos de la cenefa con ojales sobre la cenefa donde vamos a coser los botones. Ahora, trabajar juntos el primer punto de una cenefa con el 4º pt de la otra, el 2º pt con el 3º de la otra cenefa, el 3º pt con el 2º de la otra cenefa y el 4º punto con el 1º de la otra cenefa.

21.08.2022 - 20:29