
Popular categories
Looking for a yarn?


|
|||||||||||||||||||||||||
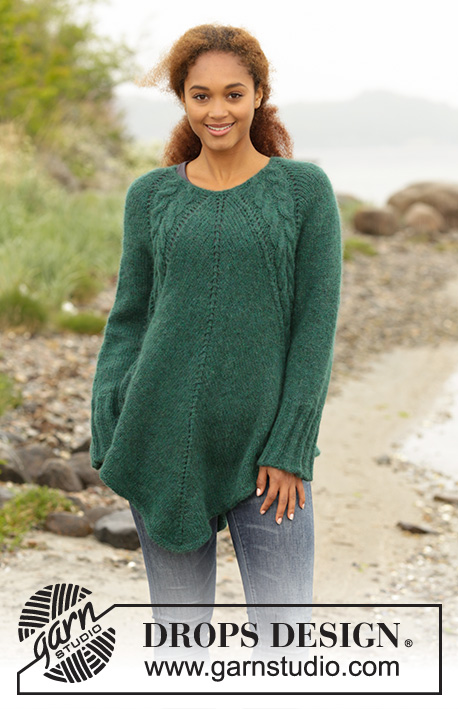
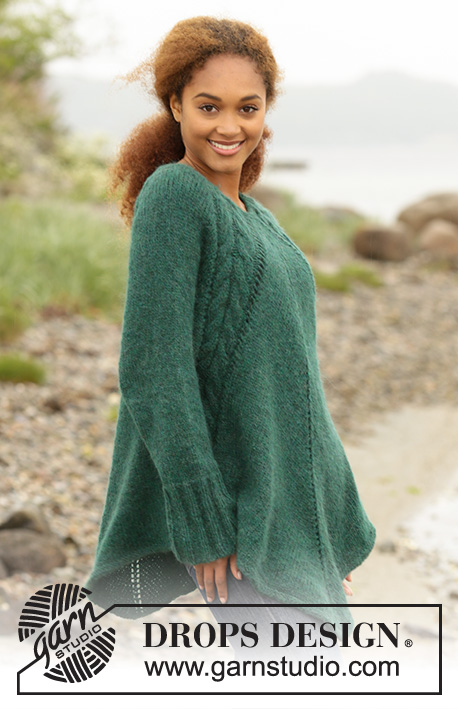
Emerald Queen |
|||||||||||||||||||||||||
 |
 |
||||||||||||||||||||||||
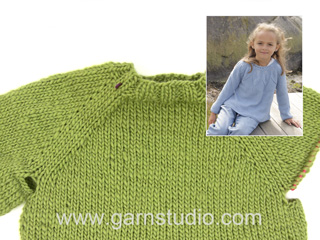
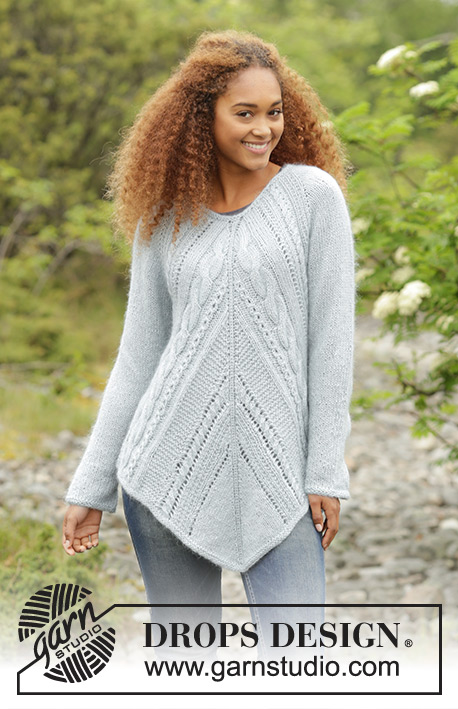
Knitted DROPS tunic with deep raglan and cables, worked top down in ”Air”. Size: S - XXXL.
DROPS 171-1 |
|||||||||||||||||||||||||
|
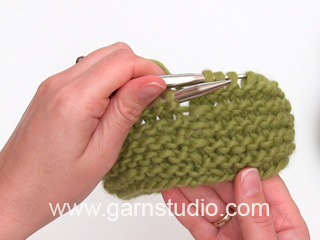
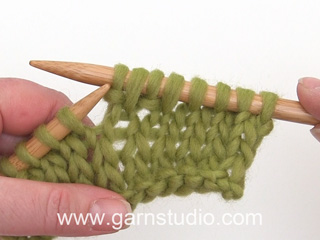
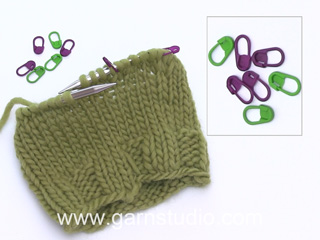
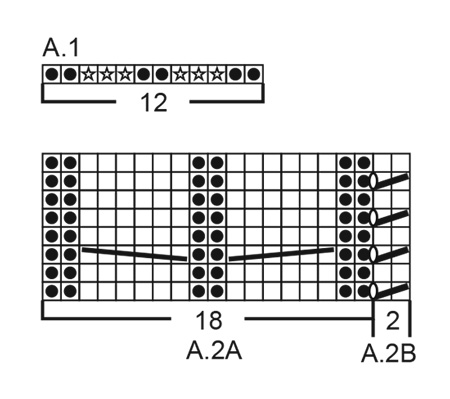
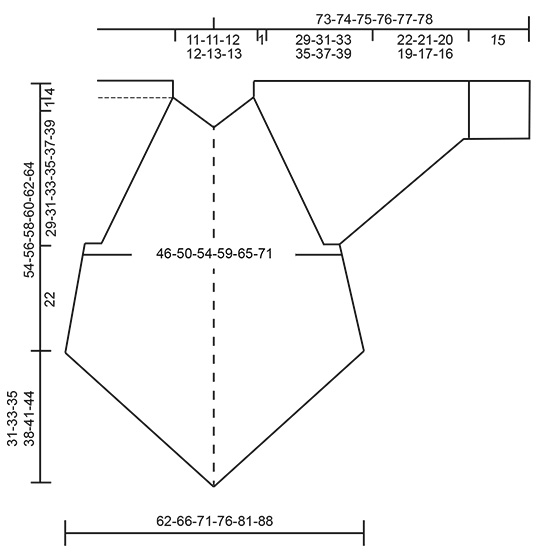
GARTER ST (worked in the round): 1 ridge = 2 rounds. * K 1 round and P 1 round *, repeat from *-*. PATTERN: See diagrams A.1 to A.5. INCREASE FOR SLEEVES: Increase 1 st in each side on each sleeve by increasing after A.2 and before A.3 (= 2 st inc on each sleeve and 4 sts in total on round). Inc 1 st by making 1 yarn over, on next round knit yarn over to make holes. INCREASE MID FRONT AND MID BACK: Increase 2 sts on each side of st with marker thread on mid front and mid back as follows: Knit until 1 st before st with marker thread, make 1 yarn over, knit 1, make 1 yarn over, knit st with marker thread, make 1 yarn over, knit 1, make 1 yarn over (= 4 sts inc mid front/mid back and 8 sts in total on round). On next round knit the 2 yarn overs closest to the st with mid-st to make holes, the outermost 2 sts should be knit twisted to avoid holes. Increase 1 st on each side of st with marker thread on mid front and mid back as follows: Work until st with maker thread, make 1 yarn over, knit st with maker thread (mid-st), make 1 yarn over (= 2 sts inc mid front/mid back and 4 sts in total on round).On next round knit yarn overs to make holes. KNITTING TIP-1: To avoid the eye let row being interrupted while increasing for sleeves on every 4th row and not on every 2nd row as before, work as follows on the rows that previously had increases: After A.2: Make 1 yarn over, slip 1 st knitvise, knit 1 and pass slipped st over the knit st. Before A.3: Knit until 2 sts before A.3, knit 2 st tog and make 1 yarn over. KNITTING TIP-2: If you want a little less volume on body, it is possible to make some adjustments after dividing for sleeves. Decrease 2 sts mid front and mid back on i.e every 8th round as follows (decrease on a round with increases): Knit until 2 sts before st with marker (= mid-st), knit 2 tog, make 1 yarn over, knit 1 (= mid-st), make 1 yarn over, slip 1 st knitvise, knit 1 and pass slipped st over the knit st (this decrease will give approx 8 cm / 3⅛" less width in total at the end of body). DECREASE TIP (applies to sleeves): Beg 3 sts before marker and dec as follows: K 2 tog, K 2 (marker is in the middle of these 2 sts), slip 1 st as if to K, K 1, psso. ---------------------------------------------------------- TUNIC: Worked in the round on circular needle, top down. YOKE: Cast on 66-66-70-70-74-74 sts on a short circular needle size 4 mm / US 6 with 2 strands Air. Remove 1 strand and continue with 1 strand Air as follows: Work 2 ridges in GARTER ST - see explanation above. Switch to a short circular needle size 5 mm / US 8, work next round as follows: Work A.1 (= 12 sts inc to 18 sts), 2 sts in stockinette st (= sleeve), A.1 (= 12 sts inc to 18 sts), 7-7-9-9-11-11 sts in stockinette st (insert 1 marker in the middle of these sts = mid front), A.1 (= 12 sts inc to 18 sts), 2 sts in stockinette st (= sleeve), A.1 (= 12 sts inc to 18 sts) and 7-7-9-9-11-11 sts in stockinette st (insert 1 marker in the middle of these sts = mid back) = 90-90-94-94-98-98 sts on needle. Next round work as follows: Work A.2 (= 18 sts), inc 1 st – READ INCREASE FOR SLEEVES, knit 2, inc 1 st for sleeve, work A.3 (= 20 sts), knit 0-0-1-1-2-2 s, inc 2 sts on each side of st with marker thread – READ INCREASE MID FRONT AND MID BACK, knit 0-0-1-1-2-2 sts, work A.2B (= 2 sts), work A.2A (=18 sts), inc 1 st for sleeve, knit 2 sts, inc 1 st for sleeve, work A.3 (= 20 sts), knit 0-0-1-1-2-2 sts, inc 2 sts on each side of st with marker thread (= mid back) and knit 0-0-1-1-2-2 sts and work A.2B (= 2 sts) = 102-102-106-106-110-110 sts on needle. Then work stockinette st in the round with A.2 and A.3 in every transition between body and sleeves. AT THE SAME TIME continue increase for sleeves and increase mid front and mid back as follows: SLEEVES: Increase on every 2nd round 10-13-15-21-23-27 times in total (including the increase explained on firste round), then increase on every 4th round 11-11-11-9-9-8 times in total - READ KNITTING TIP-1. MID FRONT AND MID BACK : Inc 2 sts on every side of st with marker in it on every 2nd round 11-14-15-18-21-25 times in total (including the increases explained on first round). Then increase 1 st on each side of st with marker in it on every 2nd round 21-20-21-21-20-18 times in total. REMEMBER THE GAUGE! After last increase on body and sleeves each side of st with marker thread there are 346-378-402-442-474-510 sts on needle. Work next round as follows: Work as before over the first111 sts (= until middle of 2 P sts in A.2), slip the next 62-68-72-80-84-90 sts on a stitch holder (= sleeve), cast on 6-6-8-8-10-12 new sts under sleeve, work as before over the next 111-121-129-141-153-165 sts on front piece(i.e 11 st in A.3, 89-99-107-119-131-143 knit sts, 11 sts in A.2)slip the next 62-68-72-80-84-90 sts on a stitch holder (= sleeve), cast on 6-6-8-8-10-12 new sts under sleeve and work the remaining 100-110-118-130-142-154 sts on back piece as before (i.e 11 sts in A.3 and 89-99-107-119-131-143 knit sts). Finish body and sleeves separately. BODY: = 234-254-274-298-326-354 sts. Insert 1 marker in the piece. Work next round as follows: Work A.4 (12 sts), knit 4-4-6-6-8-10 sts, A.5 (=11 sts), knit until mid-st, make 1 yarn over, knit 1 (= mid-st), make 1 yarn over, knit until A.2, work A.4 (= 12 sts), knit 4-4-6-6-8-10 sts, A.5 (= 12 sts), knit until mid-st, make 1 yarn over, knit 1 (= mid-st), make 1 yarn over and knit the rest of round (= 4 sts increased). Continue pattern like this while AT THE SAME TIME continuing to increase mid front and mid back on every 2nd round until inc has been done 20 times on each side of mid front/mid back from marker - READ KNITTING TIP-2 = 314-334-354-378-406-434 sts on needle (or work until desired length). On next round work sts in each cable K tog 2 by 2 (= 12 sts dec) = 302-322-342-366-394-422 sts. Switch to circular needle size 4 mm / US 6 and work 2 ridges in garter st in the round over all sts. Switch back to circular needle size 5 mm / US 8 and bind off (this is done to avoid a tight bind-off edge). SLEEVE: Worked in the round on a short circular needle, switch to double pointed needles when needed. Slip the sts from stitch holder in one side of piece on a short circular needle size 5 mm / US 8 and pick up 1 st in each of the 6-6-8-8-10-12 sts cast on under sleeve on body = 68-74-80-88-94-102 sts on needle. Insert 1 marker at beg of round (= mid under sleeve) - NOW MEASURE PIECE FROM HERE. Work in stockinette st in the round over all sts AT THE SAME TIME on first round dec over the two cables by working sts in each cable K tog 2 by 2 (= 6 sts dec) = 62-68-74-82-88-96 sts. When piece measures 2 cm / ¾", dec 2 sts mid under sleeve - READ DECREASE TIP. Dec a total of 12-14-17-20-22-25 times in Size S: On every 4th round, in size M: On every 3rd round, in size L: Alternately on every 2nd and 3rd round, in size XL: On every other round, in size XXL: Alternately on every and every other round and size XXXL. On every round = 38-40-40-42-44-46 sts on needle. Continue to work until piece measures 22-21-20-19-17-16 cm / 8¾"-8¼"-8"-7½"-6¾"-6¼" (NOTE: Shorter measurements in the larger sizes because of wider shoulders). K 1 round while AT THE SAME TIME inc 7-10-10-8-11-9 sts evenly = 45-50-50-50-55-55 sts. Switch to double pointed needles size 4 mm / US 6 and work rib in the round = K 2/P 3. When rib measures 15 cm / 6", switch back to double pointed needles size 5 mm / US 8 before binding off with K over K and P over P (this is done to avoid a tight bind-off edge). Work the other sleeve the same way. |
|||||||||||||||||||||||||
Diagram explanations |
|||||||||||||||||||||||||
|
|||||||||||||||||||||||||
|
|||||||||||||||||||||||||

|
|||||||||||||||||||||||||
|
|||||||||||||||||||||||||
|
Have you made this or any other of our designs? Tag your pictures in social media with #dropsdesign so we can see them! Do you need help with this pattern?You'll find tutorial videos, a Comments/Questions area and more by visiting the pattern on garnstudio.com. © 1982-2024 DROPS Design A/S. We reserve all rights. This document, including all its sub-sections, has copyrights. Read more about what you can do with our patterns at the bottom of each pattern on our site. |
|||||||||||||||||||||||||


With over 40 years in knitting and crochet design, DROPS Design offers one of the most extensive collections of free patterns on the internet - translated to 17 languages. As of today we count 304 catalogs and 11422 patterns - 11417 of which are translated into English (US/in).
We work hard to bring you the best knitting and crochet have to offer, inspiration and advice as well as great quality yarns at incredible prices! Would you like to use our patterns for other than personal use? You can read what you are allowed to do in the Copyright text at the bottom of all our patterns. Happy crafting!
Comments / Questions (165)
Thank you for the answer about the cast on. Now I have run into another problem with the very first round. I am making size medium. I cast on 66 stitches. The directions say that, at the end of the first round, I should have 102 stitches on the needle. But there are four decreases on that round, (near the center front and back) and I only end up with 98. I have checked and rechecked, counted and recounted.
24.01.2019 - 22:26DROPS Design answered:
Dear Mrs Kerr, after the ridges over the 66 sts you first work A.1 increasing the number of sts to 90. Then work A.2 and A.3 increasing at the same time as explained in the written pattern, but there are no decreases in the diagrams A.2B/A.3 every dec in these diagram is compensated by a YO, eg: A.2B is K2 tog, YO (= 2 sts). At the end of A.3 you work YO, slip 1 as if to K, K1, psso (= 2 sts). Happy knitting!
25.01.2019 - 08:57I've just bought this pattern and the yarn, but I can't even get started because I don't understand the cast on with 2 strands. I've looked around on the internet and there are different definitions of this. I'm not sure which one I should use. Do I want to have my cast on stitches double, then work the first row picking up 2 stitches as one? Or am I just using two strands the same way I would do a long-tail cast on?
24.01.2019 - 03:55DROPS Design answered:
Dear Sharon you'll simply use 2 strands of yarn only for the cast on, and then you'll continue to work with 1 strand. In this way the cast on edge remains heavier. Happy knitting!
24.01.2019 - 06:58Hej Bodil. Helt enig. Jeg har siddet med præcis samme overvejelser. Tror det er den samme problematik, der volder problemer for dem, der ikke at kan få maskeantallet til at passe.
18.01.2019 - 14:03Hallo, ich stricke Größe 40 und bin jetzt bei den 402 Maschen. Nun heißt es 11 maschen stricken, dann die vom Ärmel stilllegen und dann neue Maschen anschlagen. Brauche ich dann eine neue Nadel? Und wie schlage ich die Maschen an?
17.01.2019 - 20:23DROPS Design answered:
Liebe Lisa, dieses Video zeigt, wie man einen Pullover von oben nach unten strickt - nach ca 6:55 zeigen wir wie man die Maschen für die Ärmel stillegen und wie die neuen Maschen unter den Ärmeln angeschlagen werden. Viel Spaß beim stricken!
18.01.2019 - 08:34Er det rigtigt at der er et omslag før indtagning i A 3 og A2 B ? Har efter 10 cm og undren af masketal opdaget det lille 0, kunne det evt. laves med farvet symbol for at gøre det tydeligt.
16.01.2019 - 20:47DROPS Design answered:
Hei Bodil, Ja det er kast ved hver felling i diagram A.2b, A.3, A.4 og A.5. Vi bruker et tydeligere symbol i de nyere oppskriftene, men vi skal få oppdatert dette diagrammet også. God fornøyelse
21.01.2019 - 13:36Hallo, ich habe die jeweils 15 Zunahmen in Ärmel und Rumpfteil in jeder zweiten Runde getätigt. Wenn ich im Rumpfteil nur noch jeweils eine Masche beidseitig der Masche mit dem Markierungsfaden zunehme, aber weiterhin die Reduzierung von Maschen in A.2B, bzw. durch das Zusammenstricken der beiden Maschen am Ende von A.3 erfolgt, dann findet also da keine weitere Zunahme mehr statt. Habe ich das so richtig verstanden?
15.01.2019 - 08:18DROPS Design answered:
Liebe Uschi, in A.2B/ A.3 gibt es keine richtige Abnahme, die Abnahme in A.2B/A.3 wird mit dem jeweiligen Umschlag in jedem Diagram ausgeglichen (die Maschenanzahl in A.2B/A.3 bleibt immer die gleiche). Viel Spaß beim stricken!
15.01.2019 - 09:50Chtěla bych se zeptat, k čemu jsou schémata A.2B, A3, A4 a A5....a jak je to s tím přidáváním...je psáno v 1.kruhové řadě přidávat na předním a zadním díle a pak v každé druhé řadě a u rukávů začínáme v druhé řadě a pak zase v každé druhé řadě - vyplývá mi z toho, že v jedné řadě přidám na předním a zadním díle a v další řadě přidávám u rukávů - chápu to tak správně? Moc děkuji.
13.01.2019 - 20:26Hallo, das ist mir klar, aber was ist mit den Abnahmen von A3 und A2B? Wenn ich die mitstricke, komme ich nicht auf die 442 Maschen.
17.12.2018 - 09:57DROPS Design answered:
Liebe Frau Rosenmann, die Abnahmen in A.3 und A.2B (sowie in A.4 und A.5) werden die Zunahemn (Umschläge) ausgleichen : in A.2B stricken Sie 2 M re zs, 1 Umschlag = es sind immer noch 2 Maschen. Viel Spaß beim stricken!
17.12.2018 - 10:27Ich stricke die Größe XL, das kommt aber nicht auf die Größe an. Die Maschen stimmen in jeder Größe nur, wenn man die Abnahmen nicht macht.
12.12.2018 - 17:23DROPS Design answered:
Liebe Frau Rosemann, Sie haben 94 M dann nehmen Sie für die Ärmel (4 M x 21 + 4 M x 9) und für Vorder und Rückenteil (8 M x 18 + 4 M x 21 ) = 94 + 120 + 228 = 442 M. Viel Spaß beim stricken!
17.12.2018 - 09:02Guten Tag, ich rechne jetzt schon seit Tagen und komme immer zu dem Ergebnis, dass ich die Maschenzahl nur erreichen kann, wenn ich an den Reglanärmeln (A3 und A2A und A2B) nicht abnehme. Ich hatte schon die Hälfte gestrickt und dann bemerkt, dass mit der Maschenzahl etwas nicht stimmt. Was habe ich falsch gemacht?
12.12.2018 - 14:10DROPS Design answered:
Liebe Frau Rosemann, können Sie uns bitte sagen, welche Größe Sie stricken? Viel Spaß beim stricken!
12.12.2018 - 14:13