The yarn cost is calculated from the pattern’s smallest size and the yarn’s cheapest product type. Looking for an even better price? You might find it on the DROPS Deals!
-------------------------------------------------------
Alternative Yarn – See how to change yarns here
Yarn Groups A to F – Use the same pattern and change the yarn here
Yarn usage using an alternative yarn – Use our yarn converter here
-------------------------------------------------------
The yarn cost is calculated from the pattern’s smallest size and the yarn’s cheapest product type. Looking for an even better price? You might find it on the DROPS Deals!
This pattern has been corrected. Click here to see the correction/s.
All measurements in charts are in cm.
= knit from the right side, purl from the wrong side | |
= purl from the right side, knit from the wrong side | |
= slip 1 stitch as if to knit, knit 1, pass the slipped stitch over the knitted stitch | |
= knit 2 together (from the right side and the wrong side) | |
= 1 yarn over between 2 stitches | |
= 1 double yarn over between 2 stitches, on the next row work the first yarn over in knit and the second yarn over is dropped | |
= slip 1 stitch as if to knit, knit 2 together, pass the slipped stitch over the knitted together stitches | |
= bind off 1 stitch | |
= knit 2 stitches in 1 stitch (from the right side and the wrong side) |
Each of our patterns has specific tutorial videos to help you.
These step-by-step tutorials might also help you:
Why is the knitting/crochet tension so important?
Knitting tension is what determines the final measurements of your work, and is usually measured per 10 x 10 cm. It is provided like so: number of stitches in width x number of rows in height - eg: 19 stitches x 26 rows = 10 x 10 cm.
The knitting tension is very individual; some people knit/crochet loosely while others work tightly. You adjust the knitting tension with the needle size, which is why the suggested needle size only serve as a guide! You need to adjust this (up or down) to ensure that YOUR knitting tension matches the knitting tension provided in the pattern. If you work with a different knitting tension than provided you will have a different yarn consumption, and your work will have different measurements than what the pattern suggests.
The knitting tension also determines which yarns can replace each other. As long as you achieve the same knitting tension you can replace one yarn with another.
See DROPS lesson: How to measure your tension/gauge
See DROPS video: How to make a gauge tension swatch
How do I know how many balls of yarn I need?
The required amount of yarn is provided in grams, eg: 450 g. To calculate how many balls you’ll need you first need to know how many grams are in 1 ball (25g, 50g or 100g). This information is available if you click on the individual yarn quality on our pages. Divide the amount required with the amount of each ball. For example, if each ball is 50g (the most common amount), the calculation will be as follows: 450 / 50 = 9 balls.
Can I use a different yarn than what the pattern suggests?
The important thing when changing from one yarn to another is that the knitting/crochet tension remains the same. This is so that the measurements of the finished piece will be the same as on the sketch provided. It is easier to achieve the same knitting tension using yarns from the same yarn group. It is also possible to work with multiple strands of a thinner yarn to achieve the knitting tension of a thicker one. Please try our yarn converter. We recommend you to always work a test swatch.
Please NOTE: when changing yarn the garment might have a different look and feel to the garment in the photo, due to individual properties and qualities of each yarn.
See DROPS lesson: Can I use a different yarn than the one mentioned in the pattern?
What are the yarn groups?
All our yarns are categorised into yarn groups (from A to F) according to thickness and knitting tension – group A contains the thinnest yarns and group F the thickest. This makes it easier for you to find alternative yarns to our patterns, should you wish to switch yarn. All yarns within the same group have a similar knitting tension and can easily replace each other. However, different yarn qualities have different structures and properties which will give the finished work a unique look and feel.
How do I use the yarn converter?
At the top of all our patterns you’ll find a link to our yarn converter, which is a helpful tool should you wish to use a different yarn than suggested. By filling in the yarn quality you wish to replace, the amount (in your size) and number of strands, the converter will present good alternative yarns with the same knitting tension. Additionally it will tell you how much you’ll require in the new qualities and whether you’ll need to work with multiple strands. Most skeins are 50g (some are 25g or 100g).
If the pattern is worked with multiple colours, every colour will have to be converted separately. Similarly, if the pattern is worked with several strands of different yarns (for example 1 strand Alpaca and 1 strand Kid-Silk) you will have to find alternatives for each, individually.
Why do you show discontinued yarns in the patterns?
Since different yarns have different qualities and textures we have chosen to keep the original yarn in our patterns. However, you can easily find options among our available qualities by using our yarn converter, or simply pick a yarn from the same yarn group.
It is possible that some retailers still have discontinued yarns in stock, or that someone has a few skeins at home that they would like to find patterns for.
The yarn converter will provide both alternative yarn as well as required amount in the new quality.
What size should I knit?
If you think it's hard to decide what size to make, it can be a good idea to measure a garment you own already and like the size of. Then you can pick the size by comparing those measures with the ones available in the pattern's size chart.
You'll find the size chart at the bottom of the pattern.
See DROPS lesson: How to read size chart
Why do I get the wrong knitting tension with the suggested needle size?
The needle size provided in the pattern serves only as a guide, the important thing is to follow the knitting tension. And since knitting tension is very individual, you will have to adjust the needle size to ensure that YOUR tension is the same as in the pattern – maybe you’ll have to adjust 1, or even 2 needle sizes, up or down to achieve the correct tension. For this, we recommend that you work test swatches.
Should you work with a different knitting tension than the one provided, the measurements of the finished garment might deviate from the measurement sketch.
See DROPS lesson: How to measure your tension/gauge
See DROPS video: How to make a gauge tension swatch
Why is the pattern worked top-down?
Working a garment top-down provides more flexibility and room for personal adjustment. For example it is easier to try the garment on while working, as well as making adjustments to length of yoke and shoulder caps.
The instructions are carefully explaining every step, in the correct order. Diagrams are adjusted to the knitting direction and are worked as usual.
How do I work according to a knitting diagram?
The diagram depicts all rows/rounds, and every stitch seen from the right side. It is read from bottom to top, from right to left. 1 square = 1 stitch.
When working back and forth, every other row is worked from the right side and every other row is worked from the wrong side. When working from the wrong side, the diagram will have to be worked reversed: from left to right, knit stitches are purled, purl stitches are knit etc.
When working in the round every round is worked from the right side and the diagram are worked from right to left on all rounds.
See DROPS lesson: How to read knitting diagrams
How do I work according to a crochet diagram?
The diagram depicts all rows/rounds, and every stitch seen from the right side. It is worked from bottom to top, from right to left.
When working back and forth every other row is worked from the right side: from right to left and every other row is worked from the wrong side: from left to right.
When working in the round, every row in the diagram are worked from the right side, from right to left.
When working a circular diagram you start in the middle and work your way outwards, counter clockwise, row by row.
The rows usually start with a given number of chain stitches (equivalent to the height of the following stitch), this will either be depicted in the diagram or explained in the pattern.
See DROPS lesson: How to read crochet diagrams
How do I work several diagrams simultaneously on the same row/round?
Instructions for working several diagrams after each other on the same row/round, will often be written like so: “work A.1, A.2, A.3 a total of 0-0-2-3-4 times". This means you work A.1 once, then A.2 is worked once, and A.3 is repeated (in width) the number of times provided for your size – in this case like so: S = 0 times, M = 0 times, L=2 times, XL= 3 times and XXL = 4 times.
The diagrams are worked as usual: begin with the first row in A.1, then work the first row in A.2 etc.
See DROPS lesson: How to read knitting diagrams
See DROPS lesson: How to read crochet diagrams
Why are the sleeves shorter in larger sizes?
The total width of the garment (from wrist-to-wrist) will be larger in the larger sizes, despite the actual sleeves being shorter. The larger sizes have longer sleeve caps and wider shoulders, so there will be a good fit in all sizes.
Where on the garment is the length measured?
The measurement sketch/schematic drawing provides information regarding the full length of the garment. If it’s a jumper or a jacket the length is measured from the highest point on the shoulder (usually closest to the neckline), and straight down to the bottom of the garment. It is NOT measured from the tip of shoulder. Similarly, the length of yoke is measured from the highest point on the shoulder and down to where yoke is split into body and sleeves.
See DROPS lesson: How to read a schematic drawing
What is a repeat?
Diagrams are often repeated on the round or in height. 1 repeat is the diagram the way it appears in the pattern. If it says to work 5 repeats of A.1 in the round, then you work A.1 a total of 5 times after/next to each other in the round. If it says to work 2 repeats of A.1 vertically/in height you work the entire diagram once, then begin again at the start and work the entire diagram one more time.
Why does the piece start with more chain stitches than it’s worked with?
Chain stitches are slightly narrower than other stitches and to avoid working the cast-on edge too tight, we simply chain more stitches to begin with. The stitch count will be adjusted on the following row to fit the pattern and measurement sketch.
Why increase before the rib edge when the piece is worked top-down?
The rib edge is more elastic and will contract slightly compared to, for example, stocking stitch. By increasing before the rib edge, you avoid a visible difference in width between the rib edge and the rest of the body.
Why increase in the cast-off edge?
It’s very easy to cast off too tightly, and by making yarn overs while casting off (and simultaneously casting these off) you avoid a too tight cast off edge.
See DROPS video: How to bind off with yarn overs (yo)
How do I increase/decrease on every 3rd and 4th row/round alternately?
To achieve an even increase (or decrease) you can increase on, for example: every 3rd and 4th row alternately, like so: work 2 rows and increase on the 3rd row, work 3 rows and increase on the 4th. Repeat this until the increase is complete.
See DROPS lesson: Increase or decrease 1 st on every 3rd and 4th row alternately
How can I work a jacket in the round instead of back and forth?
Should you prefer to work in the round instead of back and forth, you may of course adjust the pattern. You’ll need to add steeks mid-front (usually 5 stitches), and follow the instructions. When you would normally turn and work from the wrong side, simply work across the steek and continue in the round. At the end you’ll cut the piece open, pick up stitches to work bands, and cover the cut edges.
See DROPS video: How to knit steeks and cut open
Can I work a jumper back and forth instead of in the round?
Should you prefer to work back and forth instead of in the round, you may of course adjust the pattern so you work the pieces separately and then assemble them at the end. Divide the stitches for the body in 2, add 1 edge stitch in each side (for sewing) and work the front and back pieces separately.
See DROPS lesson: Can I adapt a pattern for circular needles into straight needles?
Why is the pattern slightly different than what I see in the photo?
Pattern repeats can vary slightly in the different sizes, in order to get the correct proportions. If you’re not working the exact same size as the garment in the photo, yours might deviate slightly. This has been carefully developed and adjusted so that the complete impression of the garment is the same in all sizes.
Make sure to follow instructions and diagrams for your size!
How do I make a women’s size garment into a men’s size one?
If you have found a pattern you like which is available in women’s size it’s not very difficult to convert it to men’s size. The biggest difference will be the length of sleeves and body. Start working on the women size that you think would fit across the chest. The additional length will be worked right before you cast off for the armhole/sleeve cap. If the pattern is worked top-down you can add the length right after the armhole or before the first decrease on sleeve.
Regarding additional yarn amount, this will depend on how much length you add, but it is better with a skein too many than too few.
How do I prevent a hairy garment from shedding?
All yarns will have excess fibres (from production) that might come off as lint or shedding. Brushed yarns (ie hairier yarns) have more of these loose, excess fibres, causing more shedding.
Shedding also depends on what is worn under or over the garment, and whether this pulls at the yarn fibres. It’s therefore not possible to guarantee that there will be no shedding
Below are some tips on how to get the best result when working with hairier yarns:
1. When the garment is finished (before you wash it) shake it vigorously so the looser hairs come off. NOTE: do NOT use a lint roller, brush or any method that pulls at the yarn.
2. Place the garment in a plastic bag and put it in your freezer - the temperature will cause the fibres to become less attached to each other, and excess fibres will come off easier.
3. Leave in the freezer for a few hours before taking it out and shaking it again.
4. Wash the garment according to the instructions on the yarn label.
Why does my garment pill?
Pilling is a natural process that happens to even the most exclusive of fibers. It's a natural sign of wear and tear that is hard to avoid, and that is most visible in high friction areas of your garment like a sweater's arms and cuffs.
You can make your garment look as new by removing the pilling, using a fabric comb or a pill/lint remover.
Honey Blossom Cardigan |
||||||||||||||||||||||||||||
|
||||||||||||||||||||||||||||
Knitted jacket with lace pattern and lace edge, worked top down with ¾ length sleeves in DROPS Merino Extra Fine. Sizes S - XXXL.
DROPS 176-9 |
||||||||||||||||||||||||||||
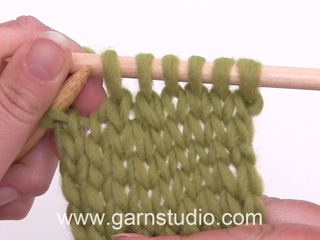
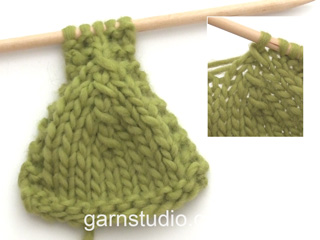
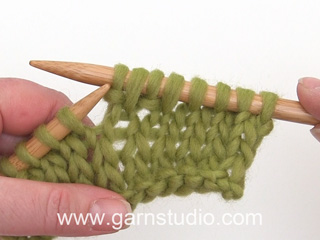
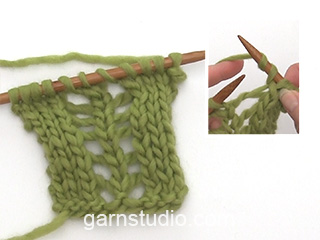
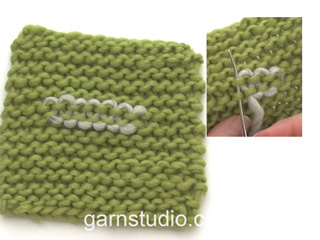
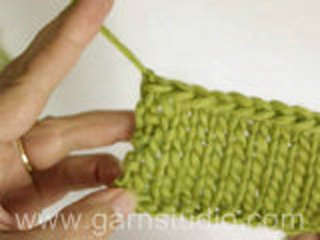
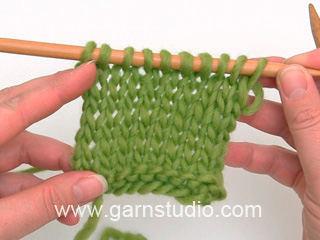
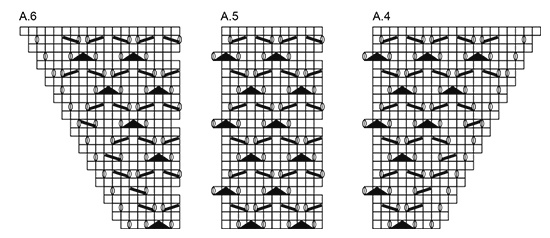
RIDGE/GARTER STITCH (worked back and forth): 1 ridge = Work 2 rows knit. PATTERN: See diagrams A.1 to A.7. The diagrams show all rows in the pattern seen from the right side. A.1 is the left band and A.3 is the right band. RAGLAN: SLEEVE: Increases on the sleeve are part of diagrams A.2, A.4 and A.6. Increase 2 stitches on each sleeve every 2nd row, purl the yarn overs on the next row, there will be holes. BODY: Increase 2 stitches on the back piece and 1 stitch on each front piece as follows: ON EACH ROW: Increase as follows from the right side: Start 2 stitches before A.2: Make 1 yarn over, knit 2, work A.2, knit 2, make 1 yarn over. Repeat before and after the next A.2. Purl the yarn overs on next row, there will be holes. Increase as follows from the wrong side: Start 2 stitches before A.2: Make 1 yarn over, purl 2, work A.2, purl 2, make 1 yarn over. Repeat before and after the next A.2. Knit the yarn overs on next row, there will be holes. ON EVERY 2ND ROW: Increase as follows from the right side: Start 2 stitches before A.2: Make 1 yarn over, knit 2, work A.2, knit 2, make 1 yarn over. Repeat before and after the next A.2. Purl the yarn overs on next row, there will be holes. ON EVERY 4TH ROW: ROW 1 (= from the right side): Start 2 stitches before A.2: Make 1 yarn over, knit 2, work A.2, knit 2, make 1 yarn over. Repeat before and after the next A.2. ROW 2 (= from the wrong side): Purl the yarn overs, there will be holes. ROW 3 (= from the right side): Start 4 stitches before A.2: Knit 2 together, make 1 yarn over, knit 2, work A.2, knit 2, make 1 yarn over, slip 1 stitch as if to knit, knit 1, pass the slipped stitch over the stitch that was knitted – there are no increases, but the row of holes continues as before. Repeat before and after the next A.2. ROW 4 (= from the wrong side): Purl the yarn overs, there will be holes. INCREASE TIP: Start 1 stitch before the marker thread, make 1 yarn over, knit 2 (the marker thread sits between theses stitches), make 1 yarn over. Purl the yarn overs twisted on next row. DECREASE TIP: Start 3 stitches before the marker thread, knit 2 together, knit 2 (the marker thread sits between these 2 stitches), slip 1 stitch as if to knit, knit 1, pass the slip stitch over the stitch that was knitted. The stitches that do not fit the pattern mid under sleeve are worked in stockinette stitch. ---------------------------------------------------------- JACKET: The piece is worked back and forth on a circular needle from mid front, top downwards. Cast on 110-114-118-122-126-130 stitches (including 11 band stitches in each side towards mid front) with circular needle size 4 mm / US 6 and Merino Extra Fine. Work 2 RIDGES – see description above, on the last row of the ridges increase 20 stitches evenly along the row = 130-134-138-142-146-150 stitches. Continue to work as follows – from the right side: Work A.1 (= 11 stitches ), 16-17-18-19-20-21 stitches stockinette stitch, 1 yarn over, 1 stitch stockinette stitch (= left front piece), A.2 (= 17 stitches) (= left sleeve), 1 stitch stockinette stitch, 1 yarn over, 38-40-42-44-46-48 stitches stockinette stitch, 1 yarn over, 1 stitch stockinette stitch ( = back piece), A.2 (= right sleeve), 1 stitch stockinette stitch, 1 yarn over, 16-17-18-19-20-21 stitches stockinette stitch, A.3 (= 11 stitches) (= right front piece). The first increase to RAGLAN is now complete. Continue upwards with this division of pattern and stockinette stitch. Increase to raglan as described above. On the sleeve increase every 2nd row 22-26-29-31-32-33 times, on the body increase every row 0-0-0-0-0-6 times, then every 2nd row 14-16-17-25-32-30 times, and finally every 4th row 4-5-6-3-0-0 times. NOTE! When A.2 is finished, continue working as follows (across the stitches on the sleeves): A.4 (= 8 stitches), A.5 (= 12 stitches), A.6 (= 7 stitches). When A.4 to A.6 are worked 1 time in height work as follows: A.4, A.5 across the next 36 stitches (= 3 repeats), A.6. Every time A.4, A.5 and A.6 are worked one time in height continue with 2 more repeats of A.5 between A.4 and A.6. Finish A.4, A.5 and A.6 when you have increased in total 22-26-29-31-32-33 times on the sleeves and in total 18-21-23-28-32-36 times on each front piece/back piece. After all the increases, there are 61-69-75-79-81-83 stitches on each sleeve, 76-84-90-102-112-122 stitches on the back piece and 46-50-53-59-64-69 stitches on each front piece= 290-322-346-378-402-426 stitches in total. The next row is worked as follows from the wrong side: Work 46-50-53-59-64-69 stitches (= right front piece), place the next 61-69-75-79-81-83 stitches on a thread (= sleeve), cast on 8-8-10-10-12-14 new stitches, work the next 76-84-90-102-112-122 stitches (= back piece), place the next 61-69-75-79-81-83 stitches on a thread (= sleeve), cast on 8-8-10-10-12-14 new stitches, work the last 46-50-53-59-64-69 stitches (= left front piece). BODY: There are now 184-200-216-240-264-288 stitches on the body. Continue with A.1, stockinette stitch and A.3 as before. Insert a marker thread in each side, in the middle of the 8-8-10-10-12-14 new stitches which were cast on. THE PIECE IS NOW MEASURED FROM HERE. When the piece measures 3 cm / 1" increase 1 stitch on each side of each marker thread (= 4 stitches increased), increase every 7 cm / 2¾" in total 4 times – READ INCREASE TIP = 200-216-232-256-280-304 stitches. When the piece measures 27-26-26-26-27-29 cm / 10½"-10¼"-10¼"-10¼"-10½"-11½" work A.7 with A.1 and A.3 in each side, then cast/bind off. The piece measures approx. 50-52-54-56-58-60 cm / 19¾"-20½"-21¼"-22"-22¾"-23⅝" from the cast-on edge. SLEEVE: Place the stitches from the thread back on double pointed needles size 4 mm / US 6 and knit up 1 stitch in each of the 8-8-10-10-12-14 stitches which were cast on under the sleeve = 69-77-85-89-93-97 stitches. Insert 1 marker thread in the middle of the new stitches = mid undersleeve. Continue with A.5, the stitches which do not fit the pattern mid under sleeve are worked in stockinette stitch. Continue this pattern. When the piece measures 3-3-3-5-5-5 cm / 1"-1"-1"-2"-2"-2" decrease 1 stitch on each side of the marker thread, decrease every 3-2-1½-1½-1-1 cm / 1"-¾"-½"-½"-⅜"-⅜" in total 9-12-15-16-17-18 times – READ DECREASE TIP = 51-53-55-57-59-61 stitches. When the piece measures 33-30-29-28-28-28 cm / 13"-11¾"-11½"-11"-11"-11" work A.7 across all the stitches. Bind off when A.7 has been worked 1 time in height, the sleeve measures approx. 36-33-32-31-31-31 cm / 14¼"-13"-12½"-12¼"-12¼"-12¼". Work the other sleeve the same way. Place 6-6- 6-7- 7-7 buttons evenly distributed on left front band and sew them on. There are no buttonholes, use the holes in the pattern on right front band. |
||||||||||||||||||||||||||||
Diagram explanations |
||||||||||||||||||||||||||||
|
||||||||||||||||||||||||||||
Have you made this or any other of our designs? Tag your pictures in social media with #dropsdesign so we can see them! Do you need help with this pattern?You'll find tutorial videos, a Comments/Questions area and more by visiting the pattern on garnstudio.com. © 1982-2024 DROPS Design A/S. We reserve all rights. This document, including all its sub-sections, has copyrights. Read more about what you can do with our patterns at the bottom of each pattern on our site. |
With over 40 years in knitting and crochet design, DROPS Design offers one of the most extensive collections of free patterns on the internet - translated to 17 languages. As of today we count 304 catalogs and 11422 patterns - 11417 of which are translated into English (US/in).
We work hard to bring you the best knitting and crochet have to offer, inspiration and advice as well as great quality yarns at incredible prices! Would you like to use our patterns for other than personal use? You can read what you are allowed to do in the Copyright text at the bottom of all our patterns. Happy crafting!
Comments / Questions (27)
Els Van Zantvliet wrote:
Bij A1 en A3 staan in de teruggaande naalden bolletjes: 2 steken recht in een steek. Hoe doe ik dat? Ik kon geen filmpje vinden. Alvast bedankt. Groetjes Els
26.05.2022 - 09:51DROPS Design answered:
Dag Els,
Je kan 1 steek in de voorste lus van de steek breien en 1 steek in de achterste lus van de steek. Ik kon inderdaad ook geen video vinden. Je zou deze video kunnen bekijken, waarbij je de omslag achterwege laat.
28.05.2022 - 18:59Francisca Albert wrote:
Hola Estoy haciendo un tejido donde el diagrama muestra unos puntos que salen hacia afuera Como los interpreto? Es mi primer tejido con Ustedes
06.02.2021 - 00:03DROPS Design answered:
Hola Francisca, esto significa que hay mas puntos en algunas filas en el diagrama y menos en otro diagrama (para compensar el numero de puntos). Trabaja como antes y repite los diagramas segun el patron. Buen trabajo!
11.02.2021 - 08:29Christine Buberl wrote:
Ich finde in der Anleitung keine Angabe über die Knopflöcher. Wie und in welchem Abstand werden sie gemacht? Danke für die Antwort!
20.07.2020 - 21:56DROPS Design answered:
Liebe Frau Buberl, der Hinweis wurde am Ende der Anleitung nach den Ärmeln hinzugefügt. Es werden keine Knopflöcher gearbeitet, sondern die Knöpfe werden durch die Muster-Löcher zugeknöpft. Viel Spaß beim Stricken!
21.07.2020 - 08:58Ana wrote:
En primer lugar agradeceros los patrones gratuitos, ya he hecho varios con distintas calidades, me encantan vuestras lanas, la relación precio y calidad muy buenas. El modelo es precioso, comencé a realizarlo con Puna, pero me han parecido las explicaciones muy enrevesadas, he desistido, haré otro que me resulte más sencillo de entender. De todas formas, muchas gracias por vuestro trabajo.
17.02.2019 - 22:23Sonia wrote:
Hola, de verdad que adoro los patrones y agradezco que sean gratuitos pero están muy regular explicados. Se necesitan más comas y menos resumen. Hay muchas cosas que hay que adivinar. Y creo que no soy la única que piensa eso. Sólo hay que dar un repaso a los comentarios. Es genial tener patrones gratuitos, pero de qué sirven si no se pueden tejer.
06.10.2018 - 23:40Izabela wrote:
Czy w schemacie A.1 i A.3 są podane rzędy po kolei czy tylko nieparzyste
17.02.2018 - 12:44DROPS Design answered:
Witaj Izabelo, są podane wszystkie rzędy po kolei. Miłej robótki!
18.02.2018 - 22:15Looten wrote:
Bonjour, Pouvez-vous me donner la légende des diagrammes svp ? Elle ne s'affiche pas correctement sur mon ordinateur. A la place j'ai des points d'interrogation. Merci.
20.01.2018 - 07:49DROPS Design answered:
Bonjour Mme Looten, la légende des diagrammes figure bien sur chaque symbole, vérifiez les paramètres de votre navigateur (mise à jour etc...), elle devrait s'afficher. Bon tricot!
22.01.2018 - 09:06Valentina wrote:
Buongiorno desidero sapere se è possibile avere le spiegazioni per il modello 'Honey blossom cardigan' DRPS 176-9 coi ferri normali e non con i ferri circolari. Grazie e saluti valentina
24.09.2017 - 15:57DROPS Design answered:
Buonasera Valentina, questo modello è un cardigan, quindi viene lavorato avanti e indietro sui ferri: può utilizzare i ferri dritti seguendo le stesse istruzioni. Buon lavoro!
24.09.2017 - 18:25Anette Ulriksen Thune wrote:
Under jakken i første afsnit, næstsidste linje står der: derefter på hver 2.pind 14-16-17-25-30 gange. Er det rigtig for alle andre steder er det en række på 6 tal
27.08.2017 - 20:30DROPS Design answered:
Hej Anette, du har ret, her skal der også være 6 størrelser. Vi skal få det rettet og lagt ud på opskriften. Tak for information! :)
05.09.2017 - 15:58Kirsten Schmidt wrote:
Er der fejl i diagram A1? Vil tro at A1 og A3 skal være ens, blot spejlvendte. Eller skal man strikke 2 sm og slå om både på ret og vrangsiden af A1?
06.06.2017 - 22:59DROPS Design answered:
Hej Kirsten, du skal følge diagrammet, så vil du se at det bliver ens i begge sider mod midt foran. God fornøjelse!
09.06.2017 - 15:22