Warm Waves

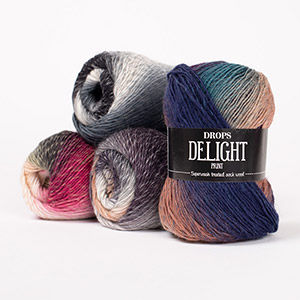
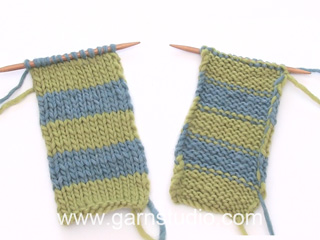
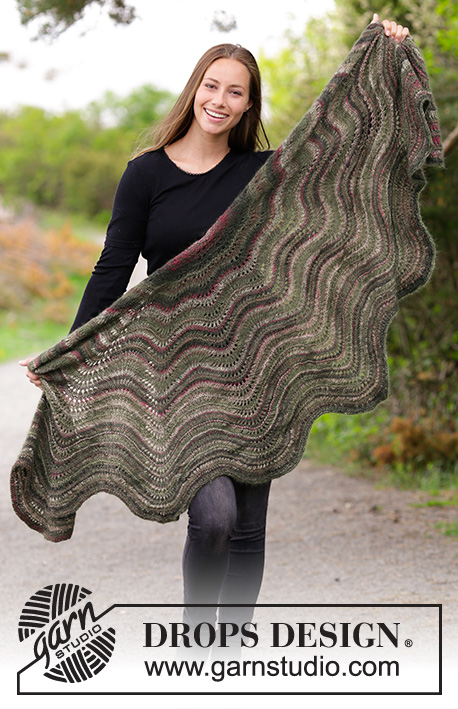
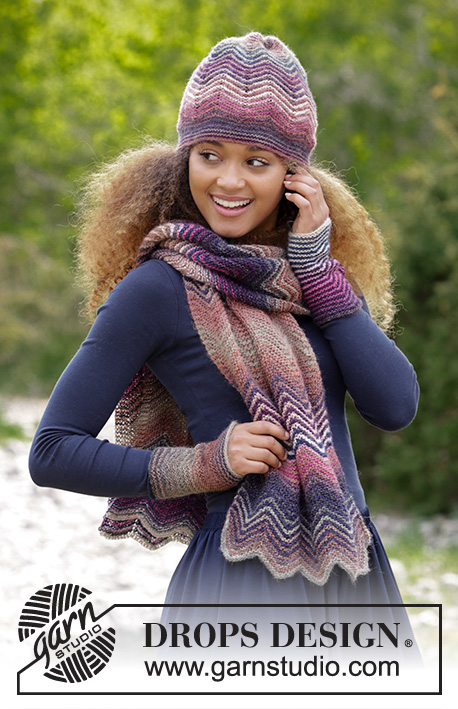
Set consists of: Knitted scarf, hat and wrist warmers with stripes and zig-zag pattern in garter stitch. All parts are knitted in DROPS Delight.

DROPS 180-32
DROPS design: Pattern de-174
Yarn group A
----------------------------------------------------------
For entire set use approx. 200 g of each color in all sizes in DROPS Delight.
----------------------------------------------------------

SCARF:
Measurements: Length: 150 cm / 59" Width: 35 cm / 13¾"
Materials:
DROPS DELIGHT from Garnstudio (belongs to yarn group A)
150 g color no 05, beige/gray/pink
150 g color 18, fall forest

Piece can also be knitted with yarn from:
"Alternative yarn (yarn group A)" - see link below.

DROPS CIRCULAR NEEDLE (60 or 80 cm / 24" or 32") SIZE 3.5 mm/US 4 – or size needed to get 28 stitches and 30 rows in zig-zag pattern = width 10 cm / 4" and 10 cm / 4" vertically.
----------------------------------------------------------

HAT:
Size: S/M – L/XL
Head circumference: approx. 54/56 - 58/60 cm / 21"/22" - 22½"/23½"
Materials:
DROPS DELIGHT from Garnstudio (belongs to yarn group A)
50 g in both sizes in color no 05, beige/gray/pink
50 g in both sizes in color 18, fall forest

Piece can also be knitted with yarn from:
"Alternative yarn (yarn group A)" - see link below.

DROPS CIRCULAR NEEDLE (60 or 80 cm / 24" or 32") SIZE 3.5 mm/US 4 – or size needed to get 28 stitches and 30 rows in zig-zag pattern = width 10 cm / 4" and 10 cm / 4" vertically.

DROPS CIRCULAR NEEDLE (60 or 80 cm / 24" or 32") SIZE 2.5 mm/ US 1.5 - for garter stitch.
----------------------------------------------------------

WRIST WARMERS:
Size: S/M – L/XL
Measurements: Circumference: approx. 17-19 cm / 6¾"-7½" Length: approx. 16-17 cm / 6¼"-6¾"
Materials:
DROPS DELIGHT from Garnstudio (belongs to yarn group A)
50 g in both sizes in color no 05, beige/gray/pink
50 g for all sizes in color 18, fall forest

Piece can also be knitted with yarn from:
"Alternative yarn (yarn group A)" - see link below.

DROPS STRAIGHT NEEDLES size 3.5 mm / US 4 – or size needed to get 28 stitches and 30 rows in zig-zag pattern = width 10 cm / 4" and 10 cm / 4" vertically.

-------------------------------------------------------

Alternative Yarn – See how to change yarns here
Yarn Groups A to F – Use the same pattern and change the yarn here
Yarn usage using an alternative yarn – Use our yarn converter here

-------------------------------------------------------

Pattern instructions

NOTE: This pattern is written in American English. All measurements in charts are in cm. For conversion from inches to cm - click here. There are different terms for crocheting in American and British English. If this pattern includes crochet, click for "crochet terms" here. For this pattern in British English, please click here.
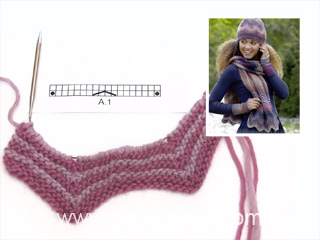
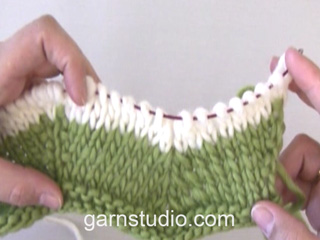
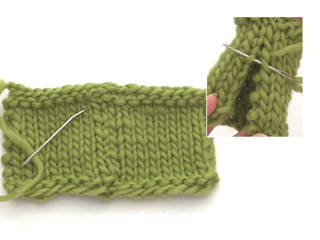
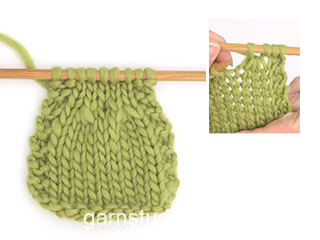
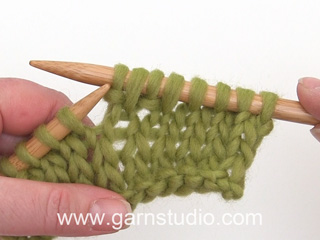
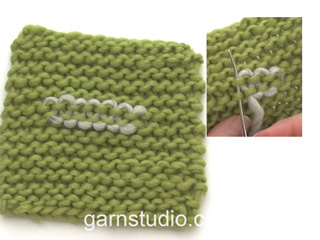
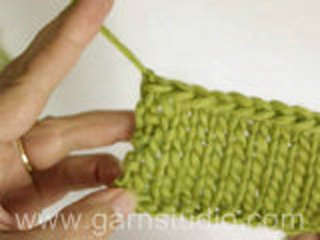
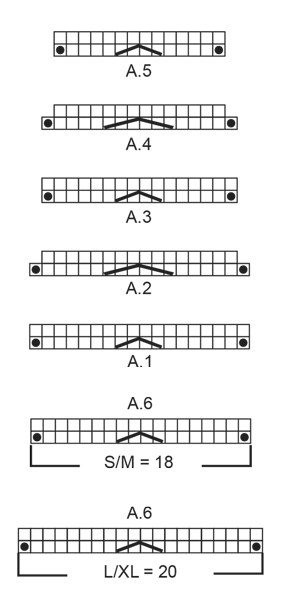
INFORMATION FOR PATTERN:

GARTER STITCH (back and forth):
1 ridge = knit 2 rows.

PATTERN:
Scarf: See diagram A.1.
Hat: See diagrams A.1 to A.5.
Wrist warmers: See diagram A.6. Choose diagram for your size.
Diagrams show all rows in pattern seen from the right side. NOTE! Knit all rows.

STRIPES:
* Work 2 rows with beige/gray/pink, work 2 rows with fall forest *, repeat from *-* until finished measurements.

BIND-OFF TIP:
To avoid a tight bind-off edge you may use a needle ½ size larger.
----------------------------------------------------------

SCARF:
Work back and forth on circular needle in STRIPES - see explanation above. Cast on 96 stitches on circular needle size 3.5 mm / US 4 with beige/gray/pink. Work 1 ridge in GARTER STITCH - see explanation above. Then work as follows: Work 3 stitches in garter stitch, A.1 - read PATTERN above, over the next 90 stitches (= 5 repetitions of 18 stitches), finish with 3 stitches in garter stitch. Continue this pattern - REMEMBER THE KNITTING GAUGE. When piece measures 150 cm / 59", bind off - read BIND-OFF TIP.

----------------------------------------------------------

HAT:
Worked back and forth on circular needle and sewn tog when finished.
Work in GARTER STITCH and STRIPES - see explanation above.
Cast on 136-152 stitches (including 1 edge stitch in each side) on circular needle size 2.5 mm / US 1.5 with beige/gray/pink. Work 4 cm / 1½". Work 1 row and increase 10-12 stitches evenly = 146-164 stitches. Switch to circular needle size 3.5 mm / US 4 and continue according to diagram A.1 - read PATTERN above (= 8-9 repetitions in width), with 1 edge stitch in garter stitch in each side (continue edge stitches until finished measurements). REMEMBER THE GAUGE!
When piece measures 16 cm / 6¼", work 1 repetition of A.2 vertically = 130-146 stitches. Then work according to diagram A.3. When piece measures approx. 20 cm / 8", work 1 repetition of A.4 vertically = 114-128 stitches. Then work according to diagram A.5. When piece measures 25-26 cm / 9¾"-10¼", knit all stitches together 2 by 2 = 57-64 stitches remain on needle. On next 2 rows knit 1-0 stitches and then knit together all stitches 2 by 2 = 15-16 stitches. Cut the yarn and pull it through the remaining stitches, tighten together and fasten. Sew hat together mid back, sew inside 1 edge stitch.

----------------------------------------------------------

WRIST WARMER:
Worked back and forth and sewn tog when finished.
Work in GARTER STITCH and STRIPES - see explanation above.
Cast on 44-48 stitches on needle size 3.5 mm / US 4 and work pattern as follows: Work 26-28 stitches in garter stitch, work A.6 (= 18-20 stitches) - read PATTERN above. Continue like this. REMEMBER THE GAUGE! When piece measures 16-17 cm / 6¼"-6¾" (measure above ridges at the beginning), bind off - read BIND-OFF TIP above. Sew together in outer loops of edge stitches to avoid a chunky seam. Work another wrist warmer the same way but reversed.

Diagram

All measurements in charts are in cm.

symbols = knit from right side, knit from wrong side
symbols = work 2 stitches in one stitch
symbols = slip 1 stitch knitwise, knit 1, pass slipped stitch over stitch worked, knit 2 together (= 2 stitches decreased)
symbols = slip 1 stitch knitwise, knit 2 together, pass slipped stitch over stitch worked, knit 3 together (= 4 stitches decreased)
diagram
Do you have a question? See a list of frequently asked questions (FAQ)

Knitting tension is what determines the final measurements of your work, and is usually measured per 10 x 10 cm. It is provided like so: number of stitches in width x number of rows in height - eg: 19 stitches x 26 rows = 10 x 10 cm.

The knitting tension is very individual; some people knit/crochet loosely while others work tightly. You adjust the knitting tension with the needle size, which is why the suggested needle size only serve as a guide! You need to adjust this (up or down) to ensure that YOUR knitting tension matches the knitting tension provided in the pattern. If you work with a different knitting tension than provided you will have a different yarn consumption, and your work will have different measurements than what the pattern suggests.

The knitting tension also determines which yarns can replace each other. As long as you achieve the same knitting tension you can replace one yarn with another.

See DROPS lesson: How to measure your tension/gauge

See DROPS video: How to make a gauge tension swatch

The required amount of yarn is provided in grams, eg: 450 g. To calculate how many balls you’ll need you first need to know how many grams are in 1 ball (25g, 50g or 100g). This information is available if you click on the individual yarn quality on our pages. Divide the amount required with the amount of each ball. For example, if each ball is 50g (the most common amount), the calculation will be as follows: 450 / 50 = 9 balls.

The important thing when changing from one yarn to another is that the knitting/crochet tension remains the same. This is so that the measurements of the finished piece will be the same as on the sketch provided. It is easier to achieve the same knitting tension using yarns from the same yarn group. It is also possible to work with multiple strands of a thinner yarn to achieve the knitting tension of a thicker one. Please try our yarn converter. We recommend you to always work a test swatch.

Please NOTE: when changing yarn the garment might have a different look and feel to the garment in the photo, due to individual properties and qualities of each yarn.

See DROPS lesson: Can I use a different yarn than the one mentioned in the pattern?

All our yarns are categorised into yarn groups (from A to F) according to thickness and knitting tension – group A contains the thinnest yarns and group F the thickest. This makes it easier for you to find alternative yarns to our patterns, should you wish to switch yarn. All yarns within the same group have a similar knitting tension and can easily replace each other. However, different yarn qualities have different structures and properties which will give the finished work a unique look and feel.

Click here for an overview of the yarns in each yarn group

At the top of all our patterns you’ll find a link to our yarn converter, which is a helpful tool should you wish to use a different yarn than suggested. By filling in the yarn quality you wish to replace, the amount (in your size) and number of strands, the converter will present good alternative yarns with the same knitting tension. Additionally it will tell you how much you’ll require in the new qualities and whether you’ll need to work with multiple strands. Most skeins are 50g (some are 25g or 100g).

If the pattern is worked with multiple colours, every colour will have to be converted separately. Similarly, if the pattern is worked with several strands of different yarns (for example 1 strand Alpaca and 1 strand Kid-Silk) you will have to find alternatives for each, individually.

Click here to see our yarn converter

Since different yarns have different qualities and textures we have chosen to keep the original yarn in our patterns. However, you can easily find options among our available qualities by using our yarn converter, or simply pick a yarn from the same yarn group.

It is possible that some retailers still have discontinued yarns in stock, or that someone has a few skeins at home that they would like to find patterns for.

The yarn converter will provide both alternative yarn as well as required amount in the new quality.

If you think it's hard to decide what size to make, it can be a good idea to measure a garment you own already and like the size of. Then you can pick the size by comparing those measures with the ones available in the pattern's size chart.

You'll find the size chart at the bottom of the pattern.

See DROPS lesson: How to read size chart

The needle size provided in the pattern serves only as a guide, the important thing is to follow the knitting tension. And since knitting tension is very individual, you will have to adjust the needle size to ensure that YOUR tension is the same as in the pattern – maybe you’ll have to adjust 1, or even 2 needle sizes, up or down to achieve the correct tension. For this, we recommend that you work test swatches.

Should you work with a different knitting tension than the one provided, the measurements of the finished garment might deviate from the measurement sketch.

See DROPS lesson: How to measure your tension/gauge

See DROPS video: How to make a gauge tension swatch

Working a garment top-down provides more flexibility and room for personal adjustment. For example it is easier to try the garment on while working, as well as making adjustments to length of yoke and shoulder caps.

The instructions are carefully explaining every step, in the correct order. Diagrams are adjusted to the knitting direction and are worked as usual.

The diagram depicts all rows/rounds, and every stitch seen from the right side. It is read from bottom to top, from right to left. 1 square = 1 stitch.

When working back and forth, every other row is worked from the right side and every other row is worked from the wrong side. When working from the wrong side, the diagram will have to be worked reversed: from left to right, knit stitches are purled, purl stitches are knit etc.

When working in the round every round is worked from the right side and the diagram are worked from right to left on all rounds.

See DROPS lesson: How to read knitting diagrams

The diagram depicts all rows/rounds, and every stitch seen from the right side. It is worked from bottom to top, from right to left.

When working back and forth every other row is worked from the right side: from right to left and every other row is worked from the wrong side: from left to right.

When working in the round, every row in the diagram are worked from the right side, from right to left.

When working a circular diagram you start in the middle and work your way outwards, counter clockwise, row by row.

The rows usually start with a given number of chain stitches (equivalent to the height of the following stitch), this will either be depicted in the diagram or explained in the pattern.

See DROPS lesson: How to read crochet diagrams

Instructions for working several diagrams after each other on the same row/round, will often be written like so: “work A.1, A.2, A.3 a total of 0-0-2-3-4 times". This means you work A.1 once, then A.2 is worked once, and A.3 is repeated (in width) the number of times provided for your size – in this case like so: S = 0 times, M = 0 times, L=2 times, XL= 3 times and XXL = 4 times.

The diagrams are worked as usual: begin with the first row in A.1, then work the first row in A.2 etc.

See DROPS lesson: How to read knitting diagrams

See DROPS lesson: How to read crochet diagrams

The total width of the garment (from wrist-to-wrist) will be larger in the larger sizes, despite the actual sleeves being shorter. The larger sizes have longer sleeve caps and wider shoulders, so there will be a good fit in all sizes.

The measurement sketch/schematic drawing provides information regarding the full length of the garment. If it’s a jumper or a jacket the length is measured from the highest point on the shoulder (usually closest to the neckline), and straight down to the bottom of the garment. It is NOT measured from the tip of shoulder. Similarly, the length of yoke is measured from the highest point on the shoulder and down to where yoke is split into body and sleeves.

See DROPS lesson: How to read a schematic drawing

Diagrams are often repeated on the round or in height. 1 repeat is the diagram the way it appears in the pattern. If it says to work 5 repeats of A.1 in the round, then you work A.1 a total of 5 times after/next to each other in the round. If it says to work 2 repeats of A.1 vertically/in height you work the entire diagram once, then begin again at the start and work the entire diagram one more time.

Chain stitches are slightly narrower than other stitches and to avoid working the cast-on edge too tight, we simply chain more stitches to begin with. The stitch count will be adjusted on the following row to fit the pattern and measurement sketch.

The rib edge is more elastic and will contract slightly compared to, for example, stocking stitch. By increasing before the rib edge, you avoid a visible difference in width between the rib edge and the rest of the body.

It’s very easy to cast off too tightly, and by making yarn overs while casting off (and simultaneously casting these off) you avoid a too tight cast off edge.

See DROPS video: How to bind off with yarn overs (yo)

To achieve an even increase (or decrease) you can increase on, for example: every 3rd and 4th row alternately, like so: work 2 rows and increase on the 3rd row, work 3 rows and increase on the 4th. Repeat this until the increase is complete.

See DROPS lesson: Increase or decrease 1 st on every 3rd and 4th row alternately

Should you prefer to work in the round instead of back and forth, you may of course adjust the pattern. You’ll need to add steeks mid-front (usually 5 stitches), and follow the instructions. When you would normally turn and work from the wrong side, simply work across the steek and continue in the round. At the end you’ll cut the piece open, pick up stitches to work bands, and cover the cut edges.

See DROPS video: How to knit steeks and cut open

Should you prefer to work back and forth instead of in the round, you may of course adjust the pattern so you work the pieces separately and then assemble them at the end. Divide the stitches for the body in 2, add 1 edge stitch in each side (for sewing) and work the front and back pieces separately.

See DROPS lesson: Can I adapt a pattern for circular needles into straight needles?

Pattern repeats can vary slightly in the different sizes, in order to get the correct proportions. If you’re not working the exact same size as the garment in the photo, yours might deviate slightly. This has been carefully developed and adjusted so that the complete impression of the garment is the same in all sizes.

Make sure to follow instructions and diagrams for your size!

If you have found a pattern you like which is available in women’s size it’s not very difficult to convert it to men’s size. The biggest difference will be the length of sleeves and body. Start working on the women size that you think would fit across the chest. The additional length will be worked right before you cast off for the armhole/sleeve cap. If the pattern is worked top-down you can add the length right after the armhole or before the first decrease on sleeve.

Regarding additional yarn amount, this will depend on how much length you add, but it is better with a skein too many than too few.

All yarns will have excess fibres (from production) that might come off as lint or shedding. Brushed yarns (ie hairier yarns) have more of these loose, excess fibres, causing more shedding.

Shedding also depends on what is worn under or over the garment, and whether this pulls at the yarn fibres. It’s therefore not possible to guarantee that there will be no shedding

Below are some tips on how to get the best result when working with hairier yarns:

1. When the garment is finished (before you wash it) shake it vigorously so the looser hairs come off. NOTE: do NOT use a lint roller, brush or any method that pulls at the yarn.

2. Place the garment in a plastic bag and put it in your freezer - the temperature will cause the fibres to become less attached to each other, and excess fibres will come off easier.

3. Leave in the freezer for a few hours before taking it out and shaking it again.

4. Wash the garment according to the instructions on the yarn label.

Pilling is a natural process that happens to even the most exclusive of fibers. It's a natural sign of wear and tear that is hard to avoid, and that is most visible in high friction areas of your garment like a sweater's arms and cuffs.

You can make your garment look as new by removing the pilling, using a fabric comb or a pill/lint remover.

Still can't find the answer you need? Then scroll down and leave your question so one of our experts can try to help you. This will be done normally within 5 to 10 working days.
In the meantime, you can read the questions and answers that others have left to this pattern or join the DROPS Workshop on Facebook to get help from fellow knitters/crocheters!

You might also like...

Post a comment to pattern DROPS 180-32

We would love to hear what you have to say about this pattern!

If you want to leave a question, please make sure you select the correct category in the form below, to speed up the answering process. Required fields are marked *.

Comments / Questions (23)

country flag Ragna wrote:

Hei, jeg skal strikke skjerfet. På mønster A1 ser det ut som vi strikker masker sammen, men hvor i mønsteret øker vi. Må vel erstatte de masker som vi strikker sammen?

12.01.2021 - 20:07

DROPS Design answered:

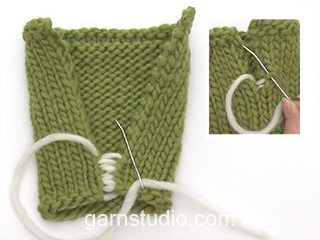
Hei Ragna, I diagrammet øker du ved å strikke 2 masker i en maske på begynnelse og slutten av rapporten (svarte sirkelen). Disse erstatte maskene som er strikket sammen i midten av rapporten. God fornøyelse!

13.01.2021 - 07:47

country flag Margareta Karlsson wrote:

Hur stickar jag A.2

23.09.2020 - 14:28

DROPS Design answered:

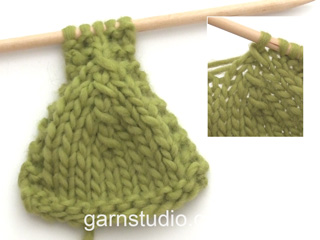
Hej Margareta. Du stickar första varvet från rätsidan såhär: sticka 2 maskor i 1 maska (dvs sticka både i bakre och främre maskbågen), 5 rätmaskor, lyft 1 maska som om den skulle stickas rät, sticka 2 maskor räta tillsammans, drag den lyfta maskan över maskorna som stickades, sticka 3 maskor räta tillsammans (= 4 maskor minskade), 5 rätmaskor, sticka 2 maskor i 1 maska (dvs sticka både i bakre och främre maskbågen). Andra varvet (=avigsidan) stickar du rätmaskor över alla maskor. Mvh DROPS Design

24.09.2020 - 11:02

country flag Jacqueline Kik wrote:

Ik snap niet wat er bedoeld wordt in het patroon voor de muts met de volgende instructie nadat ik 57 steken overgehouden heb op de naald: Brei op de volgende 2 naalden 1-0 recht

03.01.2020 - 15:50

DROPS Design answered:

Dag Jacqueline

In de kleinste maat brei je de 1 steek recht en vervolgens alle andere steken 2 aan 2 recht samen, in de grootste maat brei je 0 recht en vervolgens alle andere steken 2 aan 2 recht samen.

08.01.2020 - 09:15

country flag Susana wrote:

Creo que la bufanda no se debe hacer en una sola pieza de 1,50 de largo, sino en dos piezas iguales de 75 cm y luego unirlas por la parte recta. De otro modo, es imposible que los dos extremos queden iguales, con picos.

13.12.2019 - 18:42

country flag Ramona wrote:

Hallo, kann ich die Farbe auch nur mit einer art Farbe Stricken? Ich habe noch nie farbwexhsel gemacht und zudem hatte ich vor, die Mütze für einen Herren zu machen, daher wollte ich eine andere Farbe nehmen wie etwa grau oder blau. In einer wolle sind ja schon mehrere Farben enthalten, daher fürchte ich, dass es mit mehreren wollen zu chaotisch wird bzw kann ich mir beim Betrachten im Internet nicht so gut vorstellen, welche zusammenpassen? Vielen Dank für Ihre Hilfe!!

24.10.2019 - 13:09

DROPS Design answered:

Liebe Ramona, gerne können Sie auch mit einem uni Farben stricken, versuchen Sie unseren Garnumrechner, um Alternativen zu finden. DROPS Delight enthält selbst verschiedene Farben, einschl. graue und blaue Farben. Viel Spaß beim stricken!

24.10.2019 - 14:25

country flag Sabina Dyli wrote:

Hi there. I've strated this pattern but it is nowhere near to the one on the picture! Can you advise on which colour of each of the two dfifferent balls should I start to get the same look as in the picture please? thanks

12.10.2019 - 22:21

DROPS Design answered:

Dear Mrs Dyli, due to the yarn's character, and remember that the colours may vary from screen to screen in the same way that shades may vary slightly from dyelot to deylot - the colours may then vary from the modell in the picture, Do not hesitate to contact your DROPS store for any further assistance. Happy knitting!

14.10.2019 - 10:06

country flag Nerea wrote:

En algún comentario que he leído, se dice que una vez terminado el trabajo no queda igual que en la foto, está más apagado. Es verdad? Hay algún error con los números de color?? Gracias!

18.10.2017 - 09:45

DROPS Design answered:

Hola Nerea. Los colores son los mismos. El efecto de un colorido más vivo o más apagado depende de como se combinen los dos ovillos, es decir, el tramo claro de un ovillo con el tramo oscuro de otro da un efecto más vivo que la combinación de dos tramos oscuros.

05.11.2017 - 12:10

country flag Susanne wrote:

So, I checked the pattern in other languages and it seems that it is only the Danish one which is incorrect, just as I suspected. Please have that amended asap so I can start the work

24.07.2017 - 11:43

country flag Susanne wrote:

So, it is ok to write in e.g. German, but I cannot ask a question in Danish?? That's quite appaling! Also, quite disrespectful that you can't write my name correctly. But my question was if the pattern was correct as you say 'an empty square' is ret på retsiden, ret på vrangsiden but it is exactly the same for 'a square with a black dot in it' to me it sounds wrong?

24.07.2017 - 11:16

DROPS Design answered:

We are sorry Susanne, our Danish colleagues are right now in summer vacation but I'll try to explain you in English - the symbol with a black dot should be an increase, ie work 2 sts in the same st - correction has been done. Thank you. Happy knitting!

24.07.2017 - 11:42

country flag Susanne wrote:

Nicole: sad to hear that about the colours, I have bought the same combination because it looks very nice. I haven't knitted it yet, because the pattern seems wrong to me and they don't seem willing to reply to my question :(

24.07.2017 - 06:46

DROPS Design answered:

Dear Suzanne, can you please ask your question in English /in German here? so that we can check together what you think is wrong. Thank you!

24.07.2017 - 09:52