DROPS Cotton Light uni colour 50% Cotton, 50% Polyester |
1.40 € /50g |
Order |
Clicking the ORDER button will redirect you to Wool Warehouse Direct Ltd website
The yarn cost is calculated from the pattern’s smallest size and the yarn’s cheapest product type. Looking for an even better price? You might find it on the DROPS Deals!
-------------------------------------------------------
Alternative Yarn – See how to change yarns here
Yarn Groups A to F – Use the same pattern and change the yarn here
Yarn usage using an alternative yarn – Use our yarn converter here
-------------------------------------------------------
DROPS Cotton Light uni colour 50% Cotton, 50% Polyester 1.40 € /50g Order |
Clicking the ORDER button will redirect you to Wool Warehouse Direct Ltd website
The yarn cost is calculated from the pattern’s smallest size and the yarn’s cheapest product type. Looking for an even better price? You might find it on the DROPS Deals!
This pattern has been corrected. Click here to see the correction/s.
= Work 4 chain stitches and form them to a ring with 1 slip stitch in the first chain stitch | |
= 1 chain stitch | |
= 1 double crochet around chain-space/between 2 treble crochets | |
= 1 double crochet in stitch | |
= The round begins with 1 chain stitch and finishes with 1 slip stitch in 1st chain stitch at beginning of the round, then work slip stitches up to the 2nd chain-space | |
= Work 2 treble crochets together around the chain-stitch ring/chain-space as follows: Work 1 treble crochet, but wait with the last pull through, work 1 more treble crochet, but at the last pull through, pull the strand through all the loops on the hook | |
= The round begins with 3 chain stitches and is finished with 1 slip stitch in the 3rd chain stitch at the beginning of the round, then work slip stitches up to the first chain-space | |
= 1 treble crochet around chain-space | |
= 1 treble crochet in stitch | |
= 1 half treble crochet around chain-space/ between 2 triple treble crochets | |
= 1 double treble crochet around chain-space | |
= 1 triple treble crochet in stitch/around chain-space | |
= When A.1 has been worked in height, cut the strand. Then continue with pattern from this double crochet – see description in text | |
= When the last round in A.3a to A.3b is worked, adjust the number of stitches on the 2 sides with stars shown on the sketch - see description in the text! |
Each of our patterns has specific tutorial videos to help you.
These step-by-step tutorials might also help you:
Why is the knitting/crochet tension so important?
Knitting tension is what determines the final measurements of your work, and is usually measured per 10 x 10 cm. It is provided like so: number of stitches in width x number of rows in height - eg: 19 stitches x 26 rows = 10 x 10 cm.
The knitting tension is very individual; some people knit/crochet loosely while others work tightly. You adjust the knitting tension with the needle size, which is why the suggested needle size is only meant as a guide! You need to adjust this (up or down) to ensure that YOUR knitting tension matches the knitting tension provided in the pattern. If you work with a different knitting tension than provided you will have a different yarn consumption, and your work will have different measurements than what the pattern suggests.
The knitting tension also determines which yarns can replace each other. As long as you achieve the same knitting tension you can replace one yarn with another.
See DROPS lesson: How to measure your tension/gauge
See DROPS video: How to make a gauge tension swatch
How do I know how many balls of yarn I need?
The required amount of yarn is provided in grams, eg: 450 g. To calculate how many balls you’ll need you first need to know how many grams are in 1 ball (25g, 50g or 100g). This information is available if you click on the individual yarn quality on our pages. Divide the amount required with the amount of each ball. For example, if each ball is 50g (the most common amount), the calculation will be as follows: 450 / 50 = 9 balls.
Can I use a different yarn than what the pattern suggests?
The important thing when changing from one yarn to another is that the knitting/crochet tension remains the same. This is so that the measurements of the finished piece will be the same as on the sketch provided. It is easier to achieve the same knitting tension using yarns from the same yarn group. It is also possible to work with multiple strands of a thinner yarn to achieve the knitting tension of a thicker one. Please try our yarn converter. We recommend you to always work a test swatch.
Please NOTE: when changing yarn the garment might have a different look and feel to the garment in the photo, due to individual properties and qualities of each yarn.
See DROPS lesson: Can I use a different yarn than the one mentioned in the pattern?
What are the yarn groups?
All our yarns are categorised into yarn groups (from A to F) according to thickness and knitting tension – group A contains the thinnest yarns and group F the thickest. This makes it easier for you to find alternative yarns to our patterns, should you wish to switch yarn. All yarns within the same group have a similar knitting tension and can easily replace each other. However, different yarn qualities have different structures and properties which will give the finished work a unique look and feel.
How do I use the yarn calculator?
At the top of all our patterns you’ll find a link to our yarn calculator, which is a helpful tool should you wish to use a different yarn than suggested. By filling in the yarn quality you wish to replace, the amount (in your size) and number of strands, the calculator will present good alternative yarns with the same knitting tension. Additionally it will tell you how much you’ll require in the new qualities and whether you’ll need to work with multiple strands. Most skeins are 50g (some are 25g or 100g).
If the pattern is worked with multiple colours, every colour will have to be calculated separately. Similarly, if the pattern is worked with several strands of different yarns (for example 1 strand Alpaca and 1 strand Kid-Silk) you will have to find alternatives for each, individually.
Why do you show discontinued yarns in the patterns?
Since different yarns have different qualities and textures we have chosen to keep the original yarn in our patterns. However, you can easily find options among our available qualities by using our yarn calculator, or simply pick a yarn from the same yarn group.
It is possible that some retailers still have discontinued yarns in stock, or that someone has a few skeins at home that they would like to find patterns for.
The yarn calculator will provide both alternative yarn as well as required amount in the new quality.
What size should I knit?
If you think it's hard to decide what size to make, it can be a good idea to measure a garment you own already and like the size of. Then you can pick the size by comparing those measures with the ones available in the pattern's size chart.
You'll find the size chart at the bottom of the pattern.
See DROPS lesson: How to read size chart
Why do I get the wrong knitting tension with the suggested needle size?
The needle size provided in the pattern serves only as a guide, the important thing is to follow the knitting tension. And since knitting tension is very individual, you will have to adjust the needle size to ensure that YOUR tension is the same as in the pattern – maybe you’ll have to adjust 1, or even 2 needle sizes, up or down to achieve the correct tension. For this, we recommend that you work test swatches.
Should you work with a different knitting tension than the one provided, the measurements of the finished garment might deviate from the measurement sketch.
See DROPS lesson: How to measure your tension/gauge
See DROPS video: How to make a tension/gauge swatch
Why is the pattern worked top-down?
Working a garment top-down provides more flexibility and room for personal adjustment. For example it is easier to try the garment on while working, as well as making adjustments to length of yoke and shoulder caps.
The instructions are carefully explaining every step, in the correct order. Diagrams are adjusted to the knitting direction and are worked as usual.
How do I work according to a knitting diagram?
The diagram depicts all rows/rounds, and every stitch seen from the right side. It is read from bottom to top, from right to left. 1 square = 1 stitch.
When working back and forth, every other row is worked from the right side and every other row is worked from the wrong side. When working from the wrong side, the diagram will have to be worked reversed: from left to right, knit stitches are purled, purl stitches are knit etc.
When working in the round every round is worked from the right side and the diagram are worked from right to left on all rounds.
See DROPS lesson: How to read knitting diagrams
How do I work according to a crochet diagram?
The diagram depicts all rows/rounds, and every stitch seen from the right side. It is worked from bottom to top, from right to left.
When working back and forth every other row is worked from the right side: from right to left and every other row is worked from the wrong side: from left to right.
When working in the round, every row in the diagram are worked from the right side, from right to left.
When working a circular diagram you start in the middle and work your way outwards, counter clockwise, row by row.
The rows usually start with a given number of chain stitches (equivalent to the height of the following stitch), this will either be depicted in the diagram or explained in the pattern.
See DROPS lesson: How to read crochet diagrams
How do I work several diagrams simultaneously on the same row/round?
Instructions for working several diagrams after each other on the same row/round, will often be written like so: “work A.1, A.2, A.3 a total of 0-0-2-3-4 times". This means you work A.1 once, then A.2 is worked once, and A.3 is repeated (in width) the number of times provided for your size – in this case like so: S = 0 times, M = 0 times, L=2 times, XL= 3 times and XXL = 4 times.
The diagrams are worked as usual: begin with the first row in A.1, then work the first row in A.2 etc.
See DROPS lesson: How to read knitting diagrams
See DROPS lesson: How to read crochet diagrams
Why are the sleeves shorter in larger sizes?
The total width of the garment (from wrist-to-wrist) will be larger in the larger sizes, despite the actual sleeves being shorter. The larger sizes have longer sleeve caps and wider shoulders, so there will be a good fit in all sizes.
Where on the garment is the length measured?
The measurement sketch/schematic drawing provides information regarding the full length of the garment. If it’s a jumper or a jacket the length is measured from the highest point on the shoulder closest to the neckline, and straight down to the bottom of the garment. It is NOT measured from the tip of shoulder. Similarly, the length of yoke is measured from the highest point on the shoulder and down to where yoke is split into body and sleeves.
On a jacket measures are never taken along bands, unless specifically stated. Always measure inside band stitches when measuring the length.
See DROPS lesson: How to read a schematic drawing
What is a repeat?
Diagrams are often repeated on the round or in height. 1 repeat is the diagram the way it appears in the pattern. If it says to work 5 repeats of A.1 in the round, then you work A.1 a total of 5 times after/next to each other in the round. If it says to work 2 repeats of A.1 vertically/in height you work the entire diagram once, then begin again at the start and work the entire diagram one more time.
Why does the piece start with more chain stitches than it’s worked with?
Chain stitches are slightly narrower than other stitches and to avoid working the cast-on edge too tight, we simply chain more stitches to begin with. The stitch count will be adjusted on the following row to fit the pattern and measurement sketch.
Why increase before the rib edge when the piece is worked top-down?
The rib edge is more elastic and will contract slightly compared to, for example, stocking stitch. By increasing before the rib edge, you avoid a visible difference in width between the rib edge and the rest of the body.
Why increase in the cast-off edge?
It’s very easy to cast off too tightly, and by making yarn overs while casting off (and simultaneously casting these off) you avoid a too tight cast off edge.
See DROPS video: How to bind off with yarn overs (yo)
How do I increase/decrease on every 3rd and 4th row/round alternately?
To achieve an even increase (or decrease) you can increase on, for example: every 3rd and 4th row alternately, like so: work 2 rows and increase on the 3rd row, work 3 rows and increase on the 4th. Repeat this until the increase is complete.
See DROPS lesson: Increase or decrease 1 st on every 3rd and 4th row alternately
How can I work a jacket in the round instead of back and forth?
Should you prefer to work in the round instead of back and forth, you may of course adjust the pattern. You’ll need to add steeks mid-front (usually 5 stitches), and follow the instructions. When you would normally turn and work from the wrong side, simply work across the steek and continue in the round. At the end you’ll cut the piece open, pick up stitches to work bands, and cover the cut edges.
See DROPS video: How to knit steeks and cut open
Can I work a jumper back and forth instead of in the round?
Should you prefer to work back and forth instead of in the round, you may of course adjust the pattern so you work the pieces separately and then assemble them at the end. Divide the stitches for the body in 2, add 1 edge stitch in each side (for sewing) and work the front and back pieces separately.
See DROPS lesson: Can I adapt a pattern for circular needles into straight needles?
Why is the pattern slightly different than what I see in the photo?
Pattern repeats can vary slightly in the different sizes, in order to get the correct proportions. If you’re not working the exact same size as the garment in the photo, yours might deviate slightly. This has been carefully developed and adjusted so that the complete impression of the garment is the same in all sizes.
Make sure to follow instructions and diagrams for your size!
How do I make a women’s size garment into a men’s size one?
If you have found a pattern you like which is available in women’s size it’s not very difficult to convert it to men’s size. The biggest difference will be the length of sleeves and body. Start working on the women size that you think would fit across the chest. The additional length will be worked right before you cast off for the armhole/sleeve cap. If the pattern is worked top-down you can add the length right after the armhole or before the first decrease on sleeve.
Regarding additional yarn amount, this will depend on how much length you add, but it is better with a skein too many than too few.
How do I prevent a hairy garment from shedding?
All yarns will have excess fibres (from production) that might come off as lint or shedding. Brushed yarns (ie hairier yarns) have more of these loose, excess fibres, causing more shedding.
Shedding also depends on what is worn under or over the garment, and whether this pulls at the yarn fibres. It’s therefore not possible to guarantee that there will be no shedding
Below are some tips on how to get the best result when working with hairier yarns:
1. When the garment is finished (before you wash it) shake it vigorously so the looser hairs come off. NOTE: do NOT use a lint roller, brush or any method that pulls at the yarn.
2. Place the garment in a plastic bag and put it in your freezer - the temperature will cause the fibres to become less attached to each other, and excess fibres will come off easier.
3. Leave in the freezer for a few hours before taking it out and shaking it again.
4. Wash the garment according to the instructions on the yarn label.
Why does my garment pill?
Pilling is a natural process that happens to even the most exclusive of fibers. It's a natural sign of wear and tear that is hard to avoid, and that is most visible in high friction areas of your garment like a sweater's arms and cuffs.
You can make your garment look as new by removing the pilling, using a fabric comb or a pill/lint remover.
My Generation |
|||||||||||||||||||||||||||||||||||||||||||
|
|
||||||||||||||||||||||||||||||||||||||||||
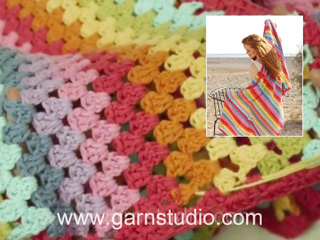
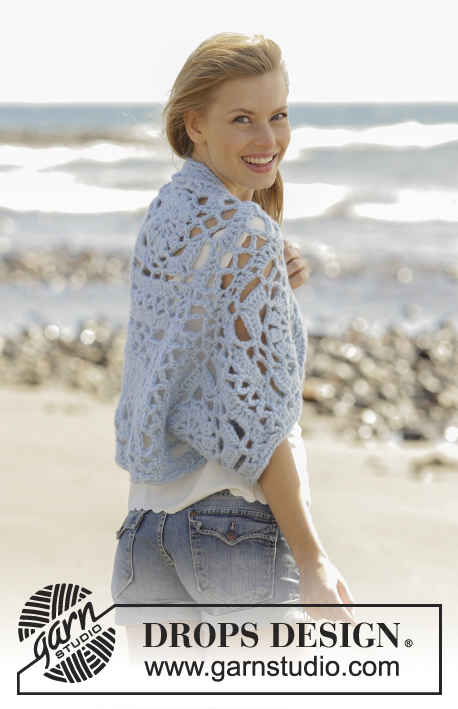
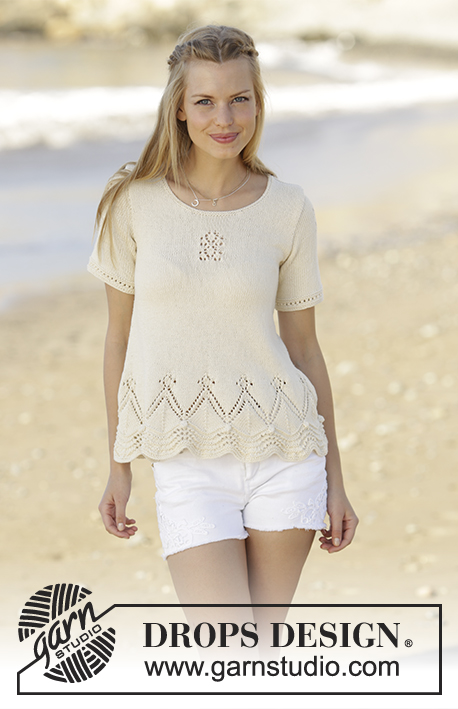
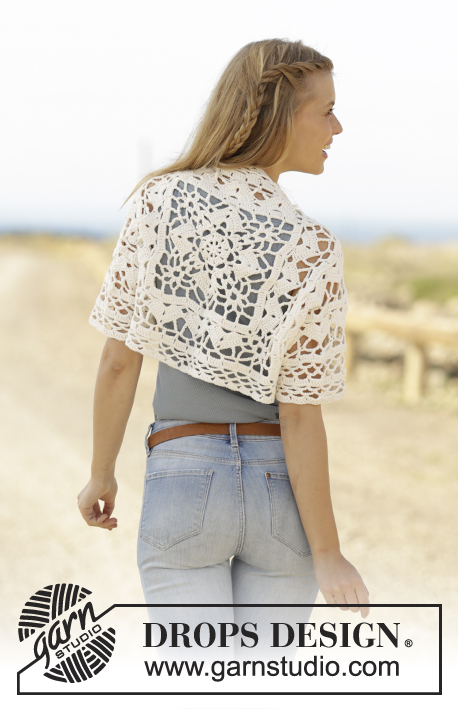
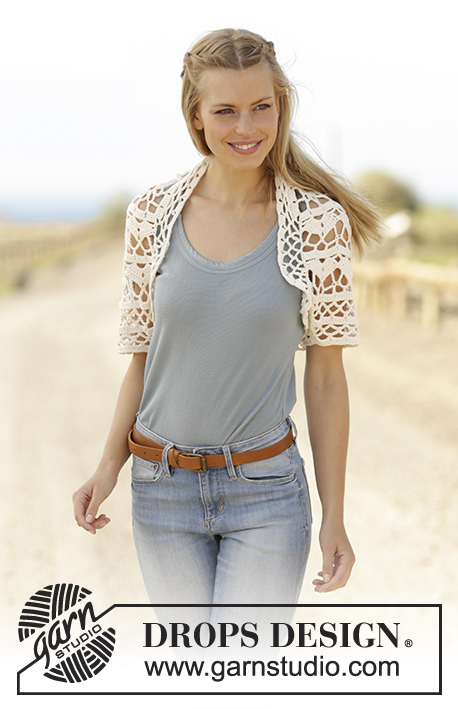
Shoulder piece with crochet square and lace pattern, worked from mid back in DROPS Cotton Light. Sizes S - XXXL.
DROPS 178-48 |
|||||||||||||||||||||||||||||||||||||||||||
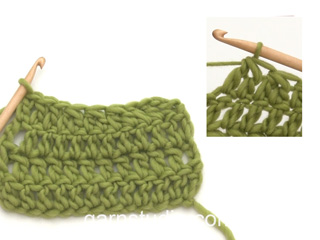
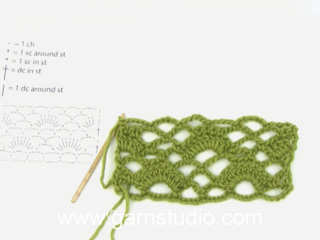
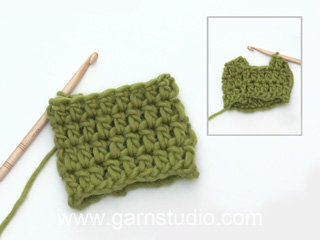
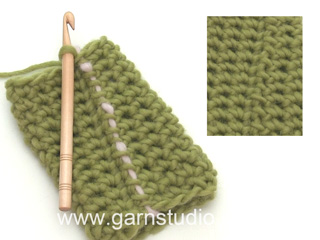
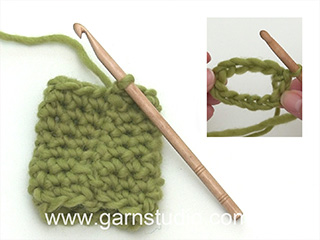
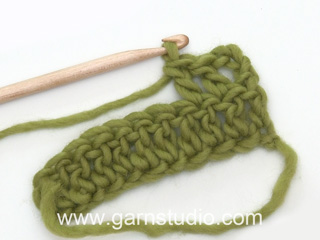
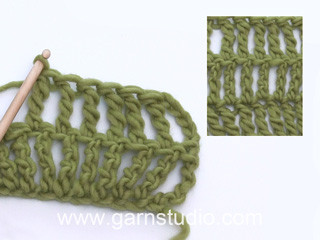
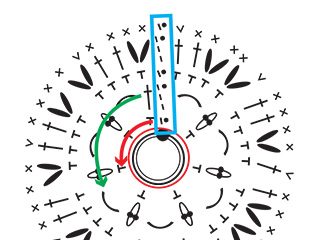
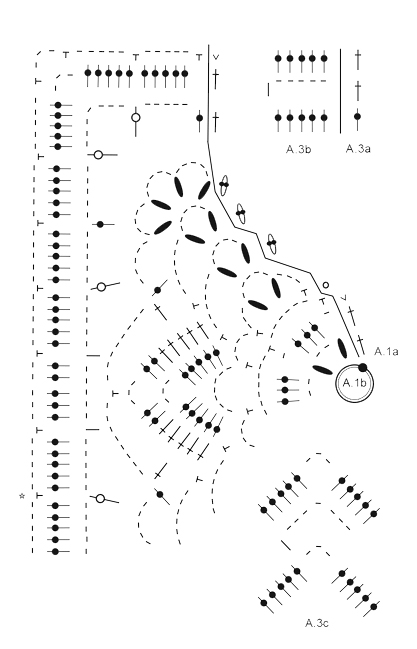
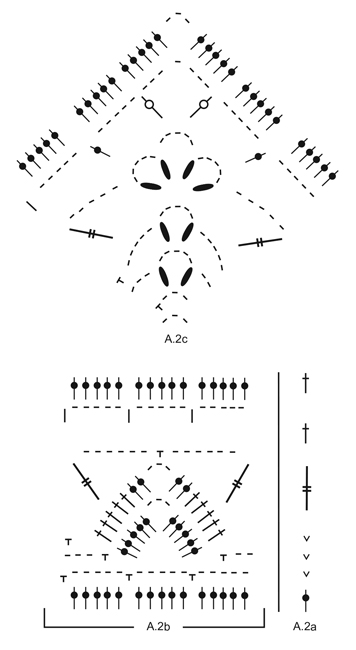
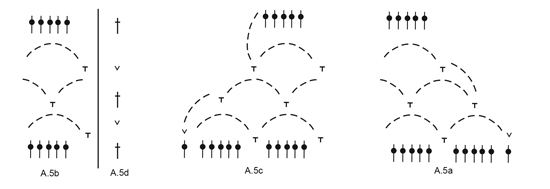
CROCHET INFO: At the beginning of every round/row with double crochets replace the first double crochet with 1 chain stitch. The round is finished with 1 slip stitch in the 1st chain stitch. At the beginning of every round/row with treble crochets replace the first treble crochet with 3 chain stitches. The round is finished with 1 slip stitch in the 3rd chain stitch. At the beginning of every round/row with triple treble crochets replace the first triple treble crochet with 5 chain stitches. The round is finished with 1 slip stitch in the 5th chain stitch. PATTERN: See diagrams A.1 to A.5. ---------------------------------------------------------- SHOULDER PIECE: You first work a crochet square in the round, then work back and forth outwards on two of the sides for the sleeves. To finish you work an edge around the opening of the shoulder piece. CROCHET SQUARE: Start with hook size 3.5 mm and Cotton Light. Work the pattern according to diagram A.1b, a total of 4 times in the round. Diagram A.1a shows how the rounds start and finish – READ CROCHET INFO! REMEMBER THE CROCHET TENSION! When the whole of A.1a and A.1b have been completed in height, the crochet square measures approx. 23 x 23 cm. Cut the strand. Start in the double crochet marked with a star on the last round in A.1b (= 4th double crochet before the corner). Work from the 3rd round in the diagrams as follows: Work A.2a in the double crochet (A.2a shows how the round starts and finishes), work A.2b over the first 3 chain-spaces, * work A.2c (= corner), work A.2b over the next 9 chain-spaces (= 3 repeats) *, repeat from *-* 2 more times, work A.2c in the corner and finish with A.2b over the remaining 6 chain-spaces in the round (= 2 repeats). When the last round in A.2a to A.2c has been completed, the crochet square for size S/M is finished and there are 75 treble crochets on each side of the square. In sizes L/XL, XXL and XXXL work from the 2nd round in the diagrams as follows: Work A.3a (shows how the round starts and finishes), work A.3b the whole round but in each corner work A.3c. Work the last 2 rounds a total of 1-2-3 times in height, AT THE SAME TIME in sizes L/XL and XXL adjust the number of stitches on the last round worked, so that there are 91 treble crochets in each size on each of the 2 sides marked with stars (SEE SKETCH!). The crochet square measures approx. 38-42-46-50 x 38-42-46-50 cm. THE SIDE AND THE SLEEVE: Work slip stitches up to the first chain-space in the corner. Now work back and forth along the one side of the crochet square in the different sizes. Start on the 2nd row in the diagrams and work as follows: Sizes S/M and XXXL: Work A.2a around the chain-space in the corner, work A.2b over the next 75-105 treble crochets (= 5-7 repeats), work A.2a around the chain-space in the corner. Sizes L/XL and XXL: Work A.4a (first stitch is worked around the chain-space in the corner), work A.2b over the next 75-75 treble crochets (= 5-5 repeats), work A.4b (the last stitch is worked around the chain-space in the corner). ALL SIZES: Turn and work back and forth until the diagrams have been worked in height. Then work from the diagrams from the 2nd row 1 more time in height, AT THE SAME TIME on the last row adjust the number of stitches so that there will be 77-92-92-107 treble crochets on row. Now work the sleeve from the 2nd row in the diagrams as follows: Work A.5a over the first 11 treble crochets, work A.5b over the next 55-70-70-85 treble crochets, work A.5c = 15-18-18-21 chain-spaces. When the diagrams have been worked in height, 1 chain-space has been decreased in each side = 13-16-16-19 chain-spaces. Start on the 2nd row in the diagrams and work A.5d (shows how the row starts and finishes), work A.5b 13-16-16-19 times and finish with A.5d. Work the diagrams from the 2nd row a total of 1-1-2-2 times in height. Fold the piece so that the sides marked with A – see the sketch, meet each other. Start outermost by the sleeve (last row worked) and crochet through both layers as follows: * work 1 double crochet around both layers, 3 chain stitches, skip approx. 1 cm *, repeat from *-* along side A down to the first row of A.5a-A.5c. Cut and fasten the strand. Work the other side and sleeve in the same way, but you are now working sides B together. Do not cut the strand! EDGE: Work an edge around the opening on the shoulder piece. Start on the 2nd round in A.5d and A.5b and work as follows: Work A.5d, * work A.5b, skip approx. 2.5 cm/5 treble crochets *, repeat from *-* the whole round in the round. When the diagrams are completed in height, repeat the diagrams from the 2nd row 0-0-1-1 times more in height. Cut and fasten the strand. |
|||||||||||||||||||||||||||||||||||||||||||
Diagram explanations |
|||||||||||||||||||||||||||||||||||||||||||
|
|||||||||||||||||||||||||||||||||||||||||||
Have you made this or any other of our designs? Tag your pictures in social media with #dropsdesign so we can see them! Do you need help with this pattern?You'll find tutorial videos, a Comments/Questions area and more by visiting the pattern on garnstudio.com. © 1982-2024 DROPS Design A/S. We reserve all rights. This document, including all its sub-sections, has copyrights. Read more about what you can do with our patterns at the bottom of each pattern on our site. |
With over 40 years in knitting and crochet design, DROPS Design offers one of the most extensive collections of free patterns on the internet - translated to 17 languages. As of today we count 304 catalogues and 11422 patterns - 11422 of which are translated into English (UK/cm).
We work hard to bring you the best knitting and crochet have to offer, inspiration and advice as well as great quality yarns at incredible prices! Would you like to use our patterns for other than personal use? You can read what you are allowed to do in the Copyright text at the bottom of all our patterns. Happy crafting!
Comments / Questions (38)
Pia Söderberg wrote:
Det är hela rutan egentligen men jag får försöka lura ut det, svårt att förklara 😊 Tack ändå och trevlig sommar
05.06.2024 - 11:25Pia Söderberg wrote:
Hej. Virkar storlek l/xl och som jag förstår det så ska jag virka 5 stolpar istället för 3 som grundmönstret är. Ska jag då ta +2 luftmaskor på nästa varv? Detta gäller då från v 2 Mvh Pia
05.06.2024 - 10:30DROPS Design answered:
Hej Pia, hvilket diagram er du usikker på?
05.06.2024 - 11:22Sylvie wrote:
De zijkant en de mouw: ik heb de halve vaste gehaakt tot aan de eerste losselus. Haak nu heen en weer over de ene kant van het gehaakte vierkant. Begin op de 2de toer. in de trelpatronen. Wat bedoelen ze hiermee zowel het heen en weer haken als begin op de 2de toer.
15.02.2024 - 20:13DROPS Design answered:
Dag Sylvie,
In plaats van dat je in de rondte haakt (zoals je eerst deed om het het vierkant te haken), haak je nu heen en weer langs één zijde van het vierkant. Dus je haakt van de ene hoek naar de andere hoek van het vierkant, dan keer je het werk en haak je terug. Als je dit doet begin je met de tweede toer in de telpatronen, dus je slaat de eerste toer over.
01.03.2024 - 07:39Astrid wrote:
Was bedeutet beim letzten Arbeitsschritt RAND:"ca. 2,5 cm/5 Stäbchen überspringen" genau? Da kann ich mir nichts drunter vorstellen. Sonst ist der Bolero fertig und sieht toll aus. Danke
10.11.2023 - 15:19DROPS Design answered:
Liebe Astrid, zwischen jedem A.5b soll man ca 2,5 cm bzw 5 Stäbchen überspringen. Viel Spaß beim häkeln!
10.11.2023 - 16:02Halle wrote:
It looks like there is a collar in the pics but I don't see what looks like those descriptions in the pattern or diagram? It also looks like there are extra rows at the bottom back but I don't see those either. Are those instructions somewhere and am I just missing it? Thank you!
18.09.2022 - 00:32DROPS Design answered:
Dear Halle, the whole piece is made up by a central square (which includes what seems like a collar and the extra rows at the bottom), the sleeves and an edge around the opening of the shoulder piece (the crochet square) which is also part of the collar and the bottom back. Happy crochetting!
18.09.2022 - 18:36Simona wrote:
E' quello che ho fatto ma non viene come in foto. Lascio perdere disfo e farò altro. Mi spiace ma le vostre spiegazioni nell'esecuzione sono davvero poco chiare e molto difficili da capire ed è un peccato perchè i modelli sono belli
27.07.2022 - 15:17DROPS Design answered:
Buongiorno Simona, ci dispiace leggere il suo commento: i modelli DROPS vengono realizzati ogni giorno da centinaia di persone in tutto il mondo. Per un'assistenza più personalizzata può rivolgersi al suo rivenditore DROPS di fiducia. Buon lavoro!
27.07.2022 - 18:48Simona wrote:
Ci rinuncio. Non capisco fino a che punto va piegata la manica e poi come fare il bordo finale. Ho provato e non viene teso e dritto ma tipo sacco
27.07.2022 - 08:42DROPS Design answered:
Buongiorno Simona, deve piegarla in modo che i due lati indicati con A nello schema delle misure in fondo alla pagina combacino, poi lavorarla per cucirla. Buon lavoro!
27.07.2022 - 15:11Simona wrote:
Quello lo avevo capito. Quello che non capisco è come cusire le maniche e fare il bordo finale
26.07.2022 - 18:02DROPS Design answered:
Buonasera Simona, deve piegare a metà la manica e cucirla ripetendo la sequenza indicata: 1 maglia bassa in entrambi gli strati, 3 catenelle, saltare circa 1 cm. Buon lavoro!
26.07.2022 - 18:14Simona wrote:
Il modello è il 178-48 My Generation Dopo aver fatto il quadrato e il pezzo delle maniche per ogni lato con la stella non capisco come devo proseguire
25.07.2022 - 08:38DROPS Design answered:
Buonasera Simona, per lavorare il lato, deve partire dell'arco di catenelle in un angolo e lavorare come riportato nel paragrafo "LATI E MANICHE" per la sua taglia, iniziando dalla 2° riga dei diagrammi. Buon lavoro!
26.07.2022 - 16:19Simona wrote:
Buongiorno, non riesco a capire come cucire le maniche e poi fare il bordo. E' davvero incomprensibile
20.07.2022 - 11:15DROPS Design answered:
Buongiorno Simona, a quale parte del modello sta facendo riferimento in particolare? Buon lavoro!
23.07.2022 - 14:22