DROPS Alpaca
DROPS Alpaca
100% Alpaca
from 3.40 £ /50g
DROPS Kid-Silk
DROPS Kid-Silk
75% Mohair, 25% Silk
from 4.60 £ /25g
Get the yarn to make this pattern from 46.80£.

The yarn cost is calculated from the pattern’s smallest size and the yarn’s cheapest product type. Looking for an even better price? You might find it on the DROPS Deals!

DROPS SS24

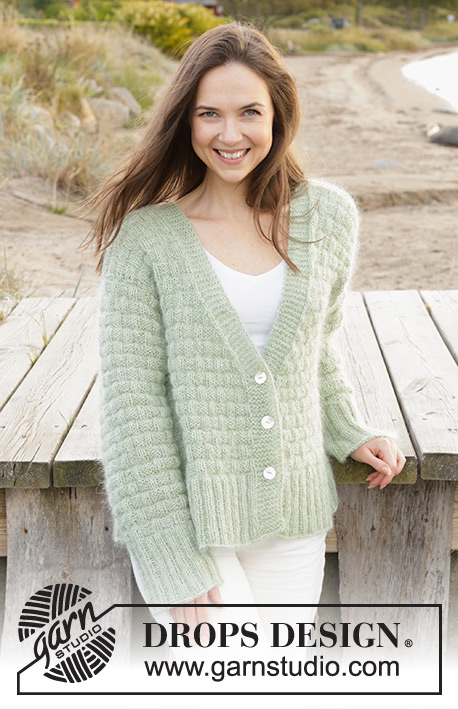
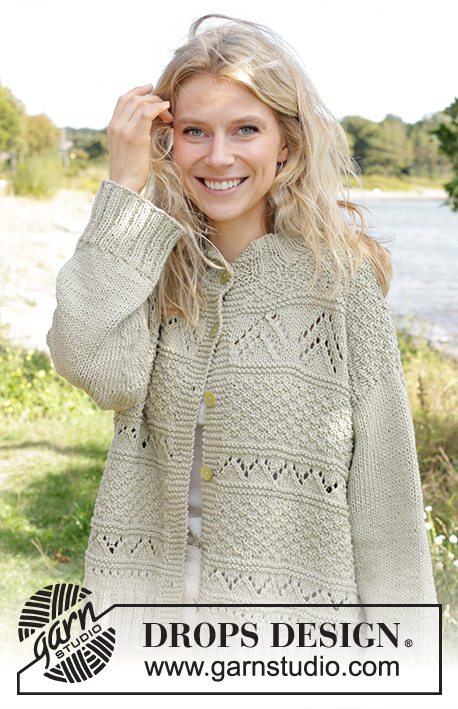
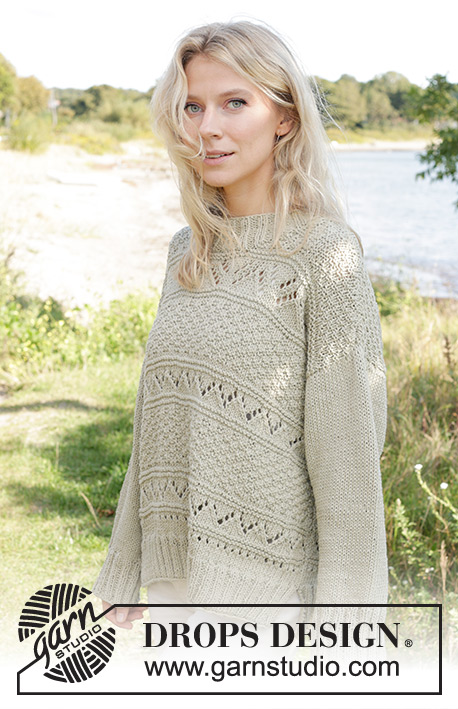
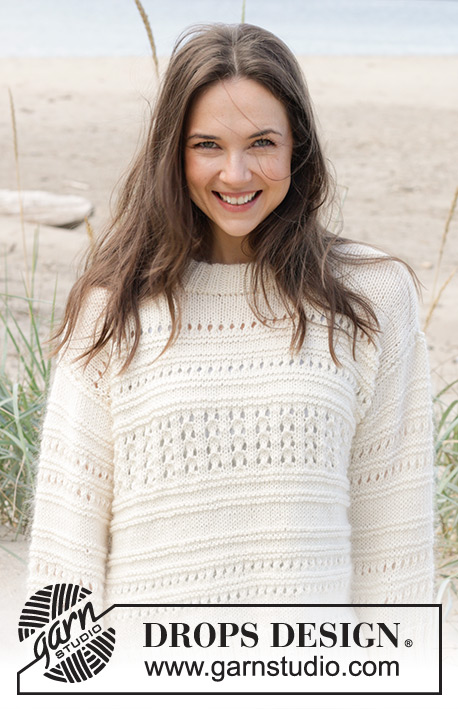
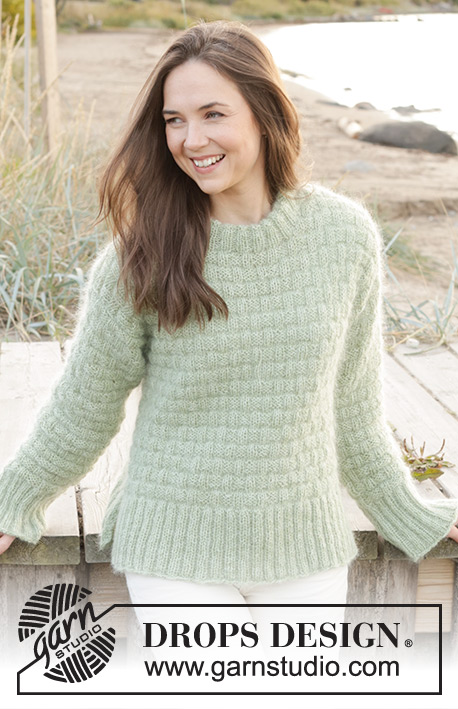
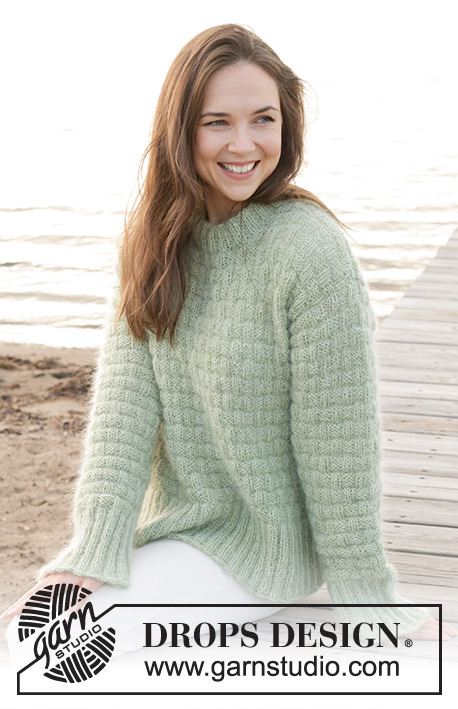
Scottish Thistle Sweater

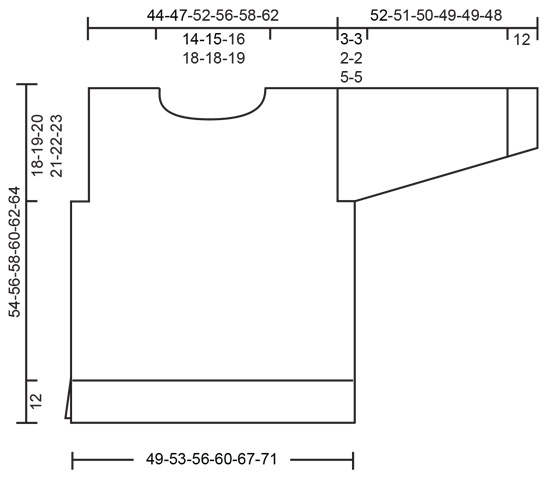
Knitted jumper in DROPS Alpaca and DROPS Kid-Silk. Piece is knitted bottom up with relief pattern and sewn-in sleeves. Size XS – XXL.

DROPS 241-6
DROPS design: Pattern z-985
Yarn group A + A or C
----------------------------------------------------------

SIZE:
XS - S - M - L - XL - XXL

YARN:
DROPS ALPACA from Garnstudio (belongs to yarn group A)
350-350-400-400-450-450 g colour 9030, pistachio ice cream
And use:
DROPS KID-SILK from Garnstudio (belongs to yarn group A)
125-125-150-150-175-175 g colour 47, pistachio ice cream

NEEDLES:
DROPS CIRCULAR NEEDLE SIZE 5 mm: Length 40 and 80 cm.
DROPS CIRCULAR NEEDLE SIZE 4 mm: Length 40 and 80 cm.
DROPS DOUBLE POINTED NEEDLES SIZE 5 mm
DROPS DOUBLE POINTED NEEDLES SIZE 4 mm
The technique MAGIC LOOP can be used – you then only need circular needle of 80 cm in each size.

KNITTING TENSION:
17 stitches in width and 22 rows vertically in stocking stitch and 1 strand of each quality = 10 x 10 cm.
NOTE! Remember that needle size is only a suggestion. If you have too many stitches on 10 cm switch to larger needles. If you have too few stitches on 10 cm switch to smaller needles.

-------------------------------------------------------

Alternative Yarn – See how to change yarns here
Yarn Groups A to F – Use the same pattern and change the yarn here
Yarn usage using an alternative yarn – Use our yarn converter here

-------------------------------------------------------

DROPS Alpaca
DROPS Alpaca
100% Alpaca
from 3.40 £ /50g
DROPS Kid-Silk
DROPS Kid-Silk
75% Mohair, 25% Silk
from 4.60 £ /25g
Get the yarn to make this pattern from 46.80£.

The yarn cost is calculated from the pattern’s smallest size and the yarn’s cheapest product type. Looking for an even better price? You might find it on the DROPS Deals!

Pattern instructions

NOTE: This pattern is written in British English. All measurements in charts are in cm. For conversion from cm to inches - click here. There are different terms for crocheting in British and American English. If this pattern includes crochet, click for "crochet terms" here. For this pattern in American English, please click here.
----------------------------------------------------------

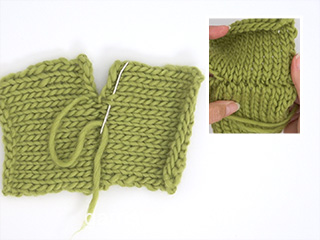
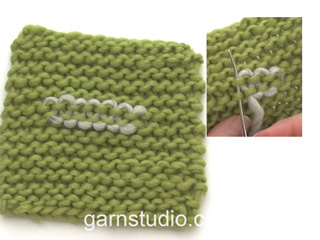
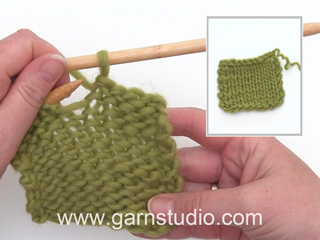
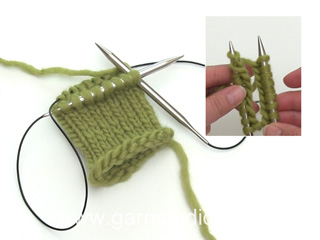
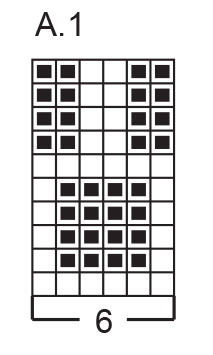
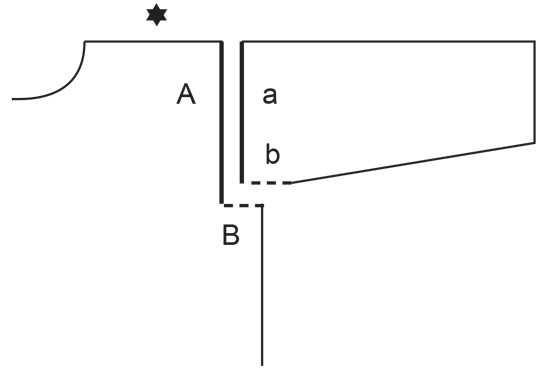
EXPLANATION FOR THE PATTERN:

----------------------------------------------------------

GARTER STITCH (back and forth):
Knit all rows.
1 ridge vertically = knit 2 rows.

PATTERN:
See diagram A.1. Diagrams show all rows in pattern seen from the right side.

INCREASE TIP (applies to mid under sleeves):
Work until there remains 1 stitch before the marking thread, make 1 yarn over, knit the next 2 stitches (the marking thread is between these 2 stitches), make 1 yarn over (= 2 stitches increased). On next round knit yarn overs twisted to avoid holes. Then work the new stitches in pattern (A.1).

----------------------------------------------------------

START THE PIECE HERE:

----------------------------------------------------------

JUMPER - SHORT OVERVIEW OF THE PIECE:
Front and back piece back and forth on circular needle, bottom up until rib has been worked, then place piece together. Body is worked in the round on circular needle up to armholes. Then finish back piece and front piece back and forth on circular needle separately until finished measurements. Work sleeves in the round on double pointed needles/short circular needle from the bottom up to sleeve cap, then work the rest of sleeve back and forth on circular needle to the finished measurements. Finish with a double neck edge.

FRONT PIECE:
Cast on 110-118-126-138-154-166 stitches on circular needle size 4 mm with 1 strand DROPS Alpaca and 1 strand DROPS Kid-Silk (= 2 strands). Purl 1 row from wrong side. Then work rib as follows: 2 stitches in GARTER STITCH - read explanation above - * knit 2, purl 2 *, work from *-* until 4 stitches remain, knit 2 and finish with 2 stitches in garter stitch. Continue rib like this for 12 cm - finish after a row from wrong side.
Put piece aside and work the back piece.

BACK PIECE:
Cast on the same number of stitches as on front piece and work the same way as front piece until rib measures 12 cm - finish after a row from wrong side.

BODY:
Put piece together as follows: Knit over stitches from back piece and decrease at the same time 26-28-30-36-40-46 stitches evenly, knit over stitches from front piece and decrease at the same time 26-28-30-36-40-46 stitches evenly = 168-180-192-204-228-240 stitches on needle.
Switch to circular needle size 5 mm. Insert 1 marker thread at beginning of round and 1 marker thread after 84-90-96-102-114-120 stitches (in the sides on body). Move the marker threads upwards when working; they should be used for armhole. Work A.1 in the round. REMEMBER THE KNITTING TENSION!

When piece measures 36-37-38-39-40-41 cm, cast off for armholes as follows: Begin 5-5-4-3-8-7 stitches before marker thread at the beginning of round, cast off 10-10-8-6-16-14 stitches for armhole, work as before until 5-5-4-3-8-7 stitches remain before marker thread in the other side, cast off 10-10-8-6-16-14 stitches for armhole, work as before the rest of round. Finish front and back piece separately.

FRONT PIECE:
= 74-80-88-96-98-106 stitches. Begin from wrong side and continue A.1 with 1 stitch in garter stitch in each side. When piece measures 47-49-50-52-53-55 cm, slip the middle 12-14-16-18-18-20 stitches on a thread for neck, and finish each shoulder separately. Continue as before and cast off stitches for neck on every row from neck as follows: Cast off 2 stitches 2 times and 1 stitch 2 times = 25-27-30-33-34-37 stitches remain on shoulder. Cast off when piece measures 54-56-58-60-62-64 cm. Work the other shoulder the same way.

BACK PIECE:
= 74-80-88-96-98-106 stitches. Begin from wrong side and work pattern and 1 stitch in garter stitch in each side the same way as on front piece. When piece measures 52-54-56-58-60-62 cm, cast off the middle 22-24-26-28-28-30 stitches for neck, and finish each shoulder separately. Cast off for neck at the beginning of every row from neck as follows: Cast off 1 stitch 1 time = 25-27-30-33-34-37 stitches remain on shoulder. Work until piece measures 54-56-58-60-62-64 cm. Cast off. Work the other shoulder the same way.

SLEEVES:
Cast on 60-64-64-68-68-72 stitches on double pointed needles size 4 mm with 1 strand of each quality (= 2 strands). Knit 1 round. Then work rib (knit 2/purl 2) in the round for 12 cm.
Knit 1 round while decreasing 14-16-14-16-14-18 stitches evenly = 46-48-50-52-54-54 stitches. Switch to double pointed needles size 5 mm. Insert 1 marking thread at the beginning of the round = mid under sleeve. Let the marking thread follow onwards, it is used for the increases. In addition insert 1 marking thread between the middle 2 stitches on top of sleeve. Count from this marking thread to know how pattern should start mid under sleeve. The marking thread mid on top of sleeve should be in the middle of A.1.
Work A.1 in the round.
When piece measures 14-14-14-14-15-15 cm, increase 2 stitches mid under sleeve – read INCREASE TIP. Increase like this 4½-4½-4-3½-2½-2½ 8-8-9-10-11-12 times in total = 62-64-68-71-75-78 stitches.
When sleeve measures 50-49-48-47-44-43 cm, work sleeve cap back and forth (from the marking thread mid under sleeve) on circular needle til finished measurements. Cast off when sleeve measures 52-51-50-49-49-48 cm. Work the other sleeve the same way.

ASSEMBLY:
Sew shoulder seams inside cast-off edge. Sew sleeve cap to armhole. Then sew vent at the top of sleeve to bottom of armhole - see chart.

DOUBLE NECK EDGE:
Use a short circular needle size 4 mm, start at one shoulder seam and pick up approx. 72 to 92 stitches around the neck (including stitches on thread). Number of stitches must be divisible 4. Work rib (knit 2/purl 2) for 5 cm. Purl a row from wrong side and continue with (knit 2/purl 2) for another 5 cm. Neck now measures approx. 10 cm, and cast off with knit over knit and purl over purl. Fold the rib down on inside of garment. Fasten rib to get a double neck edge. To avoid a tight neck edge that sticks out it is important to keep the seam elastic.

Diagram

symbols = knit from the right side, purl from the wrong side
symbols = purl from the right side, knit from the wrong side
symbols = sew sleeve cap to armhole as follows: Sew a against A and b against B.
diagram
diagram
diagram

Each of our patterns has specific tutorial videos to help you.

Do you have a question? See a list of frequently asked questions (FAQ)

Knitting tension is what determines the final measurements of your work, and is usually measured per 10 x 10 cm. It is provided like so: number of stitches in width x number of rows in height - eg: 19 stitches x 26 rows = 10 x 10 cm.

The knitting tension is very individual; some people knit/crochet loosely while others work tightly. You adjust the knitting tension with the needle size, which is why the suggested needle size is only meant as a guide! You need to adjust this (up or down) to ensure that YOUR knitting tension matches the knitting tension provided in the pattern. If you work with a different knitting tension than provided you will have a different yarn consumption, and your work will have different measurements than what the pattern suggests.

The knitting tension also determines which yarns can replace each other. As long as you achieve the same knitting tension you can replace one yarn with another.

See DROPS lesson: How to measure your tension/gauge

See DROPS video: How to make a gauge tension swatch

The required amount of yarn is provided in grams, eg: 450 g. To calculate how many balls you’ll need you first need to know how many grams are in 1 ball (25g, 50g or 100g). This information is available if you click on the individual yarn quality on our pages. Divide the amount required with the amount of each ball. For example, if each ball is 50g (the most common amount), the calculation will be as follows: 450 / 50 = 9 balls.

The important thing when changing from one yarn to another is that the knitting/crochet tension remains the same. This is so that the measurements of the finished piece will be the same as on the sketch provided. It is easier to achieve the same knitting tension using yarns from the same yarn group. It is also possible to work with multiple strands of a thinner yarn to achieve the knitting tension of a thicker one. Please try our yarn converter. We recommend you to always work a test swatch.

Please NOTE: when changing yarn the garment might have a different look and feel to the garment in the photo, due to individual properties and qualities of each yarn.

See DROPS lesson: Can I use a different yarn than the one mentioned in the pattern?

All our yarns are categorised into yarn groups (from A to F) according to thickness and knitting tension – group A contains the thinnest yarns and group F the thickest. This makes it easier for you to find alternative yarns to our patterns, should you wish to switch yarn. All yarns within the same group have a similar knitting tension and can easily replace each other. However, different yarn qualities have different structures and properties which will give the finished work a unique look and feel.

Click here for an overview of the yarns in each yarn group

At the top of all our patterns you’ll find a link to our yarn calculator, which is a helpful tool should you wish to use a different yarn than suggested. By filling in the yarn quality you wish to replace, the amount (in your size) and number of strands, the calculator will present good alternative yarns with the same knitting tension. Additionally it will tell you how much you’ll require in the new qualities and whether you’ll need to work with multiple strands. Most skeins are 50g (some are 25g or 100g).

If the pattern is worked with multiple colours, every colour will have to be calculated separately. Similarly, if the pattern is worked with several strands of different yarns (for example 1 strand Alpaca and 1 strand Kid-Silk) you will have to find alternatives for each, individually.

Click here to see our yarn calculator

Since different yarns have different qualities and textures we have chosen to keep the original yarn in our patterns. However, you can easily find options among our available qualities by using our yarn calculator, or simply pick a yarn from the same yarn group.

It is possible that some retailers still have discontinued yarns in stock, or that someone has a few skeins at home that they would like to find patterns for.

The yarn calculator will provide both alternative yarn as well as required amount in the new quality.

If you think it's hard to decide what size to make, it can be a good idea to measure a garment you own already and like the size of. Then you can pick the size by comparing those measures with the ones available in the pattern's size chart.

You'll find the size chart at the bottom of the pattern.

See DROPS lesson: How to read size chart

The needle size provided in the pattern serves only as a guide, the important thing is to follow the knitting tension. And since knitting tension is very individual, you will have to adjust the needle size to ensure that YOUR tension is the same as in the pattern – maybe you’ll have to adjust 1, or even 2 needle sizes, up or down to achieve the correct tension. For this, we recommend that you work test swatches.

Should you work with a different knitting tension than the one provided, the measurements of the finished garment might deviate from the measurement sketch.

See DROPS lesson: How to measure your tension/gauge

See DROPS video: How to make a tension/gauge swatch

Working a garment top-down provides more flexibility and room for personal adjustment. For example it is easier to try the garment on while working, as well as making adjustments to length of yoke and shoulder caps.

The instructions are carefully explaining every step, in the correct order. Diagrams are adjusted to the knitting direction and are worked as usual.

The diagram depicts all rows/rounds, and every stitch seen from the right side. It is read from bottom to top, from right to left. 1 square = 1 stitch.

When working back and forth, every other row is worked from the right side and every other row is worked from the wrong side. When working from the wrong side, the diagram will have to be worked reversed: from left to right, knit stitches are purled, purl stitches are knit etc.

When working in the round every round is worked from the right side and the diagram are worked from right to left on all rounds.

See DROPS lesson: How to read knitting diagrams

The diagram depicts all rows/rounds, and every stitch seen from the right side. It is worked from bottom to top, from right to left.

When working back and forth every other row is worked from the right side: from right to left and every other row is worked from the wrong side: from left to right.

When working in the round, every row in the diagram are worked from the right side, from right to left.

When working a circular diagram you start in the middle and work your way outwards, counter clockwise, row by row.

The rows usually start with a given number of chain stitches (equivalent to the height of the following stitch), this will either be depicted in the diagram or explained in the pattern.

See DROPS lesson: How to read crochet diagrams

Instructions for working several diagrams after each other on the same row/round, will often be written like so: “work A.1, A.2, A.3 a total of 0-0-2-3-4 times". This means you work A.1 once, then A.2 is worked once, and A.3 is repeated (in width) the number of times provided for your size – in this case like so: S = 0 times, M = 0 times, L=2 times, XL= 3 times and XXL = 4 times.

The diagrams are worked as usual: begin with the first row in A.1, then work the first row in A.2 etc.

See DROPS lesson: How to read knitting diagrams

See DROPS lesson: How to read crochet diagrams

The total width of the garment (from wrist-to-wrist) will be larger in the larger sizes, despite the actual sleeves being shorter. The larger sizes have longer sleeve caps and wider shoulders, so there will be a good fit in all sizes.

The measurement sketch/schematic drawing provides information regarding the full length of the garment. If it’s a jumper or a jacket the length is measured from the highest point on the shoulder closest to the neckline, and straight down to the bottom of the garment. It is NOT measured from the tip of shoulder. Similarly, the length of yoke is measured from the highest point on the shoulder and down to where yoke is split into body and sleeves.

On a jacket measures are never taken along bands, unless specifically stated. Always measure inside band stitches when measuring the length.

See DROPS lesson: How to read a schematic drawing

Diagrams are often repeated on the round or in height. 1 repeat is the diagram the way it appears in the pattern. If it says to work 5 repeats of A.1 in the round, then you work A.1 a total of 5 times after/next to each other in the round. If it says to work 2 repeats of A.1 vertically/in height you work the entire diagram once, then begin again at the start and work the entire diagram one more time.

Chain stitches are slightly narrower than other stitches and to avoid working the cast-on edge too tight, we simply chain more stitches to begin with. The stitch count will be adjusted on the following row to fit the pattern and measurement sketch.

The rib edge is more elastic and will contract slightly compared to, for example, stocking stitch. By increasing before the rib edge, you avoid a visible difference in width between the rib edge and the rest of the body.

It’s very easy to cast off too tightly, and by making yarn overs while casting off (and simultaneously casting these off) you avoid a too tight cast off edge.

See DROPS video: How to bind off with yarn overs (yo)

To achieve an even increase (or decrease) you can increase on, for example: every 3rd and 4th row alternately, like so: work 2 rows and increase on the 3rd row, work 3 rows and increase on the 4th. Repeat this until the increase is complete.

See DROPS lesson: Increase or decrease 1 st on every 3rd and 4th row alternately

Should you prefer to work in the round instead of back and forth, you may of course adjust the pattern. You’ll need to add steeks mid-front (usually 5 stitches), and follow the instructions. When you would normally turn and work from the wrong side, simply work across the steek and continue in the round. At the end you’ll cut the piece open, pick up stitches to work bands, and cover the cut edges.

See DROPS video: How to knit steeks and cut open

Should you prefer to work back and forth instead of in the round, you may of course adjust the pattern so you work the pieces separately and then assemble them at the end. Divide the stitches for the body in 2, add 1 edge stitch in each side (for sewing) and work the front and back pieces separately.

See DROPS lesson: Can I adapt a pattern for circular needles into straight needles?

Pattern repeats can vary slightly in the different sizes, in order to get the correct proportions. If you’re not working the exact same size as the garment in the photo, yours might deviate slightly. This has been carefully developed and adjusted so that the complete impression of the garment is the same in all sizes.

Make sure to follow instructions and diagrams for your size!

If you have found a pattern you like which is available in women’s size it’s not very difficult to convert it to men’s size. The biggest difference will be the length of sleeves and body. Start working on the women size that you think would fit across the chest. The additional length will be worked right before you cast off for the armhole/sleeve cap. If the pattern is worked top-down you can add the length right after the armhole or before the first decrease on sleeve.

Regarding additional yarn amount, this will depend on how much length you add, but it is better with a skein too many than too few.

All yarns will have excess fibres (from production) that might come off as lint or shedding. Brushed yarns (ie hairier yarns) have more of these loose, excess fibres, causing more shedding.

Shedding also depends on what is worn under or over the garment, and whether this pulls at the yarn fibres. It’s therefore not possible to guarantee that there will be no shedding

Below are some tips on how to get the best result when working with hairier yarns:

1. When the garment is finished (before you wash it) shake it vigorously so the looser hairs come off. NOTE: do NOT use a lint roller, brush or any method that pulls at the yarn.

2. Place the garment in a plastic bag and put it in your freezer - the temperature will cause the fibres to become less attached to each other, and excess fibres will come off easier.

3. Leave in the freezer for a few hours before taking it out and shaking it again.

4. Wash the garment according to the instructions on the yarn label.

Pilling is a natural process that happens to even the most exclusive of fibers. It's a natural sign of wear and tear that is hard to avoid, and that is most visible in high friction areas of your garment like a sweater's arms and cuffs.

You can make your garment look as new by removing the pilling, using a fabric comb or a pill/lint remover.

Still can't find the answer you need? Then scroll down and leave your question so one of our experts can try to help you. This will be done normally within 5 to 10 working days.
In the meantime, you can read the questions and answers that others have left to this pattern or join the DROPS Workshop on Facebook to get help from fellow knitters/crocheters!

You might also like...

Post a comment to pattern DROPS 241-6

We would love to hear what you have to say about this pattern!

If you want to leave a question, please make sure you select the correct category in the form below, to speed up the answering process. Required fields are marked *.

Comments / Questions (26)

country flag Mai wrote:

Jeg vil gerne lave denne model i garnet Alpaca nr. 7139, men ved ikke hvilken farve jeg skal vælge af Kid Silk garnet, så det passer bedst muligt sammen farvemæssigt.

22.09.2023 - 14:25

DROPS Design answered:

Hej Mai, Kid-Silken passer fint med Alpaca selv om nuancen ikke er 100% samme. Vil du have den lidt mørkere skal du vælge Kid-Silk 37. Du kan altid spørge i butikken hvor de kan se begge garner :)

26.09.2023 - 15:37

country flag Věra Nováčková wrote:

Dobrý den...prosím jak mám začít se vzorečkem na rukávu?...při 46okách mi vzor dle A1 nevychází....pokoušela jsem se jinak,aby střed řady vycházel prostředek vzoru A1....ale při přidávání ok se do toho zamotávám.....děkuji Nováčková

27.08.2023 - 10:37

country flag Věra Nováčková wrote:

Děkuji.....tomu rozumím, jen nechápu proč takhle plést na konci.....vznikne mi nespletená mezera....rozumím tomu dobře, že tedy pravá strana přijde přišít na jednu stranu a druhá na druhou v podpaží ,?....Toho pruramku.......mě stále nejde do hlavy proč ten rukáv nemužu vsadit upleten bez té mezery.....děkuji Nováčková

21.08.2023 - 08:32

DROPS Design answered:

Ano, přesně tak - rukávovou hlavici pak přišijete po obou stranách průramku, střed hlavice (řady) by měl navazovat na ramenní šev. Vzniklý otvor v podpaží odpovídá počátečnímu ujmutí průramku - "jamce" v podpaží, viz přerušovaná linie v nákresu. Rukáv je takto tvarovaný proto, aby v podpaží lépe seděl a nebyl příliš úzký (hrudník není plochý, ale v podpaží má určitou šířku - tu právě vyrovnáváme tím ujmutím průramku). Hodně zdaru! Hana

21.08.2023 - 12:23

country flag Věra Nováčková wrote:

Dobrý den....pletu rukáv v kruhových řadách na kruhové jehlici.....prosím jak mám uplést rukávovou hlavici?.....ty dva poslední cm nevím jak plést.....děkuji Nováčková

18.08.2023 - 12:08

DROPS Design answered:

Dobrý den, Věro, rukávovou hlavici pleteme v řadách - tedy už ne do kruhu, ale po dokončení řady práci vždy otočíme a střídáme lícové/rubové řady. Pleteninu takto rozdělíme u značky v podpaží (dřívější začátek/konec kruhových řad). Hodně zdaru! Hana

20.08.2023 - 13:14

country flag Kristel Macgillavry-janssen wrote:

Ik zie nergens staan hoeveel bollen er voor elke maat nodig zijn. Kunt u mij verwijzen aub?

26.07.2023 - 21:03

DROPS Design answered:

Dag Kristel,

Bovenaan bij de lijst met materialen staat aangegeven hoeveel gram je nodig hebt in elke maat. Het eerste getal slaat op de eerste maat, het tweede getal op de tweede maat, enzovoorts. 1 bol alpaca weegt 50 gram en 1 bol Kid-Silk weegt 25 gram.

01.08.2023 - 20:48

country flag Mieke Baras wrote:

Deze trui wordt gebreid in alpaca en kid-silk. In de beschrijving van het eerste stuk wordt gesproken over drops flora. Is dat een vergissing?

11.03.2023 - 12:27

DROPS Design answered:

Dag Mieke,

Oeps, dat is inderdaad een vergissing ja, het moet natuurlijk Alpaca zijn.

12.03.2023 - 11:40

country flag Egidia wrote:

Buongiorno, vorrei fare questo modello ma non ho capito bene il diagramma. Come si inizia il primo giro? Quante maglie a diritto e quante al rovescio? E il secondo giro? Vi ringrazio

11.02.2023 - 11:19

DROPS Design answered:

Buonasera Egidia, i diagrammi si leggono dal basso verso l'alto e da destra verso sinistra per i ferri di andata e da sinistra a destra per quelli di ritorno, se si lavora in piano. Nella lavorazione in tondo si leggono sempre da destra a sinistra. In questo caso il primo ferro del diagramma A.1 si lavora con tutte le maglie a diritto. Buon lavoro!

13.02.2023 - 16:18

country flag Renata Mariotto wrote:

Il rovescio del lavoro è quello in cui la codina sta a destra? Grazie.

08.02.2023 - 18:36

DROPS Design answered:

Buonasera Renata, il primo ferro è lavorato dal rovescio del lavoro. Buon lavoro!

10.02.2023 - 23:59

country flag Susi wrote:

Mit diesen Ableitungen aus zusammen genähten Einzelteilen von unten nach oben sind Ihre StrickdesignerInnen leider überhaupt nicht mehr aktuell. Gestrickt werden mittlerweile überall Topdown Modelle ohne jede lästige Naht... Warum nur so selten bei Euch im DROPS Garnstudio ? Sehr schade... :-(

07.02.2023 - 10:07

DROPS Design answered:

Liebe Susi, einige Strickerinnen stricken immer noch gerne von unten nach oben, so versuchen wir etwas für jeder vorzuschlagen. Hier finden Sie alle unsere Pullover, die von oben nach unten gestrickt werden. Vielleicht finden Sie ein Favoritt hier? Viel Spaß beim stricken!

07.02.2023 - 10:41

country flag McKenna wrote:

Picnic basket sweater

20.01.2023 - 22:02