
Popular categories
Looking for a yarn?


|
|||||||||||||
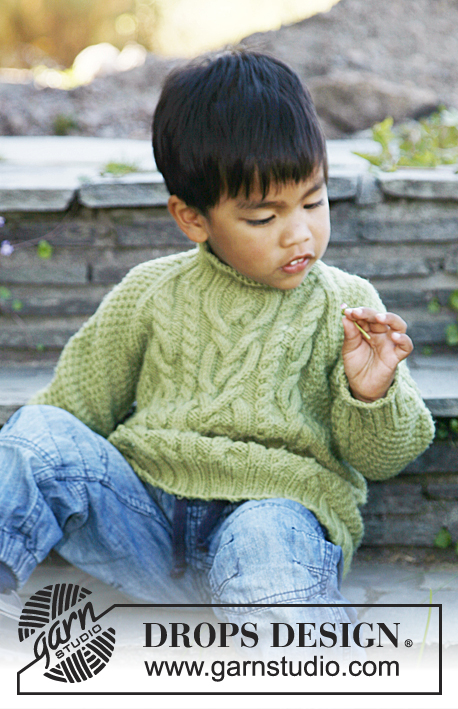
Julien |
|||||||||||||
|
|
|||||||||||||
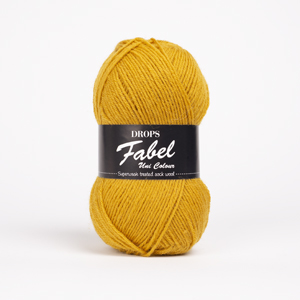
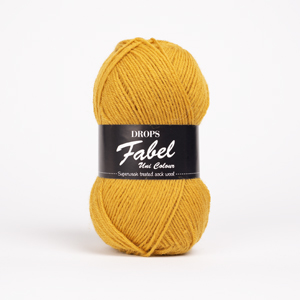
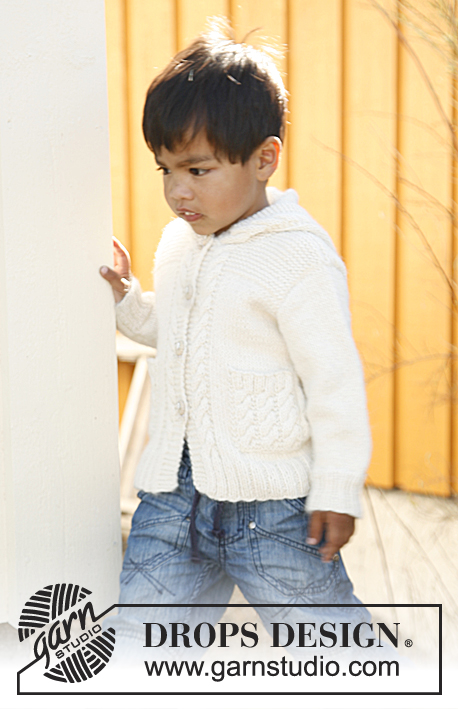
Knitted DROPS jumper with v-neck and cables in ”Fabel” or "Flora". Size 3 - 12 years.
DROPS Children 22-31 |
|||||||||||||
|
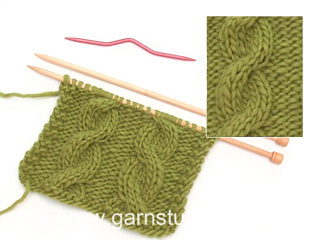
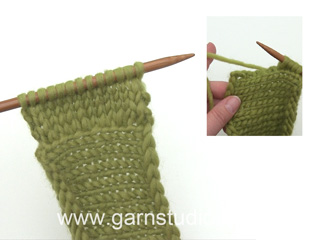
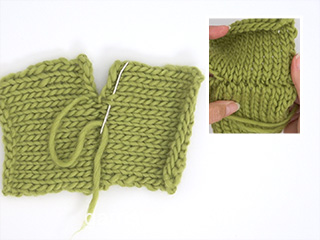
PATTERN: See diagram M.1 – all rows in diagram shows pattern from RS, 1 repetition = 24 sts in width. GARTER ST (back and forth on needle): K all rows. DECREASE TIP 1 (applies to armholes and neck): Dec inside 1 edge st in garter st + 3 sts in stocking st at the armhole and inside 1 st in garter st at the neck. All dec are done from RS. Dec AFTER 4/1 st as follows: Slip 1 st as if to K, K 1, psso. Dec BEFORE 4/1 st as follows: K 2 tog. DECREASE TIP 2 (applies to neck edge): Dec on each side of the 2 K sts mid front of neck as follows: Work until 1 st remains before the 2 K sts, K 2 tog, slip 1 st as if to K, K 1, psso. ------------------------------------------------------- BODY: Worked in the round on circular needle. Cast on 212-224-240-252-268 sts on circular needle size 2.5 mm with blue Fabel or indigo Flora. K 1 round, continue in rib = K 2/P 2 for 2 rounds. Switch to grey blue Fabel or denim blue and continue rib until piece measures 4 cm. Work next round as follows (insert a marker at beg of round): SIZE 3/4 YEARS: ** K 2, K 2 tog **, repeat from **-** a total of 6 times, [K 6, K 2 tog, K 10, K 2 tog, K 6], K 4, K 2 tog, K 14, K 2 tog, K 4, repeat from [-] 1 time, K 2 tog, repeat from **-** a total of 5 times, * K 8, K 2 tog *, repeat from *-* 8 times, K 8 = 186 sts. SIZE 5/6 YEARS: ** K 4, K 2 tog **, repeat from **-** a total of 4 times, [K 6, K 2 tog, K 10, K 2 tog, K 6], K 4, K 2 tog, K 4, K 2 tog, K 6, K 2 tog, K 4, K 2 tog, K 4, repeat from [-] 1 time, K 2 tog, repeat from **-** a total of 3 times, * K 7, K 2 tog *, repeat from *-* a total of 10 times, K 8 = 198 sts. SIZE 7/8 YEARS: ** K 2, K 2 tog, K 4, K 2 tog **, repeat from **-** a total of 2 times, K 2, K 2 tog, K 2, K 2 tog, [K 6, K 2 tog, K 10, K 2 tog, K 6], K 4, (K 2 tog, K 3), repeat from (-) a total of 6 times, then from [-] 1 time, K 2 tog, K 2, K 2 tog, repeat from **-** a total of 2 times, * K 10, K 2 tog *, repeat from *-* a total of 8 times, K 4 = 210 sts. SIZE 9/10 YEARS: ** K 4, K 2 tog **, repeat from **-** a total of 4 times, K 4, [K 6, K 2 tog, K 10, K 2 tog, K 6], K 4, (K 2 tog, K 6), repeat from (-) a total of 3 times, K 2 tog, K 4, repeat from [-] 1 time, repeat from **-** a total of 4 times, K 2, * K 2 tog, K 6 *, repeat from *-* a total of 14 times = 222 sts. SIZE 11/12 YEARS: ** K 2, K 2 tog, K 4, K 2 tog **, repeat from **-** a total of 3 times, K 2, [K 6, K 2 tog, K 10, K 2 tog, K 6], K 2, (K 2 tog, K 4), repeat from (-) a total of 6 times, repeat from [-] 1 time, repeat from **-** a total of 3 times, K 8, * K 2 tog, K 7 *, repeat from *-* a total of 12 times = 234 sts. ALL SIZES: There are now 186-198-210-222-234 sts on needle. Work next round as follows: K 18-20-22-24-26, diagram M.1 (= 24 sts), K 24-26-28-30-32, diagram M.1 (= 24 sts) and K 96-104-112-120-128. Continue the pattern like this until piece measures 27-29-31-33-35 cm. REMEMBER THE KNITTING TENSION! Work next round as follows: Cast off the first 6 sts for armhole, work as before over the next 96-102-108-114-120 sts (= front piece), cast off 6 sts for armhole, work in stocking st over the last 78-84-90-96-102 sts (= back piece). Finish front and back piece separately. BACK PIECE: = 78-84-90-96-102 sts. Work in stocking st back and forth with 1 edge st in each side in GARTER ST – see explanation above! AT THE SAME TIME on first row from RS, dec 1 st in each side inside 4 sts - SEE DECREASE TIP 1! Repeat dec every other row a total of 7-8-9-10-11 times = 64-68-72-76-80 sts remain on needle. When piece measures 39-42-45-48-51 cm, cast off the middle 22-24-26-28-30 sts for neck and finish each shoulder (= 21-22-23-24-25 sts) separately. Cast off when piece measures 40-43-46-49-52 cm. FRONT PIECE: = 96-102-108-114-120 sts. Continue pattern back and forth on needle and cast off for armholes as on back piece. AT THE SAME TIME when piece measures 30-32-34-36-38 cm, slip the middle 6 sts on a stitch holder for neck and finish each side separately. Slip the sts in one side on to a stitch holder. Continue cast off for armholes – AT THE SAME TIME on next row from RS dec 1 st towards the neck inside 1 st - SEE DECREASE TIP 1. Repeat dec every other row a total of 8-9-10-11-12 times. After all cast off for armholes and dec for neck, 30-31-32-33-34 sts remain on shoulder. Continue pattern with 1 st in garter st in each side. When piece measures approx. 39½-42½-45½-48½-51½ cm (adjust so that next row is from RS), dec 2 sts over each of the small cables and 5 sts over the large cable in the middle by K tog sts 2 by 2 = 21-22-23-24-25 sts remain on shoulder. On next row, cast off the remaining sts. Piece measures approx. 40-43-46-49-52 cm. Slip the stitches on the stitch holder back on needle and work as first side but reversed. SLEEVE: Worked in the round on double pointed needles. Cast on 48-52-52-56-56 sts on double pointed needles size 2.5 mm with blue Fabel or indigo Flora. K 1 round, then work 1 round rib = K 2/P 2. Switch to grey blue Fabel or denim blue Flora. Continue rib until it measures 4 cm. Continue in stocking st – AT THE SAME TIME on 1st round, dec 4 sts evenly = 44-48-48-52-52 sts. Insert a marker at beg of round (= mid under sleeve). When piece measures 6-6-6-7-7 cm, inc 1 st on each side of marker. Repeat inc every 2½ cm a total of 9-10-12-12-14 times = 62-68-72-76-80 sts. When piece measures 30-34-37-40-43 cm, cast off 6 sts mid under sleeve and work back and forth until finished measurements. Continue to cast off for sleeve cap at beg of every row in each side: 2 sts 3 times and 1 st 2-3-5-7-8 times, then cast off 2 sts in each side until piece measures 34-39-43-47-51 cm. Now cast off 3 sts 1 time in each side, then cast off the remaining sts. Sleeve measures approx. 35-40-44-48-52 cm. ASSEMBLY: Sew the shoulder seams. NECK: Knit up 128-136-144-152-160 sts (divisible by 4, incl sts on stitch holder at the front) inside 1 edge st around the neck on circular needle size 2.5 mm with grey blue Fabel or denim blue Flora. (NOTE: If too few or too many sts have been knitted up, inc or dec evenly on 1st round.) Work rib = K 2/P 2 – adjust so that 2 K sts are mid front. AT THE SAME TIME on 2nd round, dec 1 st on each side of the 2 K sts mid front – SEE DECREASE TIP 2. Repeat dec every round until finished measurements. When neck edge measures 2 cm, switch to blue Fabel or indigo Flora. Work 2 more rounds in rib, then cast off with K over K and P over P. |
|||||||||||||
Diagram explanations |
|||||||||||||
|
|||||||||||||

|
|||||||||||||
|
Have you made this or any other of our designs? Tag your pictures in social media with #dropsdesign so we can see them! Do you need help with this pattern?You'll find tutorial videos, a Comments/Questions area and more by visiting the pattern on garnstudio.com. © 1982-2024 DROPS Design A/S. We reserve all rights. This document, including all its sub-sections, has copyrights. Read more about what you can do with our patterns at the bottom of each pattern on our site. |
|||||||||||||


With over 40 years in knitting and crochet design, DROPS Design offers one of the most extensive collections of free patterns on the internet - translated to 17 languages. As of today we count 304 catalogues and 11422 patterns - 11422 of which are translated into English (UK/cm).
We work hard to bring you the best knitting and crochet have to offer, inspiration and advice as well as great quality yarns at incredible prices! Would you like to use our patterns for other than personal use? You can read what you are allowed to do in the Copyright text at the bottom of all our patterns. Happy crafting!
Comments / Questions (30)
Backpiece decrease 1 stitch in each side inside 4 stitches. I don't understand this. Are we decreasing for the armhole and neck ? Does "each side" refer to right and wrong side ? What is meant by "inside 4 stitches" ? Am I right in thinking "at each end " means beginning and end of a row ? Sorry for appearing so ignorant. Could you please elaborate the beginning of the back piece.
20.04.2023 - 22:44DROPS Design answered:
Hi Dhanalakshmi, You are decreasing for the armholes, on both sides of the back piece. This is done by: work 4 stitches, slip 1 stitch, K1 and pass the slipped stitch over the knitted stitch, work until there are 6 stitches left on the row, knit 2 together, then work the last 4 stitches. Happy knitting!
21.04.2023 - 07:31I'm very confused about the sleeve instruction: " bind off 6 sts mid under sleeve and work back and forth until finished measurements. Continue to bind off for sleeve cap at beg of every row in each side" Where is the end of the row ? Are the6 bind off stitches in the middle of the row? Please help! Thanks, Elise
05.02.2023 - 18:50DROPS Design answered:
Hi Elise, After you have bound off the 6 stitches (under the sleeve) you no longer work in the round. Work back and forth starting from the bound off stitches and ending the row when you reach the bound off stitches on the other side . Continue to bind off at the beginning and end of row for the sleeve cap. Hope this helps and happy knitting!
06.02.2023 - 08:01Liebes Team,\r\nmeine Frage lautet: was mache ich mit den Maschen, die auf einer Hilfsnadel liegen? In der Anleitungs steht nichts, wie die Ärmel angenäht werden und was mit den Maschen auf der Hilfsnadel passiert.
07.01.2022 - 15:29DROPS Design answered:
Liebe Johanna, wenn Sie die Hälfte der Maschen vom Vorderteil stillegen, stricken Sie die 1. Seite bis zum Schulter, dann ketten Sie ab; und nun stricken Sie die stillgelegten Maschen mit Abnahmen, dh wie beim 1. Teil aber verkehr. Dieses Video zeigt, wie man die Ärmel annäht. Viel Spaß beim stricken!
07.01.2022 - 16:19Möchte den pullover gerne mit schalkragen stricken. Wie setze ich das am besten um ?
21.03.2021 - 14:58Zajímalo by mě, proč po upletení čtyřcentimetrového lemu mám ubrat oka. Jaký to má význam? Děkuji za odpověď.
24.10.2020 - 16:34DROPS Design answered:
Dobrý den, Evo, oka je nutné ubrat kvůli přechodu z jednoho vzoru do druhého: lem je pletený pružným vzorem - tvoří ho hodně ok, která se ve vzoru stahují, smršťují k sobě a pletenina působí úzce (dá se ale roztáhnout do větší šířky); "tělo" je pletené převážně lícovým žerzejem, který je "rovný", hladký. Kdybychom nechali stejný počet ok, jako u lemu, bude pletenina v lícovém žerzeji příliš široká a v úpletu by vznikla nepěkná "kapsa". Hodně zdaru! Hana
24.10.2020 - 20:28Ich nutze das Garn Fabel für diesen Pullover. Allerdings stimmt die Mascheprobe nicht. Für 10 cm habe ich 31 Maschen. Die Größe sollte 9-10 Jahre sein, ich habe daher die größer Anleitung für 11/12 Jahre und größere Nadeln genommen. Nun sind diese Angaben aber immer noch zu klein. Können Sie Angaben für die nächstgrößere Anleitung (13/14 Jahre) machen?
26.09.2020 - 11:24DROPS Design answered:
Liebe Frau Van, leider können wir nicht jede Anleitung nach jeder Anfrage umrechnen - die Maschenprobe können Sie auch mal waschen/trocknen lassen und die noch mal messen - sollte es immer noch nicht richtig sein, dann versuchen Sie am besten mit anderen Nadeln - hier lesen Sie mehr über Maschenprobe. Viel Spaß beim stricken!
28.09.2020 - 09:26Bonsoir, je tricote la 1ère manche (1ère taille) : à 30 cm, rab. 6 mailles au milieu ... 3 fois 2m et 2 fois 1m. Rab. ensuite 2m de ch côté jusqu'à ce que le manche mesure 34 cm (?) : soit 4cm d'EMM. ? puis rab 1 fois 3 m de ch côté et rab les m. restantes. la manche mesure environ 35 cm ??? je ne comprends pas ces explications qui ne correspondent pas au schéma : 13 cm de hauteur d'EMM. Pouvez-vous m'expliquer !? Un grand merci
26.01.2020 - 19:04DROPS Design answered:
Bonjour Mme Pitschon, la manche mesure bien 35 cm dans la 1ère taille comme le montre le schéma, et la tête de manche mesure 5 cm. La hauteur d'emmanchure = les 13 cm correspondent à la hauteur entre les mailles rabattues pour l'emmanchure dos/devant et l'épaule. Si vos mesures sont justes, vous aurez suffisamment de largeur de manche pour les assembler le long des emmanchures. Bon tricot!
27.01.2020 - 09:48Jeg har strikket en sweater i drops big merino, med bærestykke/hestemønster mm. altid vasket efter vaskeanvisningen, samme maskine, samme vaskemiddel. Ved sidste vask filtede grundfarven lys rosa i bærestykket, totalt!! De andre farver i mønstret gjorde ikke, HVAD skyldes dette, meget meget mærkeligt og kedeligt.
16.01.2019 - 22:50DROPS Design answered:
Hei Martha. Det var trist å høre, og veldig beklagelig. Big Merino er superwashbehandlet og skal derfor ikke toves i vask, så her er det en svikt i garnet. Ta kontakt med butikken du handlet garnet hos, og de vil hjelpe deg der. Hvis du fortsatt har merkelappen med batch-nummeret til fargen så er det veldig fint om du også kan ta denne med til butikken. Igjen, beklager så mye for dette.
23.01.2019 - 09:51Jeg har strikket Julien model nr FA-005-bn i str 12. Jeg anvendte jeres omregner til garn af mærket Drops baby merino. Den anbefalede 10 nøgler. Jeg er nu færdig, og har blot lige startes på nr 7 nøgle. Strikkefastheden er tilpasset garnets vejledning. ---- Jeg synes godt nok det er en dårlig omregning...…….. man er ikke altid interesseret i for meget garn.
16.01.2019 - 22:39Ich kenne mich bei der Anleitung nicht recht aus und zwar steht da für Vo/Rüteil erst 2 Abnahmen 6 x (3-4Jahre) danach kommt eine spitze Klammer mit Abnahmen, wie stricke ich denn jetzt genau, erst die Abnahmen 6 x danach die spitze Klammer? Komme nicht auf die 186 M. Danke, Barbara
22.05.2018 - 20:18DROPS Design answered:
Liebe Barbara, so werden Sie stricken: 2 re., 2 re. Zusammen = 4 M x 6 (= über 24 M), dann stricken Sie: [6 re., 2 re. zusammen, 10 re., 2 re. zusammen, 6 re.], dann stricken Sie 4 re., 2 re. zusammen, 14 re., 2 re. zusammen, 4 re., dann wiederholen Sie wieder von [-] 1 Mal wiederholen (= 6 re., 2 re. zusammen, 10 re., 2 re. zusammen, 6 re) , Dann 2 re. Zusammen. Jetzt (2 re., 2 re. Zusammen) x 5 Mal (= über die nächsten 20 M), * 8 re., 2 re. zusammen *, von *-* 8 Mal wiederholen, 8 re. = 186 M. Viel Spaß beim stricken!
23.05.2018 - 08:56