
Popular categories
Looking for a yarn?


|
|||||||||||||||||||||||||
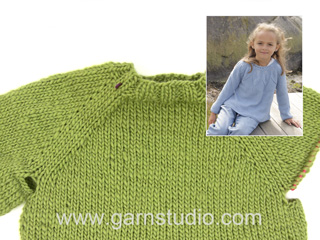
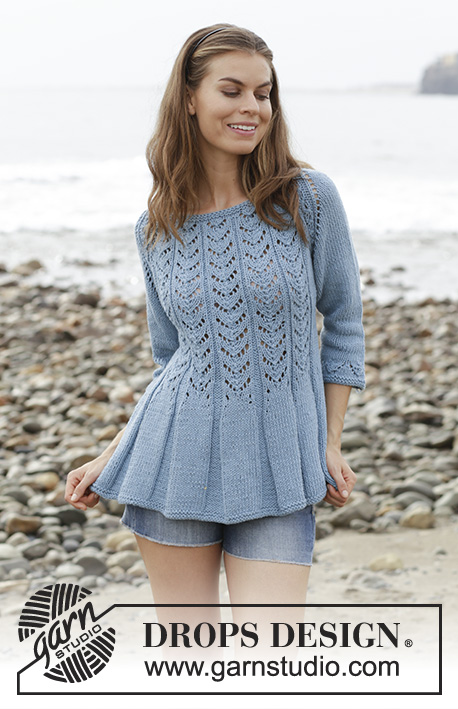
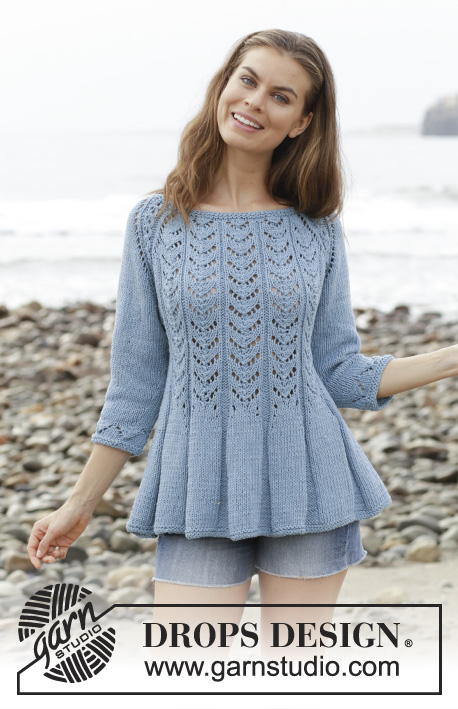
Belle Époque Sweater |
|||||||||||||||||||||||||
 |
 |
||||||||||||||||||||||||
Fitted jumper with lace pattern, raglan and ¾ sleeves, knitted top down. Size: S - XXXL Piece is knitted in DROPS Big Merino.
DROPS 186-6 |
|||||||||||||||||||||||||
|
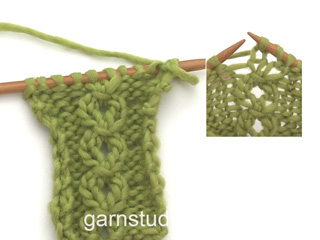
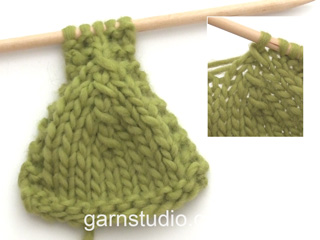
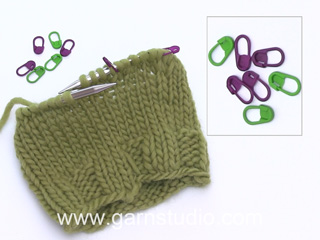
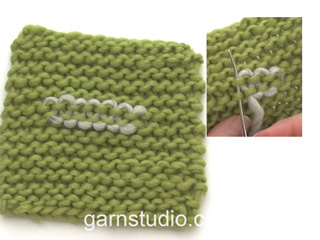
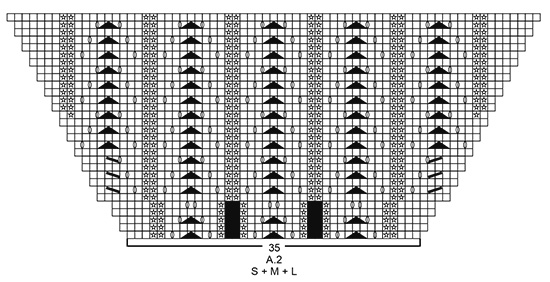
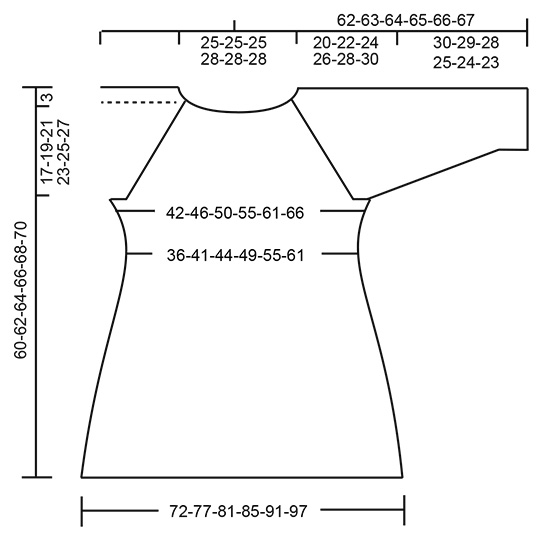
INFORMATION FOR PATTERN: GARTER STITCH (worked in the round): 1 ridge = 2 rounds. Knit 1 round and purl 1 round. INCREASE TIP-1: To calculate how to increase evenly, use the total number of stitches on row (e.g. 88 stitches) and divide stitches by number of increases to be done (e.g. 18) = 4.9. In this example increase by making 1 yarn over after approx. every 5th stitch. On next round knit yarn overs twisted to avoid holes. PATTERN: See diagrams A.1 to A.4. Choose diagram for your size (applies to A.2 and A.3). RAGLAN: Increase for raglan on each side of A.1 in every transition between body and sleeves (= 8 stitches increased on every increase round). Increase 1 stitch by making 1 yarn over, on next round knit yarns over to make holes. Work the increased stitches in stocking stitch on sleeves and according to diagram on front and back piece. DECREASE TIP (applies to sides on body and mid under sleeves): Begin 4 stitches before marker and knit 2 together, knit 4 (marker is between these 4 stitches), slip 1 stitch knitwise, knit 1, pass slipped stitch over stitch worked (= 2 stitches decreased). INCREASE TIP-2 (applies to purl sections on body): Increase 1 stitch in every purl section by making 1 yarn over before all 2 purl stitches. On next round purl yarn overs twisted to avoid holes. On next increase make 1 yarn over after every 3 purl stitches. Continue increase by alternately increasing at beginning and end of purl section. INCREASE TIP-3 (applies to sides of body): Begin 3 stitches before marker thread, make 1 yarn over, knit 6 (marker thread is in the middle of these 6 stitches), make 1 yarn over (= 2 stitches increased). On next round knit yarn overs twisted to avoid holes. INCREASE TIP-4 (applies to sections in stocking stitch over A.3 on body): When A.3 has been done, work in stocking stitch over the 9-9-9-11-11-11 stitches with lace pattern. Increase over these 9-9-9-11-11-11 stitches as follows: Work 1 stitch in stocking stitch, make 1 yarn over, work in stocking stitch until 1 stitch in stocking stitch remains, make 1 yarn over, work 1 stitch in stocking stitch. On next round knit yarn overs twisted to avoid holes. ---------------------------------------------------------- JUMPER: Worked in the round on circular needle from top down. Work sleeves in the round on double pointed needles/a short circular needle, top down. NECK EDGE: Cast on 88-92-96-100-104-108 stitches on a short circular needle size 4 mm with Big Merino. Work 2 ridges in GARTER STITCH in the round - see explanation above. Knit 1 round while increasing 18-14-10-18-14-10 stitches evenly - read INCREASE TIP-1 = 106-106-106-118-118-118 stitches. Knit 1 round. Switch to circular needle size 5 mm and work yoke as explained below. YOKE: Insert 1 marker at beginning of round and work first round as follows: Work A.1 (= 8 stitches), make 1 yarn over, work 2 stitches in stocking stitch (= sleeve cap), make 1 yarn over, work A.1, make 1 yarn over, work A.2 (= 35-35-35-41-41-41 stitches), make 1 yarn over, work A.1, make 1 yarn over, work 2 stitches in stocking stitch (= sleeve cap), make 1 yarn over, work A.1, make 1 yarn over, work A.2 (= 35-35-35-41-41-41 stitches), make 1 yarn over = 118-118-118-130-130-130 stitches (including yarn overs in A.1). Continue pattern like this. AT THE SAME TIME on every other round increase for RAGLAN - see explanation above, until increase has been done 14-18-20-21-24-26 times on each side of A.1 (including increases on first round after neck edge). REMEMBER THE KNITTING TENSION! NOTE! When A.2 has been worked, continue pattern the same way, but work the next increased stitches on each side of A.1 in stocking stitch. In size S the increases for raglan is done when 3 rounds remain in A.2, continue pattern without increase as explained below. After last increase for raglan there are 230-262-278-298-322-338 stitches on needle if it is on a round with 8 stitches in A.1 or 234-266-282-302-326-342 stitches if it is on a round with 9 stitches in A.1. Continue pattern as before without increases for raglan until piece measures 17-19-21-23-25-27 cm from cast-on edge mid front, but finish so that last round on needle is a round with 8 stitches in A.1. Work next round as follows: Work 0-0-0-0-0-1 stitches in stocking stitch, slip the next 48-56-60-62-67-68 stitches on 1 stitch holder for sleeve, cast on 6-6-8-8-10-12 new stitches on needle (= in the side under sleeve), continue with stocking stitch and pattern as before over the next 65-73-77-85-93-101 stitches (= front piece), slip the next 50-58-62-64-68-68 stitches on 1 stitch holder for sleeve, cast on 6-6-8-8-10-12 new stitch on needle (= in the side under sleeve), continue with stocking stitch and pattern as before over the next 65-73-77-85-93-100 stitches (= back piece) and slip the remaining 2-2-2-2-1-0 stitches on stitch holder for first sleeve. Finish body and sleeves separately. NOW MEASURE PIECE FROM HERE! BODY: = 142-158-170-186-206-226 stitches. Insert 1 marker thread in the middle of the 6-6-8-8-10-12 new stitches that were cast on under sleeve in each side. Begin round at one of the marker thread and move the marker threads when working. Work first round as follows: Work in stocking stitch over the first 7-11-14-13-18-23 stitches, work A.3 over the next 55-55-55-65-65-65 stitches (= 5 repetitions of 11-11-11-13-13-13 stitches, continue on correct round in diagram), purl 2, 14-22-28-26-36-46 stitches in stocking stitch, A.3 over the next 55-55-55-65-65-65 stitches, purl 2 and work in stocking stitch over the remaining 7-11-14-13-18-23 stitches. Continue the pattern like this – READ THE REST OF BODY BEFORE CONTINUING! DECREASE IN THE SIDES: When piece measures 1 cm from division, decrease 1 stitch on each side of both marker threads - read DECREASE TIP (= 4 stitches decreased). Decrease like this every other round 5 times in total in each side = 122-138-150-166-186-206 stitches. INCREASE IN PURL SECTIONS: When piece measures 6 cm from division, increase 1 stitch in every purl section (= 12 stitches increased on round) – read INCREASE TIP-2. Increase like this every 5 cm 6 times in total in every purl section (there are now 8 stitches in each of these purl sections). INCREASE IN THE SIDES: AT THE SAME TIME when piece measures 7 cm from division, increase 1 stitch on each side of both marker threads - read INCREASE TIP-3 (= 4 stitches increased). Increase like this every 6 cm 3 times in total in each side. INCREASE IN STOCKING STITCH SECTIONS: AT THE SAME TIME when piece measures approx. 15 cm from division, finish A.3. Then work knit over knit and purl over purl over these stitches. On next round increase 2 stitches in each stocking stitch section over A.3 - read INCREASE TIP-4 (= 20 stitches increased). Repeat this increase after 2 cm (= 20 stitches increased). When all increases are done there are 246-262-274-290-310-330 stitches on row. Continue with knit over knit and purl over purl until piece measures approx. 59-61-63-65-67-69 cm from shoulder and down. Switch to circular needle size 4.5 mm. Work 2 ridges in the round. Switch back to circular needle size 5 mm and cast off by knitting. Jumper measures approx. 60-62-64-66-68-70 cm from shoulder and down. SLEEVE: Slip the 50-58-62-64-68-68 stitches from stitch holder in one side of piece on double pointed needles or a short circular needle size 5 mm and pick in addition up 1 stitch in each of the 6-6-8-8-10-12 new stitches cast on under sleeve = 56-64-70-72-78-80 stitches. Insert 1 marker thread in the middle of the 6-6-8-8-10-12 stitches under sleeve and begin round here. Work in stocking stitch in the round. When piece measures 2-2-2-2-3-3 cm from division, decrease 2 stitches mid under sleeve - read DECREASE TIP. Decrease like this every 3½-2½-2-1½-1-1 cm 7-10-12-12-14-14 times in total = 42-44-46-48-50-52 stitches. Continue until sleeve measures 26-25-24-21-20-19 cm (shorter measurements in the larger sizes because of longer yoke). Knit 1 round while adjusting number of stitches to 40-40-48-48-48-48. Work A.4 in the round (= 5-5-6-6-6-6 repetitions of 8 stitches). When A.4 has been worked, switch to double pointed needles size 4 mm. Work 2 ridges in the round. Switch back to double pointed needles size 5 mm and cast off by knitting. Sleeve measures approx. 30-29-28-25-24-23 cm from division. Work the other sleeve the same way. |
|||||||||||||||||||||||||
Diagram explanations |
|||||||||||||||||||||||||
|
|||||||||||||||||||||||||

|
|||||||||||||||||||||||||
|
|||||||||||||||||||||||||

|
|||||||||||||||||||||||||
|
|||||||||||||||||||||||||
|
Have you made this or any other of our designs? Tag your pictures in social media with #dropsdesign so we can see them! Do you need help with this pattern?You'll find tutorial videos, a Comments/Questions area and more by visiting the pattern on garnstudio.com. © 1982-2024 DROPS Design A/S. We reserve all rights. This document, including all its sub-sections, has copyrights. Read more about what you can do with our patterns at the bottom of each pattern on our site. |
|||||||||||||||||||||||||


With over 40 years in knitting and crochet design, DROPS Design offers one of the most extensive collections of free patterns on the internet - translated to 17 languages. As of today we count 304 catalogues and 11422 patterns - 11422 of which are translated into English (UK/cm).
We work hard to bring you the best knitting and crochet have to offer, inspiration and advice as well as great quality yarns at incredible prices! Would you like to use our patterns for other than personal use? You can read what you are allowed to do in the Copyright text at the bottom of all our patterns. Happy crafting!
Comments / Questions (40)
Hallo, ich habe mit dem Pullover begonnen. Kann es sein, dass in der XXL Version von A2 einen kleinen Fehler gibt? Ab Reihe 9 müsste am Ende ebenfalls ein Umschlag gemacht werden, genau wie im Beginn von A2. Weil ich sonst immer eine Masche abnehme, aber keine zunehme und nicht auf die Maschen Anzahl der nächsten Reihe komme. Liebe Grüße
02.02.2019 - 18:31Jeg strikken denne sweater i small og er nået til bærestykket ; har 106 masker.kan ikke fåå maskeantallet til at gå op ? Der står strik A1 = 8 masker, det bliver da 9m når man skal lavet et omslag ? o.s.v. antallet kommer ikke til at passe ?
15.01.2019 - 16:22DROPS Design answered:
Hei Hanne. Ja, maskeantallet i hvert diagram endrer seg underveis. Men når det står Strikk A.1 (=8 masker) er det fordi du strikker A.1 over 8 masker akkurat på den omgangen. Kastet du lager teller ikke med i dette maskeantallet, siden det lages mellom 2 masker. Når omgangen er ferdig, teller kastene du lagde med i maskeantallet, for de strikkes som masker på neste omgang. Du har altså 106 masker, du øker med kast totalt 12 ganger på omgangen (1 gang på hver side av hver A.1, og 1 gang midt i hver A.1) = 118 masker på pinnen når omgangen er ferdig. God fornøyelse.
23.01.2019 - 13:48If I want to make it longer as if to do a dress in size M (let\'s say a short one, above the knee), how much yarn would you suggest to add?
07.12.2018 - 19:08DROPS Design answered:
Hello Francesca. For any question regarding yarn amount, please contact your DROPS store via mail or phone. Happy knitting!
07.12.2018 - 21:16Hej! Jag stickar just nu oket, och har en fråga ang en formulering i beskrivningen. Det jag inte förstår är detta: ”Nästa varv stickas så här: Sticka 0-0-0-0-0-1 maskor slätstickning” Vad betyder det att jag ska sticka 0-0-0-0-0-1 maskor? Jättevackert mönster och tröjan kommer bli fantastisk! Hoppas ni kan hjälpa mig förstå. Tack på förhand! Vänliga hälsningar, Simona
19.09.2018 - 14:55DROPS Design answered:
Hei Simona. For at mønsteret skal gå opp i alle størrelser blir det noen ganger lagt inn elementer som kun skal strikkes i visse størrelser. Her gjelder det den største størrelsen (hvor det skal strikkes 1 maske glattstrikk). Alle størrelsene blir likevel vist, for ordens skyld. Hvis du strikker en av de andre størrelsene skal du ikke strikke noen masker glattstrikk så bare gå videre til å sette masker på en tråd til erme. God fornøyelse.
20.09.2018 - 08:39Witam.Nie widzę teraz żadnego zdjęcia Jak korzystać ze strony Dropsa
10.09.2018 - 12:42DROPS Design answered:
Witam, sytuacja już jest naprawiona. Pozdrawiamy!
10.09.2018 - 17:00Dag, Ik heb de meerderingen gedaan 14 keer. Er zijn 230 steken op de naald. Nu begrijp ik niet hoe ik verder in patroon zal breien, want als ik dat doe worden meer dan 230 steken op de naald. Plus als de 30e naad gebreid is, hoe kan ik verder in patroon breien als A2 niet 35 steken zijn maar eigenlijk veel meer? Bedankt! Mvg, Daiana
23.05.2018 - 21:03DROPS Design answered:
Hallo Daiana, Als je klaar bent met de 14 keer meerderen voor de raglan, kun je gewoon A.2 blijven volgen tot de gewenste lengte. Het aantal steken in A.2 blijft namelijk nu hetzelfde, omdat je geen meerderingen meer maakt voor de raglan.
31.05.2018 - 16:35Bonjour, j'aime beaucoup la coupe du modèle - notamment les plis du bas - mais je ne souhaite pas faire les motifs troués et je séparerai vers la taille avec une bande (fine) de couleur contrastante. Dans ce cas, si on remplace les motifs par du jersey, quelles sont les explications ? Merci d'avance de votre réponse et bravo encore pour vos modèles :)
14.05.2018 - 14:09DROPS Design answered:
Bonjour Martine, nous ne sommes malheureusement pas en mesure de pouvoir ajuster chacun de nos modèles à chaque demande individuelle, pour toute assistance complémentaire, merci de bien vouloir contacter le magasin où vous avez acheté votre fil. Bon tricot!
14.05.2018 - 15:20I’m not doing the sweater, I’m doing the jacket, the pattern isn’t in the round although it’s done on size 5 circulars, the sweater is 186-6 I’m doing 186-7 thanks
07.03.2018 - 18:13DROPS Design answered:
Dear Mrs Norman, when working from WS (= row 2,4, 6...) read diagram from the left towards the right, the inc sts for raglan (before and after A.3) are worked either in stocking st (= sleeve: P YOs from WS to make holes) or as shown in diagram A.2/A.5 (font pieces) and A.4 (back piece). See also RAGLAN at the beg of pattern. Happy knitting!
08.03.2018 - 09:48I’m doing the 186-7 pattern, not got off He staring blocks yet, my question is, when doing the second row do I follow the chart from left to right and do I make 1 yo on these ws rows as well as the chart patterns, also do I increase where there is 2 stocking stitches or just on the A3 chart, very confused, thanks Janet Norman
07.03.2018 - 16:45DROPS Design answered:
Dear Mrs Norman, sweater is here worked in the round, ie you will read every round starting from the bottom corner on the right side towards the left. Increase for raglan on each side of A.1 (= before and after each A.1) at the transition between body/sleeve, on every other round (= 1 round with increase with a YO, on next round work the YO as shown in diagrams on body and in stockinette on sleeves. Happy knitting!
07.03.2018 - 17:06Quand'è che mettete la spiegazione??
20.02.2018 - 13:54