
Popular categories
Looking for a yarn?


|
|||||||||||||||||||
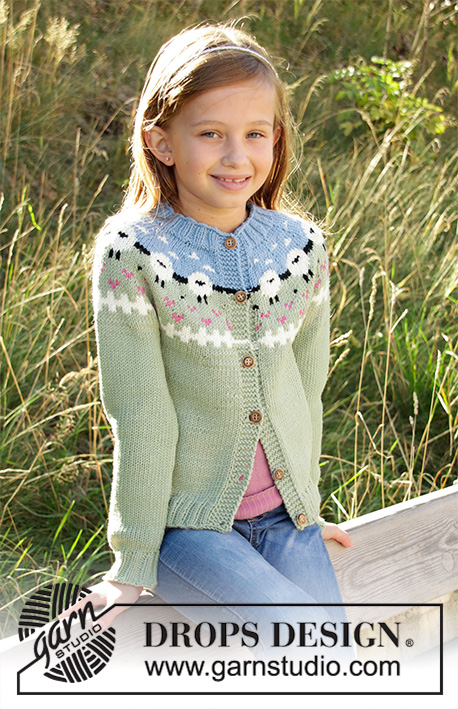
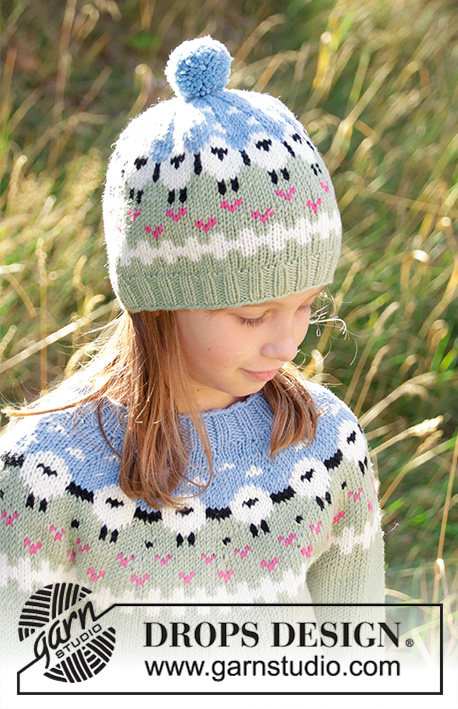
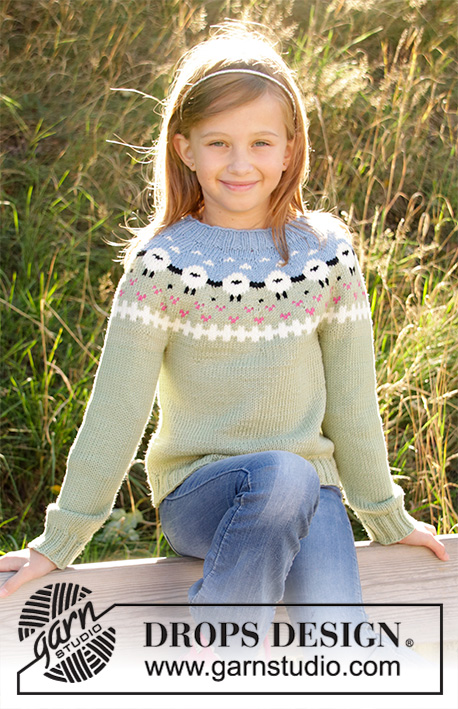
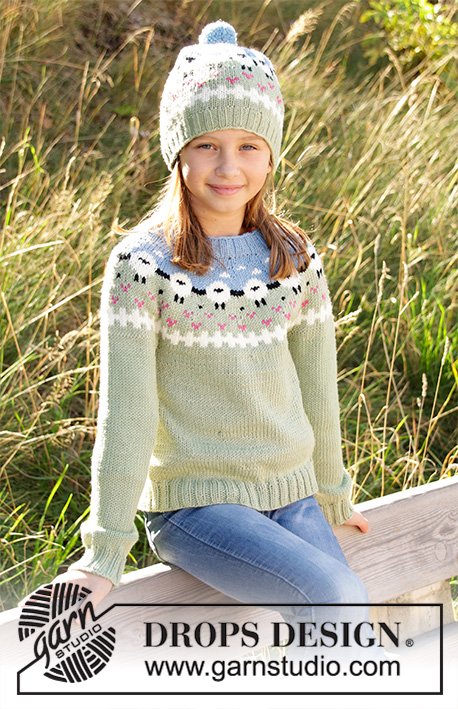
Lamb Dance Sweater |
|||||||||||||||||||
 |
 |
||||||||||||||||||
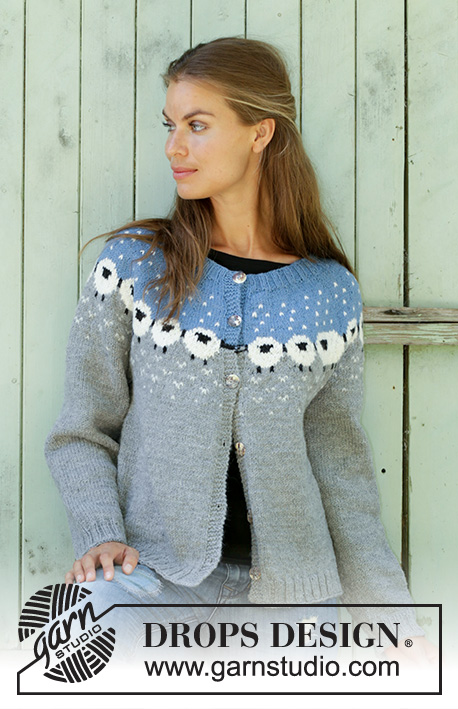
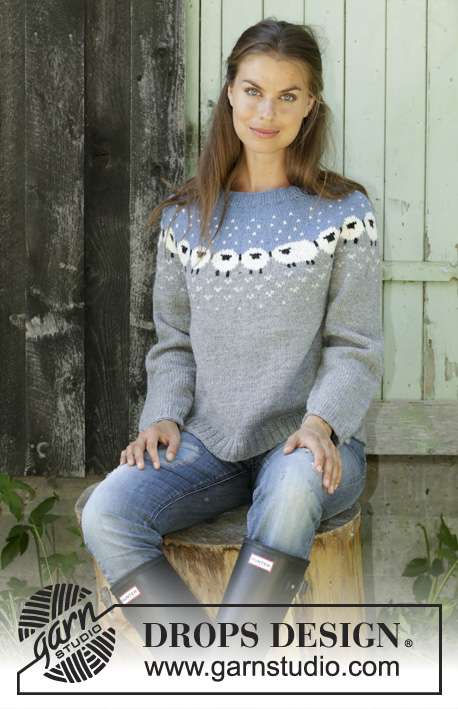
Knitted jumper for kids in DROPS Merino Extra Fine or DROPS Lima. Piece is knitted top down with sheep, colour pattern, ribs and stocking stitch. Size 3-12 years
DROPS Children 34-3 |
|||||||||||||||||||
|
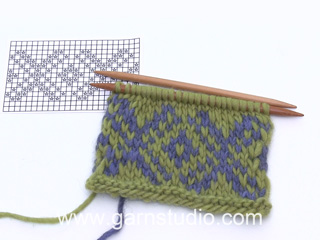
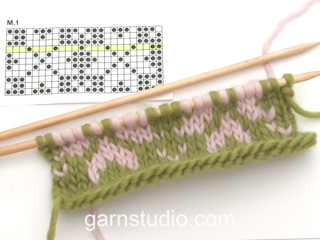
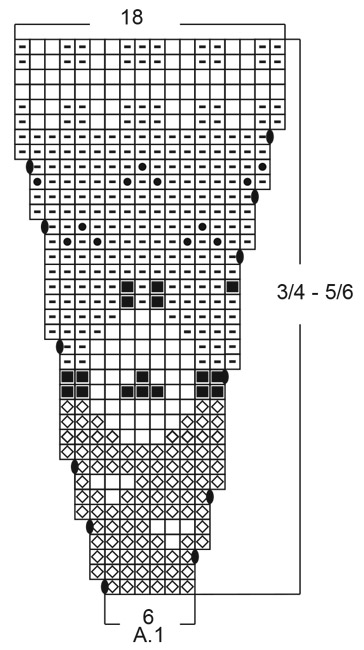
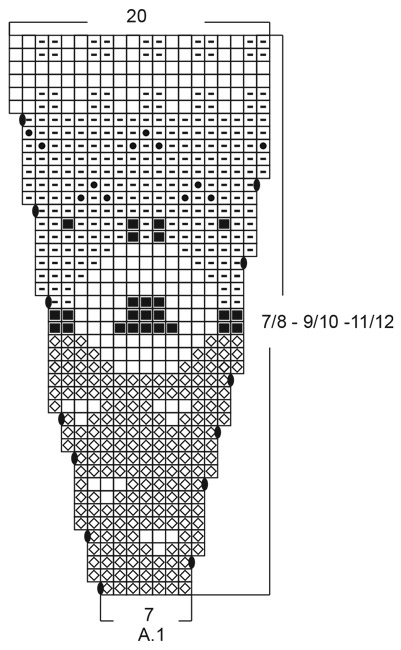
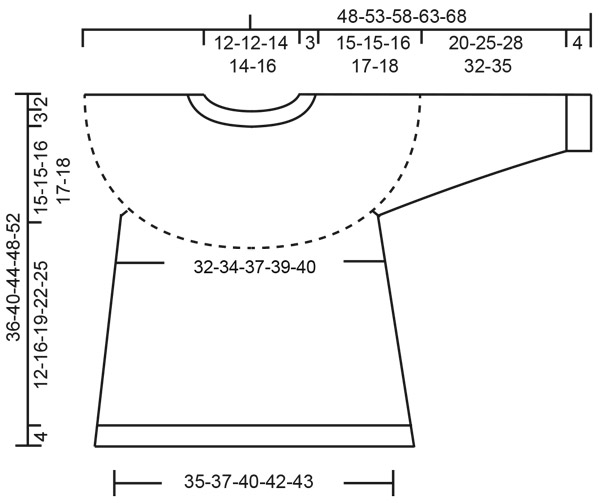
---------------------------------------------------------- EXPLANATION FOR THE PATTERN: ---------------------------------------------------------- PATTERN: See diagrams A.1. Choose diagram for your size. Diagram show all rows in pattern seen from the right side. DECREASE/INCREASE TIP (evenly): To calculate how to decrease evenly, use the total number of stitches on round (e.g. 84 stitches) and divide stitches by number of decreases to be done (e.g. 7) = 12. In this example decrease by knitting every 11th and 12th stitch together. To increase use the same calculation but make instead a yarn over after every 12th stitch. Knit yarn overs twisted on next round to avoid holes. INCREASE TIP-2 (applies to sides of body): Work until 1 stitch remains before marker thread, 1 yarn over, knit 2 (marker thread is in the middle of these stitches), 1 yarn over = 2 stitches increased. On next round work yarn over twisted to avoid hole. Then work the new stitches in stocking stitch. DECREASE TIP-2 (applies to sleeves): Decrease 1 stitch on each side of marker thread as follows: Work until 3 stitches remain before marker thread, knit 2 together, knit 2 stitches (marker thread is between these stitches), slip 1 stitch knitwise, knit 1, pass slipped stitch over stitch worked = 2 stitches decreased. ---------------------------------------------------------- START THE PIECE HERE: ---------------------------------------------------------- JUMPER - SHORT OVERVIEW OF THE PIECE: Worked in the round on circular needle, top down. When dividing for sleeves, work body in the round on circular needle, work sleeves in the round on double pointed needles/short circular needle. YOKE: Cast on 80-84-96-108-112 stitches on circular needle size 3 mm with light grey blue. Join to work in the round and work 1 round in stocking stitch. Work rib in the round with knit 2/purl 2 for 3 cm (neck edge). Switch to circular needle size 4 mm. Work 1 round in stocking stitch while decreasing 14-12-12-17-14 stitches evenly - read DECREASE/INCREASE TIP = 66-72-84-91-98 stitches. Then work according to diagram A.1, work diagram 11-12-12-13-14 times on round. NOTE: Choose diagram for correct size. REMEMBER THE KNITTING TENSION! When entire A.1 has been worked there are 198-216-240-260-280 stitches on round. On next round work with pistachio and stocking stitch and increase 14-8-2-2-2 stitches evenly on round = 212-224-242-262-282 stitches. Continue with pistachio and in stocking stitch until piece measures approx. 18-18-19-20-21 cm from cast-on edge. Work next round as follows: Knit 62-64-70-77-79 stitches (= back piece), slip the next 44-48-51-54-62 stitches on a stitch holder (= sleeve), cast on 6 new stitches under sleeve, work 62-64-70-77-79 stitches in stocking stitch (= front piece), slip the next 44-48-51-54-62 stitches on a new stitch holder (= sleeve), cast on 6 new stitches under sleeve. BODY: There are now 136-140-152-166-170 stitches on round. NOW MEASURE PIECE FROM HERE! Insert 1 marker thread in the middle of the 6 new stitches cast on. Continue in stocking stitch and pistachio. When piece measures 3 cm, increase 1 stitch on each side of each marker (= 4 stitches increased) - read INCREASE TIP-2! Repeat increase 1 more time after 4 cm = 144-148-160-174-178 stitches on needle. Work until piece measures approx. 12-16-19-22-25 cm (or to desired length, there is approx. 4 cm until finished measurements). Work 1 round in stocking stitch and increase 12-12-12-10-10 stitches evenly = 156-160-172-184-188 stitches. Switch to circular needle size 3 mm and work rib with knit 2/purl 2. Work rib for 4 cm. Loosely cast off stitches with knit over knit and purl over purl. Cut and fasten the yarn. SLEEVE: Slip stitches from on stitch holder back on a short circular needle/double pointed needles size 4 mm (= 44-48-51-54-62 stitches), pick up 1 stitch in each of the 6 stitches cast on on body (= 50-54-57-60-68 stitches). Insert 1 marker thread in the middle of these 6 stitches. Work in stocking stitch in the round until sleeve measures 2 cm. Now decrease 1 stitch on each side of marker thread - read DECREASE TIP-2! Continue in stocking stitch and repeat decrease every 4-3½-4-4-3½ cm until decrease has been done 5-7-7-8-10 times in total = 40-40-43-44-48 stitches on needle. Work in stocking stitch until sleeve measures 21-26-29-33-36 cm. Knit 1 round and increase 4-4-5-4-4 stitches on round = 44-44-48-48-52 stitches. Switch to double pointed needles size 3 mm and work rib in the round with knit 2/purl 2 for 4 cm. Loosely cast off stitches with knit over knit and purl over purl. Cut and fasten the yarn. Work the other sleeve the same way. |
|||||||||||||||||||
Diagram explanations |
|||||||||||||||||||
|
|||||||||||||||||||
|
|||||||||||||||||||
|
|||||||||||||||||||
|
|||||||||||||||||||
|
Have you made this or any other of our designs? Tag your pictures in social media with #dropsdesign so we can see them! Do you need help with this pattern?You'll find tutorial videos, a Comments/Questions area and more by visiting the pattern on garnstudio.com. © 1982-2024 DROPS Design A/S. We reserve all rights. This document, including all its sub-sections, has copyrights. Read more about what you can do with our patterns at the bottom of each pattern on our site. |
|||||||||||||||||||


With over 40 years in knitting and crochet design, DROPS Design offers one of the most extensive collections of free patterns on the internet - translated to 17 languages. As of today we count 304 catalogues and 11422 patterns - 11422 of which are translated into English (UK/cm).
We work hard to bring you the best knitting and crochet have to offer, inspiration and advice as well as great quality yarns at incredible prices! Would you like to use our patterns for other than personal use? You can read what you are allowed to do in the Copyright text at the bottom of all our patterns. Happy crafting!
Comments / Questions (41)
Hi, when knitting the sleeves in the round, there is a marker in the middle of the new 6 stitches. For me, this marker also marks the beginning and the end of the rows. When decreasing, it says k2tog before the marker and another decrease after the marker. As I knit from right to left, this means that my decreases will be in 2 different rows. Before the marker is end of row and after the marker is the next (new) row. I am confused. Could you please clarify? Thank you.
09.11.2019 - 09:37DROPS Design answered:
Dear Helena, this is absolutely right - in fact you decrease at the beg and at the end of one round. But dont worry about that - just decrease on both sides of marker - and that is all :-) Happy knitting!
10.11.2019 - 20:18Hei! Har nettop strikka denne gensaren og so lure eg på når man skal slutte å auke masker på dei forsjellige str. Eg strikka etter diagrammet og enda opp med det antall masker som skulle vere på den største str og eg skulle strikke 7/8 år.
14.10.2019 - 15:52DROPS Design answered:
Hej Inger, Du øger kun ifølge diagrammet, så når du er færdig med diagrammet, så er du færdig med udtagningerne. Husk at strikkefastheden skal stemme :)
16.10.2019 - 15:00Fin oppskrift,kjekk å strikke. Strikket noe lengre armer( str7/8) dermed forlite garn! Er det mulig å få tilsendt 2 nøster Drops Merino extra fine color 05 dyelot 90658 ?
07.09.2019 - 08:23DROPS Design answered:
Hei Bente. Vi sender/selger ikke garn direkte til våre forbrukere, men ta kontakt med en av nettbutikkene som selger våre garn. Oversikten over butikker finner du under: Finn en butikk. Nå er det også DROPS Merino Mania, der du kan få kjøpe garnet til 30% :) God Fornøyelse!
09.09.2019 - 12:28When it says: "Continue with pistachio and in stocking stitch until piece measures approx. 18-18-19-20-21 cm from cast-on edge. " does it mean from the very beginning and thus the beginning of the cast on edge, or not counting the edge? Thanks!
21.07.2019 - 21:55DROPS Design answered:
Dear Emilija, yes, thats mean from the very beginning of garment. Happy knitting!
22.07.2019 - 05:58Thankyou for your reply. I do work from right to left. I have undone back to the ribbing and re- knitted back to row 14. I have the right number of stitches on the needle, but still am short of a stitch on row 15? Where it says k4 I have k3.
12.06.2019 - 01:59DROPS Design answered:
Dear Mrs Perry, we have forwarded your feedback to our design team, the diagram will probably be edited to fix this extra stitch. Thanks for your patience.
12.06.2019 - 07:39I am knitting this sweater in size 7/8 years. When I tried to knit row 15 of the graph, there are not enough stitches. I have undone a lot of rows and re-knitted. Can you tell me how many stitches should be on the needle by row 14 please. The row reads as K3(blue) K3(white) K4(blue) K3(white K1 Blue, yo then repeat. When it says K3 blue there are only 2 stitches. Are the rows of the graph worked just from the left. Or every second row knitted from the right?
11.06.2019 - 08:56DROPS Design answered:
Hi Dianne. Since you work in the round all rows in the diagram are worked from right to left. Row 14 reads as: 4 sts blue, 1 st white, 6 sts blue, 1 st white, 1 st blue. In size 7/8 years you repeat pattern A.1 a total of 12 times on the round. You have so far increased 1 st in each repeat of A.1 on rows 1, 3, 5, 9, 11 and 13 in the diagram. Thus, you have increased a total of: 6 sts X 12 repeats of A.1 = 72 sts . Adding those to the original sts count of 84, that leaves you with 156 sts on row 14 - 13 sts in each repeat of A.1 (at this point). You increase again at the end of each repeat on row 15, so after row 15 is worked you have 168 sts. Happy knitting.
11.06.2019 - 14:54Hello again, When increasing in the body (e.g. small size) it says the first increase is after 3cm measured from the body and the second increase is after 4cm. Is this 4cm from the start of the body or 4cm after the first increase? Thank you
27.05.2019 - 18:53DROPS Design answered:
Dear Mrs Maine, the 2nd increase will be worked 4 cm after the first one (= 7 cm from the division). Happy knitting!
28.05.2019 - 09:05Hi In A1, (for the smallest size) when starting row number 15, the row starts with a YO before the black colour stitches - which colour should be the yarn over, please?
25.05.2019 - 16:03DROPS Design answered:
Hello Helena. You work the yo with the black colour. Happy knitting!
25.05.2019 - 19:04Helt fel mått från armhåla till full längd på fram- och bakstycke. Stickar man enl. mönstret slutar tröjan i midjehöjd. Beräkningen av garnåtgång är helt fel. Mycket tråkigt!
06.04.2019 - 13:27DROPS Design answered:
Hei Lena. Dette er en kort modell, som går ca til bukselinningen. Vi har nå likevel lagt til litt på lengden. Vi har også justert garnmengden opp i grønn og blå. Takk for beskjed, god fornøyelse
11.04.2019 - 14:59Veldig kjedelig at oppgitt garnmengde ikke stemmer - verken på denne eller «voksenmodellen».
31.03.2019 - 20:54