
Popular categories
Looking for a yarn?


|
|
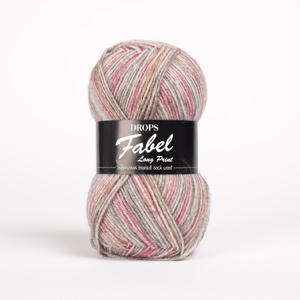
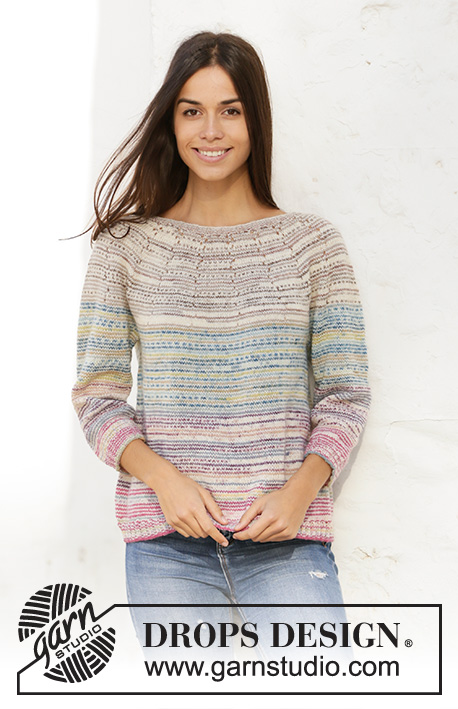
Watercolour Sky |
|
 |
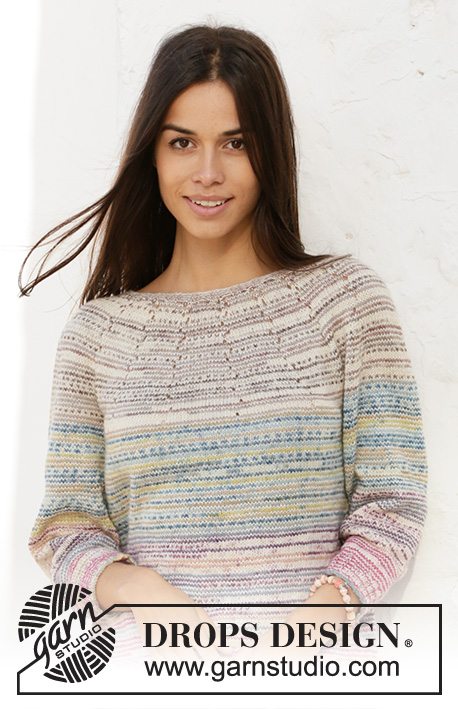 |
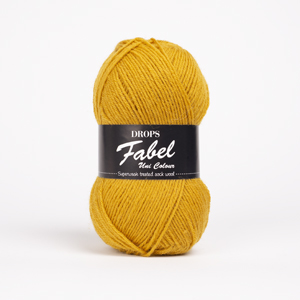
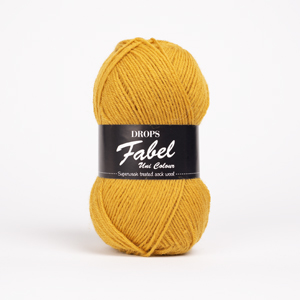
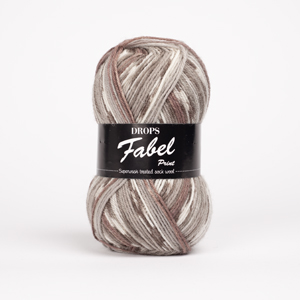
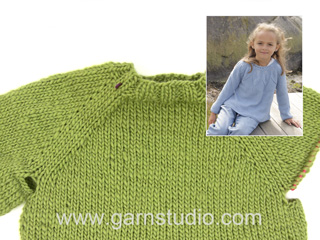
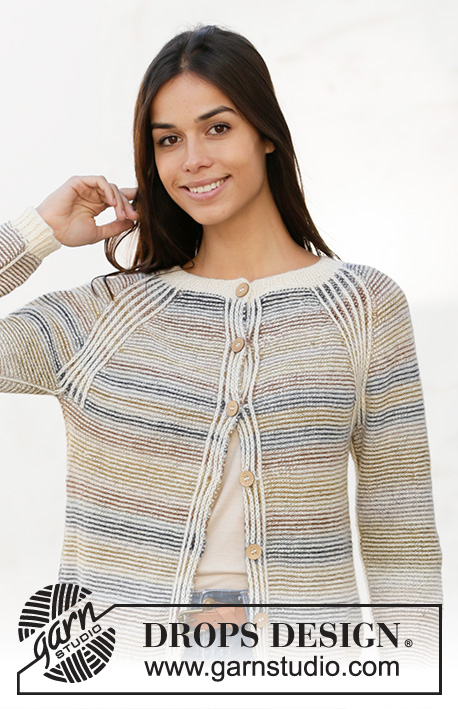
Knitted jumper with round yoke in DROPS Fabel. The piece is worked top down with stripes and ¾-length sleeves. Sizes S - XXXL.
DROPS 210-22 |
|
|
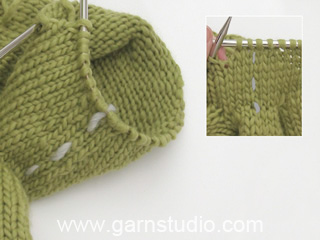
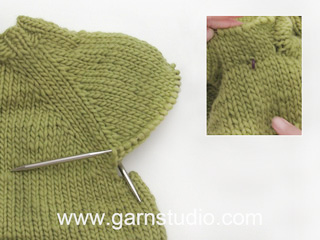
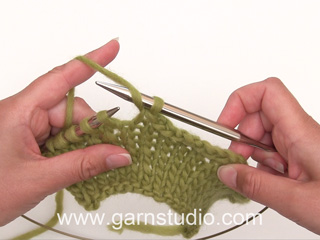
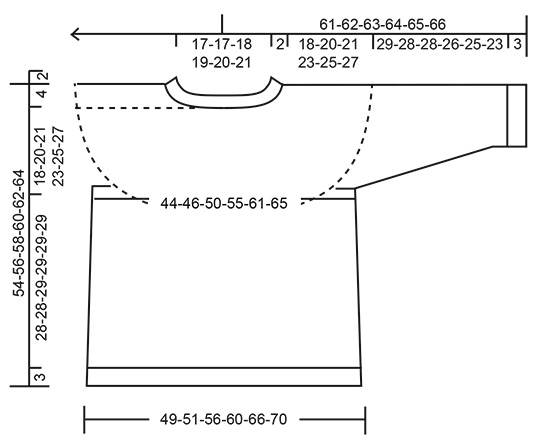
------------------------------------------------------- EXPLANATIONS FOR THE PATTERN: ------------------------------------------------------- STRIPES: Work 4 stripes as follows (adjust so each stripe ends with off-white and begins with the colour): STRIPE 1: Work * 1 round with soft chocolate, 1 round with off white *, work from *-* for a total of 18-18-19-19-20-20 cm (i.e. measured from the cast-on edge). STRIPE 2: Work * 1 round with sea mist, 1 round with off white *, work from *-* for 13-13-13-14-14-14 cm. STRIPE 3: Work * 1 round with lavender, 1 round with off white *, work from *-* for 13-13-13-14-14-14 cm. STRIPE 4: Work * 1 round with pink dream, 1 round with off white *, work from *-* to finished length. INCREASE TIP-1 (evenly spaced): To work out how to increase evenly, count the total number of stitches on the needle (e.g. 108 stitches) and divide by the number of increases to be made (e.g. 20) = 5.4. In this example, increase by making 1 yarn over after alternately each 5th and 6th stitch. On the next round work the yarn overs twisted to avoid holes. INCREASE TIP-2 (for round yoke): All increases are worked on a round with off-white. Increase by making 1 yarn over between 2 stitches. The yarn over is not worked twisted on the next round. INCREASE TIP-3 (for sides of body): Work until there are 2 stitches left before the marker thread, make 1 yarn over, knit 4 (marker thread sits between these 4 stitches) make 1 yarn over (= 2 stitches increased at each marker thread; 4 stitches increased on round). On the next round work the yarn overs twisted to avoid holes. DECREASE TIP (for sleeves): Decrease 1 stitch on each side of the marker thread as follows: Work until there are 3 stitches left before the marker thread, knit 2 together, knit 2 (marker thread sits between these 2 stitches), slip 1 stitch as if to knit, knit 1 and pass the slipped stitch over the knitted stitch. CASTING-OFF TIP: To avoid the cast-off edge being tight you can cast off with a larger size needle. If the edge is still tight, make 1 yarn over after approx. each 4th stitch at the same time as casting off and the yarn overs are cast off as normal stitches. ------------------------------------------------------- START THE PIECE HERE: ------------------------------------------------------- JUMPER – SHORT OVERVIEW OF THE PIECE: The neck and yoke are worked in the round with circular needle, from mid back and top down. The yoke is divided for body and sleeves. The body is continued in the round with circular needle. The sleeves are worked in the round with double pointed needles, top down. NECK: Cast on 104-108-112-116-120-124 stitches with circular needle size 2.5 mm and off-white. Work the piece in STRIPES – read description above (i.e. the first round is worked with soft chocolate). Knit 1 round. Work rib (= knit 2 / purl 2) over all stitches. When the rib measures 2 cm, adjust so the next round is worked with off-white, change to circular needle size 3.5 mm. Insert 1 marker thread on the beginning of the round; the yoke will be measured from this marker thread! YOKE: Knit 1 round and increase 15-20-24-28-24-16 stitches evenly spaced – read INCREASE TIP-1 = 119-128-136-144-144-140 stitches. Work 2 rounds. REMEMBER THE KNITTING TENSION! Then insert markers on the next round with soft chocolate as follows: * Knit 3, insert 1 marker in the next stitch and knit the stitch, knit 3-4-4-4-4-3 *, work from *-* (= 17-16-17-18-18-20 times in width). Stiches will be increased on each side of these stitches with a markers. On the next round with off-white increase 1 stitch before each stitch with a marker (= 17-16-17-18-18-20 stitches increased) – read INCREASE TIP-2. Increase like this every 4th round a total of 12-13-14-15-17-17 times but increase alternately before and after the stitches with markers = 323-336-374-414-450-480 stitches. When the piece measures 18-20-21-23-25-27 cm from the marker thread, divide the piece for body and sleeves as follows: Work 47-49-54-59-66-71 stitches (= half back piece), place the next 68-70-79-89-93-98 stitches on a thread for the sleeve and cast on 8 stitches under the sleeve, work 93-98-108-118-132-142 stitches (= front piece), place the next 68-70-79-89-93-98 stitches on a thread for the sleeve and cast on 8 stitches under the sleeve, finish by working the last 47-49-54-59-66-71 stitches (= half back piece). BODY: = 203-212-232-252-280-300 stitches. Insert 1 marker thread in the middle of the 8 new stitches under each sleeve (= in sides of body). There are 102-106-116-126-140-150 stitches on the back piece and 101-106-116-126-140-150 stitches on the front piece. Allow the threads to follow your work onwards; they will be used when increasing in the sides. Continue in the round with stripes and stocking stitch. When the piece measures 3 cm from the division increase 1 stitch on each side of both marker threads – read INCREASE TIP-3 (= 4 stitches increased). Increase like this every 4 cm a total of 6 times = 227-236-256-276-304-324 stitches. When the piece measures 28-28-29-29-29-29 cm from where the body and sleeves were divided increase 1-0-0-0-0-0 stitch = 228-236-256-276-304-324 stitches. Change to circular needle size 2.5 mm and work rib (= knit 2 / purl 2) for 3 cm; adjust so the last round is worked with off-white. Cast off with knit using pink dream – read CASTING-OFF TIP. SLEEVES: Place the 68-70-79-89-93-98 stitches from the thread on the one side of the piece on double pointed needles size 3.5 mm and knit up 1 stitch in each of the 8 stitches cast on under the sleeve = 76-78-87-97-101-106 stitches. Insert 1 marker thread in the middle of the 8 stitches under the sleeve. Allow the thread to follow your work onwards; it will be used when decreasing under the sleeve. Continue with stocking stitch and stripes. When the sleeve measures 3-3-1-1-4-2 cm from the division decrease 1 stitch on each side of the marker thread – read DECREASE TIP (= 2 stitches decreased). Decrease like this every 2½-2½-2-1½-1-1 cm a total of 9-9-12-16-17-19 times = 58-60-63-65-67-68 stitches. When the sleeve measures 29-28-28-26-25-23 cm from the division, change to double pointed needles size 2.5 mm and increase 2-0-1-3-1-0 stitches = 60-60-64-68-68-68 stitches. Work rib in the round (= knit 2 / purl 2) for 3 cm; adjust so the last round is worked with off-white. Cast off with knit using pink dream. Work the other sleeve in the same way. |
|
|
|
|
Have you made this or any other of our designs? Tag your pictures in social media with #dropsdesign so we can see them! Do you need help with this pattern?You'll find tutorial videos, a Comments/Questions area and more by visiting the pattern on garnstudio.com. © 1982-2024 DROPS Design A/S. We reserve all rights. This document, including all its sub-sections, has copyrights. Read more about what you can do with our patterns at the bottom of each pattern on our site. |
|


With over 40 years in knitting and crochet design, DROPS Design offers one of the most extensive collections of free patterns on the internet - translated to 17 languages. As of today we count 304 catalogues and 11422 patterns - 11422 of which are translated into English (UK/cm).
We work hard to bring you the best knitting and crochet have to offer, inspiration and advice as well as great quality yarns at incredible prices! Would you like to use our patterns for other than personal use? You can read what you are allowed to do in the Copyright text at the bottom of all our patterns. Happy crafting!
Comments / Questions (59)
Hey, wie toll ist das denn: Die Anleitung für meine Größe beim Ausdrucken markiert!!! Der Marker kann in Rente gehen. Die beste Idee ever. Ich bin begeistert. Seit wann gibt es diese Möglichkeit denn schon, habe ich da etwas nicht mitbekommen? Etwas mehr Werbung bitte!
07.05.2024 - 10:04Jeg strikker str. xxxl og skal øke på bærestykket, jeg forstår ikke hvor mange masker i mellom merkene- 20 ganger ??
25.04.2024 - 22:01DROPS Design answered:
Hei May Brit, Du begynner med å øke rett før hver maske med merke, 20 merker så 20 økte masker på første omgang. Øke slik hver 4. omgang, men vekselsvis rett etter og rett før merke-maskene) totalt 17 ganger (16 ganger til)= 20 x 17 = 340 økte masker. Da har du 140 + 340 = 480 masker. Håper dette hjelper og god fornøyelse!
26.04.2024 - 07:03Petites questions, c'est dit pour échantillon si plus grand de 10 cm ou trop de ms, de prendre aiguilles plus Grosse, ou plus petit l'échantillon prendre aiguilles plus petites Cela serait pas le contraire, aiguilles plus petite si échantillon plus grand et vice versa A moins que vous parler de la laine, merci
29.01.2024 - 15:36Jag stickar i Fabel print och undrar var jag ska sätta markeringen för övergången till oket? Uppläggningstråden skulle ju vara mitt bak som jag förstår? Behöver jag en markering för övergång till oket?
16.01.2024 - 14:45DROPS Design answered:
Hej Tina, du behöver bara 1 märktråd för att kunna mäta oket :)
16.01.2024 - 14:50Liebes Drops Team. Ich fürchte ich habe die Anleitung für Watercolour Sky falsch verstanden. Bei der Zunahme für die Passe bin ich so vorgegangen: 1. Runde eine Masche vor der markierten Masche zunehmen, 2. Runde nach der markierten Masche zunehmen, dann 2 Runden ohne Zunahme. Von der Länge habe ich etwa die Hälfte der Passe. Wird dann ohne Zunahme weiter gestrickt? Auf dem Foto sieht das anders aus.
29.03.2023 - 16:24DROPS Design answered:
Liebe Ana, Sie stricken die Zunahmen in jeder 4. Runde, d.h. so: 1 Runde mit Zunahmen vor allen markierten Maschen, dann 3 Runden ohne Zunahmen, dann 1 Runde mit Zunahmen nach allen markierten Maschen, 3 Runden ohne Zunahmen, 1 Runde mit Zunahmen vor allen markierten Maschen, 3 Runden ohne Zunahmen usw., bis die genannte Anzahl an Zunahme-Runden gestrickt wurde. Gutes Gelingen weiterhin!
05.04.2023 - 11:29Nie rozumie 3 oczka prawe ,umieścić 1 marker w następne oczko i przerobić to oczko na prawo , 3-4-4-4-4-3 0czka , powtarzać od ;do .[=17-16-17-18-18-20 razy na szerokość] .Oczka będą dodawane z każdej strony tych oczek z markerem . w następnym okrążeniu dodać 1oczko przed każdym oczkiem 1markerem [=dodanych 17-16-17-18-18-20 oczek] Proszę o wytłumaczenie mi bo się pogubiłam .
21.10.2022 - 12:46DROPS Design answered:
Witaj Bogusiu, przerabiasz całe okrążenie następująco: *3 oczka prawe, umieścić 1 marker w następne oczko i przerobić to oczko na prawo, przerobić 3-4-4-4-4-3 oczka prawe (wybrać liczbę w zależności od wykonywanego rozmiaru)*, powtarzać od *-* (= 17-16-17-18-18-20 razy w okrążeniu) –wybrać liczbę powtórzeń w zależności od rozmiaru. W następnym okrążeniu należy dodać 1 oczko przed każdym oczkiem z markerem - aby dodać oczko należy wykonać 1 narzut przed oczkiem z markerem, ale pamiętaj, że w następnym okrążeniu przerabiasz narzut normalnie (nie przekręcasz oczek), będą dziurki w miejscu narzutów. Miłej pracy!
24.10.2022 - 09:43Jag vill göra den i en färg. Hur ska jag tänka med ökningar? Har svårt att räkna ut hur ofta jag ska öka när jag inte byter färg.
09.10.2022 - 11:31DROPS Design answered:
Hei Ulli. Når vrangborden måler 2 cm,strikkes det 3 omganger der det økes masker på 1. omgang (se i oppskriften antall masker i den str. du strikker). Deretter strikkes det 1 omgang der det settes merker i maskene (se i oppskriften hvor i den str. du strikker). På neste omgang økes det 1 maske før hver maske med merke – les ØKETIPS-2. Øk slik på hver 4.omgang totalt x-antall ganger (se antall ganger din str), men det økes vekselsvis før og etter masken med merket. mvh DROPS Design
17.10.2022 - 10:08Hei. Jeg förstår ikke hva som menas med att man ska"anpassa så att varje rand avslutas med natur och börjar med färgen"?
14.09.2022 - 21:10DROPS Design answered:
Hej Tone, när du avslutar rand 1 gör du det med natur och så börjar du med rand 2 med färgen :)
16.09.2022 - 07:28Watercolour Sky i XL. Jeg har kommet til bærestykke og har økt til 144 masker, strikket to omganger og nå satt markører i hver 8. maske etter den første markøren som er i 4. maske. Jeg avslutter omgangen med siste markør før de 4 siste rettmaskene. Totalt får jeg da 17. markører. I følge oppskrift skal det være 18, markører i str XL. Hva er galt? Fortsetter jeg med 17. blir jo alle økninger feil i følge oppskriften videre.
23.05.2022 - 11:56DROPS Design answered:
Hei Kjerst. Du har i str. XL 144 masker. Strikk 3 masker, sett 1 merke i neste maske og strikk denne masken, strikk 4 masker = 8 masker. Da kan vi si at 1 rapport går over 8 masker og i 1 rapport er det 1 markør. 144 masker / 8 masker = 18 markører. Du får da 18 rapporter av: Strikk 3 masker + 1 maske med markør + 4 masker. mvh DROPS Design
23.05.2022 - 13:11Jeg skal strikke blusen i str. L, og ser at jeg skal starte halskanten med at slå 112 masker op på rundpind 2,5 mm. Det er da ALT for lille omkreds! Der kan da ikke komme et normalt hoved igennem en halskant med 112 masker på pind 2.5. I øvrigt kan maskerne ikke en gang nå hele vejen rundt på selv den korteste rundpind på 40 cm. Og når man kigger på billedet af modellen, kan man tydeligt se, at der går mere end 112 m til at lave halskanten. Hvad læser jeg forkert?
27.04.2022 - 18:00DROPS Design answered:
Hej Anne-Mette, der er rigtig mange som har strikket denne populære bluse og vi har ikke fået nogle kommentarer om at halskanten er for kort. Sørg for at du ikke slår for stramt op :)
29.04.2022 - 08:10