
Popular categories
Looking for a yarn?


|
|||||||||||||||||||||||||||||||
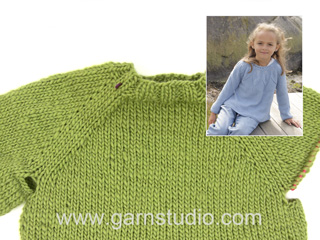
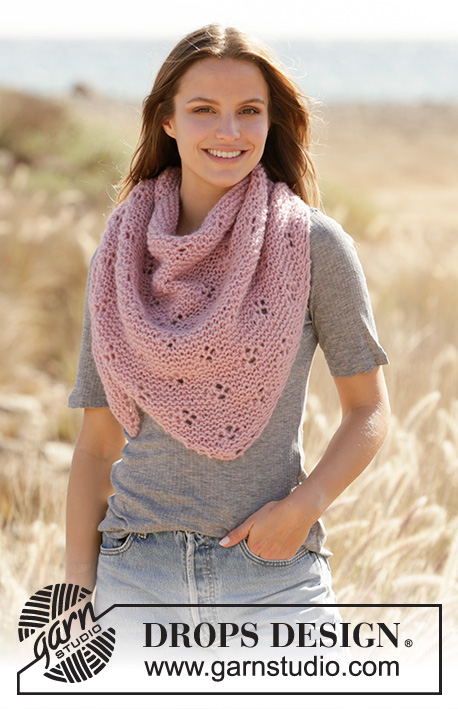
Springs Surrender Jacket |
|||||||||||||||||||||||||||||||
 |
 |
||||||||||||||||||||||||||||||
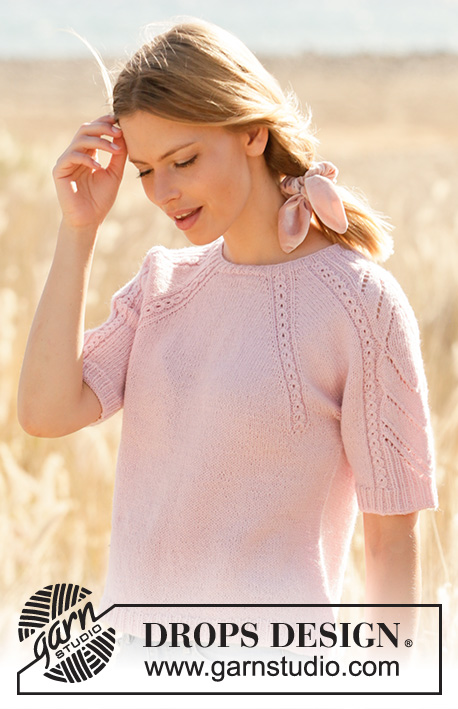
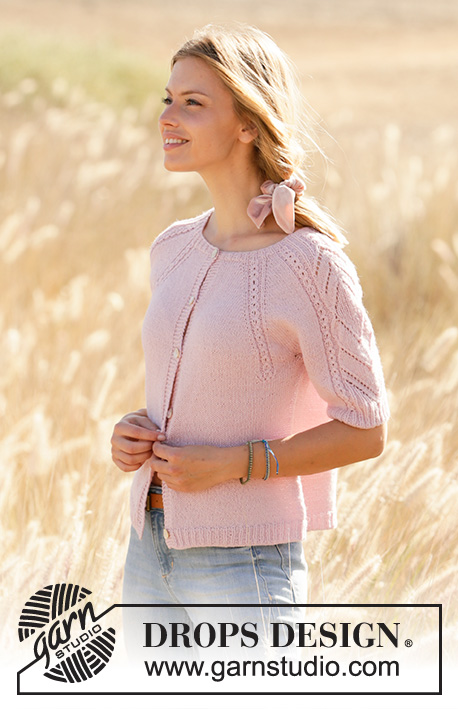
Knitted jacket with raglan in DROPS Alpaca. Piece is knitted top down with lace pattern and short sleeves. Size: S - XXXL
DROPS 212-39 |
|||||||||||||||||||||||||||||||
|
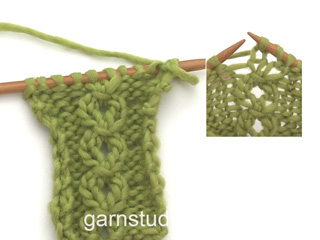
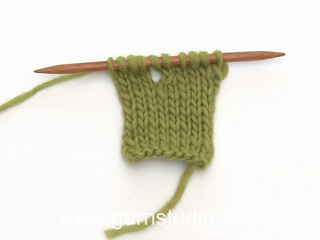
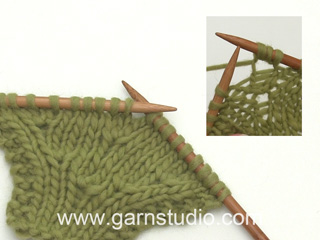
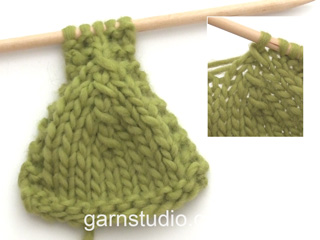
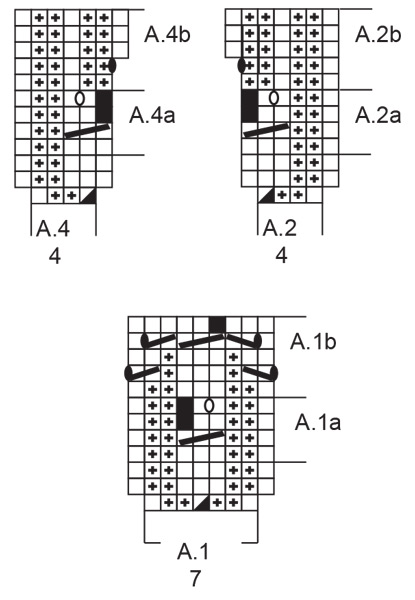
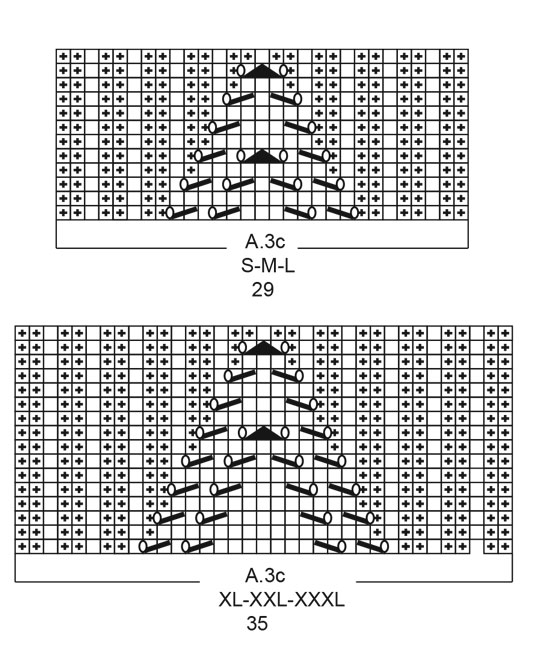
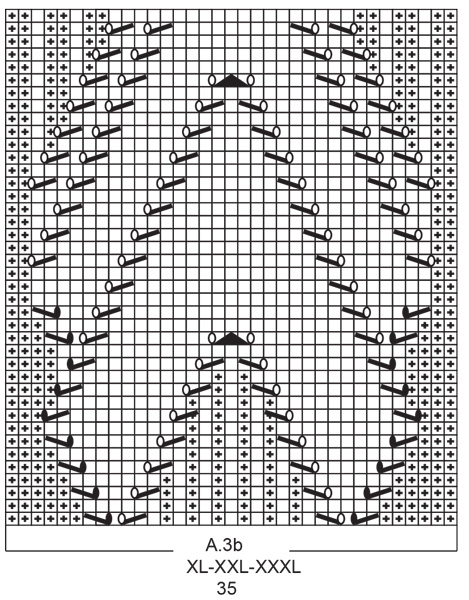
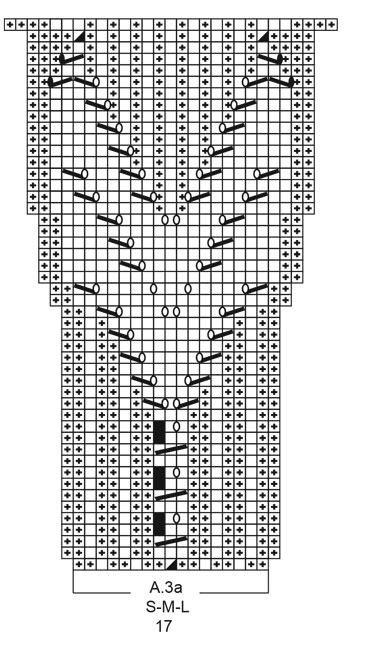
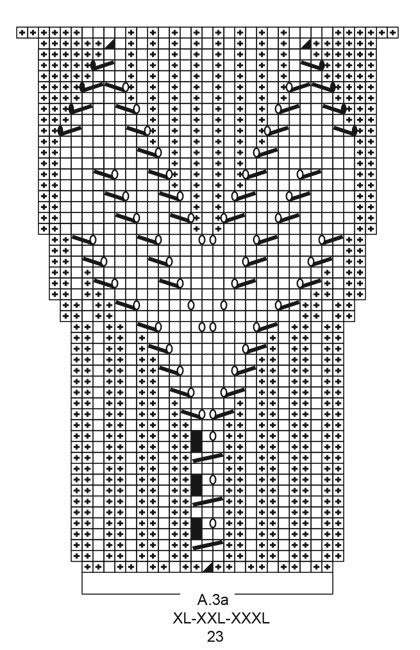
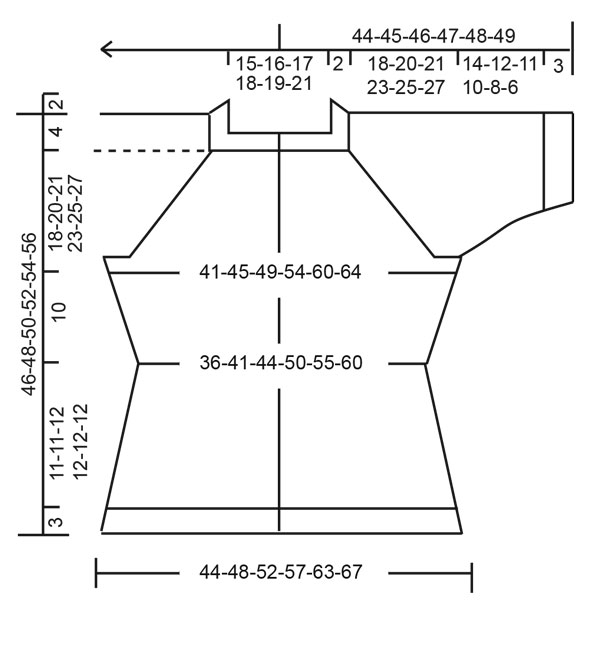
---------------------------------------------------------- EXPLANATION FOR THE PATTERN: ---------------------------------------------------------- GARTER STITCH (back and forth): Knit all rows. 1 ridge vertically = knit 2 rows. PATTERN: See diagrams A.1 to A.4. Choose diagram for your size. Diagrams show all rows in pattern seen from the right side. INCREASE TIP-1 (applies to raglan): All increases are done on a row from right side. Increase 1 stitch by making 1 yarn over between 2 stitches. On next row purl yarn over twisted to avoid hole. Then work the new stitches in stocking stitch. INCREASE TIP-2 (applies to sides of body): All increases are done on a row from right side. Work until 2 stitches remain before marker thread, 1 yarn over, knit 4 (marker thread is in the middle of these stitches), 1 yarn over. On next row purl yarn overs twisted to avoid holes. Then work the new stitches in stocking stitch. DECREASE TIP (applies to side on body and sleeves): All decreases are done on a row from right side. Decrease 1 stitch on each side of marker thread as follows: Work until 3 stitches remain before marker thread and knit 2 together, knit 2 (marker thread is between these stitches), slip 1 stitch knitwise, knit 1, pass slipped stitch over stitch worked. NUMBER OF STITCHES: As both increases and decreases are done in A.1a, A.2a, A.3a and A.4a, number of stitches vary according to which row it is counted on (depending on you are increasing/decreasing in pattern). CAST-OFF TIP: To avoid a tight cast-off edge you may use a larger needle. If this also is too tight, make 1 yarn over after approx. every 4th stitch and cast off these as regular stitches. BUTTONHOLES: Decrease for buttonholes on right band (when garment is worn). Decrease from right side when 3 stitches remain on row as follows: Make 1 yarn over, knit the next 2 stitches together, knit last stitch. On next row knit yarn over to make holes. Decrease first buttonhole when neck edge measures approx. 1½-2 cm. Then decrease the next 5-5-5-5-6-6, approx. 8-8½-8½-9-8-8 cm apart. ---------------------------------------------------------- START THE PIECE HERE: ---------------------------------------------------------- JACKET - SHORT OVERVIEW OF THE PIECE: Work neck edge and yoke back and forth on circular needle from mid front, top down. Now divide yoke for body and sleeves. Work body back and forth on circular needle, top down. Work sleeves in the round on double pointed needles, top down. NECK EDGE: Cast on 119-131-137-143-146-155 stitches (including 5 band stitches in each side towards mid front) on circular needle size 2.5 mm with Alpaca. Purl 1 row (= wrong side). Work next row as follows from right side: Work 5 band stitches in GARTER STITCH - read explanation above, * knit 1, purl 2 *, work from *-* until 6 stitches remain, knit 1 and finish with 5 band stitches in garter stitch. Decrease for BUTTONHOLES - read explanation above. Continue rib like this for 2 cm. Switch to circular needle size 3 mm. Insert 1 marker after band at the beginning of row mid front, measure yoke from this marker! YOKE: Now work as follows from right side: Left front piece: Work 5 band stitches in garter stitch, 6-9-9-9-9-12 stitches in stocking stitch, A.1 (= 7 stitches). Left sleeve: Work 2 stitches in stocking stitch, A.2 (= 4 stitches), A.3a (= 17-17-17-23-23-23 stitches), A.4 (= 4 stitches), 2 stitches in stocking stitch. Back piece: Work A.1 over 7 stitches, 11-17-23-17-20-23 stitches in stocking stitch, A.1 over 7 stitches. Right sleeve: Work 2 stitches in stocking stitch, A.2 over 4 stitches, A.3a over 17-17-17-23-23-23 stitches, A.4 over 4 stitches, 2 stitches in stocking stitch. Right front piece: Work A.1 over 7 stitches, 6-9-9-9-9-12 stitches in stocking stitch and finish with 5 band stitches in garter stitch. On next row from right side increase for raglan on each side of every A.1 – read INCREASE TIP-1 (= 8 stitches increased). REMEMBER THE KNITTING TENSION! Increase like this every other row 22-24-28-33-37-40 times in total. When the first 3 rows in pattern A.1, A.2 and A.4 has been worked, repeat A.1a, A.2a and A.4a in height. When A.3a has been worked 1 time vertically, work A.3b (= 29-29-29-35-35-35 stitches) over A.3a. When increase for raglan is done, there are 335-363-401-447-482-515 stitches on needle – read NUMBER OF STITCHES. Work in the established pattern until piece measures 18-20-21-23-25-27 cm from marker. Adjust so that next row is a row with total number of stitches (i.e. 335-363-401-447-482-515 stitches), this because number of stitches can vary because of decreases/increases in diagrams. On next row divide piece for body and sleeves as follows: Work over the first 50-55-59-66-72-77 stitches as before, slip the next 73-77-87-97-101-107 stitches on a stitch holder for sleeve and cast on 8 stitches under sleeve, work over the next 89-99-109-121-136-147 stitches, slip the next 73-77-87-97-101-107 stitches on a stitch holder for sleeve and cast on 8 stitches under sleeve and work the last 50-55-59-66-72-77 stitches. BODY: = 205-225-243-269-296-317 stitches. Insert 1 marker thread after 54-59-63-70-76-81 stitches in from each side (= in the side of body). There are 97-107-117-129-144-155 stitches between marker threads on back piece. Move the marker threads upwards when working; they should be used for increase and decrease later in the sides. When last repetition of A.1a from the yoke has been worked vertically, work A.1b over every A.1a. When A.1b has been worked 1 time vertically, there are 201-221-239-265-292-313 stitches on needle. Work in stocking stitch with 5 band stitches in garter stitch in each side. When piece measures 2 cm from division, decrease 1 stitch on each side of the marker thread in each side - read DECREASE TIP (= 4 stitches decreased). Decrease like this every 2 cm 4 times in total = 185-205-223-249-276-297 stitches. When piece measures 10 cm from division, increase 1 stitch on each side of marker threads in the sides - read INCREASE TIP-2(= 4 stitches increased). Increase like this every cm 9 times in total = 221-241-259-285-312-333 stitches. When piece measures 21-21-22-22-22-22 cm from division, increase 12-13-13-14-14-14 stitches evenly = 233-254-272-299-326-347 stitches. Switch to circular needle size 2.5 mm and work from right side as follows: Work 5 band stitches in garter stitch, * knit 1, purl 2 *, repeat from *-* until 6 stitches remain, finish with knit 1 and 5 band stitches in garter stitch. When piece measures 24-24-25-25-25-25 cm from division, cast off all stitches by knitting from right side - read CAST-OFF TIP. SLEEVES: Slip the 73-77-87-97-101-107 stitches from stitch holder in one side of piece on double pointed needles size 3 mm and pick up 1 new stitch in each of the 8 stitches cast on under sleeve = 81-85-95-105-109-115 stitches – remember number of stitches. Insert 1 marker thread in the middle of the 8 new stitches. Move the marker thread upwards when working; it should be used for decrease mid under sleeve. READ ALL OF THE FOLLOWING SECTION BEFORE CONTINUING! Work pattern and decrease stitches mid under sleeve as follows: Work A.2a, A.3b and A.4a over the middle stitches, knit the remaining stitches. When A.3b has been worked, work A.3c over A.3b. When sleeve measures 1 cm from division, decrease 1 stitch on each side of marker thread (= 2 stitches decreased). Decrease like this every cm 3-3-3-3-5-5 times in total, then decrease every other cm 2-2-2-2-0-0 times in total = 71-75-85-95-99-105 stitches. On last round in A.3c increase 0-1-2-0-1-1 stitches before pattern, and 2-0-1-2-0-0 stitches after the pattern = 73-76-88-97-100-106 stitches. When A.3c has been worked 1 time vertically, piece measures approx. 14-12-11-10-8-6 cm from division. Switch to double pointed needles size 2.5 mm. Work next round as follows: * Knit 1, purl 2 *, work from *-* over the first 15-18-24-24-27-30 stitches, A.2b over A.2a, continue with knit over knit and purl over purl over stitches in A.3c, A.4b over A.4a, * purl 2, knit 1 *, work from *-* over 15-15-21-24-24-27 stitches and finish with purl 2 = 75-78-90-99-102-108 stitches. Continue with knit over knit and purl over purl until piece measures 17-15-14-13-11-9 cm from division, then cast off by knitting. Work the other sleeve the same way. ASSEMBLY: Sew the buttons on to the left band. |
|||||||||||||||||||||||||||||||
Diagram explanations |
|||||||||||||||||||||||||||||||
|
|||||||||||||||||||||||||||||||
|
|||||||||||||||||||||||||||||||
|
|||||||||||||||||||||||||||||||

|
|||||||||||||||||||||||||||||||
|
|||||||||||||||||||||||||||||||
|
|||||||||||||||||||||||||||||||
|
|||||||||||||||||||||||||||||||
|
|||||||||||||||||||||||||||||||
|
Have you made this or any other of our designs? Tag your pictures in social media with #dropsdesign so we can see them! Do you need help with this pattern?You'll find tutorial videos, a Comments/Questions area and more by visiting the pattern on garnstudio.com. © 1982-2024 DROPS Design A/S. We reserve all rights. This document, including all its sub-sections, has copyrights. Read more about what you can do with our patterns at the bottom of each pattern on our site. |
|||||||||||||||||||||||||||||||


With over 40 years in knitting and crochet design, DROPS Design offers one of the most extensive collections of free patterns on the internet - translated to 17 languages. As of today we count 304 catalogues and 11422 patterns - 11422 of which are translated into English (UK/cm).
We work hard to bring you the best knitting and crochet have to offer, inspiration and advice as well as great quality yarns at incredible prices! Would you like to use our patterns for other than personal use? You can read what you are allowed to do in the Copyright text at the bottom of all our patterns. Happy crafting!
Comments / Questions (70)
Jeg er i tvivl om raglan udtagningen efter mønster A1. Skal jeg blive ved med at foretage udtagningen lige efter mønster A1 eller skal udtagningerne foretages en maske længere ude end forrige udtagning,- således at det er ærmestykkerne der får flere masker mens forstykke og ryg forbliver samme maskeantal? Håber mit spørgsmål er til at forstå. Venlig hilsen Heidi
25.03.2021 - 22:39DROPS Design answered:
Hej Heidi, du tager altid ud til raglan lige før og lige efter A.1 God fornøjelse!
21.04.2021 - 15:56Quand on écrit monter 119 mailles y compris 5 mailles de chaque côté pour la bordure. Les mailles sont-elles comprises dans le 119 mailles ou faut-il les ajouter aux 119.
17.03.2021 - 22:50DROPS Design answered:
Bonjour Mme Boilard, vous n'avez pas besoin de les monter en plus, elles sont déjà comprises dans les 119 mailles. Bon tricot!
18.03.2021 - 09:43At the beginning of the instructions, under 'Neck Edge', what are 'band stitches'? It is an unfamiliar term to me so I cannot understand the bit in brackets after 'Cast on'. I'm not doing very well, am I?
17.12.2020 - 01:57DROPS Design answered:
Hi Sallie, The bands are the strips down the front pieces, where you work the buttonholes on the right side and where you sew the buttons onto the left side. Happy knitting!
17.12.2020 - 07:41Liebese drops team, in 3 a befinden sich keine fehler.
24.10.2020 - 09:50Liebes drops team, muss euch leider mitteilen dass sich im muster 3 b in den rückreihen sehr viele fehler befinden fast jede rückreihe ist verkehrt, bin beim stricken fast verzweifelt. bitte überprüft dies und macht eine korrektur für die nächste strickerin viele grüsse ingrid
20.10.2020 - 18:01DROPS Design answered:
Liebe Ingrid, Ihr vorrigen Hinweis wurde unseren Designteam weiterleitet - es sieht aus, daß Sie richtig sind, was für andere Fehler haben Sie in A.3b gesehen ? Ich habe leider keine andere gefunden. Danke im voraus!
21.10.2020 - 08:56Hallo liebes drops team, kann es sein dass bei muster 3 b in der 6. reihe (rückreihe) ein fehler unter-laufen ist, es müssen nämlich nicht fünf rechte maschen, sondern nur 4 rechte maschen gestrickt werden. ich bitte um baldige rückmeldung bin gerade beim stricken.
19.10.2020 - 12:46Hallo liebes team, vielen dank für die schnelle antwort, also immer stricken bis a 1 und dann zunehmen, das heißt die schon zugenommenen maschen stricken bis A 1 beginnt und dann linear immer vor dem beginn von A q1 zunehmen. Die nächste frage wäre, ich stricke grösse xxl und habe 146 maschen angeschlagen. in dieser grösse wird für die ranglangschrägung 37 mal zugenommen, dann bin ich aber bei insgesamt 442 maschen und nicht wie angegeben 482 maschen. woran kann das liegen .
15.10.2020 - 16:59DROPS Design answered:
Liebe Ingrid, die fehlende Maschen sind in den unterschiedlichen Diagramme zugenommen, dh in A.1, A.2 und A.4 nehmen Sie je 2 Maschen bei der 1. Reihe in a, dann wird b wiederholt (= A.1, A.2 und A.4 = 9 M), in jedem A.3a werden 12 Maschen zugenommen (= 24 M insgesamt), wenn Sie eine Reihe mit 3 Maschen im Zopf von A.1/A.2/A.4 stricken dann haben Sie die 482 M (= 146 + 40 Zunahme Diagramme + 37x8 M RAglan = 482 M). Viel Spaß beim stricken!
16.10.2020 - 08:27Hallo, wie sind die raglangaufnahmen zu verstehen wo nehme ich die masche auf immer vor der ersten rechten masche bevor musterbeginn in der anleitung heißt es nur beidseitig von A 1, also wo muss ich die masche genau aufnehmen? ich bitte um baldige antwort da ich gerade beim stricken bin und nicht weiter weis. auf baldige antwort hoffend viele grüsse ingrid.
15.10.2020 - 16:11DROPS Design answered:
Liebe Ingrid, wie gesagt wird es beidseitig von jedem A.1 zugenommen, dh Linkes Vorderteil stricken bis die Maschen von A.1 bleiben, 1 Umschlag, A.1 stricken, 1 Umschlag, die Maschen für den Ärmel stricken, und vor den nächsten A.1 1 Umschlag (Zunahme Ärmel), A.1, 1 Umschlag (Zunahmen Rückenteil), dann bis nächstes A.1 stricken und noch mal 1 Umschlag, A.1, 1 Umschlag stricken, usw. A.1 wird für jede Raglanlinie gestrickt und vor/nach jedem A.1 wird es so zugenommen. Viel Spaß beim stricken!
15.10.2020 - 16:50Bonjour Pour les manches, l'ordre des diagrammes A2 et A4 ne doit pas être inversé de part et d'autre du dos? Merci pour votre réponse.
21.08.2020 - 09:40DROPS Design answered:
Bonjour Catherine, les diagrammes doivent être tricotés de la même façon sur les deux manches, autrement dit d'abord A.2 et A.4 à la fin. Bon tricot!
21.08.2020 - 10:21Bonjour Que veut dire tricoter comme avant dans le paragraphe empiècement? Merci pour votre réponse.
21.08.2020 - 09:38DROPS Design answered:
Bonjour Catherine, quand les augmentations du raglan sont terminées, tricotez les mailles comme vous le faisiez auparavant, mais sans augmenter maintenant, jusqu'à la hauteur indiquée, autrement dit, suivez les diagrammes comme avant. Bon tricot!
21.08.2020 - 10:16