
Popular categories
Looking for a yarn?


|
|||||||||||||||||||||||||
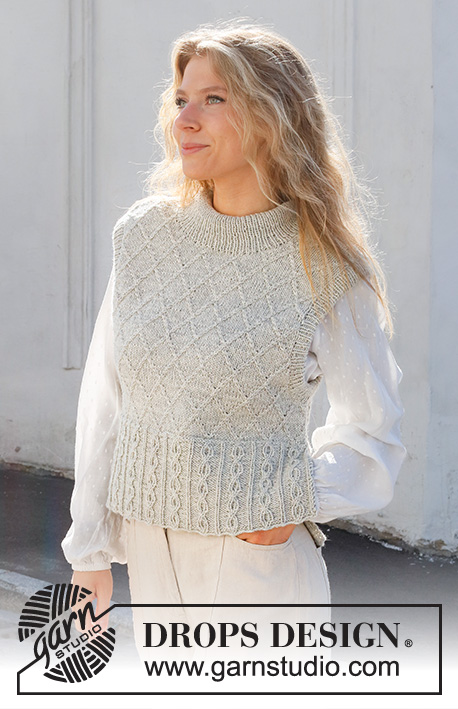
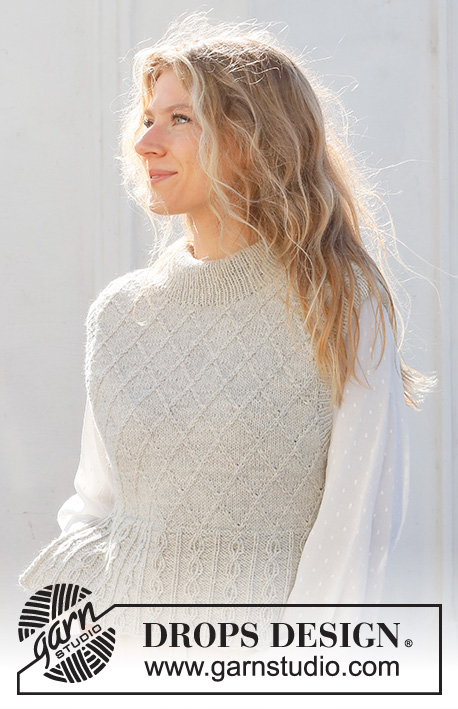
Diamond Sky |
|||||||||||||||||||||||||
 |
 |
||||||||||||||||||||||||
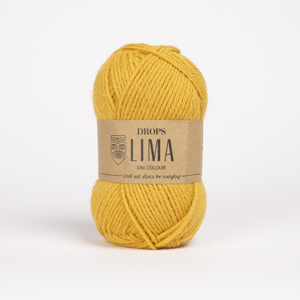
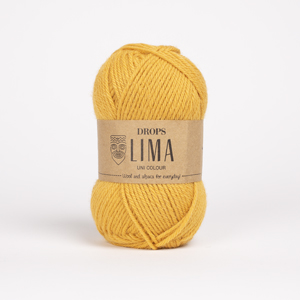
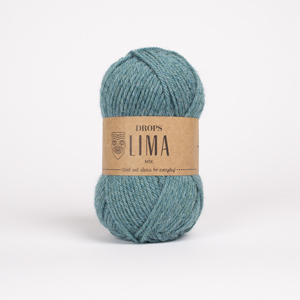
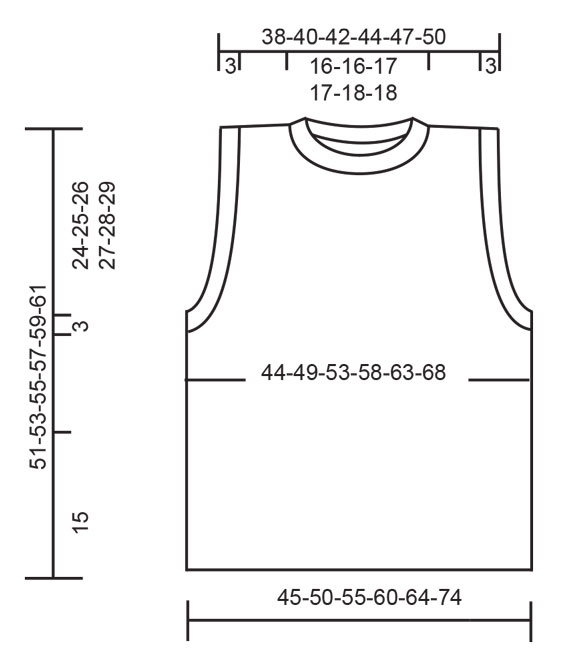
Knitted vest / slipover in DROPS Lima or DROPS Merino Extra Fine. Piece is knitted with cables, textured pattern, double neck edge and sleeve edges. Size: S - XXXL
DROPS 228-8 |
|||||||||||||||||||||||||
|
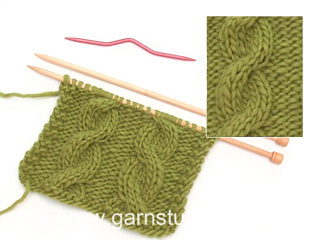
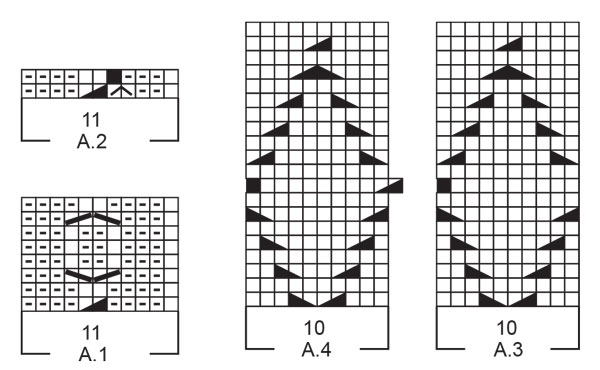
---------------------------------------------------------- EXPLANATION FOR THE PATTERN: ---------------------------------------------------------- GARTER STITCH (back and forth): Knit all rows. 1 ridge vertically = knit 2 rows. PATTERN: See diagrams A.1 to A.4. Diagrams show all rows in pattern seen from the right side. CAST-OFF TIP: To avoid a tight cast-off edge when casting off, you may use a larger needle. If this still is too tight make 1 yarn over after approx. every 4th stitch while casting off (cast off yarn overs as stitches). ---------------------------------------------------------- START THE PIECE HERE: ---------------------------------------------------------- VEST – SHORT SUMMARY OF PIECE: Work front and back piece back and forth in 2 parts. Then assemble the piece at the shoulder seems and sew the side seams. Finish with a double neck edge and sleeve edges in the round on a circular needle. BACK PIECE: Cast on 104-115-126-137-148-159 stitches (including 2 edge stitches in each side) on circular needle size 4 mm with DROPS Lima or DROPS Merino Extra Fine. Purl 1 row from wrong side. Then work pattern as follows: 2 edge stitches in GARTER STITCH – read explanation above, A.1 over the next 99-110-121-132-143-154 stitches (= 9-10-11-12-13-14 repetitions of 11 stitches), work first stitch in A.1, 2 edge stitches in garter stitch. Continue back and forth until A.1 has been worked 5 times vertically. REMEMBER THE KNITTING TENSION. Work next row as follows: Knit 2 together (= 1 stitch decreased), work A.2 over every repetition of A.1 (1 stitch is decreased in each repetition A.2 = 9-10-11-12-13-14 stitches decreased), knit the next 3 together (= 2 stitches decreased), cast on 1 stitch at the end of row (= edge stitch). Turn and work 1 edge stitch in garter stitch, purl 1, work A.2 until 1 stitch remains, purl 1, cast on 1 stitch at the end of row (= 1 edge stitch in garter stitch) = 94-104-114-124-134-144 stitches on needle and piece measures approx. 15 cm. Now work pattern as follows: 1 edge stitch in garter stitch, 1 stitch in stocking stitch, A.3 over the next 10 stitches, A.4 over the next 80-90-100-110-120-130 stitches (= 8-9-10-11-12-13 repetitions of 10 stitches), work 1 stitch in stocking stitch, and finish with 1 edge stitch in garter stitch. Continue back and forth like this. On 9th row in A.4 knit 1 when last repetition is finished. When piece measures 24-25-26-27-28-29 cm, cast off 6-6-9-9-12-12 stitches for armholes at the beginning of the next 2 rows. Then cast off stitches in each side (cast off stitches at the beginning of the row) as follows: Cast off 2 stitches on every other row 1-2-2-2-2-2 times, then cast off 1 stitch on every other row 1-1-1-3-3-5 times and finally 1 stitch every 4th row 4-5-5-6-5-5 times = 68-72-76-80-86-92 stitches. Continue to work until piece measures 49-51-53-55-57-59 cm. Now cast off the middle 32-32-34-34-36-36 stitches for neck and finish each shoulder separately. Then cast off 1 stitch on next row from the neck = 17-19-20-22-24-27 stitches remain on each shoulder. Now finish each shoulder separately. Continue to work until piece measures 51-53-55-57-59-61 cm. Cast off knitting from right side. Work the other shoulder the same way. FRONT PIECE: Cast on and work as on back piece until piece measures 43-45-46-48-49-51 cm. Now slip the middle 16-16-18-18-20-20 stitches on a stitch holder and finish each shoulder separately. Then cast off stitches on every row from neck as follows: Cast off 3 stitches 1 time, 2 stitches 2 times and 1 stitch 2 times = 17-19-20-22-24-27 stitches remain for shoulder. Cast off when piece measures 51-53-55-57-59-61 cm. Work the other shoulder the same way. ASSEMBLY: Sew the shoulder seams. Sew side seam from armholes and down to where 1 edge stitch was cast on in each side (= approx. 15 cm vent). DOUBLE SLEEVE EDGES: Begin mid under sleeve in side seam and pick up approx. 136 to 162 stitch around armhole with circular needle size 3 mm and DROPS Lima or DROPS Merino Extra Fine. Number of stitches must be divisible by 2. Work rib in the round (= knit 1/purl 1) for 6 cm. Cast off – read CAST-OFF TIP. Fold the rib around sleeves on inside of garment. Fasten rib to get a double sleeve edge. To avoid a tight sleeve edge that sticks out it is important to keep the seam elastic. DOUBLE NECK EDGE: Pick up from right side approx. 100 to 116 stitches (including stitch on stitch holder) inside 1 edge stitch around the neck on circular needle size 3 mm with DROPS Lima or DROPS Merino Extra Fine. Number of stitches must be divisible by 2. Work rib in the round (= knit 1/purl 1) for 10 cm. Now increase 1 purl stitch in approx. every other section with purl stitches. Then work knit over knit and purl over purl until neck edge measures 14 cm. Cast off stitches with knit over knit and purl over purl - make sure to avoid a tight neck edge - remember CAST-OFF TIP. Fold rib at the top of neck down on inside of garment. Fasten rib to get a double neck edge. To avoid a tight neck edge that sticks out it is important to keep the seam elastic. |
|||||||||||||||||||||||||
Diagram explanations |
|||||||||||||||||||||||||
|
|||||||||||||||||||||||||
|
|||||||||||||||||||||||||
|
|||||||||||||||||||||||||
|
Have you made this or any other of our designs? Tag your pictures in social media with #dropsdesign so we can see them! Do you need help with this pattern?You'll find tutorial videos, a Comments/Questions area and more by visiting the pattern on garnstudio.com. © 1982-2024 DROPS Design A/S. We reserve all rights. This document, including all its sub-sections, has copyrights. Read more about what you can do with our patterns at the bottom of each pattern on our site. |
|||||||||||||||||||||||||


With over 40 years in knitting and crochet design, DROPS Design offers one of the most extensive collections of free patterns on the internet - translated to 17 languages. As of today we count 304 catalogues and 11422 patterns - 11422 of which are translated into English (UK/cm).
We work hard to bring you the best knitting and crochet have to offer, inspiration and advice as well as great quality yarns at incredible prices! Would you like to use our patterns for other than personal use? You can read what you are allowed to do in the Copyright text at the bottom of all our patterns. Happy crafting!
Comments / Questions (65)
Når man tager 1 maske ud i vrang masken i ribben i halskanten, hvordan strikker man så efterfølgende? Jeg kan kun få det til at blive 1 ret 1 vrang 1 ret 2 vrang og så videre
16.02.2022 - 17:47DROPS Design answered:
Hej Ann-Marie, Når du tager ud i hver 2.vrangparti, så strikker du 1r, 1vr, 1r, 2vr, 1r, 1vr, 1r, 2vr osv. God fornøjelse!
17.02.2022 - 15:24Vedr. rettelse fra 07/02-22. Der er ikke vist i selve optegnelse af diagrammet hvor den nye “maske snoning” skal være? Jeg sidder nu med en næsten færdig strikket vest!!! Desuden passer mængden af garn ikke. Jeg skal i hvertfald bestille 1 nøgle mere og jeg har overholdt strikkefastheden. Jeg strikker med drops merino extra fine. Størrelse S. Købte 6 nøgler på nettet. Skal nu bestille 1 mere og betale fragt + at jeg ikke kan få samme indfarvning. Ikke i orden!!!
15.02.2022 - 17:25DROPS Design answered:
Hej Ann-Marie, det burde virkelig være nok med 6 nøgler (hvis målene i måleskitsen og strikkefastheden er overholdt), vi beklager naturligvis og noterer din kommentar! Hvilket symbol siger du mangler i A.3 og A.4 og på hvilken pind? Så skal vi få design til at se på det.
16.02.2022 - 15:47Fel i mönstret? Såvitt jag kan se är det fel i varv två i mönsterdiagrammet A2. Varv 2 (=avigsidan) borde väl stickas: 1avig, 4 räta, 2aviga, 1”blank”, 3räta
06.02.2022 - 14:19DROPS Design answered:
Hej Ulla-Britt, Varv 2 i A.2 stickas från avigsidan: 4 räta, 2aviga, 3 räta, 1 avig. Lycka till :)
08.02.2022 - 07:47Jag undrar hur man gör när man ska öka i en dubbel halskant nu ökas det1 avigmaska i ca parti med avigmaskor. Vad betyder parti?
23.01.2022 - 22:28DROPS Design answered:
Hej Barbro. "Nu ökas det 1 avigmaska i ca vartannat parti med avigmaskor". Istället för att sticka 1 rm, 1 am så ökar du nu 1 maska i vartannat parti med avig maska så du kommer sen ha 1 rm, 1 am, 1 rm, 2 am, osv. Mvh DROPS Design
24.01.2022 - 07:21Jeg strikker str S i Merino ekstra fine og overholder strikkefastheden. Jeg kan se på billedet at der tages ind til ærmegab før de 24 cm som der beskrives. Kan det forklares? Jeg når at strikke 1 1/2 gange mønster. Det ser ud som om der er startet på ærmegab omkring 21cm? Er for- og bagstykke lige lange
16.01.2022 - 17:24DROPS Design answered:
Hej Ann-Marie, vesten er strikket i DROPS Lima som fylder lidt mere, hvilket kan være en forklaring. Men opskriften er skrevet for at vesten skal sidde som den gør på billedet, så det er bare at finde dine mål i måleskitsen og følge den opskrift som passer dig. God fornøjelse!
17.01.2022 - 15:36Boa tarde, para A3 e A4 este esquema está mesmo correcto? symbols = passar 1 malha para a agulha auxiliar, colocada atrás da peça, tricotar 1 malha meia, retomar a malha em espera e tricotá-la em liga symbols = passar 1 malha para a agulha auxiliar, colocada à frente da peça, tricotar 1 malha liga, retomar a malha em espera e tricotá-la em meia Na foto não parece que haja malhas de liga. Obrigada
14.01.2022 - 18:24DROPS Design answered:
Bom dia, Efectivamente, à primeira vista, parece não haver malhas liga no ponto de losângos em relevo. No entanto, as malhas liga dos torcidos vão ficar meio ocultas pelas malhas meia, ajudando a dar mais relevo. Mas vamos perguntar à equipa de designers e, se houver alguma falha, será adicionada uma correcção ao modelo. Bom tricô!
19.01.2022 - 10:46Bedankt voor het antwoord op mijn vorige vraag. Een andere vraag is deze: de 2 kabelsteken die je in A3 en A4 breit zijn toch niet meer een combinatie van een rechte en een averechte, terwijl de uitleg in de legende voor dat symbool zegt van wel. Als ik de foto bekijk, zie ik dat alle steken in de ruiten rechten zijn. Klopt dat?
07.01.2022 - 10:16DROPS Design answered:
Dag Mieke,
Ja, je hebt gelijk, in A.3 en A.4 worden alle steken recht gebreid aan de goede kant, dus ook in de kabel. Ik zal het doorgeven aan de ontwerpafdeling ter controle.
12.01.2022 - 10:02Diagramm Muster A3 und A4 werden die Mädchen in glatt rechts dargestellt, obwohl in der Beschreibung von li gestrickten Maschen der Zopfnadel geschrieben wird. Ist das Muster nun glatt rechts also auch Rückreihe ebenso? Oder auch Hinreihe mit linken Maschen, die dann rechts in der Rückreihe gestrickt werden? Danke für ihre Hilfe
03.01.2022 - 21:13DROPS Design answered:
Liebe Frau Strisi, Sie sind ja recht, bei A.1 wird man die Maschen so (links) stricken, aber in A.3 und A.4 sollen die Maschen glatt rechts gestrickt - unser Designteam wird das mal prüfen, danke für den Hinweis. Viel Spaß beim stricken!
04.01.2022 - 07:22Ik brei maat M en ik zie niet hoe de eerste en tweede naald eruit zien na het breien van A1. De eerste 2 st samenbreien, bedoel je dan de 2 ribbelsteken aan het begin van de naald? Waar moeten 3st samengebreid worden in deze nld? Kan je mij de eerste 2 nld steek voor steek uitschrijven voor maat M ? Dank!
03.01.2022 - 20:18DROPS Design answered:
Dag Mieke,
Je breit inderdaad de eerste 2 ribbelsteken recht samen en je breit A.3 over A.1 waarbij je zorgt dat het midden van A.3 boven het midden van A.1 komt en je breit steeds de eerste 2 steken van iedere herhaling samen. In het midden van A.3 brei je kabels zoals aangegeven in het telpatroon. De tweede naald van A.3 is een teruggaande naald, dus die brei je averecht.
06.01.2022 - 09:53Jeg er færdig med nederste kant og er gået i gang med A3 og A4. Der står, at masken på snoningspinden hhv foran og bagved arbejdet skal strikkes "vrang". Resten af mønsteret er strikket i ret. Jeg synes, det ser lidt mærkeligt ud - har jeg forstået det korrekt, eller skal jeg strikke alle masker "ret", også dem på snoningspinden?
03.01.2022 - 10:56DROPS Design answered:
Hei Birthe. Ved 1.diagramikon (strek over 2 masker, fra øverste høyre hjørne og ned til venstre hjørne) strikkes det slik: Sett 1 maske på flettepinnen BAK arbeidet, strikk 1 rett, strikk 1 VRANG fra flettepinnen. Ved 2.diagramikon (strek over 2 masker, fra øverste venstre hjørne og ned til høyre hjørne) strikkes det slik: Sett 1 maske på flettepinnen FORAN arbeidet, strikk 1 VRANG, strikk 1 rett fra flettepinnen. Fra vrangen strikkes alle masker vrang. Da vil du få det mønstret du ser på vesten. mvh DROPS Design
14.01.2022 - 11:07