
Popular categories
Looking for a yarn?


|
|||||||
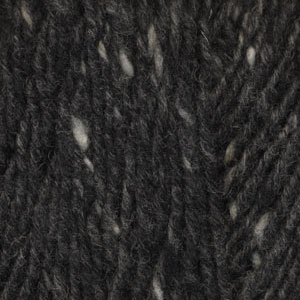
Villmark |
|||||||
 |
 |
||||||
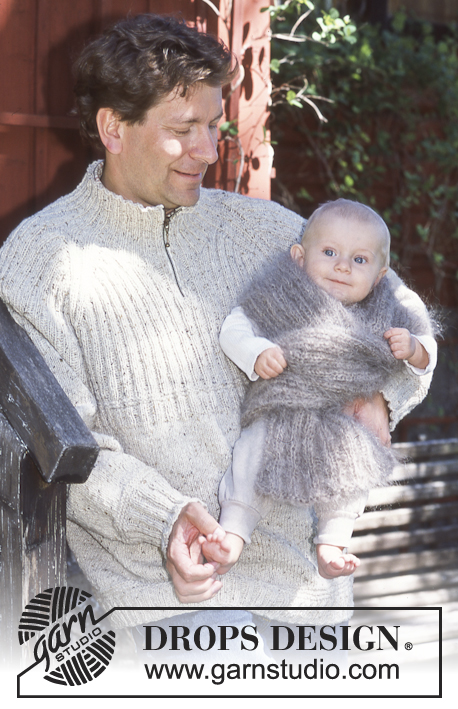
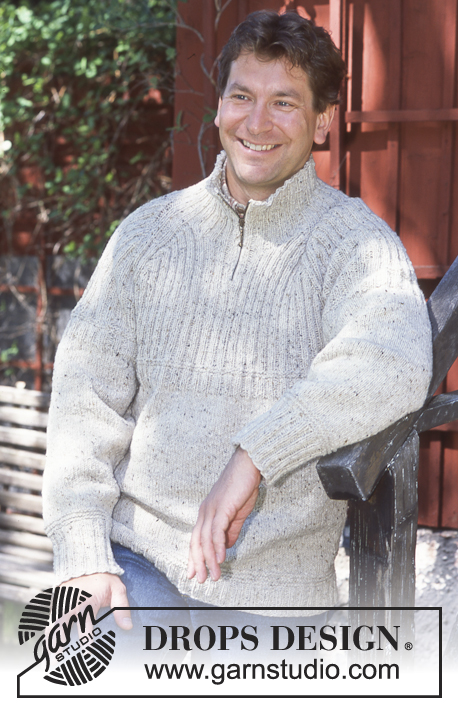
DROPS Pullover for men in Angora-Tweed (with or without zipper). Ribbed scarf in Vienna
DROPS 70-21 |
|||||||
|
Gauge: 2 1 sts x 24 rows on larger needles in stockinette st = 10 x 10 cm Rib: * K 2, P 2 *, repeat from * - *. Pattern: See chart. The pattern is seen from the right side. Body: Cast on 184-200 (216-232-248) sts on smaller circular needles; join and place a marker at the join. P 1 row (seen from the right side) then knit Pattern 2. Change to larger circular needles and stockinette st. When the piece measures 28-30 (32-35-39) cm knit Pattern 3. At the same time when the piece measures 35-36 (39-42-46) cm place a marker at each side - in the middle of a K 2 rib. There are 92-100 (108-116-124) sts between markers on Body. On the next row bind off 12 sts at each side for armhole (bind off 6 sts each side of marker as follows: P 1, K 2, P 2, K 1, marker, K 1, P2, K 2, P 1). There are now 80-88 (96-104-112) sts each on front and back. Lay aside and knit sleeves. Sleeve: Cast on 52-52 (60-60-60) sts on smaller double-pointed needles; join and place a marker at the join. P 1 row (seen from the right side), then knit Pattern 1. After Pattern 1 change to larger double-pointed needles and stockinette st. Read the rest of the sleeve instructions before continuing. When the piece measures 14 cm inc 1 st at each side of marker (make all incs 1 st in from marker so that you have 2 sts between incs) 12-16 (12-16-16) times: Size S/M (women): alternately every 6th and 7th row Size M/L (women): every 5th row. Size M (men): alternately every 7th and 8th row. Sizes L + XL (men): alternately every 5th and 6th row = 76-84 (84-92-92) sts - knit the increased sts into pattern as you go along. At the same time when the piece measures 41-42 (45-45-46) cm knit Pattern 3 - place pattern so that you have a K st on each side of marker. Keep these 2 sts in stockinette st thoughout and make incs at each side of these 2 sts. When the piece measures 48-49 (52-52-53) cm bind off 6 sts each side of marker (you will bind off P 1, K 2, P 2, K1, marker, K 1, P 2, K 2, P 1) = 64-72 (72-80-80) sts remain on needles. Lay piece aside and knit another sleeve. Yoke: Put the sleeves in on the same circular needles as Body where sts were bound off for armhole = 288-320 (336- 368-384) sts. Put a marker in each transition between front, back and sleeve = 4 markers. Continue with Pattern 3 until it is complete and then repeat Pattern 4 to finished measurements at the same time as shaping raglan. Knit 4 rows before beginning raglan shaping. Raglan shaping: read this entire section before knitting. There are 8 decs per dec row and 8 sts between decs at each transition between front, back and sleeve (4 sts each side of each marker). These 8 sts = raglan sts which are knit as follows: P 1, K 2, P 2, K 2, P 1. Dec 1 st each side of the 8 raglan st every 4 rows 2 times, then every other row 14-12 (15-13-13) times, then every row 8-14 (11-17-17) times. A total of 192-224 (224-256-256) sts are decreased for raglan. Dec as follows from right side: P 2 tog Dec as follows from wrong side (after neck shaping): K 2 tog. Collar with zipper: When the piece measures 46-48 (52-56-60) cm knit 2 rows with garter st over the front center 2 sts. On the next row bind off these 2 sts (for zipper opening). Keep the edge st at each side of center front opening in garter st, and continue in pattern over remaining sts. When the piece measures 52-54 (58-60-62) cm bind off 4-4 (6-6-8) sts at each side (center front edge), then bind off at each neck edge every other row: 2 sts 2 times and 1 st 2 times. After all raglan and neck shaping is complete there are 74-74 (86-86-98) sts on needles and the piece measures approx. 58-60-(64-68-72) cm [22-7/8" - 23-5/8" (25.25" - 26.75" - 28.25")] to shoulder. Put sts around the neck on smaller double-pointed needles, pick up 14-14 (16-16-18) sts each side of neck to center front = 102-102 (118-118-134) sts. Knit rib back and forth, keeping 1 st at each front edge in garter st - match up ribs from Body. Bind off in pattern when the collar measures approx. 12 cm. Collar without zipper: When the piece measures 52-54 (58-60-62) cm put 10-10 (14-14-18) sts at center front on a st holder for the neck. Then bind off at each side of sts on holder for neck every other row: 2 sts 2 times and 1 st 2 times. After all raglan and neck shaping is complete there are 74-74 (86-86-98) sts on needles and the piece measures approx. 58-60-(64-68-72) cm to shoulder. Put sts around the neck on smaller double-pointed needles, pick up 30-30 (34-34-38) sts at center front (incl. sts from st holder) = 104-104 (120-120-136) sts; join and place a marker at the join. Knit rib over all sts - match up ribs from Body. Bind off in pattern when the collar measures approx. 12 cm. Assembly: Sew opening under the sleeve and sew in zipper. RIBBED SCARF IN VIENNA: Size: approx. 26 x 160 cm Materials: DROPS VIENNA from Garnstudio 150 g. col. no. 44, brown. DROPS 8 mm needles, or size needed to obtain correct gauge. Gauge: 12 sts x 14 rows rib = 10 x 10 cm. Rib: * K 2, P 2 *, repeat from * - *. Garter st, when knitting flat: Knit all sts, all rows. Scarf: Cast on 32 sts with 2 strands Vienna. Change to 1 strand and knit as follows: K 1 (edge st knit in garter st thoughout), 30 sts rib, K 1 (edge st knit in garter st thoughout). When scarf measures 160 cm bind off all sts with double strands of yarn in rib. |
|||||||
Diagram explanations |
|||||||
|
|||||||

|
|||||||

|
|||||||
|
Have you made this or any other of our designs? Tag your pictures in social media with #dropsdesign so we can see them! Do you need help with this pattern?You'll find tutorial videos, a Comments/Questions area and more by visiting the pattern on garnstudio.com. © 1982-2024 DROPS Design A/S. We reserve all rights. This document, including all its sub-sections, has copyrights. Read more about what you can do with our patterns at the bottom of each pattern on our site. |
|||||||


With over 40 years in knitting and crochet design, DROPS Design offers one of the most extensive collections of free patterns on the internet - translated to 17 languages. As of today we count 304 catalogues and 11422 patterns - 11422 of which are translated into English (UK/cm).
We work hard to bring you the best knitting and crochet have to offer, inspiration and advice as well as great quality yarns at incredible prices! Would you like to use our patterns for other than personal use? You can read what you are allowed to do in the Copyright text at the bottom of all our patterns. Happy crafting!
Comments / Questions (25)
Cela voudrait dire que je pourrais faire les manches du chandail Villmark avec une aiguille circulaire Est ce vrai
18.06.2021 - 13:46DROPS Design answered:
Bonjour Mme Hebert, tout à fait, vous pouvez les tricoter d'abord en magic loop puis continuer avec une circulaire de 40 cm lorsque vous aurez augmenté assez de mailles. Ou bien vous pouvez les tricoter en rangs - comme expliqué dans cette leçon. Bon tricot!
21.06.2021 - 07:20Est ce que les manches se tricotent en aller seulement Quand vous dites monter 60 mailles avec des aiguilles double pointe et vous indiquez joindre, ca voudrait dire joindre a la premiere maille
17.06.2021 - 04:41DROPS Design answered:
Bonjour Mme Hebert, effectivement, les manches se tricotent en rond, cette vidéo montre comment monter les mailles sur aiguilles doubles pointes, joindre et tricoter en jersey (tricotez ici bien comme indiqué dans votre modèle). Bon tricot!
17.06.2021 - 08:25Hej vilket garn kan man välja istället för det utgångna . Hälsar Gunilla
24.01.2021 - 10:13DROPS Design answered:
Hej Gunilla. Här kan du se vilka garn som du kan ersätta DROPS Ull-Tweed med. Mvh DROPS Design
26.01.2021 - 14:06Hallo, immer noch die Frage von heut morgen: nach Aufnahme der Maschen und der linken Reihe SOFORT mit M2 beginnen und NICHT erst 6 cm im Bündchenmuster?
29.03.2019 - 20:37DROPS Design answered:
Liebe Barbara, siehe Antwort unten :) Viel Spaß beim stricken!
01.04.2019 - 11:34Moin, es ist für das Bündchen 2 re 2 li angegeben, aber der Rumpfteil beginnt direkt mit M2 - wo ja auch 2 re 2 li sind!? Also nicht erst - lt Diagramm - 6 cm Bündchenmuster? Sondern DIREKT M2 und nach ca 6 cm glatt rechts? Korrekt???
29.03.2019 - 10:06DROPS Design answered:
Liebe Barbara, ganz am Anfang Rumpfteil stricken Sie M.2 = (2 M li, 2 M re, 2 M li, 2 M re) x 14 Reihen dann 1 Rd re, 1 Rd li, 2 Rd re, 1 Rd li, 2 Rd re, 1 Rd li, 1 Rd re = M.2 muss dann ca 6 cm messen. Viel Spaß beim stricken!
01.04.2019 - 10:26Sorry, aber ich verstehe die Abnahmen für den Hals immer noch nicht. Können Sie mir sie bitte noch einmal erklären. Ab der Abnahme für den Reißverschluss wird nicht mehr in Runden gestrickt, was passiert mit dem Maschen rechts und links des Reißverschlusses, wenn die die 8 Maschen rechts und links in der Mitte abgekettet werden? Werden Sie stillgelegt?
23.04.2018 - 12:08DROPS Design answered:
Liebe Sabine, für den Reißverschluss werden nach 46-48 (52-56-60) cm die 2 mittleren Maschen abgekettet und dann hin und zurück gestrickt. Nach 52-54 (58-60-62) cm (= nach weitere 6-4(6-4-2) cm werden die 4-4(6-6-8) Maschen auf beiden Seiten abgekettet, dann auf beiden Seiten so abketen: 2 M x 2, 1 M x 2 (= Halsausschnitt). Viel Spaß beim stricken!
23.04.2018 - 12:40Ich stricke diesen Pullover mit Reißverschluss und verstehe nach der Teilung für den Kragen die Anleitung nicht : Wenn die Arb 52-54 (58-60-62) cm misst, 4-4 (6-6-8) M auf jeder Seite der Mitte vorne abketten. Wenn ich auf jeder Seite 8 Maschen abkette, ist da die Lücke für den Reißverschluss nicht zu groß?
17.04.2018 - 17:43DROPS Design answered:
Liebe Sabine, diese Maschen werden nicht für die Lücke für den Reißverschluss abgekettet sondern für den Hals. Später werden Sie die Maschen um den Hals auffassen und weiter in Krausrippen stricken. Viel Spaß beim stricken!
18.04.2018 - 09:09Det står at du skal strikke M 1-M4, men det står ikke hva slags masker det skal være? På skjerf står det at det er vrang og rett med skjerf i parantes. Ut fra bildet ser det ut som det er rett og vrang? Mvh Elin
09.08.2017 - 17:53DROPS Design answered:
Hei Elin. Her skulle det ikke ha stått skjerf i parentes. Diagrammet gjelder for genseren, ikke skjerfet (skjerfet strikkes kun i rille og vrangbord). Takk for at du gjorde oss oppmerksom på dette, vi skal få ordnet opp i dette.
10.08.2017 - 07:41Hallo, ich verstehe die Zunahme an den Ärmeln nicht: was ist unter 1 Masche auf jeder Seite der 2. Masche in der Mitte zu verstehen? Auch die weitere Zunahme von 2 re Maschen unten in der Mitte ist für mich nicht verständlich. Und wo wird abgekettelt, an den Seiten oder mittig? Vielen Dank für Ihre Hilfe
16.03.2016 - 09:11DROPS Design answered:
Liebe Bettina, es wird wie üblich an der Ärmelunterkante zugenommen. Es heisst auch: auf jeder Seite der 2 Maschen in der Mitte zunehmen, nicht der 2. Masche. Abgekettet wird dann auch an der Ärmelunterkante, also unter der Achsel.
16.03.2016 - 18:23No, of course not
19.08.2015 - 18:57