
Popular categories
Looking for a yarn?


|
|||||||||||||||||||||||||
Ipanema |
|||||||||||||||||||||||||
 |
 |
||||||||||||||||||||||||
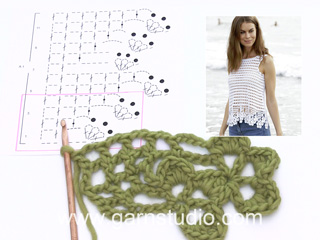
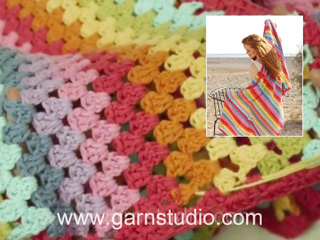
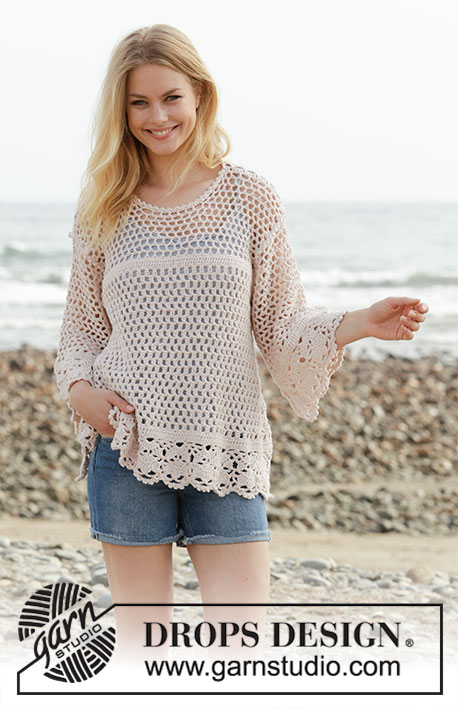
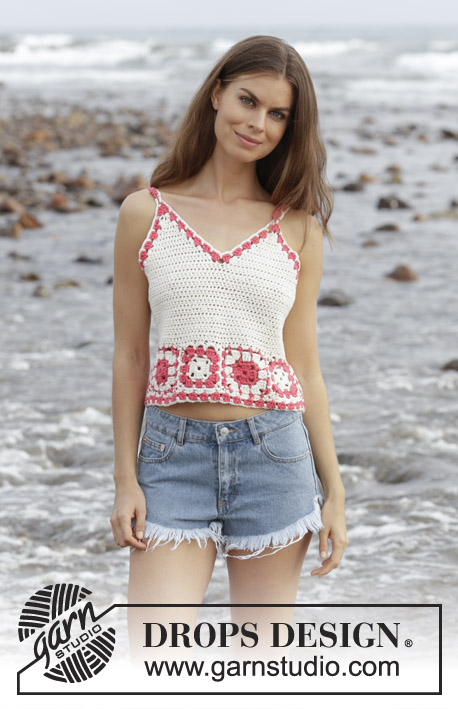
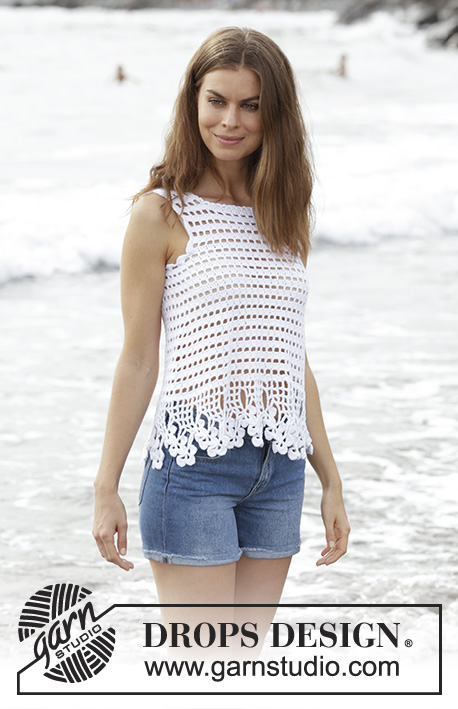
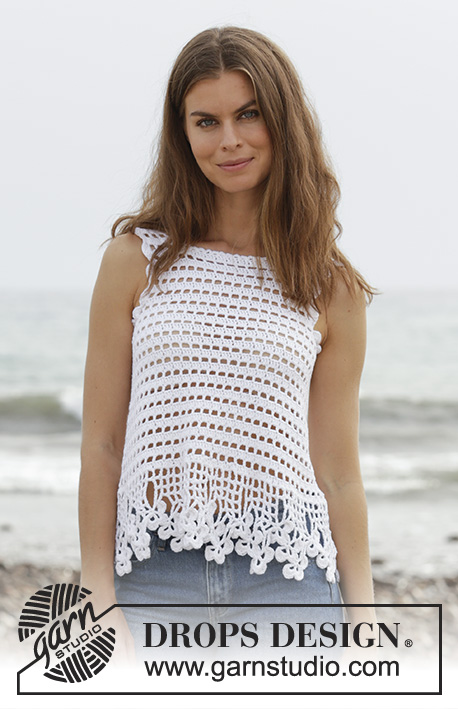
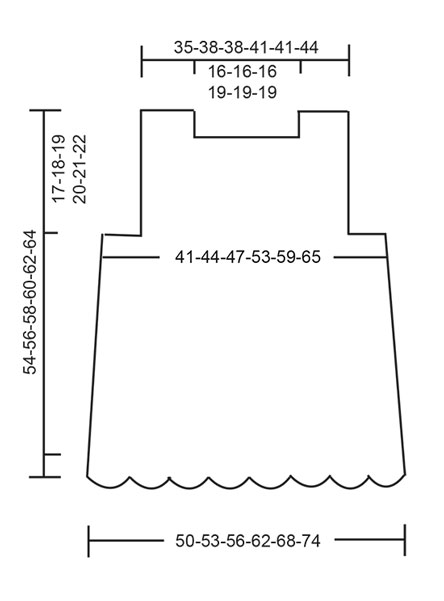
Crocheted top with clover and lace pattern. The piece is worked in DROPS Cotton Light. Sizes S - XXXL.
DROPS 190-2 |
|||||||||||||||||||||||||
|
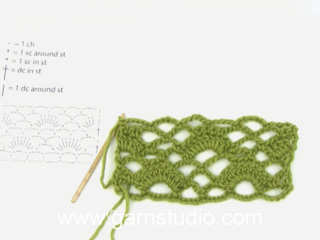
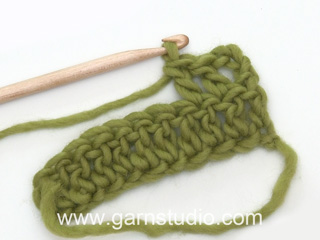
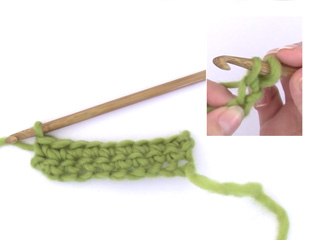
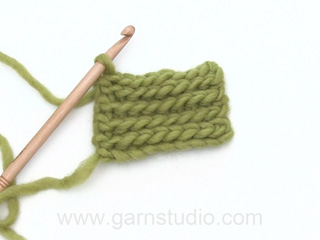
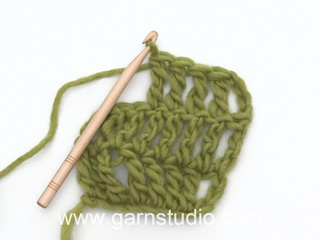
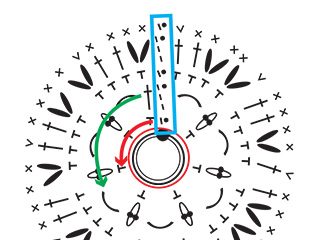
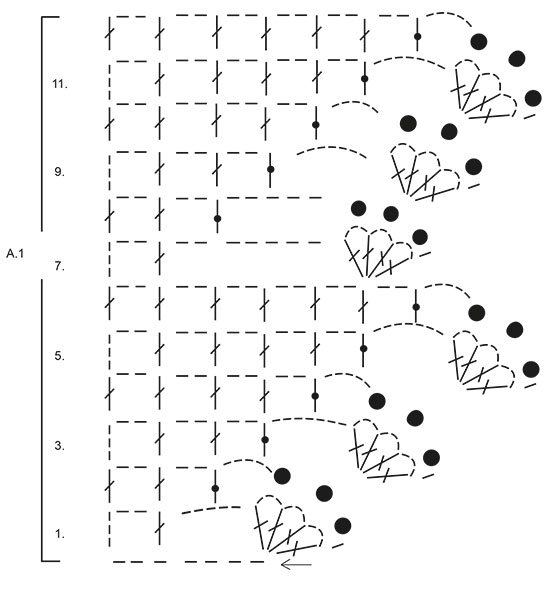
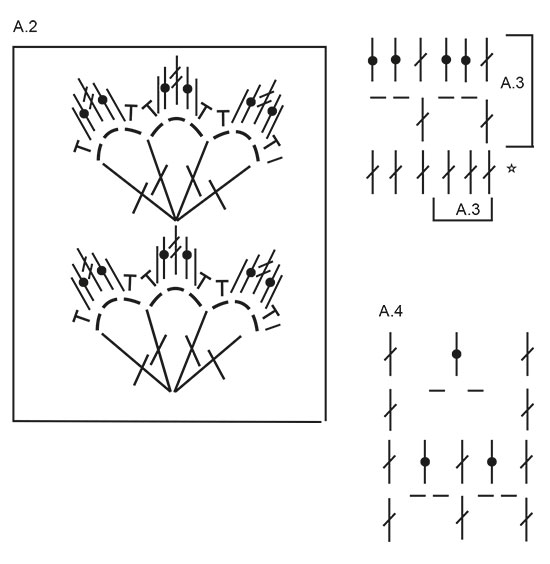
INFORMATION FOR THE PATTERN: PATTERN: See diagrams A.1 to A.4. CROCHET INFO-1: The first row on each clover leaf (= 1 treble crochet, 3 chain stitches, 1 treble crochet, 3 chain stitches, 1 treble crochet, 3 chain stitches, 1 treble crochet in the same treble crochet) is worked in the middle double treble crochet of the previous clover leaf - see A.2. CROCHET INFO-2: The first treble crochet at the beginning of the row/round is replaced by 3 chain stitches. Finish the row/round with 1 slip stitch in the 3rd chain stitch at the beginning of the row/round. The first double crochet at the beginning of the row is replaced by 1 chain stitch. ---------------------------------------------------------- TOP: First the clover pattern is worked from side to side at the bottom, then the top is worked upwards in the round as far as the armholes. Here the piece is divided and the front and back pieces are worked separately. Work 12 chain stitches (including 5 chain stitches to turn) with Cotton Light and hook size 3.5 mm. Read CROCHET INFO-1! Continue by working according to A.1 until you have worked 1 repeat in height. Then repeat rows 7-12 until the piece measures approx. 100-106-112-124-136-148 cm – finish after row 12. Sew the clover edge together to make a ring (seam = side of the top). Then continue working upwards in the round, THE PIECE IS NOW MEASURED FROM HERE! Crochet up 198-210-222-246-270-294 treble crochets around the treble crochets from the long-side in A.1. Then work according to A.3 – read CROCHET INFO-2. Continue this pattern upwards. Insert 2 marker threads in the piece, 1 at the beginning of the round and 1 after 99-105-111-123-135-147 treble crochets (= sides). When the piece measures 2 cm decrease 1 treble crochet group (= 3 treble crochets or 1 treble crochet + 2 chain stitches) in each side, decrease before both marker threads. Diagram A.4 shows how to decrease in the pattern. Repeat the decrease upwards every 4 cm; decrease alternately before and after the marker threads in the sides, i.e. the first time you decrease 1 treble crochet group before the marker threads, the second time you decrease 1 treble crochet group after both marker threads. Decrease a total of 6 times in each side of the top = 162-174-186-210-234-258 treble crochets/chain stitches. When the piece measures 25-26-27-28-29-30 cm, adjust so that the next round to be worked is the first round in A.3, divide the piece for the front and back pieces. Cut the strand. FRONT PIECE: Skip the first 6-6-9-12-18-21 treble crochets, work A.3 over the next 70-76-76-82-82-88 treble crochets (= 23-25-25-27-27-29 repeats of A.3 + 1 treble crochet). Turn and work back. Continue this pattern upwards. When the piece measures 36-38-40-42-44-46 cm work over just the first 19-22-22-22-22-25 treble crochets/chain stitches on the row = right shoulder. Continue until the piece measures 42-44-46-48-50-52 cm, cut and fasten the strand. Work the left shoulder in the same way, i.e. work over just the last 19-22-22-22-22-25 treble crochets/chain stitches on the row. The 32-32-32-38-38-38 treble crochets/chain stitches not worked = neck. The piece measures a total of 54-56-58-60-62-64 cm. BACK PIECE: Skip the first 11-11-17-23-35-41 treble crochets after the front piece, work A.3 over the next 70-76-76-82-82-88 treble crochets (= 23-25-25-27-27-29 repeats of A.3 + 1 treble crochet). Turn and work back (there are now 11-11-17-23-35-41 treble crochets in each side which are not worked (= armholes). Continue A.3 upwards. When the piece measures 30-32-34-36-38-40 cm divide the back piece so that you have a split mid back. RIGHT BACK PIECE: Now work over just the first 35-38-38-41-41-44 treble crochets; work A.3 over the first 33-36-36-39-39-42 treble crochets/chain stitches and finish with 2 treble crochets towards mid back. When the piece measures 36-38-40-42-44-46 cm work over just the first 19-22-22-22-22-25 treble crochets/chain stitches on the row = right shoulder. The 16-16-16-19-19-19 treble crochets not worked = neck. Continue until the piece measures 42-44-46-48-50-52 cm, cut and fasten the strand. LEFT BACK PIECE: Now work over just the last 35-38-38-41-41-44 treble crochets; work 1 treble crochet towards mid back, work A.3 over the next 33-36-36-39-39-42 treble crochets/chain stitches and finish with 1 treble crochet towards the side. When the piece measures 36-38-40-42-44-46 cm work over just the last 19-22-22-22-22-25 treble crochets/chain stitches on the row = left shoulder. The 16-16-16-19-19-19 treble crochets not worked = neck. Continue until the piece measures 42-44-46-48-50-52 cm, cut and fasten the strand. ASSEMBLY: Sew the shoulder seams. CROCHET EDGE AROUND THE ARMHOLES: Start at bottom of armhole. Work 1 double crochet,* skip forward approx. 2 cm, work 7 treble crochets around the next treble crochet, skip forward approx. 2 cm, work 1 double crochet around the next treble crochet *, repeat from *-* and finish with 1 slip stitch in the double crochet at the beginning of the round. Work in the same way around the other armhole. CROCHET EDGE AROUND THE NECK: Start mid back. Work 1 double crochet, * 3 chain stitches, skip forward approx. 1 cm, work 1 double crochet *, repeat from *-*. ASSEMBLY -2: Sew a button to the top of the split mid back; the button is buttoned through 2 treble crochets. |
|||||||||||||||||||||||||
Diagram explanations |
|||||||||||||||||||||||||
|
|||||||||||||||||||||||||
|
|||||||||||||||||||||||||
|
|||||||||||||||||||||||||
|
|||||||||||||||||||||||||
|
Have you made this or any other of our designs? Tag your pictures in social media with #dropsdesign so we can see them! Do you need help with this pattern?You'll find tutorial videos, a Comments/Questions area and more by visiting the pattern on garnstudio.com. © 1982-2024 DROPS Design A/S. We reserve all rights. This document, including all its sub-sections, has copyrights. Read more about what you can do with our patterns at the bottom of each pattern on our site. |
|||||||||||||||||||||||||


With over 40 years in knitting and crochet design, DROPS Design offers one of the most extensive collections of free patterns on the internet - translated to 17 languages. As of today we count 304 catalogues and 11422 patterns - 11422 of which are translated into English (UK/cm).
We work hard to bring you the best knitting and crochet have to offer, inspiration and advice as well as great quality yarns at incredible prices! Would you like to use our patterns for other than personal use? You can read what you are allowed to do in the Copyright text at the bottom of all our patterns. Happy crafting!
Comments / Questions (40)
Necesito ayuda para interpretar esta parte del patron: Cuando la labor mida 2 cm disminuir 1 grupo de puntos altos (= 3 puntos altos o 1 punto alto + 2 puntos de cadeneta) a cada lado, disminuir antes de ambos marcapuntos. El diagrama A.4 muestra cómo disminuir en el patrón. Agradecería a quien me pueda ayudar. Gracias Gaby
08.04.2024 - 22:08DROPS Design answered:
Hola Gaby, en el diagrama A.4 puedes ver como se disminuye el grupo hasta 1 punto alto. En la fila 2 del diagrama tienes 3 puntos centrales que vas a disminuir y 1 punto alto a cada lado de estos puntos. En la fila 3 disminuyes estos 3 puntos trabajando 2 cadenetas encima de estos puntos altos. En la siguiente fila trabajas 1 punto alto dentro de este arco de cadenetas. De este modo pasas de tener 3 puntos altos en la fila 2, a 2 cadenetas en la Fila 3 y 1 punto alto en la Fila 4. Si en vez de 3 puntos altos tienes 1 punto alto y 2 cadenetas se haría lo mismo; solo cambian los puntos iniciales.
14.04.2024 - 18:24Hallo ik ben net aan dit patroon begonnen met A1 maar weet niet goed hoe ik het tweede klavertje moet haken( rij 3)
23.03.2024 - 19:02If you start with chain 12 on the clover bottom the first clover is much shorter than all the other and looks odd when joined. Wouldn't it be better to start with a 21 chain as per the clover position on round 7 ?
25.09.2023 - 22:03DROPS Design answered:
Dear Jane, the garment was made like this, but feel free to change and start with row 7 and more chains if you like to. Happy crocheting!
02.10.2023 - 09:19Hallo, kapiere die Abnahme vom armausschnitt nicht. Vorderteil 6 Stäbchen, Rückenteil 11 Stäbchen.Die Maschen welche noch über sind, sind bei Vorderteil und Rückenteil gleich . Das kann doch nicht stimmen. Da ist doch der Rücken kleiner.
05.07.2022 - 14:14DROPS Design answered:
Liebe Ingrid, am Anfang Vorderteil überspringen Sie die 6 ersten Stäbchen dann häkeln Sie A.3 insgesamt 23-25 Mal (siehe Größe) - bei dem Rückenteil, überspringen Sie 11 Stäbchen nach dem Vorderteil und häkeln A.3 insgesamt 23-25 Mal = es sind 11 Stäbchen für das 2. Armoch vor dem Vorderteil. Viel Spaß beim häkeln!
05.07.2022 - 15:45🤗 Ich verstehe die Abnahme bei A. 4 nicht. Lt. Zeichnung würde eine Abnahme dann über drei Reihen gehen oder? Verstehe jetzt auch nicht, wie ich die Abnahme beginne, wenn ich nicht die Luftmaschen, sondern die Stäbchen habe. Diese Zeichnung fehlt mir irgendwie. Wahrscheinlich denke ich zu kompliziert, komme aber hier einfach nicht weiter. Danke für die Hilfe Lg Martina
26.06.2022 - 21:28DROPS Design answered:
Liebe Martina, bei der 2. Reihe in A.4 häkeln Sie je 1 Stäbchen um die 2 Luftmaschenbogen (anstatt 2 Stäbchen um jeden diesen 2 Luftmaschenbogen in A.3), bei der 3. Reihe haben Sie dann nur noch 1 Luftmaschenbogen anstatt 2 und dann bei der 4. Reihe häken Sie 1 Stäbchen um den Luftmaschenbogen. Viel Spaß beim häkeln!
27.06.2022 - 09:01Pattern 190-2. . It says to repeat t decreases every 1 1/2”. But according to the decrease diagram it takes 4 rows to do the decreases which is almost 1 3/4”. It also appears that in the size small the total number of decreased stitches is 36. But according to the decrease chart it appears that 8 stitches are decreased in total from both sides per decrease. It says to decrease 6 times in all which x6 = 48 stitches decreased.
19.06.2022 - 02:18DROPS Design answered:
Dear Mrs Castaneda, the decreases are worked alternately before and after the markers, so that you will decrease 3 sts first before both markers (= 6 sts) then after both markers (6 sts) and repeat this a toatal of 6 times = 6 sts decreased x 6 = 36 sts decreased in total. When the 4 rows are worked before marker, start them again after marker to decrease, then before marker etc. Happy crocheting!
20.06.2022 - 08:20Met diagram geen probleem maar nu bezig met dit topje en moet ik minderen is het de bedoeling dat ik per rij 4 steken minder maal 6 is 24 dan kom ik niet uit op de 258 stokjes snap er niks van
26.05.2022 - 12:16DROPS Design answered:
Dag Mary,
Je mindert inderdaad steeds 3 steken in beide zijnaden, dus 6 steken in totaal op de toer. Dit doe je 6 keer, dus minder je in totaal 36 steken. Voor het minderen had je (147 x 2 =) 294 stokjes op de toer. Als je hier 36 vanaf haalt, kom je op 258 stokjes .
03.07.2022 - 14:45I am working on top part where it said the measurement 9-3/4 is that including the design or not? “ When the piece measures 25-26-27-28-29-30 cm / 9¾''-10¼''-10 5/8''-11''-11 3/8''-11¾'', adjust so that the next round to be worked is the first round in A.3, divide the piece for the front and back pieces. Cut the strand.” Thank you hoping u can help me out.
26.09.2020 - 07:53DROPS Design answered:
Dear Marivi, you start measuring from where it says: THE PIECE IS NOW MEASURED FROM HERE!, this means you measure only from the part work in the round, not the edge. Happy crocheting!
28.09.2020 - 09:21I am learning how to read a crochet diagram pattern and try as I may the decrease A.4 on the Drops 190-2 pattern has me baffled. I really like this for my granddaughter but the written part is a bit wordy and I struggle trying to it. The video made the shamrock edging easy to follow and I am pleased with what I've done so far. As I stated, I'm learning to read the crochet patterns, so I would appreciate any additional assistance. Thank you
06.09.2020 - 04:48DROPS Design answered:
Dear Mrs Sanchez, A.4 will worked only 2 times in the round at the same time as you are working A.3 (= same round, starting on row 1 in A.3 = row 1 in A.4) work A.4 ober the last 2 chain- spaces in A.3 before each marker. When the 4 rows have been worked, work A.4 over the 2 ch-space after each marker. And continue like this, on next decraese work A.4 over the 2 ch-spaces before each marker, on the next decrease, work A.4 over the 2 ch-spaces after each marker, etc. Happy crocheting!
07.09.2020 - 08:35Bonjour, J'ai acheté le coton pour réaliser ce modèle, il est très jolie, mais je regrette d'avoir pris ce coton qui se partage quand on le crochète, je ne le conseille pas et je suis très déçue. Je viens de finir un autre top avec un coton d'une autre marque, rien à voir ! Le drops n'est pas cher mais la qualité n'est pas de mise, c'est dommage.
08.08.2020 - 19:36