DROPS Sky
DROPS Sky
74% Alpaca, 18% Polyamide, 8% Wool
from 5.40 € /50g
Get the yarn to make this pattern from 27.00€.

The yarn cost is calculated from the pattern’s smallest size and the yarn’s cheapest product type. Looking for an even better price? You might find it on the DROPS Deals!

DROPS SS24

Woodland Fairy

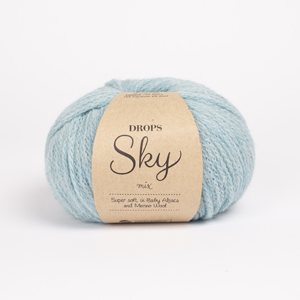
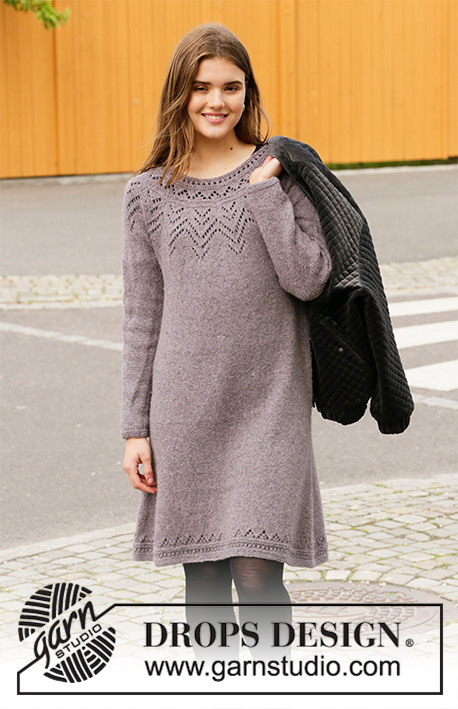
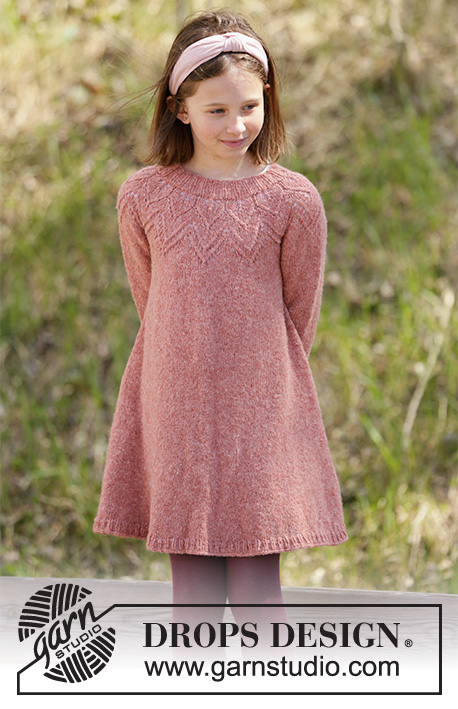
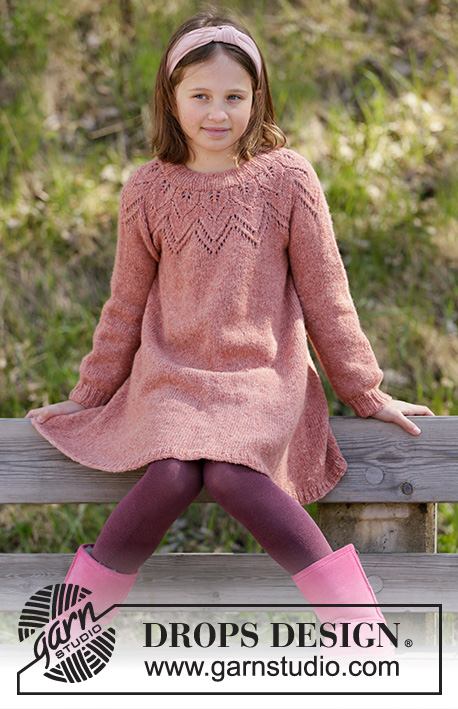
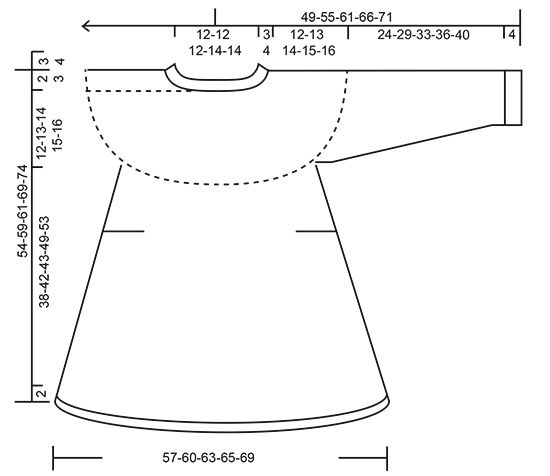
Knitted dress for children in DROPS Sky or DROPS Merino Extra Fine. The piece is worked top down with lace pattern. Sizes 3-12 years.

DROPS Children 34-25
DROPS Design: Pattern no sk-008-bn
Yarn group B
-------------------------------------------------------

SIZES:
3/4 - 5/6 - 7/8 - 9/10 - 11/12 years
Size in cm: 98/104 - 110/116 - 122/128 - 134/140 - 146/152
MATERIALS:
DROPS SKY from Garnstudio (belongs to yarn group B)
250-250-300-300-350 g colour 19, brick
Or use:
DROPS MERINO EXTRA FINE from Garnstudio (belongs to yarn group B)
400-450-500-550-600 g colour 33, rose

KNITTING TENSION:
21 stitches in width and 28 rows in height with stocking stitch = 10 x 10 cm.

NEEDLES:
DROPS DOUBLE POINTED NEEDLES SIZE 4 MM.
DROPS CIRCULAR NEEDLE SIZE 4 MM: Length 40 cm and 60 cm or 80 cm.
DROPS DOUBLE POINTED NEEDLES SIZE 3.5 MM for rib.
DROPS CIRCULAR NEEDLE SIZE 3.5 MM: Length 40 cm and 80 cm for rib.
Needle size is only a guide. If you get too many stitches on 10 cm, change to a larger needle size. If you get too few stitches on 10 cm, change to a smaller needle size.

-------------------------------------------------------

-------------------------------------------------------

Alternative Yarn – See how to change yarns here
Yarn Groups A to F – Use the same pattern and change the yarn here
Yarn usage using an alternative yarn – Use our yarn converter here

-------------------------------------------------------

DROPS Sky
DROPS Sky
74% Alpaca, 18% Polyamide, 8% Wool
from 5.40 € /50g
Get the yarn to make this pattern from 27.00€.

The yarn cost is calculated from the pattern’s smallest size and the yarn’s cheapest product type. Looking for an even better price? You might find it on the DROPS Deals!

Pattern instructions

-------------------------------------------------------

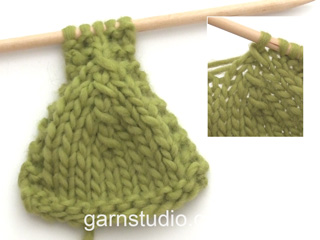
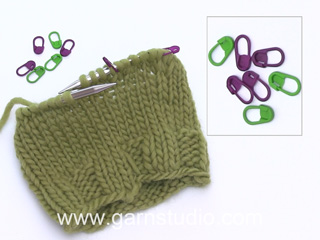
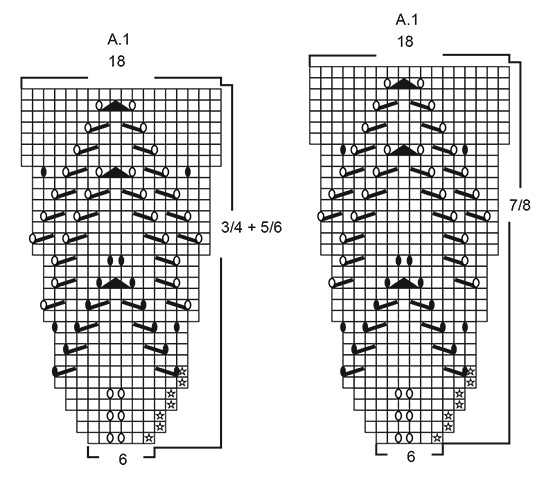
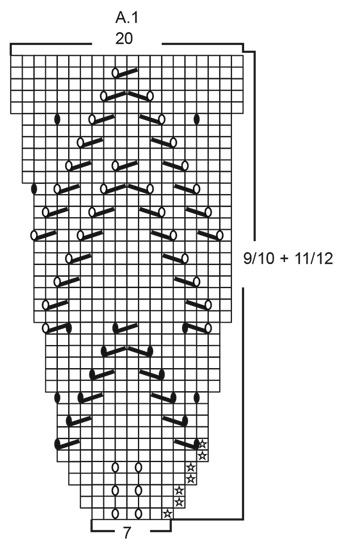
EXPLANATIONS FOR THE PATTERN:

-------------------------------------------------------

INCREASE TIP: 
Increase with 1 yarn over; on the next round work the yarn over twisted to avoid a hole.

PATTERN: 
See diagram A.1; choose your size in the diagram.

-------------------------------------------------------

START THE PIECE HERE:

-------------------------------------------------------

DRESS: 
The yoke is worked in the round, top down. After the piece has been divided for body and sleeves, the body is continued in the round with circular needle, and the sleeves are workedin the round with double pointed needles.

YOKE:
Cast on 72-78-84-90-96 stitches with short circular needle size 3.5 mm and Sky. Insert 1 marker at the beginning of the round (= mid back). Work rib with knit 1/ purl 2 for 3-3-4-4-4 cm (= neck). The piece is now measured from here. Change to short circular needle size 4 mm and knit 2 rounds, adjusting on the first round the number of stitches to 66-72-78-84-91 stitches. Then work A.1 (= 11-12-13-12-13 repeats in width) – see diagram for the correct size! REMEMBER THE KNITTING TENSION! Change to a longer circular needle when you have increased enough stitches. When A.1 has been completed there are 198-216-234-240-260 stitches on the needle. On the next round increase 14-12-10-24-20 stitches evenly spaced while at the same time working stocking stitch = 212-228-244-264-280 stitches. Continue with stocking stitch until the piece measures 12-13-14-15-16 cm (without the rib). The next round is worked as follows: Knit 31-33-35-37-39 stitches (= half the back piece), place the next 44-48-52-58-62 stitches on 1 thread for sleeve (without working them), cast on 6 new stitches, knit 62-66-70-74-78 stitches (= front piece), place the next 44-48-52-58-62 stitches on 1 thread for sleeve (without working them), cast on 6 new stitches and knit 31-33-35-37-39 stitches (= half the back piece). 

BODY:
= 136-144-152-160-168 stitches. THE PIECE IS NOW MEASURED FROM HERE! Now insert 6 markers in the piece as follows: Marker 1 is inserted in the first stitch at the beginning of the round (= side), marker 2 is inserted in the 23rd-25th-26th-27th-28th stitch, marker 3 is inserted in the 47th-49th-52nd-55th-58th stitch, marker 4 is inserted in the 69th-73rd-77th-81st-86th stitch (= side), marker 5 is inserted in the 91st-97th-102nd-107th-114th stitch, marker 6 is inserted in the 115th-121st-128th-135th-144th stitch (there are 21-23-24-25-24 stitches left on the round after the last marker). READ INCREASE TIP! On the next round increase 1 stitch on each side of each marker (12 stitches increased on round) and repeat these increases every 1½-2-2-2-1½ cm a total of 4 times. Then increase as follows: Increase 1 stitch on each side of markers 1 and 4 (= sides), 1 stitch after markers 2 and 5 and 1 stitch before markers 3 and 6 – READ INCREASE TIP (= 8 stitches increased per round). Increase in the different sizes as follows:
3/4 years: Increase approx every 3 cm a total of 11 times.
5/6 years: Increase approx. every 3 cm a total of 11 times.
7/8 years: Increase approx. every 3 cm a total of 12 times.
9/10 years: Increase approx. every 3½ cm a total of 12 times.
11/12 years: Increase approx. every 4 cm a total of 12 times.
There are now 272-280-296-304-312 stitches on the round. Work until the piece measures 38-42-43-49-53 cm. On the next round increase 34-35-37-38-39 stitches evenly spaced – READ INCREASE TIP (increase after approx. each 8th stitch) = 306-315-333-342-351 stitches. Change to circular needle size 3.5 mm and work rib with knit 1/ purl 2 for 2 cm. Loosely cast off with knit on the next round.

SLEEVE:
Place the stitches from the one thread on double pointed needles size 4 mm and knit up 1 stitch in each of the 6 stitches cast on in the side of the body (insert 1 marker in the middle of these stitches) = 50-54-58-64-68 stitches. THE PIECE IS NOW MEASURED FROM HERE! Work stocking stitch in the round. When the piece measures 24-29-33-36-40 cm from the marker adjust the number of stitches to 42-42-48-48-48 stitches. Change to double pointed needles size 3.5 mm and work rib with knit 1/ purl 2 for 4 cm. Loosely cast off with knit on the next round. Work the other sleeve in the same way.

Diagram

symbols = knit
symbols = purl
symbols = between 2 stitches make 1 yarn over. The yarn over is knitted twisted on the next round to avoid a hole
symbols = between 2 stitches make 1 yarn over. The yarn over is knitted on the next round to leave a hole
symbols = slip 1 stitch as if to knit, knit 1 and pass the slipped stitch over
symbols = knit 2 together
symbols = slip 1 stitch as if to knit, knit 2 together and pass the slipped stitch over the knitted together stitches
diagram
diagram
diagram

Each of our patterns has specific tutorial videos to help you.

Do you have a question? See a list of frequently asked questions (FAQ)

Knitting tension is what determines the final measurements of your work, and is usually measured per 10 x 10 cm. It is provided like so: number of stitches in width x number of rows in height - eg: 19 stitches x 26 rows = 10 x 10 cm.

The knitting tension is very individual; some people knit/crochet loosely while others work tightly. You adjust the knitting tension with the needle size, which is why the suggested needle size is only meant as a guide! You need to adjust this (up or down) to ensure that YOUR knitting tension matches the knitting tension provided in the pattern. If you work with a different knitting tension than provided you will have a different yarn consumption, and your work will have different measurements than what the pattern suggests.

The knitting tension also determines which yarns can replace each other. As long as you achieve the same knitting tension you can replace one yarn with another.

See DROPS lesson: How to measure your tension/gauge

See DROPS video: How to make a gauge tension swatch

The required amount of yarn is provided in grams, eg: 450 g. To calculate how many balls you’ll need you first need to know how many grams are in 1 ball (25g, 50g or 100g). This information is available if you click on the individual yarn quality on our pages. Divide the amount required with the amount of each ball. For example, if each ball is 50g (the most common amount), the calculation will be as follows: 450 / 50 = 9 balls.

The important thing when changing from one yarn to another is that the knitting/crochet tension remains the same. This is so that the measurements of the finished piece will be the same as on the sketch provided. It is easier to achieve the same knitting tension using yarns from the same yarn group. It is also possible to work with multiple strands of a thinner yarn to achieve the knitting tension of a thicker one. Please try our yarn converter. We recommend you to always work a test swatch.

Please NOTE: when changing yarn the garment might have a different look and feel to the garment in the photo, due to individual properties and qualities of each yarn.

See DROPS lesson: Can I use a different yarn than the one mentioned in the pattern?

All our yarns are categorised into yarn groups (from A to F) according to thickness and knitting tension – group A contains the thinnest yarns and group F the thickest. This makes it easier for you to find alternative yarns to our patterns, should you wish to switch yarn. All yarns within the same group have a similar knitting tension and can easily replace each other. However, different yarn qualities have different structures and properties which will give the finished work a unique look and feel.

Click here for an overview of the yarns in each yarn group

At the top of all our patterns you’ll find a link to our yarn calculator, which is a helpful tool should you wish to use a different yarn than suggested. By filling in the yarn quality you wish to replace, the amount (in your size) and number of strands, the calculator will present good alternative yarns with the same knitting tension. Additionally it will tell you how much you’ll require in the new qualities and whether you’ll need to work with multiple strands. Most skeins are 50g (some are 25g or 100g).

If the pattern is worked with multiple colours, every colour will have to be calculated separately. Similarly, if the pattern is worked with several strands of different yarns (for example 1 strand Alpaca and 1 strand Kid-Silk) you will have to find alternatives for each, individually.

Click here to see our yarn calculator

Since different yarns have different qualities and textures we have chosen to keep the original yarn in our patterns. However, you can easily find options among our available qualities by using our yarn calculator, or simply pick a yarn from the same yarn group.

It is possible that some retailers still have discontinued yarns in stock, or that someone has a few skeins at home that they would like to find patterns for.

The yarn calculator will provide both alternative yarn as well as required amount in the new quality.

If you think it's hard to decide what size to make, it can be a good idea to measure a garment you own already and like the size of. Then you can pick the size by comparing those measures with the ones available in the pattern's size chart.

You'll find the size chart at the bottom of the pattern.

See DROPS lesson: How to read size chart

The needle size provided in the pattern serves only as a guide, the important thing is to follow the knitting tension. And since knitting tension is very individual, you will have to adjust the needle size to ensure that YOUR tension is the same as in the pattern – maybe you’ll have to adjust 1, or even 2 needle sizes, up or down to achieve the correct tension. For this, we recommend that you work test swatches.

Should you work with a different knitting tension than the one provided, the measurements of the finished garment might deviate from the measurement sketch.

See DROPS lesson: How to measure your tension/gauge

See DROPS video: How to make a tension/gauge swatch

Working a garment top-down provides more flexibility and room for personal adjustment. For example it is easier to try the garment on while working, as well as making adjustments to length of yoke and shoulder caps.

The instructions are carefully explaining every step, in the correct order. Diagrams are adjusted to the knitting direction and are worked as usual.

The diagram depicts all rows/rounds, and every stitch seen from the right side. It is read from bottom to top, from right to left. 1 square = 1 stitch.

When working back and forth, every other row is worked from the right side and every other row is worked from the wrong side. When working from the wrong side, the diagram will have to be worked reversed: from left to right, knit stitches are purled, purl stitches are knit etc.

When working in the round every round is worked from the right side and the diagram are worked from right to left on all rounds.

See DROPS lesson: How to read knitting diagrams

The diagram depicts all rows/rounds, and every stitch seen from the right side. It is worked from bottom to top, from right to left.

When working back and forth every other row is worked from the right side: from right to left and every other row is worked from the wrong side: from left to right.

When working in the round, every row in the diagram are worked from the right side, from right to left.

When working a circular diagram you start in the middle and work your way outwards, counter clockwise, row by row.

The rows usually start with a given number of chain stitches (equivalent to the height of the following stitch), this will either be depicted in the diagram or explained in the pattern.

See DROPS lesson: How to read crochet diagrams

Instructions for working several diagrams after each other on the same row/round, will often be written like so: “work A.1, A.2, A.3 a total of 0-0-2-3-4 times". This means you work A.1 once, then A.2 is worked once, and A.3 is repeated (in width) the number of times provided for your size – in this case like so: S = 0 times, M = 0 times, L=2 times, XL= 3 times and XXL = 4 times.

The diagrams are worked as usual: begin with the first row in A.1, then work the first row in A.2 etc.

See DROPS lesson: How to read knitting diagrams

See DROPS lesson: How to read crochet diagrams

The total width of the garment (from wrist-to-wrist) will be larger in the larger sizes, despite the actual sleeves being shorter. The larger sizes have longer sleeve caps and wider shoulders, so there will be a good fit in all sizes.

The measurement sketch/schematic drawing provides information regarding the full length of the garment. If it’s a jumper or a jacket the length is measured from the highest point on the shoulder closest to the neckline, and straight down to the bottom of the garment. It is NOT measured from the tip of shoulder. Similarly, the length of yoke is measured from the highest point on the shoulder and down to where yoke is split into body and sleeves.

On a jacket measures are never taken along bands, unless specifically stated. Always measure inside band stitches when measuring the length.

See DROPS lesson: How to read a schematic drawing

Diagrams are often repeated on the round or in height. 1 repeat is the diagram the way it appears in the pattern. If it says to work 5 repeats of A.1 in the round, then you work A.1 a total of 5 times after/next to each other in the round. If it says to work 2 repeats of A.1 vertically/in height you work the entire diagram once, then begin again at the start and work the entire diagram one more time.

Chain stitches are slightly narrower than other stitches and to avoid working the cast-on edge too tight, we simply chain more stitches to begin with. The stitch count will be adjusted on the following row to fit the pattern and measurement sketch.

The rib edge is more elastic and will contract slightly compared to, for example, stocking stitch. By increasing before the rib edge, you avoid a visible difference in width between the rib edge and the rest of the body.

It’s very easy to cast off too tightly, and by making yarn overs while casting off (and simultaneously casting these off) you avoid a too tight cast off edge.

See DROPS video: How to bind off with yarn overs (yo)

To achieve an even increase (or decrease) you can increase on, for example: every 3rd and 4th row alternately, like so: work 2 rows and increase on the 3rd row, work 3 rows and increase on the 4th. Repeat this until the increase is complete.

See DROPS lesson: Increase or decrease 1 st on every 3rd and 4th row alternately

Should you prefer to work in the round instead of back and forth, you may of course adjust the pattern. You’ll need to add steeks mid-front (usually 5 stitches), and follow the instructions. When you would normally turn and work from the wrong side, simply work across the steek and continue in the round. At the end you’ll cut the piece open, pick up stitches to work bands, and cover the cut edges.

See DROPS video: How to knit steeks and cut open

Should you prefer to work back and forth instead of in the round, you may of course adjust the pattern so you work the pieces separately and then assemble them at the end. Divide the stitches for the body in 2, add 1 edge stitch in each side (for sewing) and work the front and back pieces separately.

See DROPS lesson: Can I adapt a pattern for circular needles into straight needles?

Pattern repeats can vary slightly in the different sizes, in order to get the correct proportions. If you’re not working the exact same size as the garment in the photo, yours might deviate slightly. This has been carefully developed and adjusted so that the complete impression of the garment is the same in all sizes.

Make sure to follow instructions and diagrams for your size!

If you have found a pattern you like which is available in women’s size it’s not very difficult to convert it to men’s size. The biggest difference will be the length of sleeves and body. Start working on the women size that you think would fit across the chest. The additional length will be worked right before you cast off for the armhole/sleeve cap. If the pattern is worked top-down you can add the length right after the armhole or before the first decrease on sleeve.

Regarding additional yarn amount, this will depend on how much length you add, but it is better with a skein too many than too few.

All yarns will have excess fibres (from production) that might come off as lint or shedding. Brushed yarns (ie hairier yarns) have more of these loose, excess fibres, causing more shedding.

Shedding also depends on what is worn under or over the garment, and whether this pulls at the yarn fibres. It’s therefore not possible to guarantee that there will be no shedding

Below are some tips on how to get the best result when working with hairier yarns:

1. When the garment is finished (before you wash it) shake it vigorously so the looser hairs come off. NOTE: do NOT use a lint roller, brush or any method that pulls at the yarn.

2. Place the garment in a plastic bag and put it in your freezer - the temperature will cause the fibres to become less attached to each other, and excess fibres will come off easier.

3. Leave in the freezer for a few hours before taking it out and shaking it again.

4. Wash the garment according to the instructions on the yarn label.

Pilling is a natural process that happens to even the most exclusive of fibers. It's a natural sign of wear and tear that is hard to avoid, and that is most visible in high friction areas of your garment like a sweater's arms and cuffs.

You can make your garment look as new by removing the pilling, using a fabric comb or a pill/lint remover.

Still can't find the answer you need? Then scroll down and leave your question so one of our experts can try to help you. This will be done normally within 5 to 10 working days.
In the meantime, you can read the questions and answers that others have left to this pattern or join the DROPS Workshop on Facebook to get help from fellow knitters/crocheters!

You might also like...

Woodland Fairy

Kerensa, United States

Woodland Fairy

Monika, Poland

Woodland Fairy

Ela, Germany

Woodland Fairy

Gabriela, Romania

Post a comment to pattern DROPS Children 34-25

We would love to hear what you have to say about this pattern!

If you want to leave a question, please make sure you select the correct category in the form below, to speed up the answering process. Required fields are marked *.

Comments / Questions (50)

country flag Zsuzsa wrote:

Hogy fér bele a gyermek feje, ha a nyakkivágás csak kb. 30 cm ? A 3,5-es kötőtűvel kezdve lesz annyira rugalmas a patent a nyakán, hogy egy 3 éves 50 cm fejkörfogatú lányka fel tudja venni ? Köszönöm válaszukat előre is!

04.06.2020 - 21:03

DROPS Design answered:

Dear Zsuzsa, the rib is stretchy, so it should be ok. The problem may be with the first round (casting on). Try to do it as elastic as possible. You can use bigger needles to do it, or use two needles, please see our video HERE. Don't give up and happy knitting!

20.11.2020 - 08:47

country flag Emilie wrote:

Hva betyr stjernen i starten av diagrammet?

23.05.2020 - 10:10

DROPS Design answered:

Hei Emilie, Stjernen betyr at du skal strikke en vrangmaske. God fornøyelse!

25.05.2020 - 07:38

country flag Jillyknits wrote:

Thanks for this pattern. In this pattern there are two types of YO, one to create a hole and the other to be twisted knit on the next row. Some rows have both. Would it be OK to increase by the knit front and back method where we don’t want a hole to be? Would make it easier.

08.05.2020 - 00:34

DROPS Design answered:

Dear Jillyknits, if you don't want to increase with the yarn overs, you can also tray to increase with the M1 (make one) technique, this would avoid the small demarcation you would get with knitting front and back loop of a stitch. But feel free to test different increase techniques on a swatch and choose the one you rather. Happy knitting!

08.05.2020 - 09:16

country flag Hermine wrote:

Hallo, kann es sein, dass die linken Maschen im Diagramm nicht versetzt, sondern immer übereinander gestrickt werden. Vielen Dank!

05.05.2020 - 23:07

DROPS Design answered:

Liebe Hermine, ja genau, sie sind im Diagram wegen Zunahmen in der Mitte vom Diagram versetzt aber sie werden immer übereinander gestrickt. Viel Spaß beim stricken!

06.05.2020 - 10:32

country flag Iben Gredsted wrote:

Jeg strikker str 11/12 og er nået tilsat sætte 6 markører . Når ærmerne er formet starter omgangen jo midt bag, men i opskriften står der at første markør er siden . Der er ikke nogen markør i siden men før og efter ærmet og midt for og midt bag. Er det forkert? Vh Iben

08.04.2020 - 09:11

DROPS Design answered:

Hei Iben. De 6 merkene som settes i plagget, er der hvor du skal øke. 1. merke indikerer hvor du skal øke første gang. Det skal økes med 1 maske på hver side av hvert merke (12 masker økt pr økning), da vil det bli en jevn økning rundt hele kjolen. 1. og 4. merke viser også sidene i kjolen. God Fornøyelse!

27.04.2020 - 12:04

country flag Stine wrote:

Hei. Strikker denne kjolem og er nå på økningene under arm. I følge str 3-4 år skal det økes 4 ganger hver 1.5 cm og 11 ganger hver 3 cm. Dette blir jo 39 cm. Så står det at mam videre skal strikke til arbeidet måler 38 cm. Det stemmer ikke for meg når jeg allerede har 39 cm. Har jeg regnet feil?

30.03.2020 - 23:43

DROPS Design answered:

Hej Den första ökningen blir när arbetet mäter 0 cm, den andra efter 1,5 cm osv så det innebär att arbetet är 4,5 cm efter de 4 första ökningarna och när alla ökningar är klara mäter arbetet ca 37,5 cm (4,5 + 33 ). Mvh DROPS Design

31.03.2020 - 07:11

country flag Karla Silva wrote:

Mi hija acaba de cumplir 4 años esta bien realizar la prenda en talla de 3 a 4 años.....? por que la talla de 5 a 6 creo que sera muy grande para ella.

28.03.2020 - 19:36

DROPS Design answered:

Hola Karla. Para elegir la talla correcta como referencia puedes usar las medidas de la prenda bajo el patrón. Cuando tengas dudas entre dos tallas recomendamos elegir la talla más grande.

29.03.2020 - 23:11

country flag Christina Christensen wrote:

Når jeg har taget 11 gange ud i størrelse 5/6 år, så får jeg 282 masker og ikke 280. De 282 passer også med regnestykket 144+50 (5x12)+88(11x8). Hvor regner jeg forkert? Mvh Christina

19.03.2020 - 22:53

DROPS Design answered:

Hej Den första ökningen gör du totalt 4 gånger; 4 x 12 =48 m. 144+48+88= 280 m. Lycka till!

20.03.2020 - 06:57

country flag Nicky Middleton wrote:

I have reached the point in this pattern where I have separated for sleeves and body. All good so far, but please can you explain why the first and fourth markers indicate (=side) instead of mid -front and mid-back? Are these the correct places for increasing? Thank you in advance!

09.03.2020 - 23:20

DROPS Design answered:

Dear Nicky, you have to put the markers , and decrease and increase at the sides for waist shaping and shaping the skirt of the dress, which you don't do at the middle of the front and back BUt at the sides. I hope this helps. Happy Knitting!

10.03.2020 - 05:22

country flag Marie wrote:

Tack för svar! Jag var nog otydlig. Det är på varv 2 och 3 i diagrammet som det blir tokigt. Gör jag ingen förskjutning på första aviga så stämmer det, men blir fel på tredje...

05.03.2020 - 17:08

DROPS Design answered:

Hej Marie Är inte helt säker på att jag förstår vad du menar, men den första aviga i diagrammet gör du alltid på den första maskan på varvet, då ska mönstret stämma. Hålmönstret ska komma i linje uppåt. Mvh DROPS Design

06.03.2020 - 13:30