
Popular categories
Looking for a yarn?


|
|||||||||||||||||||||||||||||||||||||
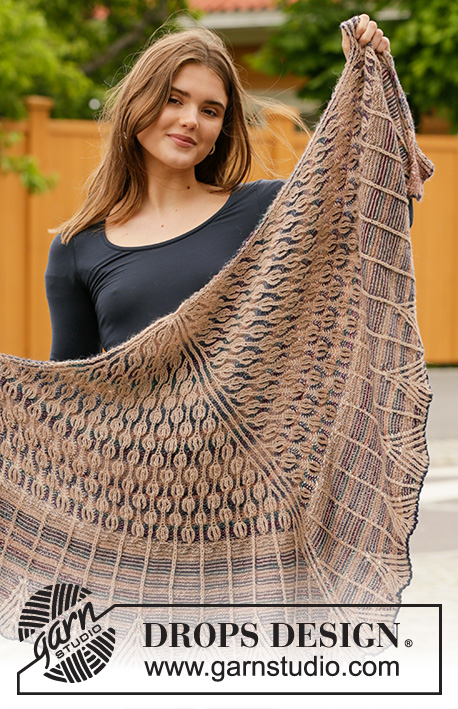
Owl Feathers |
|||||||||||||||||||||||||||||||||||||
 |
 |
||||||||||||||||||||||||||||||||||||
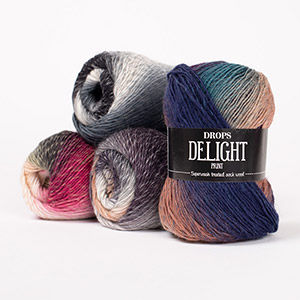
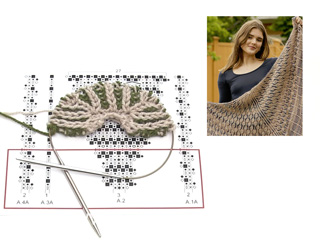
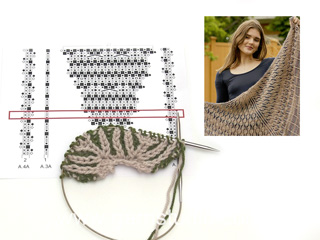
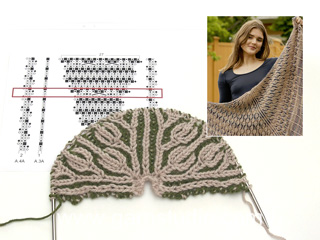
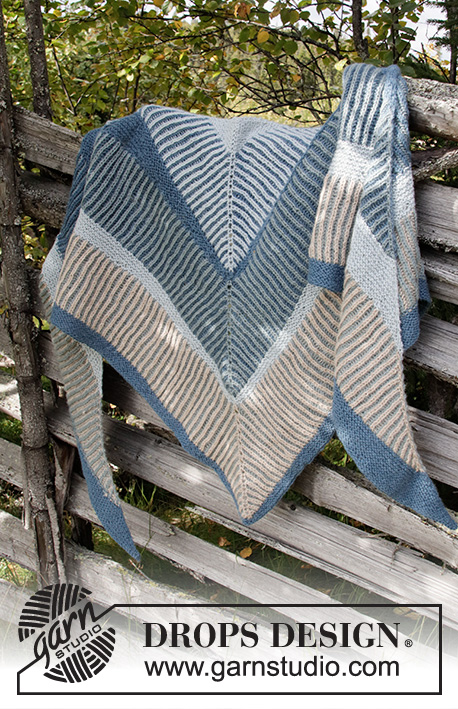
Knitted shawl in DROPS Delight and DROPS Alpaca. The piece is worked top down with stripes and 2-coloured leaf pattern in English rib.
DROPS 203-13 |
|||||||||||||||||||||||||||||||||||||
|
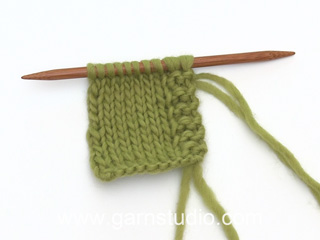
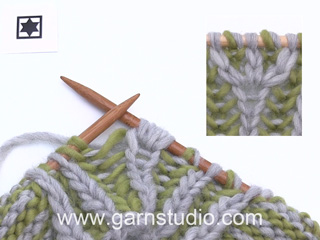
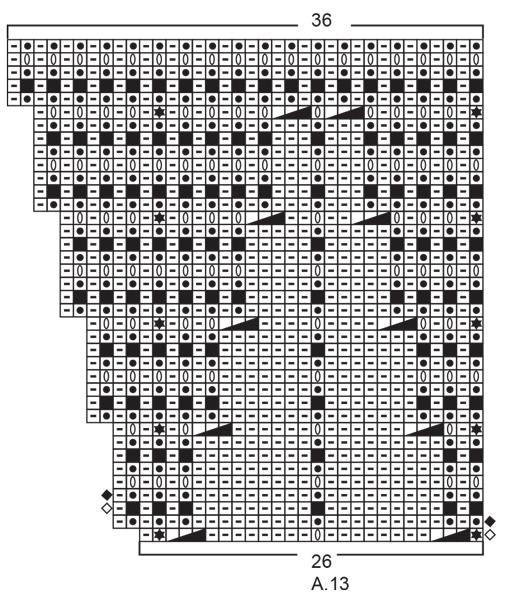
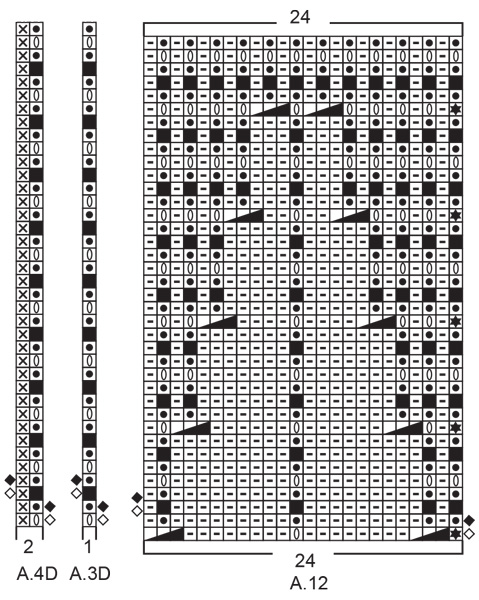
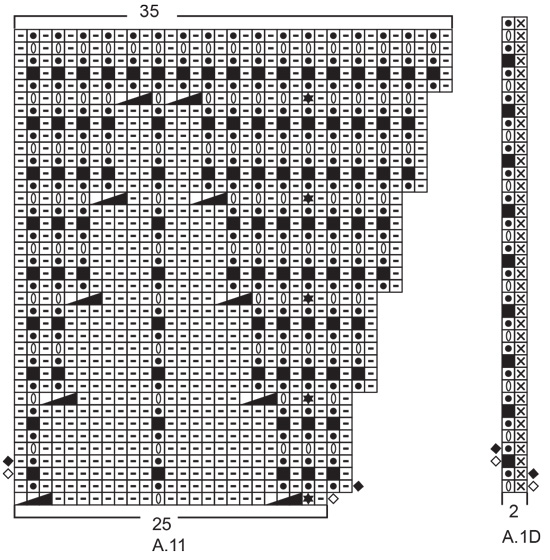
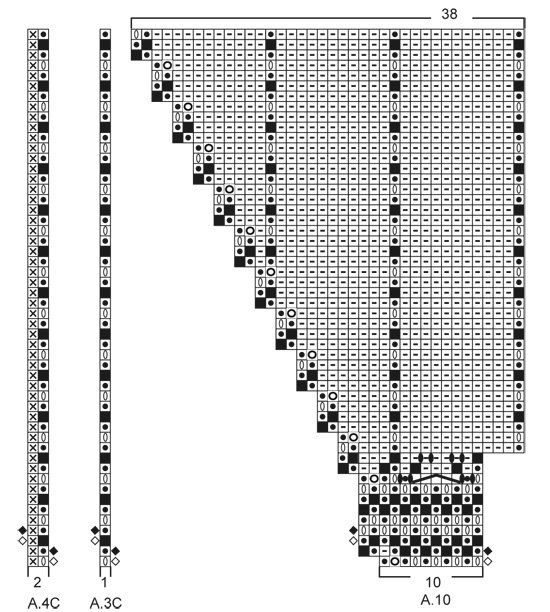
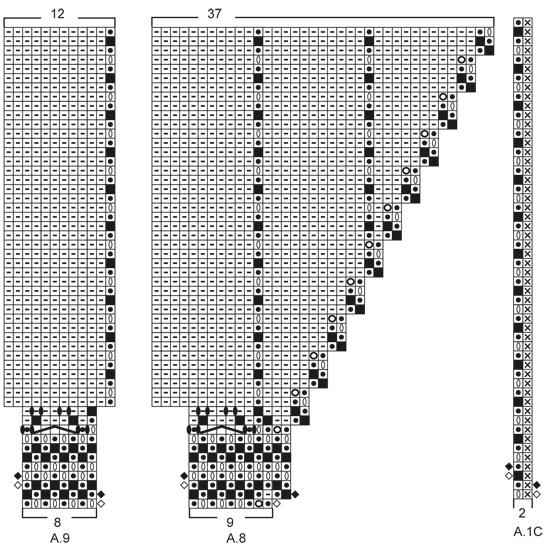
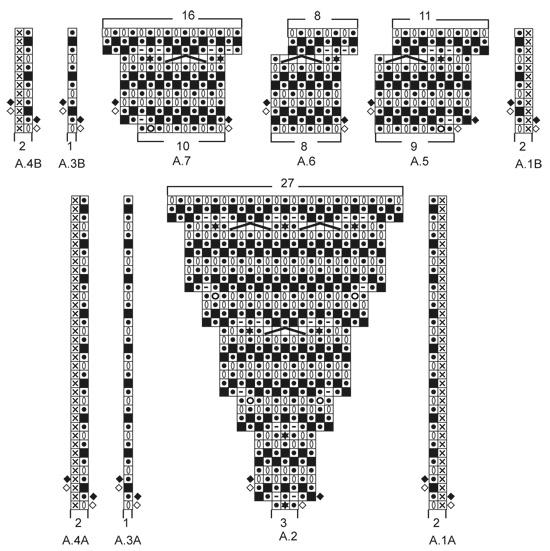
------------------------------------------------------- EXPLANATIONS FOR THE PATTERN: ------------------------------------------------------- RIDGE/GARTER STITCH (worked back and forth): Knit all rows. 1 ridge in height = Knit 2 rows. EDGE STITCH IN GARTER STITCH: As the pattern includes working 2 rows from the right side followed by 2 rows from the wrong side, the garter stitches need to be worked as follows: * Knit from the right side, purl from the right side, purl from the wrong side, knit from the wrong side *, work from *-*. The edge stitches are worked with double strand each time there are 2 strands on the same side. PATTERN: See diagrams A.1 to A.13. A.1 and A.4 = sides of shawl. A.3 = mid-stitch on shawl. 2-COLOURED PATTERN IN ENGLISH RIB (back and forth): The striped pattern is worked in English rib as shown in diagrams A.1 to A.13. To get the 2-coloured effect, the stripes are worked alternately with 1 row camel beige and 1 row fall forest. * Work 1 row from the right side with camel beige, push the stitches back to the far end of the needle, so the next row is also worked from the right side. Work this row with fall forest. Work 1 row from the wrong side with camel beige, push the stitches back to the far end of the needle, so the next row is also worked from the wrong side. Work this row with fall forest *, work from *-* to finished length. Empty and filled squares (outside the diagram); show if the row is worked from the right or wrong side. The square also shows whether the row is worked with camel beige or fall forest. Read KNITTING TIP-1 below. KNITTING TIP-1: If you are unsure which colour to use on the next row when working 2-coloured English rib, you can see the colour used on the previous round by looking at the edge stitches. KNITTING TIP-2 (number of stitches): All stitch-counts given when working English rib do not include the yarn overs; the yarn overs belong to the knitted stitches and they are counted together as 1 stitch. ------------------------------------------------------- START THE PIECE HERE: ------------------------------------------------------- SHAWL – SHORT OVERVIEW OF THE PIECE: The piece is worked back and forth with stripes and 2-coloured leaf pattern in English rib. The English rib pattern changes to reversed stocking stitch, with English rib stitches in vertical stripes between. Then the English rib stitches change to fan-pattern with reversed stocking stitch between. SHAWL: Cast on 6 stitches with circular needle size 3.5 mm and camel beige. Work the first row as follows (= wrong side): 1 edge stitch in GARTER STITCH – read description above, * 1 yarn over, purl 1 *, work from *-* until there is 1 stitch left on the row, 1 yarn over and finish with 1 edge stitch in garter stitch = 11 stitches. Work the next row with camel beige (= right side): 1 edge stitch in garter stitch, knit until there is 1 stitch left on the row (yarn overs are knitted twisted to avoid holes) and finish with 1 edge stitch in garter stitch. Work the next row with camel beige (= wrong side): 1 edge stitch in garter stitch, * 1 yarn over, slip 1 stitch as if to purl, knit 1 *, work from *-* until there is 1 stitch left before the edge stitch, 1 yarn over, slip 1 stitch as if to purl and finish with 1 edge stitch in garter stitch. Turn the piece. Then work 2-COLOURED PATTERN IN ENGLISH RIB and EDGE STITCH IN GARTER STITCH – read descriptions above. WORK A.1A, A.2, A.3A AND A.4A AS FOLLOWS: Starting from the right side. Work A.1A (= 2 stitches), A.2 (= 3 stitches), A.3A (= 1 mid-stitch), work A.2 (= 3 stitches) and finish with A.4A (= 2 stitches). Continue this pattern. When A.2 has been completed in height there are 59 stitches on the needle – read KNITTING TIP-2. The piece measures approx. 9 cm down the mid-stitch. WORK A.1B, A.5, A.6, A.7, A.3B AND A.4B AS FOLLOWS: Starting from the right side: Work A.1B (= 2 stitches), A.5 (= 9 stitches), A.6 (= 8 stitches), A.7 (= 10 stitches), work A.3B (= 1 mid-stitch), A.5 (= 9 stitches), A.6 (= 8 stitches), A.7 (= 10 stitches) and finish with A.4B (= 2 stitches). Continue this pattern. When A.6 has been completed in height there are 75 stitches on the needle. Continue by repeating A.1B, A.5, A.6, A.7, A.3B and A.4B in height; each time you have repeated the diagrams in height, you increase 16 stitches on the row and there is room for 1 more repeat of A.6 in width between each A.5 and A.7. Continue like this until A.6 has been worked a total of 13 times in height = 267 stitches on the row. The piece measures approx. 50 cm along the mid-stitch. WORK A.1C, A.8, A.9, A.10, A.3C AND A.4C AS FOLLOWS: Starting from the right side: Work A.1C (= 2 stitches), A.8 (= 9 stitches), A.9 over the next 112 stitches (= 14 repeats of 8 stitches), work A.10 (= 10 stitches), A.3C (= 1 mid-stitch), work A.8 (= 9 stitches), A.9 over the next 112 stitches (= 14 repeats of 8 stitches), A.10 (= 10 stitches) and finish with A.4C (= 2 stitches). Continue this pattern. When A.9 has been completed in height there are 491 stitches on the needle and the piece measures approx. 70 cm down the mid-stitch. WORK A.1D, A.11, A.12, A.13, A.3D AND A.4D AS FOLLOWS: Starting from the right side: Work A.1D (= 2 stitches), A.11 (= 25 stitches), A.12 over the next 192 stitches (= 8 repeats of 24 stitches), work A.13 (= 26 stitches), A.3D (= 1 mid-stitch), work A.11 (= 25 stitches), A.12 over the next 192 stitches (= 8 repeats of 24 stitches), A.13 (= 26 stitches) and finish with A.4D (= 2 stitches). Continue this pattern. When A.12 has been completed in height there are 531 stitches on the needle and the piece measures approx. 80 cm down the mid-stitch. Cast off using fall forest from the wrong side – with knit over knit, purl over purl – NOTE: The yarn overs are cast off as normal stitches – in addition make 1 extra yarn over between each stitch without a yarn over (this yarn over is worked as 1 stitch and then cast off as normal). Doing this gives the fans a nice, arched finish. |
|||||||||||||||||||||||||||||||||||||
Diagram explanations |
|||||||||||||||||||||||||||||||||||||
|
|||||||||||||||||||||||||||||||||||||
|
|||||||||||||||||||||||||||||||||||||
|
|||||||||||||||||||||||||||||||||||||
|
|||||||||||||||||||||||||||||||||||||
|
|||||||||||||||||||||||||||||||||||||
|
|||||||||||||||||||||||||||||||||||||
|
|||||||||||||||||||||||||||||||||||||
|
Have you made this or any other of our designs? Tag your pictures in social media with #dropsdesign so we can see them! Do you need help with this pattern?You'll find tutorial videos, a Comments/Questions area and more by visiting the pattern on garnstudio.com. © 1982-2024 DROPS Design A/S. We reserve all rights. This document, including all its sub-sections, has copyrights. Read more about what you can do with our patterns at the bottom of each pattern on our site. |
|||||||||||||||||||||||||||||||||||||


With over 40 years in knitting and crochet design, DROPS Design offers one of the most extensive collections of free patterns on the internet - translated to 17 languages. As of today we count 304 catalogues and 11422 patterns - 11422 of which are translated into English (UK/cm).
We work hard to bring you the best knitting and crochet have to offer, inspiration and advice as well as great quality yarns at incredible prices! Would you like to use our patterns for other than personal use? You can read what you are allowed to do in the Copyright text at the bottom of all our patterns. Happy crafting!
Comments / Questions (67)
Hallo, ich möchte dieses Tuch für meine Schwiegertochter stricken. Da sie sehr groß ist, möchte ich fragen, ob man das Tuch auch verlängern kann. Und wenn ja, wie. Vielen Dank für Ihre Hilfe. Liebe Grüße und danke für die tollen Anleitungen. Ich habe schon einige davon gestrickt.
11.05.2023 - 08:57DROPS Design answered:
Liebe Heidi, leider können wir nicht jede Anleitung nach jeder Anfrage anpassen, gerne können Sie mal Ihr DROPS Laden nach persönnlicher Hilfe bitten - oder schauen Sie vielleicht, ob Ihnen ein größres Tuch gefällt. Viel Spaß beim stricken!
11.05.2023 - 16:26Ik zit helemaal vast in het gedeelte van A1c, A8, A9, A3C en A4C. Op rij 10 staan zwarte vakjes, maar er is niet bij elke steek een omslag. Bijv. de 1e 3 zwarte vakjes van A8 kloppen, maar de 4e heeft dus geen omslag. Dit zelfde probleem is ook bij A9 en A10 van dezelfde rij. Wat doe ik hier fout? Alvast bedankt voor de hulp.
03.01.2023 - 18:16DROPS Design answered:
Dag Monica,
Bij de vierde steek in A.8 heb je op de vorige naald een omslag gemaakt en de steek averecht afgehaald. Deze omslag en afhaling brei je nu, in rij 10, samen. Bij A.10 is dit ook het geval, maar dan op het einde. Kan het zijn dat het 7e de symbool in de lijst, waarbij je 2 steken meerdert door 3 steken in een rechte steek en omslag te breien, verwarring heeft opgeleverd?
04.01.2023 - 21:01Why did you take the zoom feature off your patterns? I really miss it.
21.07.2022 - 17:19Kann ich alles bei Drops einssehen
08.06.2022 - 21:50DROPS Design answered:
Liebe Frau Koster, alle unsere Anleitungen können kostenlos gelesen und gedruckt werden. Am Ende jeder Anleitung-Seite finden Sie auch eine Liste von Lektionnen sowie Videotutorials, die Ihnen auch helfen kann. Gerne können Sie auch Ihre Frage hier stellen. Viel Spaß beim stricken!
09.06.2022 - 08:28Ce modèle est très joli mais pour tricoteurs/euses confirmé/es. J'ai pas mal galéré à le réaliser. Je tricote serré donc le châle est plus petit que sur l'image même si je l'ai étiré au maximum
05.02.2022 - 12:50Bonjour. J. ai fait des essais, vu les vidéos ms je n. arrive pas à démarrer ce modèle. Je n. arrive pas à comprendre, lorsqu. on arrive aux rangs envers 1°) suit-on le diagram de gauche à droite ou continue-t-on à suivre de droite à gauche ? 2°) Faut-il inverser 1 jete/ une m glissée à l. envers par 1 m glissée à l. endroit ? Et du coup le jeté se fait il après ? Merci de votre aide. J. ai hâte de le démarrer....
11.11.2021 - 00:02DROPS Design answered:
Bonjour Mme Delattre, dans ce modèle, vous alternez 2 rangs sur l'endroit et 2 rangs sur l'envers (cf côtes anglaises bicolores). Vous devez donc lire les 2 rangs sur l'endroit de droite à gauche et les 2 rangs sur l'envers de gauche à droite - suivez la légende des symboles, elle est adaptée aux rangs sur l'endroit et aux rangs sur l'envers. Pensez également que vous pouvez ralentir les vidéos pour prendre plus de temps à bien regarder si besoin. Bon tricot!
11.11.2021 - 08:58Your instructions made absolutely no sense at all. Who taught you how to write patterns??
11.10.2021 - 22:53Bonjour,dois je insérer un motif de A6 à côté du premier de chaque côté de la maille centrale ou bien juste avant la maille centrale de chaque côté. Cela bien sûr après avoir augmenté les 16 mailles. Merci de votre réponse
11.04.2021 - 10:09DROPS Design answered:
Bonjour Mme Chaignepain, quand A.5, A.6 et A.7 son terminés, vous avez 11+9+16 m (=35m); tricotez-les ainsi: A.5, 2x A.6, A.7 (=9+8+8+10 m), la fois suivante, vous aurez 3xA.6 de la même façon (=9+8+8+8+10m) et ainsi de suite. Et ceci de chaque côté de la maille centrale. Bon tricot!
12.04.2021 - 09:37Hvis jeg har fortått riktig, og det tviljer jeg på men...: 2. og 4. omgang hver syklus skal strikkes fra vrangen pga. at en tar arbeidet over på ny pinne. Dermed leser en 3. og 4. rad fra venstre mot høyre og speiler det en skal gjøre. (Vrangt blir rett osv.) Men hvorfor ikke strikke vanlig? Da leser en 2. og 4. omgang vrangt istedet og får like mye stress med det, men slipper å ta over masker. Evt. tar maskene over hele tiden slik at en slipper å lese mønsteret vrangt.
07.03.2021 - 23:31Jeg er i gang med dette smukke sjal, jeg har strikket pind 13 i første mønster, efter denne pind kan jeg ikke få maskeantallet til at passe jeg mangler 2 masker på hver side af midtermasken, jeg har lavet det om 100 gange uden resultat. Jeg er en virkelig erfaren strikker og har aldrig opgivet et projekt.
04.01.2021 - 14:28DROPS Design answered:
Hej Bettina, har du set videoen hvor vi strikker pind nr 13? Du skal få 2 nye masker i hver side af diagrammet (ialt 4 nye masker ifølge diagrammet). God fornøjelse!
15.01.2021 - 13:34