
Popular categories
Looking for a yarn?


|
|||||||||||||||||||
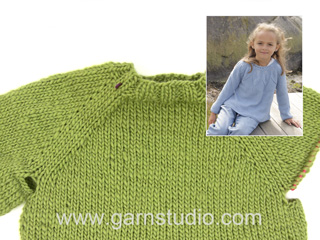
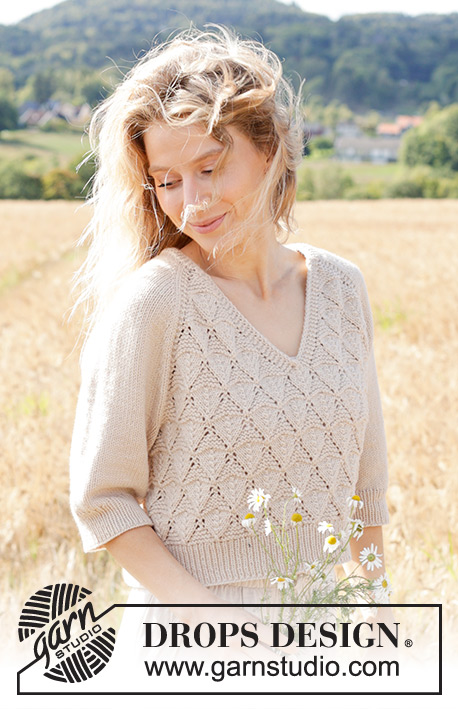
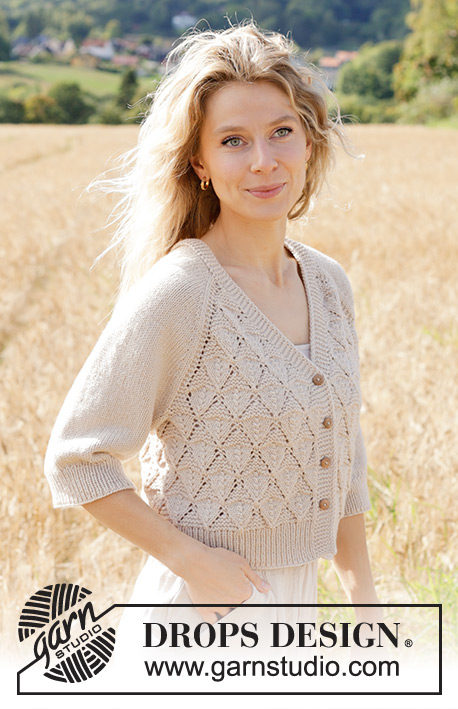
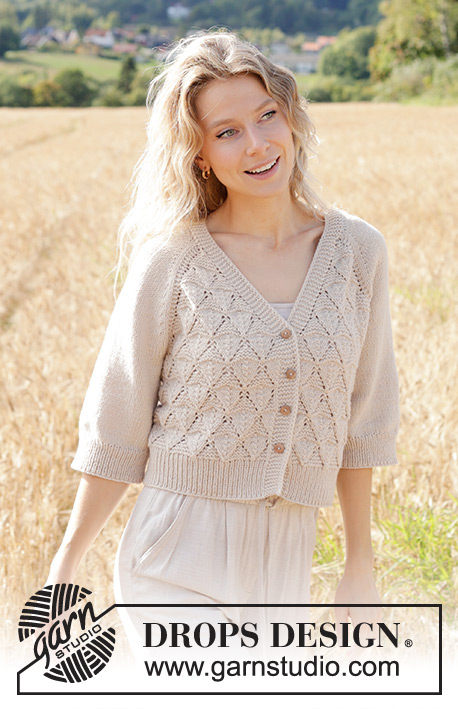
Sand Diamond Cardigan |
|||||||||||||||||||
 |
 |
||||||||||||||||||
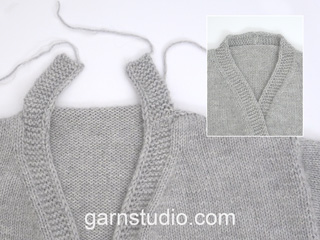
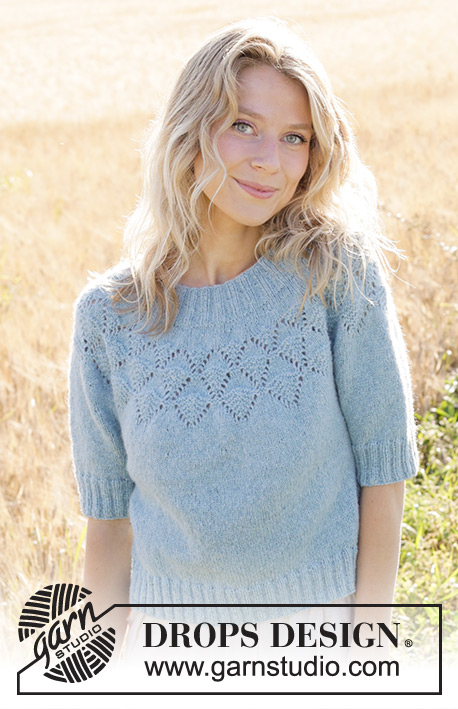
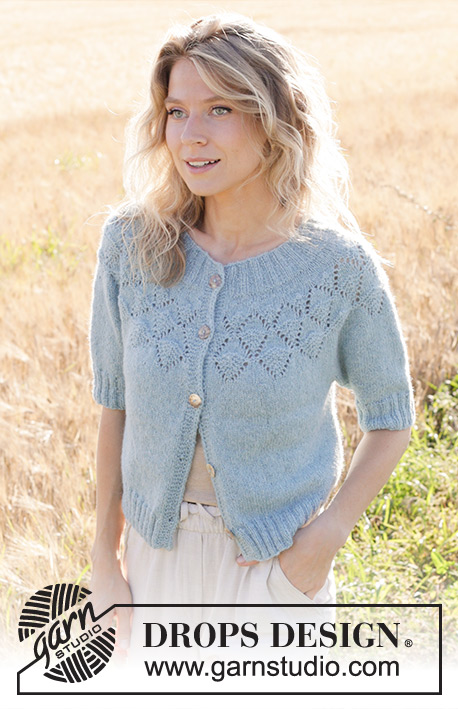
Knitted jacket in DROPS Daisy or DROPS Merino Extra Fine. The piece is worked top down with raglan, V-neck, lace pattern and ¾-length sleeves. Sizes S - XXXL.
DROPS 248-5 |
|||||||||||||||||||
|
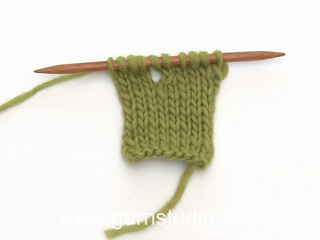
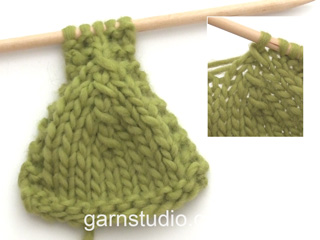
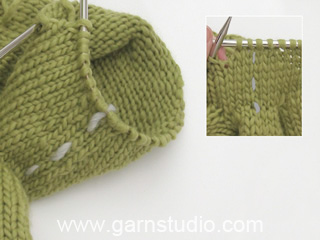
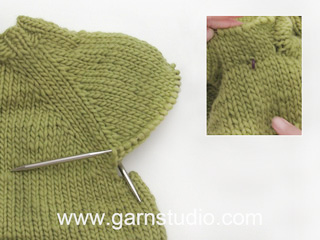
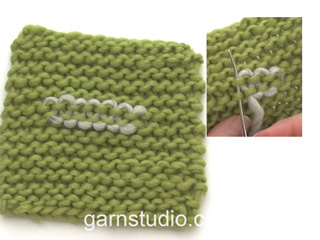
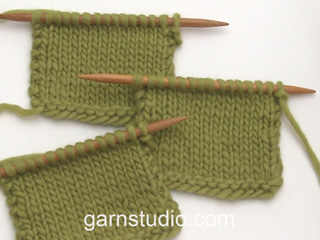
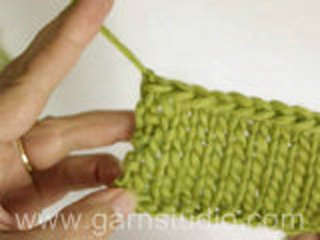
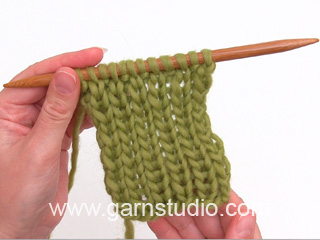
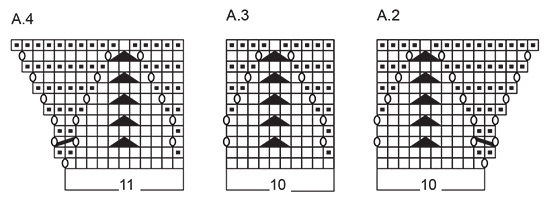
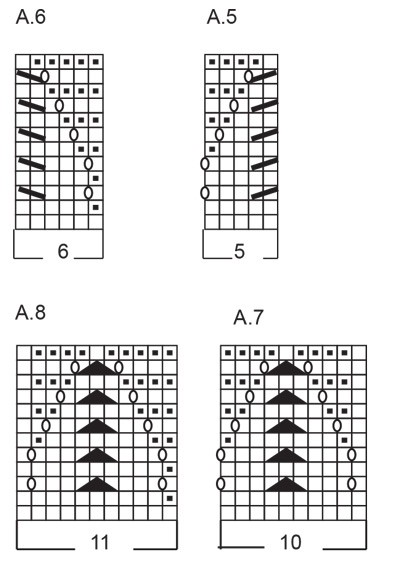
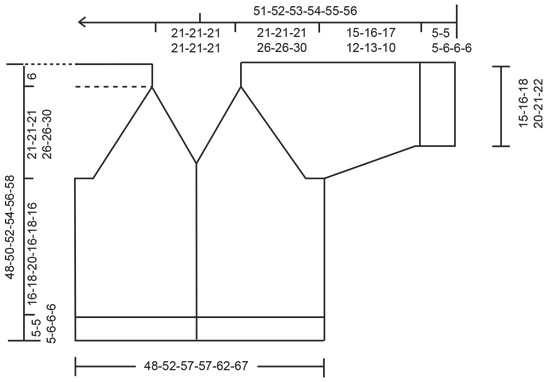
------------------------------------------------------- EXPLANATIONS FOR THE PATTERN: ------------------------------------------------------- GARTER STITCH (worked back and forth): Knit all rows, from both the right and wrong side. 1 ridge in height = knit 2 rows. PATTERN: See diagrams A.1 to A.8. The diagrams show all the rows in the pattern seen from the right side. RIGHT BAND WITH I-CORD: RIGHT SIDE: Work 10 garter stitches, slip 1 stitch purl-wise with strand in front, knit 1. WRONG SIDE: Slip 1 stitch purl-wise with strand in front, knit 1, 10 garter stitches. LEFT BAND WITH I-CORD: RIGHT SIDE: Slip 1 stitch purl-wise with strand in front, knit 1, 10 garter stitches. WRONG SIDE: Work 10 garter stitches, slip 1 stitch purl-wise with strand in front, knit 1. RAGLAN: Increase 1 stitch by making 1 yarn over, which is worked twisted on the next row. The new stitches are then worked in stocking stitch. BUTTONHOLES: Work the buttonholes on the right band from the right side. ROW 1: Work until there are 4 stitches left on the row, make 1 yarn over, knit 2 together, finish the band as before. ROW 2: Knit the yarn over (other band-stitches as before) to leave a hole. The first buttonhole is worked when the increases for V-neck are finished (front piece measures approx. 23 cm, from top of shoulder). The other buttonholes are worked when the front piece measures (from top of shoulder): S: 29, 36 and 43 cm M: 30, 38 and 45 cm L: 30, 39 and 47 cm XL: 30, 39 and 48 cm XXL: 31, 40 and 50 cm XXXL: 31, 41 and 52 cm (= the last buttonhole is worked in the transition between the stocking stitch and rib at the bottom of the front piece). DECREASE TIP (for sleeves): Decrease 1 stitch on each side of the marker-stitch as follows: Work until there are 2 stitches left before the marker-stitch, knit 2 together, knit 1 (= marker-stitch), slip 1 stitch knit-wise, knit 1 and pass the slipped stitch over the knitted stitch. ------------------------------------------------------- START THE PIECE HERE: ------------------------------------------------------- JACKET - SHORT OVERVIEW OF THE PIECE: The pattern uses both long and short needles; start with the length which fits the number of stitches and change when necessary. The piece is worked back and forth with circular needle, top down. Start by working 2 loose bands, then cast on stitches for the neckline between the bands and work the yoke back and forth. When the yoke is finished, divide for the body and sleeves. Continue the body back and forth, while the sleeves wait. The sleeves are then worked in the round. The bands are sewn together mid-back and sewn to the neckline. RIGHT BAND (when the garment is worn): Cast on 12 stitches with circular needle size 4 mm and DROPS Daisy or DROPS Merino Extra Fine. Work RIGHT BAND WITH I-CORD – read description above, back and forth for 4 cm. Now knit together the first 2 stitches from the right side (opposite side to the I-cord). Decrease like this every 3 cm a total of 5 times = 7 band stitches. Continue working until the band measures 21cm, finishing after a row from the wrong side. Cut the strand and lay the piece to one side. LEFT BAND (when the garment is worn): Cast on 12 stitches with circular needle size 4 mm. Work LEFT BAND WITH I-CORD – read description above, back and forth for 4 cm. Now knit together the last 2 stitches from the right side (opposite side to the I-cord). Decrease like this every 3 cm a total of 5 times = 7 band stitches. Continue working until the band measures 21 cm, finish after a row from the right side. Do not cut the strand. Cast on 99-99-99-103-103-103 stitches at the end of the row, then work the 7 stitches from the right band = 113-113-113-117-117-117 stitches. Work 1 row from the wrong side, purling the 99-99-99-103-103-103 cast on stitches and working the 7 band-stitches on each side as before. INFORMATION BEFORE CONTINUING. FRONT AND BACK PIECES: Lace pattern is now worked on the front and back pieces according to the diagrams.. The increases for the V-neck and raglan are drawn into the diagrams. When A.2, A.3 and A.4 have been worked 1 time in height, work 1 more repeat of A.3 between A.2 and A.4. SLEEVES: The sleeves are worked in stocking stitch and increased as described under RAGLAN. YOKE: Work the first row as follows from the right side: 7 band stitches as before, A.1, work 2 GARTER STITCHES – read description above, knit 2, increase 1 stitch for RAGLAN - read description above, 20-20-20-22-22-22 stocking stitches, increase 1 stitch for raglan, knit 2, 2 garter stitches, A,2, A.3 over the next 20 stitches, A.4, 2 garter stitches, knit 2, increase 1 stitch for raglan, 20-20-20-22-22-22 stocking stitches, increase 1 stitch for raglan, knit 2, 2 garter stitches, A.1 and 7 band stitches as before. REMEMBER THE KNITTING TENSION! FIND YOUR SIZE: Pattern is now worked differently in the different sizes. Continue from the section for your size. SIZE S: Increase for raglan and work pattern simultaneously as follows – read both RAGLAN and PATTERN before continuing. RAGLAN: Increase inside 2 stocking stitches on each side of the sleeves every 2nd row 4 times, then every 4th row 10 times = 14 increases on each side of each sleeve. PATTERN: When A.1 has been worked 1 time in height all increases are finished = 289 stitches. Work as follows from the right side: 7 band stitches, A.3 over the next 40 stitches, work the first stitch in A.3, 2 garter stitches, stocking stitch over the sleeve, 2 garter stitches, A.3 over the next 80 stitches, work the first stitch in A.3, 2 garter stitches, stocking stitch over the sleeve, 2 garter stitches, A.3 over the next 40 stitches, work the first stitch in A.3 and 7 band stitches – AT THE SAME TIME on this row work the first BUTTONHOLE – read description above! Work A.3 one time in height, the yoke measures approx. 27 cm from the shoulder. Continue from DIVIDE FOR BODY AND SLEEVES SIZES M-L: Increase for raglan and work pattern simultaneously as follows – read both RAGLAN and PATTERN before continuing. RAGLAN: Increase inside 2 stocking stitches on each side of the sleeves every 2nd row 3-2 times, then every 4th row 13-13 times = 16-15 increases on each side of each sleeve. PATTERN: When A.1 has been worked 1 time in height, the increases towards mid-front are finished; continue increasing for raglan in each transition between body and sleeves, working as follows from the right side: 7 band stitches, A.3 over the next 30 stitches, work A.4, 2 garter stitches, work and increase as before over the sleeve, 2 garter stitches, A.2, A.3 over the next 60 stitches, A.4, 2 garter stitches, work and increase as before over the sleeve, 2 garter stitches, A.2, A.3 over the next 30 stitches, work the first stitch in A.3 and 7 band stitches - AT THE SAME TIME on this row work the first BUTTONHOLE – read description above! Continue increasing like this until A.2, A.3 and A.4 have been worked 1-1 time in height. All increases are finished. There are 317-313 stitches and the yoke measures approx. 27-27 cm from the shoulder. Continue from DIVIDE FOR BODY AND SLEEVES. SIZES XL - XXL: Increase for raglan and work pattern simultaneously as follows – read both RAGLAN and PATTERN before continuing. RAGLAN: Increase inside 2 stocking stitches on each side of the sleeves every 2nd row 11-7 times, then every 4th row 12-14 times = 23-21 increases on each side of each sleeve. PATTERN: When A.1 has been worked 1 time in height, the increases towards mid-front are finished; continue increasing for raglan in each transition between body and sleeves, working as follows from the right side: 7 band stitches, A.3 over the next 30 stitches, work A.4, 2 garter stitches, work and increase as before over the sleeve, 2 garter stitches, A.2, A.3 over the next 60 stitches, A.4, 2 garter stitches, work and increase as before over the sleeve, 2 garter stitches, A.2, A.3 over the next 30 stitches, work the first stitch in A.3 and 7 band stitches - AT THE SAME TIME on this row work the first BUTTONHOLE – read description above! Continue increasing like this until A.2, A.3 and A.4 have been worked 1-1 time in height. Work as follows from the right side: 7 band stitches, A.5, A.3 over the next 30 stitches, work A.4, 2 garter stitches, work and increase as before over the sleeve, 2 garter stitches, A.2, A.3 over the next 70 stitches, A.4, 2 garter stitches, work and increase as before over the sleeve, 2 garter stitches, A.2, A.3 over the next 30 stitches, A.6 and 7 band stitches. Continue increasing like this until A.2, A.3 and A.4 have been worked 1-1 time in height. All increases are finished. There are 369-361 stitches and the yoke measures approx. 32-32 cm from the shoulder. Continue from DIVIDE FOR BODY AND SLEEVES. SIZE XXXL: Increase for raglan and work pattern simultaneously as follows – read both RAGLAN and PATTERN before continuing. RAGLAN: Increase inside 2 stocking stitches on each side of the sleeves every 2nd row 6 times, then every 4th row 17 times = 23 increases on each side of each sleeve. PATTERN: When A.1 has been worked 1 time in height, the increases towards mid-front are finished; continue increasing for raglan in each transition between body and sleeves, working as follows from the right side: 7 band stitches, A.3 over the next 30 stitches, work A.4, 2 garter stitches, work and increase as before over the sleeve, 2 garter stitches, A.2, A.3 over the next 60 stitches, A.4, 2 garter stitches, work and increase as before over the sleeve, 2 garter stitches, A.2, A.3 over the next 30 stitches, work the first stitch in A.3 and 7 band stitches - AT THE SAME TIME on this row work the first BUTTONHOLE – read description above! Continue increasing like this until A.2, A.3 and A.4 have been worked 1 time in height. Work as follows from the right side: 7 band stitches, A.5, A.3 over the next 30 stitches, work A.4, 2 garter stitches, work and increase as before over the sleeve, 2 garter stitches, A.2, A.3 over the next 70 stitches, A.4, 2 garter stitches, work and increase as before over the sleeve, 2 garter stitches, A.2, A.3 over the next 30 stitches, A.6 and 7 band stitches. Continue increasing like this until A.2, A.3 and A.4 have been worked 1 time in height. Work as follows from the right side: 7 band stitches, A.3 over the next 40 stitches, work A.4, 2 garter stitches, work and increase as before over the sleeve, 2 garter stitches, A.2, A.3 over the next 80 stitches, A.4, 2 garter stitches, work and increase as before over the sleeve, 2 garter stitches, A.2, A.3 over the next 40 stitches, work the first stitch in A.3 and 7 band stitches. Continue increasing like this until A.2, A.3 and A.4 have been worked 1 time in height. All increases are finished. There are 389 stitches and the yoke measures approx. 36 cm from the shoulder. Continue from DIVIDE FOR BODY AND SLEEVES. DIVIDE FOR BODY AND SLEEVES – ALL SIZES: Work as follows from the right side: Over the first 50-55-55-60-60-65 stitches, work the band and knit the other stitches (= left front piece), place the next 52-56-54-72-68-72 stitches on a thread for the sleeve, cast on 15-15-25-15-25-25 stitches under the sleeve, knit 85-95-95-105-105-115 stitches, place the next 52-56-54-72-68-72 stitches on a thread for the sleeve, cast on 15-15-25-15-25-25 stitches under the sleeve, knit and work the band over the last 50-55-55-60-60-65 stitches (= right front piece). BODY – ALL SIZES: = 215-235-255-255-275-295 stitches. FIND YOUR SIZE: Work the section for your size below. SIZES S - M - L- XXXL: Start from wrong side and work 2nd row in the diagrams as follows: Work 7 band stitches as before, A.6, A.3 until there are 12 stitches left, A.5 and 7 band stitches as before. Continue in pattern like this. NOTE! Start on row 3 in the diagrams. * Work 7 band stitches as before, A.5, A.3 until there are 13 stitches left, A.6 and 7 band stitches as before. Work the diagrams 1 time in height. Continue with 7 band stitches as before, A.7, A.3 until there are 18 stitches left, A.8 and 7 band stitches as before. Work the diagrams 1 time in height *. Work from *-* until the body measures 16-18-20-16 cm, finishing after a complete repeat of A.3 in height. Go to ALL SIZES. SIZES XL - XXL: Start from wrong side and work 2nd row in the diagrams as follows: Work 7 band stitches as before, A.8, A.3 until there are 17 stitches left, A.7 and 7 band stitches as before. Continue in pattern like this. NOTE! Start on row 3 in the diagrams. * Work 7 band stitches as before, A.7, A.3 until there are 18 stitches left, A.8 and 7 band stitches as before. Work the diagrams 1 time in height. Work 7 band stitches as before, A.5, A.3 until there are 13 stitches left, A.6 and 7 band stitches as before. Work the diagrams 1 time in height *. Work from *-* until the body measures 18-16 cm, finishing after a complete repeat of A.3 in height. Go to ALL SIZES. ALL SIZES: On the next row (= right side) begin the rib, AT THE SAME TIME increase 42-42-48-48-48-58 stitches evenly on the row = 257-277-303-303-323-353 stitches, working as follows: Change to circular needle size 3 mm, work 7 band stitches as before, rib (knit 1, purl 1 – remember the increases) until there are 8 stitches left, knit 1 and 7 band stitches as before. When the rib measures 5-5-5-6-6-6 cm, cast off. The jacket measures approx. 48-50-52-54-56-58 cm from the shoulder. SLEEVES: Place the 52-56-54-72-68-72 stitches from the thread on one side of the piece on circular needle size 4 mm and knit up 1 stitch in each of the 15-15-25-15-25-25 stitches cast on under the sleeve = 67-71-79-87-93-97 stitches. Insert 1 marker in the middle stitch of the 15-15-25-15-25-25 stitches under the sleeve – start the round just before this marker-stitch. Work stocking stitch in the round. When the sleeve measures 3 cm from the division, decrease under the sleeve – read DECREASE TIP, repeat this decrease when the sleeve measures 8-8-9-6-6-6 cm = 63-67-75-83-89-93 stitches. Work until the sleeve measures 15-16-17-12-13-10 cm from the division. Change to double pointed needles size 3 mm. Work rib (knit 1, purl 1), AT THE SAME TIME increase 13-13-15-17-19-19 stitches evenly on round 1 = 76-80-90-100-108-112 stitches. Cast off when the rib measures 5-5-5-6-6-6 cm. ASSEMBLY: Sew the buttons onto the left band. Sew the bands together mid-back, then sew the bands to the neckline, stretching the bands a little to sew it on. |
|||||||||||||||||||
Diagram explanations |
|||||||||||||||||||
|
|||||||||||||||||||

|
|||||||||||||||||||
|
|||||||||||||||||||
|
|||||||||||||||||||
|
|||||||||||||||||||
|
Have you made this or any other of our designs? Tag your pictures in social media with #dropsdesign so we can see them! Do you need help with this pattern?You'll find tutorial videos, a Comments/Questions area and more by visiting the pattern on garnstudio.com. © 1982-2024 DROPS Design A/S. We reserve all rights. This document, including all its sub-sections, has copyrights. Read more about what you can do with our patterns at the bottom of each pattern on our site. |
|||||||||||||||||||


With over 40 years in knitting and crochet design, DROPS Design offers one of the most extensive collections of free patterns on the internet - translated to 17 languages. As of today we count 304 catalogues and 11422 patterns - 11422 of which are translated into English (UK/cm).
We work hard to bring you the best knitting and crochet have to offer, inspiration and advice as well as great quality yarns at incredible prices! Would you like to use our patterns for other than personal use? You can read what you are allowed to do in the Copyright text at the bottom of all our patterns. Happy crafting!
Comments / Questions (67)
Hej! Jag stickar storlek M och det står att när A1 är färdigstickat ska man göra det första knapphålet och stycket ska vara ca 23 cm. Det är omöjligt eftersom stickfastheten är 28 m på höjden och A1 är 48 varv. För att det ens ska bli 20 cm krävs 56 varv om man ska hålla stickfastheten. Jag har stickat efter stickfastheten, så mitt sycke är ca 18 cm efter att jag stcikat A1 en gång. Hur ska jag tänka? Det blir alldeles för kort. Med vänliga häslningar Monica
09.04.2024 - 09:08DROPS Design answered:
Hej Monica, stemmer det ikke når du tæller det øverste stykke med op til skulderen (som er strikket uden mønster)?
09.04.2024 - 11:51Czy przerabiając w kolejności na prawej stronie robótki :A1-rękaw-A2-A3-A4- rekaw- A1, to potem na lewej stronie w takiej samej kolejności? Czy w odwrotnej czyli A1-rekaw-A4-A3-A2-rękaw-A1 ? I schemat A2 ma 10 oczy, a A4 11 oczy raportu. Czy to prawidłowe? Pozdrawiam
07.04.2024 - 09:27DROPS Design answered:
Witaj Basiu, na lewej stronie schematy zaczynasz w odwrotnej kolejności, czyli tutaj będzie A1-rekaw-A4-A3-A2-rękaw-A1. Zobacz także kurs DROPS TUTAJ. Schemat A2 ma 10 oczek, a A4 11 oczek i jest to poprawne. Pozdrawiamy!
08.04.2024 - 08:23Comments on the question of Cindy van Rheenen and Valerie Valcke: I understand your confusion, I had the same experience, but: On the back part you knit once A2 (over 10 stitches), TWICE A3 (over 20 stitches) en once A4 (over 11) ; there are 41 stitches for the back, and these stitches increase to 43. When you knit it this way, the 113 and 117 stitches are correct.
05.04.2024 - 18:14Maat S: voor pas zijn er in totaal 113 steken ( 7 +99+7). De eerste naald zijn er echter maar 7+89 +7 steken die beschreven worden. Ik zag de opmerking reeds hiervoor. Wat is de beste oplossing eerste rij met 10 verminderen of waar pas je in de eerste rij de 10 extra steken.
02.04.2024 - 20:22Voor maat XL kom ik bij de pas uit op 107 steken ipv de 117 steken die ik zou moeten hebben.
25.03.2024 - 11:11DROPS Design answered:
Dag Cindy,
Je hebt 7 steken van de voorbies, dan zet je 103 steken op en tot slot brei je de 7 steken van de andere voorbies. Dit is in totaal (103 + 7 + 7 =) 117 steken. Op een andere plek dan daar zie ik niet waar je 117 steken moet hebben.
27.03.2024 - 13:31Ska ökningar för raglan göras både på aviga o rät sidan när oket stickas? Hur många maskor ska det finnas på arbetet efter att ojet stickas i storlek XL? Förtydliga gärna mönstret?
24.03.2024 - 09:13DROPS Design answered:
Hej Ulla, du tager ud til raglan på hver pind som strikkes fra retsiden, du tager ud ifølge diagrammet :)
03.04.2024 - 15:02Hur ska jag tänka kring aviga varven när jag stickar mönstret? Kan ni förtydliga lite mer kring ”sticka och öka som tidigare över maskorna till ärm,” Tack !
19.03.2024 - 17:43DROPS Design answered:
Hei Karin. 1) På de fleste pinnene der det strikkes mønster, strikkes det vrang fra vrangen (les diagramforklaringen til blank rute) eller rett fra vrangen (les diagramforklaringen ruten med en liten sort firkant). 2) Under STORLEK ..(str.).. står det forklart hvordan mønstret strikkes og raglan strikkes, dette gjøres samtidig og når A.1 er strikket 1 gang i høyden er økningene mot midt foran ferdig, men det skal økes videre til raglan i hver overgang mellom bol og erme. Har du fremdeles problemer? Sendt et nytt spørsmål, men husk å oppgi hvilken str. du strikker, da vi kan gi et mer spesefikt svar. mvh DROPS Design
02.04.2024 - 10:07Love the new size highlighting button on the pattern .
13.03.2024 - 12:42Efter A2,står A3 över de nästa 20m varför inte skriva A3 ,2 ggr svårt förstå vad ni menar med över de nästa 20 m
12.03.2024 - 21:59Hej! Hur jag än räknar och räknar får jag inte ihop det första varvet . När jag summerar maskorna exkl kantmaskor under rubriken OK blir det 89 maskor och skall vara 99. Mvh Anna
04.03.2024 - 08:29DROPS Design answered:
Hej Anna. Jag tror du kanske missar A.2 = 10 m. Efter det stickar du A.3 över 20 m. Du ska sticka såhär: 1+2+2+20+2+2+10+20+11+2+2+20+2+2+1=99m. Mvh DROPS Design
05.03.2024 - 08:27