DROPS Denim
DROPS Denim
100% Cotton
Discontinued
find alternatives
DROPS SS24

Summer Festival

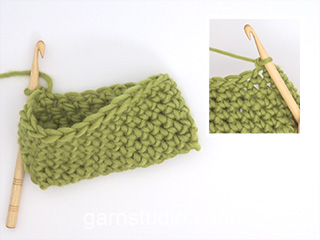
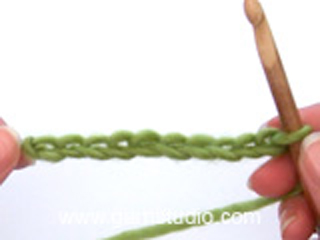
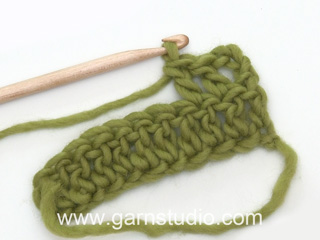
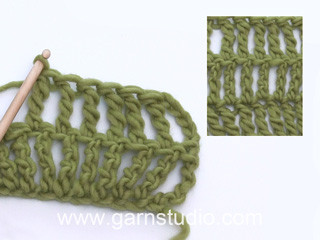
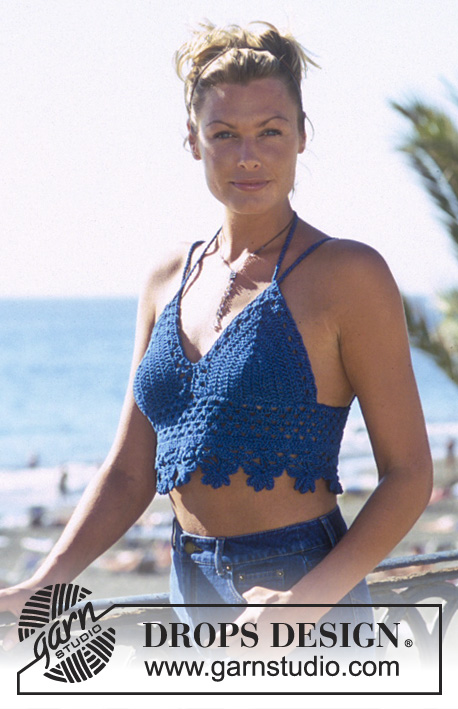
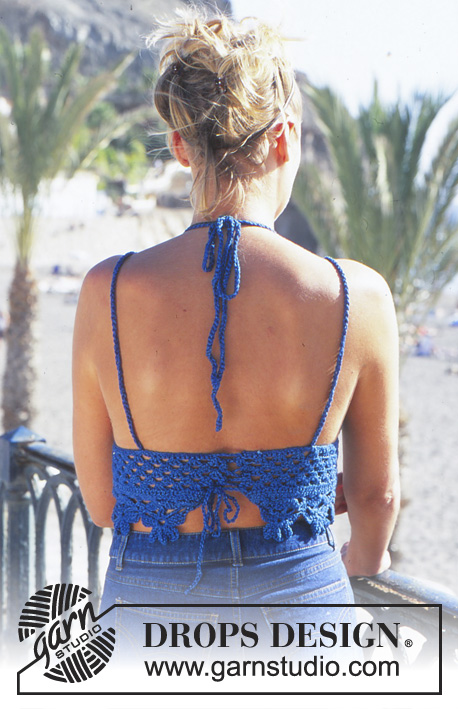
Crochet top and bottom edge on skirt in DROPS Den-M-nit or Cotton Light

DROPS 69-3
DROPS design: Pattern no R-379
----------------------------------------------------------

Size: S - M - L
Materials: DROPS Den-M-nit from Garnstudio
150-150-200 g colour no 51, blue

or use
DROPS Cotton Light from Garnstudio
150-150-200 g colour no 33, blue bonnet

DROPS Crochet hook size 3.5 mm

-------------------------------------------------------

Alternative Yarn – See how to change yarns here
Yarn Groups A to F – Use the same pattern and change the yarn here
Yarn usage using an alternative yarn – Use our yarn converter here

-------------------------------------------------------

DROPS Denim
DROPS Denim
100% Cotton
Discontinued
find alternatives

Pattern instructions

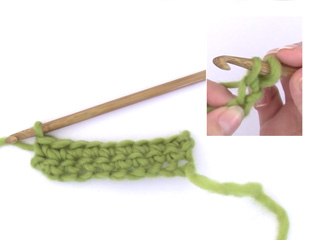
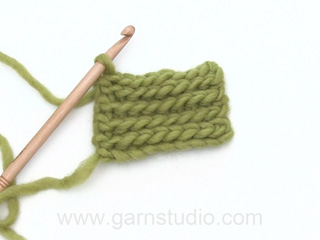
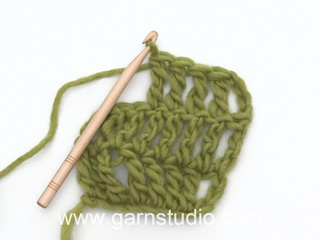
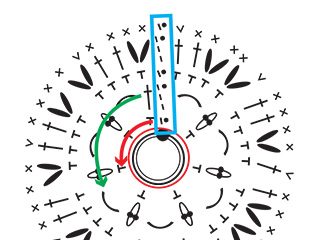
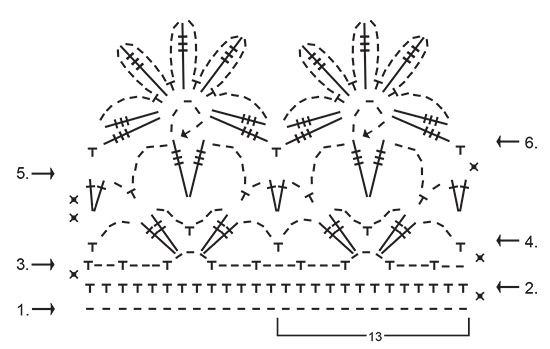
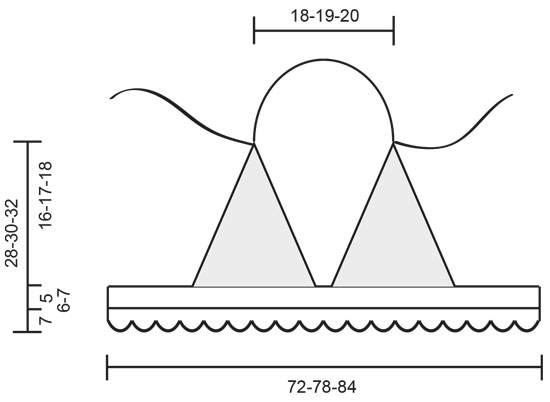
Crochet tension: 18 tr x 10 rows on hook size 3.5 mm = 10 x 10 cm. 1 repetition in diagram 1 (i.e. 1 flower) = approx. 6.5 cm in width. Remember hook size is only a guide.

DROPS TOP
Bra cup: Work a row with 9-11-13 ch with blue on hook size 3.5 mm. Then work tr up along one side of ch-row (first tr is replaced with 2 ch). In the top ch work 2 tr, 1 ch, 2 tr, continue with tr down on the other side of ch-row. Turn piece, work tr back and forth on each side of middle row - in ch at the top work 2 tr, 1 ch and 2 tr on every row. Remember the crochet tension! Work 6-7-8 rows back and forth. Work next row as follows: 2 ch + 2 tr in first tr from previous row, * 1 ch, skip 2 tr, 3 tr in next tr *, repeat from *-* up to top, in ch at the top work as follows: 3 tr, 1 ch, 2 tr. Continue from *-* down the other side. Work 1 more row like this. Work another bra cup.

Top: Now place the 2 bra cups tog into a top. Work 1 row with 37-39-41 loose ch, then work 35-39-43 sl sts along one cup, 1 ch between cups and 35-39-43 sl sts along the other cup, finish with 37-39-41 ch. Work 1 row with 1 dc in every ch = 145-157-169 dc. Work next row as follows: 3 tr in first dc, * 1 ch, skip 3 dc, 3 tr in next dc *, repeat from *-* the entire row (= 36-39-42 times). Work 5-6-7 rows with this pattern. Then work diagram 1 - beg on 2nd row = 145-157-169 dc. There should be 11-12-13 flowers in bottom edge with 13 sts each = 143-156-169 sts, i.e. on next row dec on size S: 2 sts and size M: 1 st (no dec on size L) - dec by skipping 1 st. NOTE: On size S and L there should be 1 flower mid front. On size M there should be a space between 2 flowers mid front.

Assembly: Sew tog the 2 bra cups mid front approx. 5 cm up.

Work on hook size 3.5 with 2 strands Den-M-nit or Cotton Light: Work 3 ch-strings of approx. 100 cm each.

Use 2 of the string for straps. Fasten 1 string in the middle of each back piece, then thread string into hole at the top of bra cup on matching front piece. Tie strings in the back of neck. Use the last string to tie top tog mid back. Beg by threading string at the top in alternately right and left side on back piece to form at cross down the back.
________________________________________


CROCHET EDGE ON SKIRT.

The bottom row on top, (i.e. the row with flower) can be worked separately to desired length and sew on in bottom edge of a skirt or pants.

Materials: See top.

50 g = approx. 12 flowers.

Crochet border: Measure around the skirt and find out how many flowers will fit - 1 flower = approx. 6.5 cm in width. Work 13 ch on 1st row per flower. Then work according to diagram 1.

This pattern has been corrected.

Updated online: 25.08.2023
Correction in diagram - a double crochet has been added at the end of the 3rd row.

Diagram

symbols = 1 ch
symbols = 1 dc
symbols = 1 sl st
symbols = 1 tr
symbols = 1 dtr
symbols = 1 triple tr
symbols = ch to turn piece
diagram
diagram
Do you have a question? See a list of frequently asked questions (FAQ)

Knitting tension is what determines the final measurements of your work, and is usually measured per 10 x 10 cm. It is provided like so: number of stitches in width x number of rows in height - eg: 19 stitches x 26 rows = 10 x 10 cm.

The knitting tension is very individual; some people knit/crochet loosely while others work tightly. You adjust the knitting tension with the needle size, which is why the suggested needle size is only meant as a guide! You need to adjust this (up or down) to ensure that YOUR knitting tension matches the knitting tension provided in the pattern. If you work with a different knitting tension than provided you will have a different yarn consumption, and your work will have different measurements than what the pattern suggests.

The knitting tension also determines which yarns can replace each other. As long as you achieve the same knitting tension you can replace one yarn with another.

See DROPS lesson: How to measure your tension/gauge

See DROPS video: How to make a gauge tension swatch

The required amount of yarn is provided in grams, eg: 450 g. To calculate how many balls you’ll need you first need to know how many grams are in 1 ball (25g, 50g or 100g). This information is available if you click on the individual yarn quality on our pages. Divide the amount required with the amount of each ball. For example, if each ball is 50g (the most common amount), the calculation will be as follows: 450 / 50 = 9 balls.

The important thing when changing from one yarn to another is that the knitting/crochet tension remains the same. This is so that the measurements of the finished piece will be the same as on the sketch provided. It is easier to achieve the same knitting tension using yarns from the same yarn group. It is also possible to work with multiple strands of a thinner yarn to achieve the knitting tension of a thicker one. Please try our yarn converter. We recommend you to always work a test swatch.

Please NOTE: when changing yarn the garment might have a different look and feel to the garment in the photo, due to individual properties and qualities of each yarn.

See DROPS lesson: Can I use a different yarn than the one mentioned in the pattern?

All our yarns are categorised into yarn groups (from A to F) according to thickness and knitting tension – group A contains the thinnest yarns and group F the thickest. This makes it easier for you to find alternative yarns to our patterns, should you wish to switch yarn. All yarns within the same group have a similar knitting tension and can easily replace each other. However, different yarn qualities have different structures and properties which will give the finished work a unique look and feel.

Click here for an overview of the yarns in each yarn group

At the top of all our patterns you’ll find a link to our yarn calculator, which is a helpful tool should you wish to use a different yarn than suggested. By filling in the yarn quality you wish to replace, the amount (in your size) and number of strands, the calculator will present good alternative yarns with the same knitting tension. Additionally it will tell you how much you’ll require in the new qualities and whether you’ll need to work with multiple strands. Most skeins are 50g (some are 25g or 100g).

If the pattern is worked with multiple colours, every colour will have to be calculated separately. Similarly, if the pattern is worked with several strands of different yarns (for example 1 strand Alpaca and 1 strand Kid-Silk) you will have to find alternatives for each, individually.

Click here to see our yarn calculator

Since different yarns have different qualities and textures we have chosen to keep the original yarn in our patterns. However, you can easily find options among our available qualities by using our yarn calculator, or simply pick a yarn from the same yarn group.

It is possible that some retailers still have discontinued yarns in stock, or that someone has a few skeins at home that they would like to find patterns for.

The yarn calculator will provide both alternative yarn as well as required amount in the new quality.

If you think it's hard to decide what size to make, it can be a good idea to measure a garment you own already and like the size of. Then you can pick the size by comparing those measures with the ones available in the pattern's size chart.

You'll find the size chart at the bottom of the pattern.

See DROPS lesson: How to read size chart

The needle size provided in the pattern serves only as a guide, the important thing is to follow the knitting tension. And since knitting tension is very individual, you will have to adjust the needle size to ensure that YOUR tension is the same as in the pattern – maybe you’ll have to adjust 1, or even 2 needle sizes, up or down to achieve the correct tension. For this, we recommend that you work test swatches.

Should you work with a different knitting tension than the one provided, the measurements of the finished garment might deviate from the measurement sketch.

See DROPS lesson: How to measure your tension/gauge

See DROPS video: How to make a tension/gauge swatch

Working a garment top-down provides more flexibility and room for personal adjustment. For example it is easier to try the garment on while working, as well as making adjustments to length of yoke and shoulder caps.

The instructions are carefully explaining every step, in the correct order. Diagrams are adjusted to the knitting direction and are worked as usual.

The diagram depicts all rows/rounds, and every stitch seen from the right side. It is read from bottom to top, from right to left. 1 square = 1 stitch.

When working back and forth, every other row is worked from the right side and every other row is worked from the wrong side. When working from the wrong side, the diagram will have to be worked reversed: from left to right, knit stitches are purled, purl stitches are knit etc.

When working in the round every round is worked from the right side and the diagram are worked from right to left on all rounds.

See DROPS lesson: How to read knitting diagrams

The diagram depicts all rows/rounds, and every stitch seen from the right side. It is worked from bottom to top, from right to left.

When working back and forth every other row is worked from the right side: from right to left and every other row is worked from the wrong side: from left to right.

When working in the round, every row in the diagram are worked from the right side, from right to left.

When working a circular diagram you start in the middle and work your way outwards, counter clockwise, row by row.

The rows usually start with a given number of chain stitches (equivalent to the height of the following stitch), this will either be depicted in the diagram or explained in the pattern.

See DROPS lesson: How to read crochet diagrams

Instructions for working several diagrams after each other on the same row/round, will often be written like so: “work A.1, A.2, A.3 a total of 0-0-2-3-4 times". This means you work A.1 once, then A.2 is worked once, and A.3 is repeated (in width) the number of times provided for your size – in this case like so: S = 0 times, M = 0 times, L=2 times, XL= 3 times and XXL = 4 times.

The diagrams are worked as usual: begin with the first row in A.1, then work the first row in A.2 etc.

See DROPS lesson: How to read knitting diagrams

See DROPS lesson: How to read crochet diagrams

The total width of the garment (from wrist-to-wrist) will be larger in the larger sizes, despite the actual sleeves being shorter. The larger sizes have longer sleeve caps and wider shoulders, so there will be a good fit in all sizes.

The measurement sketch/schematic drawing provides information regarding the full length of the garment. If it’s a jumper or a jacket the length is measured from the highest point on the shoulder closest to the neckline, and straight down to the bottom of the garment. It is NOT measured from the tip of shoulder. Similarly, the length of yoke is measured from the highest point on the shoulder and down to where yoke is split into body and sleeves.

On a jacket measures are never taken along bands, unless specifically stated. Always measure inside band stitches when measuring the length.

See DROPS lesson: How to read a schematic drawing

Diagrams are often repeated on the round or in height. 1 repeat is the diagram the way it appears in the pattern. If it says to work 5 repeats of A.1 in the round, then you work A.1 a total of 5 times after/next to each other in the round. If it says to work 2 repeats of A.1 vertically/in height you work the entire diagram once, then begin again at the start and work the entire diagram one more time.

Chain stitches are slightly narrower than other stitches and to avoid working the cast-on edge too tight, we simply chain more stitches to begin with. The stitch count will be adjusted on the following row to fit the pattern and measurement sketch.

The rib edge is more elastic and will contract slightly compared to, for example, stocking stitch. By increasing before the rib edge, you avoid a visible difference in width between the rib edge and the rest of the body.

It’s very easy to cast off too tightly, and by making yarn overs while casting off (and simultaneously casting these off) you avoid a too tight cast off edge.

See DROPS video: How to bind off with yarn overs (yo)

To achieve an even increase (or decrease) you can increase on, for example: every 3rd and 4th row alternately, like so: work 2 rows and increase on the 3rd row, work 3 rows and increase on the 4th. Repeat this until the increase is complete.

See DROPS lesson: Increase or decrease 1 st on every 3rd and 4th row alternately

Should you prefer to work in the round instead of back and forth, you may of course adjust the pattern. You’ll need to add steeks mid-front (usually 5 stitches), and follow the instructions. When you would normally turn and work from the wrong side, simply work across the steek and continue in the round. At the end you’ll cut the piece open, pick up stitches to work bands, and cover the cut edges.

See DROPS video: How to knit steeks and cut open

Should you prefer to work back and forth instead of in the round, you may of course adjust the pattern so you work the pieces separately and then assemble them at the end. Divide the stitches for the body in 2, add 1 edge stitch in each side (for sewing) and work the front and back pieces separately.

See DROPS lesson: Can I adapt a pattern for circular needles into straight needles?

Pattern repeats can vary slightly in the different sizes, in order to get the correct proportions. If you’re not working the exact same size as the garment in the photo, yours might deviate slightly. This has been carefully developed and adjusted so that the complete impression of the garment is the same in all sizes.

Make sure to follow instructions and diagrams for your size!

If you have found a pattern you like which is available in women’s size it’s not very difficult to convert it to men’s size. The biggest difference will be the length of sleeves and body. Start working on the women size that you think would fit across the chest. The additional length will be worked right before you cast off for the armhole/sleeve cap. If the pattern is worked top-down you can add the length right after the armhole or before the first decrease on sleeve.

Regarding additional yarn amount, this will depend on how much length you add, but it is better with a skein too many than too few.

All yarns will have excess fibres (from production) that might come off as lint or shedding. Brushed yarns (ie hairier yarns) have more of these loose, excess fibres, causing more shedding.

Shedding also depends on what is worn under or over the garment, and whether this pulls at the yarn fibres. It’s therefore not possible to guarantee that there will be no shedding

Below are some tips on how to get the best result when working with hairier yarns:

1. When the garment is finished (before you wash it) shake it vigorously so the looser hairs come off. NOTE: do NOT use a lint roller, brush or any method that pulls at the yarn.

2. Place the garment in a plastic bag and put it in your freezer - the temperature will cause the fibres to become less attached to each other, and excess fibres will come off easier.

3. Leave in the freezer for a few hours before taking it out and shaking it again.

4. Wash the garment according to the instructions on the yarn label.

Pilling is a natural process that happens to even the most exclusive of fibers. It's a natural sign of wear and tear that is hard to avoid, and that is most visible in high friction areas of your garment like a sweater's arms and cuffs.

You can make your garment look as new by removing the pilling, using a fabric comb or a pill/lint remover.

Still can't find the answer you need? Then scroll down and leave your question so one of our experts can try to help you. This will be done normally within 5 to 10 working days.
In the meantime, you can read the questions and answers that others have left to this pattern or join the DROPS Workshop on Facebook to get help from fellow knitters/crocheters!

You might also like...

Post a comment to pattern DROPS 69-3

We would love to hear what you have to say about this pattern!

If you want to leave a question, please make sure you select the correct category in the form below, to speed up the answering process. Required fields are marked *.

Comments / Questions (66)

country flag Anne wrote:

I'm struggling with starting the flower pattern. I am doing the small size so I initially have 145 stitches. The pattern says 'on next row on size S dec 2 stitches by skipping first stitch. (1) which row is the 'next row' please? (2) How do you decrease the second stitch to go from 145 to 143? (3) In row 3 how does the turning chain work- does the first DC go into the bottom of the turning chain? (4) At the end of row 3 how does it work as it seems to end with two chains? Thanks

22.06.2023 - 11:08

DROPS Design answered:

Dear Anne, skip 2 stitches evenly when working the 2nd row in the diagram, so that there are 143 sts at the end of this row, and then enough stitches to work a total of 11 repeats of 13 sts each. See the arrows showing the crochet directions, last symbol in diagram shows the turning chain, so at the beg of 3rd row, crochet 1 chain to turn with, skip 2 sts and crochet 1 dc in the next dc (UK-English terminology). At the end of row 3 just crochet a dc in the turning chain to "close" the row. Happy crocheting!

22.06.2023 - 14:12

country flag Rhonda R Hubbard wrote:

Under bodice instructions it says turn the work crochet back and forth on each side of center chain. How can you do rows back and forth and do each side of the chain? and are there no beginning chain and ending slip stitch to join?

19.06.2023 - 09:53

DROPS Design answered:

Dear Mrs Hubbard, replace the first dc with 2 chain stitches at the beg of every row; then work the first row on both sides of the foundation chain, at the end of first row turn and work back and forth, replacing the first. dc with 2 ch at the beg of every row and crochet 2 dc, ch1, 2 dc at the top of triangle. Happy crocheting!

20.06.2023 - 07:56

country flag Paola wrote:

Un chiarimento per favore: credo che ci sia un errore nella descrizione in italiano del quinto ROW …mmagino che invece di “MAGLIA ALTA” dopo la 2nda parentesi , si intenda invece maglia MAT!”Riga 5: 2 cat (per girare), 2 m.a., * 1 cat, 1 m.b, 5 cat., 1 m.a tripla, 5 cat, 1 m.bssa nella 1° cat (delle ultime 5 cat), 1 m.a., 5 cat, 1 m.b, 1 cat e 2 m.a. * poi ripetere * - * un\'altra volta.GRAZIE per farmi sapere se è corretto

13.09.2022 - 16:21

DROPS Design answered:

Buonasera, è corretto, si parla di maglia alta tripla. Buon lavoro!

27.09.2022 - 22:54

country flag Alessandra A wrote:

Buongiorno, ho visto che in inglese é stata data, molto cortesemente, la sequenza dei punti nelle righe del fiore rispondendo a chi lo chiedeva, potreste darla anche con le sigle italiane ? Nella riga 4 le maglie alte sono doppie o triple ? Anche facendo lo zoom non si riesce a capire Grazie

29.06.2022 - 09:12

DROPS Design answered:

Buonasera Alessandra, con lo zoom al 200% il diagramma risulta ancora nitido. Nella riga 4 le maglie alte sono doppie. Riga 5: 2 cat (per girare), 2 m.a., * 1 cat, 1 m.b, 5 cat., 1 m.a tripla, 5 cat, 1 m.bssa nella 1° cat (delle ultime 5 cat), 1 m.a., 5 cat, 1 m.b, 1 cat e 2 m.a. * poi ripetere * - * un'altra volta. RIGA 6: 1 cat (per girare), 1 m.b, * nelle 5 cat della riga precedente lavorare: 2 m.a. triple, 5 cat, 1 m.b, 5 cat, 1 m.a. tripla, 5 cat, 1 m.b., 5 cat, 1 m.a tripla, 5 cat, 1 m.b, 5 cat, 1 m.a. tripla, 5 cat, 1 m.b, 5 cat e 2 m.a triple. Lavorare 1 m.b tra 2 m della riga precedente *. Ripetere * - * un'altra volta. Buon lavoro!

02.07.2022 - 22:23

country flag Alessandra A wrote:

Salve, é possibile avere indicazione della sequenza dei punti delle righe 5 e 6 ? Nello schema i simboli sono così piccoli che non riesco a capire se sono maglie doppie o triple . Grazie

28.06.2022 - 17:54

DROPS Design answered:

Buonasera Alessandra, può aumentare lo zoom della pagina internet per ingrandire il diagramma. Buon lavoro!

28.06.2022 - 20:11

country flag Sima wrote:

Bonjour; j'adore ce modèle mais comme c'est la première fois que je crochète en suivant un de vos modèle est ce que vous avez une video tuto qui montre comment faire la fleur. Merci beaucoup.

12.05.2022 - 14:43

DROPS Design answered:

Bonjour Sima, nous n'avons pas de vidéo spécifique à ce modèle, mais vous trouverez dans cette leçon comment lire le diagramme. Bon crochet!

12.05.2022 - 16:37

country flag Peggy Vd Meijden wrote:

Hoe haak ik de 2 cups aan elkaar welke steek

26.04.2022 - 13:24

DROPS Design answered:

Dag Peggy,

Deze kun je met vasten aan elkaar haken.

04.05.2022 - 08:29

country flag Emma wrote:

Hva menes med at jeg skal «hekle staver på hver side av midt raden», som står under brystcup?

02.04.2022 - 15:50

DROPS Design answered:

Hei Emma. Jo, du hekler en luftmaske rad, så hekler du staver på hele luftmaskeraden, så vri arbeidet slik at du også kan hekle staver på undersiden. Ta en titt på denne videoen, frem til tidspunktet: ca. 02:40 Hvordan hekle på begge sider av et lm-bånd mvh DROPS Design

04.04.2022 - 15:16

country flag Alessandra wrote:

Non riesco a decifrare i diagrammi😩 potreste scrivere la spiegazione per ogni giro? Grazie

29.01.2022 - 19:26

DROPS Design answered:

Buonasera Alessandra, purtroppo non possiamo scrivere la spiegazione di ogni giro. I nostri diagrammi si leggono dal basso verso l'alto e da destra verso sinistra. Buon lavoro!

30.01.2022 - 20:05

country flag Agneta Lindström wrote:

Vänligen förklara hur man virkar rad 5 och 6, vilket varv ingår som och de 5 lm där dessa 5 blad ska virkas. Hur börjar man virka rad 5 och 6. Mönstret är inte lätt att förstå. Bra om ni förklarade i ord än detta obegripliga mönster. Toppen är fin och vill gärna virka den.

15.08.2021 - 15:47

DROPS Design answered:

Hei Agneta. Dette er en gml oppskrift og det ble skrevet litt annerledes enn hva vi gjør i dag. Men 5 rad starter med 2 lm (til å snu arb), 2 staver, * 1 lm, 1 fm, 5 lm, 1 trippel stav, 5 lm, 1 kjm i den 1.lm (av de 5 siste lm), 1 trippel stav, 5 lm, 1 fm, 1 lm og 2 staver * så gjenta fra *-* 1 gang til. RAD 6: 1 lm (til å snu arb i), 1 fm, * i 5-luftmaskeringen fra forrige rad hekles det slik: 2 trippelstaver, 5 lm, 1 fm, 5 lm, 1 trippelstav, 5 lm, 1 fm, 5 lm, 1 trippelstav, 5 lm, 1 fm, 5 lm, 1 trippelstav, 5 lm, 1 fm, 5 lm og 2 trippelstaver. Hekle 1 fm mellom 2 staver fra forrige rad *. Gjenta *-* 1 gang til. mvh DROPS design

19.08.2021 - 07:31