DROPS Bomull-Lin uni colour 53% Cotton, 47% Linen |
3.10 € /50g |
Order |
Clicking the ORDER button will redirect you to Igla i kukica website
The yarn cost is calculated from the pattern’s smallest size and the yarn’s cheapest product type. Looking for an even better price? You might find it on the DROPS Deals!
-------------------------------------------------------
Alternative Yarn – See how to change yarns here
Yarn Groups A to F – Use the same pattern and change the yarn here
Yarn usage using an alternative yarn – Use our yarn converter here
-------------------------------------------------------
DROPS Bomull-Lin uni colour 53% Cotton, 47% Linen 3.10 € /50g Order |
Clicking the ORDER button will redirect you to Igla i kukica website
The yarn cost is calculated from the pattern’s smallest size and the yarn’s cheapest product type. Looking for an even better price? You might find it on the DROPS Deals!
Each of our patterns has specific tutorial videos to help you.
These step-by-step tutorials might also help you:
Why is the knitting/crochet tension so important?
Knitting tension is what determines the final measurements of your work, and is usually measured per 10 x 10 cm. It is provided like so: number of stitches in width x number of rows in height - eg: 19 stitches x 26 rows = 10 x 10 cm.
The knitting tension is very individual; some people knit/crochet loosely while others work tightly. You adjust the knitting tension with the needle size, which is why the suggested needle size is only meant as a guide! You need to adjust this (up or down) to ensure that YOUR knitting tension matches the knitting tension provided in the pattern. If you work with a different knitting tension than provided you will have a different yarn consumption, and your work will have different measurements than what the pattern suggests.
The knitting tension also determines which yarns can replace each other. As long as you achieve the same knitting tension you can replace one yarn with another.
See DROPS lesson: How to measure your tension/gauge
See DROPS video: How to make a gauge tension swatch
How do I know how many balls of yarn I need?
The required amount of yarn is provided in grams, eg: 450 g. To calculate how many balls you’ll need you first need to know how many grams are in 1 ball (25g, 50g or 100g). This information is available if you click on the individual yarn quality on our pages. Divide the amount required with the amount of each ball. For example, if each ball is 50g (the most common amount), the calculation will be as follows: 450 / 50 = 9 balls.
Can I use a different yarn than what the pattern suggests?
The important thing when changing from one yarn to another is that the knitting/crochet tension remains the same. This is so that the measurements of the finished piece will be the same as on the sketch provided. It is easier to achieve the same knitting tension using yarns from the same yarn group. It is also possible to work with multiple strands of a thinner yarn to achieve the knitting tension of a thicker one. Please try our yarn converter. We recommend you to always work a test swatch.
Please NOTE: when changing yarn the garment might have a different look and feel to the garment in the photo, due to individual properties and qualities of each yarn.
See DROPS lesson: Can I use a different yarn than the one mentioned in the pattern?
What are the yarn groups?
All our yarns are categorised into yarn groups (from A to F) according to thickness and knitting tension – group A contains the thinnest yarns and group F the thickest. This makes it easier for you to find alternative yarns to our patterns, should you wish to switch yarn. All yarns within the same group have a similar knitting tension and can easily replace each other. However, different yarn qualities have different structures and properties which will give the finished work a unique look and feel.
How do I use the yarn calculator?
At the top of all our patterns you’ll find a link to our yarn calculator, which is a helpful tool should you wish to use a different yarn than suggested. By filling in the yarn quality you wish to replace, the amount (in your size) and number of strands, the calculator will present good alternative yarns with the same knitting tension. Additionally it will tell you how much you’ll require in the new qualities and whether you’ll need to work with multiple strands. Most skeins are 50g (some are 25g or 100g).
If the pattern is worked with multiple colours, every colour will have to be calculated separately. Similarly, if the pattern is worked with several strands of different yarns (for example 1 strand Alpaca and 1 strand Kid-Silk) you will have to find alternatives for each, individually.
Why do you show discontinued yarns in the patterns?
Since different yarns have different qualities and textures we have chosen to keep the original yarn in our patterns. However, you can easily find options among our available qualities by using our yarn calculator, or simply pick a yarn from the same yarn group.
It is possible that some retailers still have discontinued yarns in stock, or that someone has a few skeins at home that they would like to find patterns for.
The yarn calculator will provide both alternative yarn as well as required amount in the new quality.
What size should I knit?
If you think it's hard to decide what size to make, it can be a good idea to measure a garment you own already and like the size of. Then you can pick the size by comparing those measures with the ones available in the pattern's size chart.
You'll find the size chart at the bottom of the pattern.
See DROPS lesson: How to read size chart
Why do I get the wrong knitting tension with the suggested needle size?
The needle size provided in the pattern serves only as a guide, the important thing is to follow the knitting tension. And since knitting tension is very individual, you will have to adjust the needle size to ensure that YOUR tension is the same as in the pattern – maybe you’ll have to adjust 1, or even 2 needle sizes, up or down to achieve the correct tension. For this, we recommend that you work test swatches.
Should you work with a different knitting tension than the one provided, the measurements of the finished garment might deviate from the measurement sketch.
See DROPS lesson: How to measure your tension/gauge
See DROPS video: How to make a tension/gauge swatch
Why is the pattern worked top-down?
Working a garment top-down provides more flexibility and room for personal adjustment. For example it is easier to try the garment on while working, as well as making adjustments to length of yoke and shoulder caps.
The instructions are carefully explaining every step, in the correct order. Diagrams are adjusted to the knitting direction and are worked as usual.
How do I work according to a knitting diagram?
The diagram depicts all rows/rounds, and every stitch seen from the right side. It is read from bottom to top, from right to left. 1 square = 1 stitch.
When working back and forth, every other row is worked from the right side and every other row is worked from the wrong side. When working from the wrong side, the diagram will have to be worked reversed: from left to right, knit stitches are purled, purl stitches are knit etc.
When working in the round every round is worked from the right side and the diagram are worked from right to left on all rounds.
See DROPS lesson: How to read knitting diagrams
How do I work according to a crochet diagram?
The diagram depicts all rows/rounds, and every stitch seen from the right side. It is worked from bottom to top, from right to left.
When working back and forth every other row is worked from the right side: from right to left and every other row is worked from the wrong side: from left to right.
When working in the round, every row in the diagram are worked from the right side, from right to left.
When working a circular diagram you start in the middle and work your way outwards, counter clockwise, row by row.
The rows usually start with a given number of chain stitches (equivalent to the height of the following stitch), this will either be depicted in the diagram or explained in the pattern.
See DROPS lesson: How to read crochet diagrams
How do I work several diagrams simultaneously on the same row/round?
Instructions for working several diagrams after each other on the same row/round, will often be written like so: “work A.1, A.2, A.3 a total of 0-0-2-3-4 times". This means you work A.1 once, then A.2 is worked once, and A.3 is repeated (in width) the number of times provided for your size – in this case like so: S = 0 times, M = 0 times, L=2 times, XL= 3 times and XXL = 4 times.
The diagrams are worked as usual: begin with the first row in A.1, then work the first row in A.2 etc.
See DROPS lesson: How to read knitting diagrams
See DROPS lesson: How to read crochet diagrams
Why are the sleeves shorter in larger sizes?
The total width of the garment (from wrist-to-wrist) will be larger in the larger sizes, despite the actual sleeves being shorter. The larger sizes have longer sleeve caps and wider shoulders, so there will be a good fit in all sizes.
Where on the garment is the length measured?
The measurement sketch/schematic drawing provides information regarding the full length of the garment. If it’s a jumper or a jacket the length is measured from the highest point on the shoulder closest to the neckline, and straight down to the bottom of the garment. It is NOT measured from the tip of shoulder. Similarly, the length of yoke is measured from the highest point on the shoulder and down to where yoke is split into body and sleeves.
On a jacket measures are never taken along bands, unless specifically stated. Always measure inside band stitches when measuring the length.
See DROPS lesson: How to read a schematic drawing
What is a repeat?
Diagrams are often repeated on the round or in height. 1 repeat is the diagram the way it appears in the pattern. If it says to work 5 repeats of A.1 in the round, then you work A.1 a total of 5 times after/next to each other in the round. If it says to work 2 repeats of A.1 vertically/in height you work the entire diagram once, then begin again at the start and work the entire diagram one more time.
Why does the piece start with more chain stitches than it’s worked with?
Chain stitches are slightly narrower than other stitches and to avoid working the cast-on edge too tight, we simply chain more stitches to begin with. The stitch count will be adjusted on the following row to fit the pattern and measurement sketch.
Why increase before the rib edge when the piece is worked top-down?
The rib edge is more elastic and will contract slightly compared to, for example, stocking stitch. By increasing before the rib edge, you avoid a visible difference in width between the rib edge and the rest of the body.
Why increase in the cast-off edge?
It’s very easy to cast off too tightly, and by making yarn overs while casting off (and simultaneously casting these off) you avoid a too tight cast off edge.
See DROPS video: How to bind off with yarn overs (yo)
How do I increase/decrease on every 3rd and 4th row/round alternately?
To achieve an even increase (or decrease) you can increase on, for example: every 3rd and 4th row alternately, like so: work 2 rows and increase on the 3rd row, work 3 rows and increase on the 4th. Repeat this until the increase is complete.
See DROPS lesson: Increase or decrease 1 st on every 3rd and 4th row alternately
How can I work a jacket in the round instead of back and forth?
Should you prefer to work in the round instead of back and forth, you may of course adjust the pattern. You’ll need to add steeks mid-front (usually 5 stitches), and follow the instructions. When you would normally turn and work from the wrong side, simply work across the steek and continue in the round. At the end you’ll cut the piece open, pick up stitches to work bands, and cover the cut edges.
See DROPS video: How to knit steeks and cut open
Can I work a jumper back and forth instead of in the round?
Should you prefer to work back and forth instead of in the round, you may of course adjust the pattern so you work the pieces separately and then assemble them at the end. Divide the stitches for the body in 2, add 1 edge stitch in each side (for sewing) and work the front and back pieces separately.
See DROPS lesson: Can I adapt a pattern for circular needles into straight needles?
Why is the pattern slightly different than what I see in the photo?
Pattern repeats can vary slightly in the different sizes, in order to get the correct proportions. If you’re not working the exact same size as the garment in the photo, yours might deviate slightly. This has been carefully developed and adjusted so that the complete impression of the garment is the same in all sizes.
Make sure to follow instructions and diagrams for your size!
How do I make a women’s size garment into a men’s size one?
If you have found a pattern you like which is available in women’s size it’s not very difficult to convert it to men’s size. The biggest difference will be the length of sleeves and body. Start working on the women size that you think would fit across the chest. The additional length will be worked right before you cast off for the armhole/sleeve cap. If the pattern is worked top-down you can add the length right after the armhole or before the first decrease on sleeve.
Regarding additional yarn amount, this will depend on how much length you add, but it is better with a skein too many than too few.
How do I prevent a hairy garment from shedding?
All yarns will have excess fibres (from production) that might come off as lint or shedding. Brushed yarns (ie hairier yarns) have more of these loose, excess fibres, causing more shedding.
Shedding also depends on what is worn under or over the garment, and whether this pulls at the yarn fibres. It’s therefore not possible to guarantee that there will be no shedding
Below are some tips on how to get the best result when working with hairier yarns:
1. When the garment is finished (before you wash it) shake it vigorously so the looser hairs come off. NOTE: do NOT use a lint roller, brush or any method that pulls at the yarn.
2. Place the garment in a plastic bag and put it in your freezer - the temperature will cause the fibres to become less attached to each other, and excess fibres will come off easier.
3. Leave in the freezer for a few hours before taking it out and shaking it again.
4. Wash the garment according to the instructions on the yarn label.
Why does my garment pill?
Pilling is a natural process that happens to even the most exclusive of fibers. It's a natural sign of wear and tear that is hard to avoid, and that is most visible in high friction areas of your garment like a sweater's arms and cuffs.
You can make your garment look as new by removing the pilling, using a fabric comb or a pill/lint remover.
Laid Back Afternoon |
|
|
|
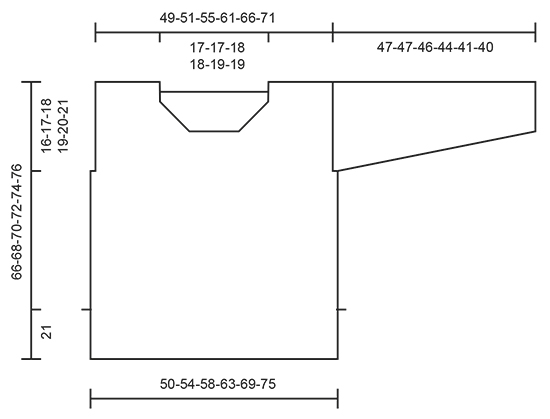
Knitted DROPS jumper with stripes and vents in the sides ”Paris” and “Bomull-Lin”. Size S- XXXL
DROPS 170-19 |
|
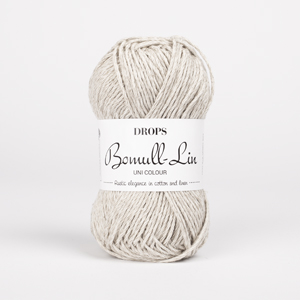
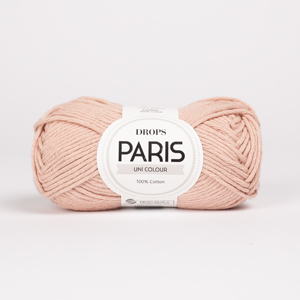
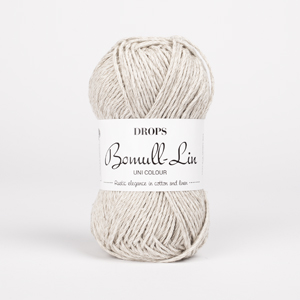
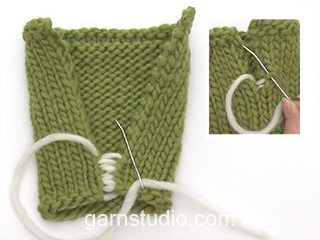
GARTER ST (back and forth): K all rows. 1 ridge = 2 rows K. STRIPES BACK AND FRONT PIECE: Stripe 1: 15-15-16-16-17-17 cm with Bomull-Lin light beige. Stripe 2: 6-7-7-8-8-9 cm with Bomull-Lin beige. Stripe 3: 2 rows in all sizes with Bomull-Lin brown. Stripe 4: 2 rows in all sizes with Bomull-Lin beige. Stripe 5: 6 rows in all sizes with Paris apricot. Stripe 6: 2 rows in all sizes with Bomull-Lin light beige. Stripe 7: 7-7-8-8-9-9 cm with Paris apricot. Stripe 8: 2 rows in all sizes with Paris raspberry. Stripe 9: 4 rows in all sizes with Paris apricot. Stripe 10: 2 rows in all sizes with Paris raspberry. Stripe 11: 4 rows in all sizes with Paris apricot. Stripe 12: 2 rows in all sizes with Paris raspberry. Stripe 13: 2 rows in all sizes with Bomull-Lin brown. Stripe 14: 2 rows in all sizes with Paris apricot. Stripe 15: 2 rows in all sizes with Bomull-Lin light beige. Stripe 16: 4 rows in all sizes with Bomull-Lin beige. Stripe 17: 2 rows in all sizes with Paris raspberry. Stripe 18: 4 rows in all sizes with Paris apricot. Stripe 19: 2 rows in all sizes with Bomull-Lin beige. Stripe 20: 2 rows in all sizes with Bomull-Lin brown. Stripe 21: 6-7-7-8-8-9 cm with Bomull-Lin beige. Stripe 22: Work with Bomull-Lin light beige until finished measurements. STRIPES SLEEVE: Stripe 1: Work 12 cm with Bomull-Lin light beige. Stripe 2: 2 rows in all sizes with Bomull-Lin brown. Stripe 3: 4 rows in all sizes with Paris apricot. Stripe 4: 2 rows in all sizes with Bomull-Lin light beige. Stripe 5: 4 rows in all sizes with Bomull-Lin beige. Stripe 6: 2 rows in all sizes with Paris raspberry. Stripe 7: 4 rows in all sizes with Paris apricot. Stripe 8: 2 rows in all sizes with Bomull-Lin beige. Stripe 9: 2 rows in all sizes with Bomull-Lin brown. Stripe 10: 5 cm in all sizes with Bomull-Lin beige. Stripe 11: Work with Bomull-Lin light beige until finished measurements. DECREASE TIP: All dec are done from RS! Dec 1 st before sts in garter st towards the neck as follows: Work until 2 sts remain before st in garter st, K 2 tog. Dec 1 st after sts in garter st from the neck as follows: Slip 1 st as if to K, K 1, psso. INCREASE TIP: All inc are done from RS. Inc 1 st by making a YO. On next row P YO twisted to avoid holes. ---------------------------------------------------------- JUMPER: Worked back and forth on circular needle. Work in stocking st from RS but assemble with WS outwards. BACK PIECE: Worked back and forth on circular needle. Cast on 75-81-87-95-103-113 sts on circular needle size 6 mm with Bomull-Lin light beige. Continue with STRIPES BACK AND FRONT PIECE - see explanation above and work as follows: Work 2 ridges in GARTER ST - see explanation above. Then work 2 sts in garter st, stocking st until 2 sts remain, 2 sts in garter st. When piece measures 21 cm in all sizes, cast on 1 edge st in each side of piece at the end of the next 2 rows = 77-83-89-97-105-115 sts. REMEMBER THE KNITTING TENSION Continue with 2 more rows in stocking st and in garter st over the outermost 3 sts in each side (incl edge st) of piece. Then continue in stocking st with 1 edge st in garter st in each side. When piece measures 50-51-52-53-54-55 cm, cast off 1-2-2-2-2-3 sts for armholes at beg of the next 2 rows = 75-79-85-93-101-109 sts on needle. When piece measures 61-63-65-67-69-71 cm, work as follows: Work the first 24-26-28-32-35-39 sts as before, work in garter st over the next 27-27-29-29-31-31 sts, continue as before over the remaining 24-26-28-32-35-39 sts. When 2 ridges have been worked over the middle 27-27-29-29-31-31 sts, work next row from RS as follows: Work until 2 sts remain before st in garter st, dec 1 st - READ DECREASE TIP, work 2 sts in garter st, cast off the next 23-23-25-25-27-27 sts for neck, work 2 sts in garter st, dec 1 st, work the remaining sts on needle as before = 25-27-29-33-36-40 sts remain for shoulder. Then finish each shoulder separately. Turn and work back and forth in stocking st with 1 edge st in garter st towards armhole and 2 sts in garter st towards the neck. When piece measures 66-68-70-72-74-76 cm, cast off all sts. Work the other shoulder the same way. FRONT PIECE: Cast on and work as back piece. When piece measures 55-57-58-60-61-63 cm, work next row from RS as follows: Work as before over the first 29-31-34-38-41-45 sts, then work in garter st over the next 17-17-17-17-19-19 sts, continue over the remaining 29-31-34-38-41-45 sts. When 2 ridges have been worked over the middle 17-17-17-17-19-19 sts, work next row from RS as follows: Work until 2 sts remain before st in garter st, dec 1 st, work 2 sts in garter st, cast off the next 13-13-13-13-15-15 sts for neck, work 2 sts in garter st, dec 1 st, work the remaining sts on needle as before. There are now 30-32-35-39-42-46 sts for shoulder. Then finish each shoulder separately. Continue back and forth over shoulder with stocking st, 2 sts in garter st towards the neck and 1 edge st in garter st towards armhole, and repeat dec on every row from the neck 5-5-6-6-6-6 more times = 25-27-29-33-36-40 sts for shoulder. When piece measures 66-68-70-72-74-76 cm, cast off all sts. Work the other shoulder the same way. SLEEVE: Worked back and forth on circular needle. Cast on 32-33-36-37-38-39 sts (incl 1 edge st in garter st in each side of piece) on circular needle size 6 mm with Bomull-Lin light beige. Continue with STRIPES SLEEVE - see explanation above and work as follows: Work 2 ridges. Then work in stocking st with 1 edge st in garter st in each side. When piece measures 11-11-11-10-10-6 cm, inc 1 st inside 1 edge st in garter st in each side - read INCREASE TIP. Repeat inc every 4-3½-3½-3-2½-2½ cm 8-9-9-10-11-12 more times = 50-53-56-59-62-65 sts on needle. When piece measures 47-47-46-44-41-40 cm (shorter measurements in the larger sizes because of wider shoulders), loosely cast off. Knit another sleeve the same way. ASSEMBLY: Assemble jumper with WS out. Sew shoulder seams inside cast-off edges. Sew sleeves to body and sew sleeve seams inside 1 edge st in garter st. Sew side seam from armhole and down to vent in each side (= vent = 21 cm). Fasten off. |
|
Have you made this or any other of our designs? Tag your pictures in social media with #dropsdesign so we can see them! Do you need help with this pattern?You'll find tutorial videos, a Comments/Questions area and more by visiting the pattern on garnstudio.com. © 1982-2024 DROPS Design A/S. We reserve all rights. This document, including all its sub-sections, has copyrights. Read more about what you can do with our patterns at the bottom of each pattern on our site. |
With over 40 years in knitting and crochet design, DROPS Design offers one of the most extensive collections of free patterns on the internet - translated to 17 languages. As of today we count 304 catalogues and 11422 patterns - 11422 of which are translated into English (UK/cm).
We work hard to bring you the best knitting and crochet have to offer, inspiration and advice as well as great quality yarns at incredible prices! Would you like to use our patterns for other than personal use? You can read what you are allowed to do in the Copyright text at the bottom of all our patterns. Happy crafting!
Comments / Questions (19)
Ulrike wrote:
Hallo an alle, bei mir ist dasselbe Problem aufgetaucht wie bei Maike N.: Die Farben 03 und 11 von Bomull-Lin unterscheiden sich so gut wie gar nicht, auch verstrickt nicht. Meine Lösung des Problems war, dass ich als Ersatz für Farbe 11 Farbe 05 von Bomull-Lin verwendet habe, und als Ersatz für die Farbe 05 von Bomull-Lin dann Farbe 44 (braun) von Paris. Und tatsächlich, jetzt ist der Kontrast zwischen den drei Beige- und Brauntönen so schön wie auf dem Bild :)
23.01.2023 - 14:04Nathalie Boussard wrote:
Bonjour Je suis arrivée aux emmanchures du dos, doit - on reprendre les 3 m point mousse de chaque côté, même question pour l'encolure ? En vous remerciant pour votre aide.
08.06.2022 - 21:12DROPS Design answered:
Bonjour Mme Boussard, après les emmanchures, on ne tricote pas de mailles au point mousse sur le côté (sauf si vous préférez ce type de maille lisière), pour l'encolure, vous continuerez à tricoter 2 mailles point mousse côté encolure. Bon tricot!
09.06.2022 - 08:25Boussard wrote:
Bonjour Au début du dos, juste après avoir fait 2 côtes au point mousse, il faut continuer 2m point mousse, jersey.... cela veut dire un rang endroit? Faut il continuer ainsi tout le dos? Merci pour votre aide.
12.05.2022 - 20:19DROPS Design answered:
Bonjour Mme Boussard, effectivement, sur l'endroit, vous tricoterez toutes les mailles à l'endroit, mais sur l'envers tricotez: 2 m endroit (= 2 m point mousse), à l'envers jusqu'à ce qu'il reste 2 m (= jersey) et terminez par 2 m endroit (= 2 m point mousse). Vous ajouterez ensuite 1 m point mousse (= 3 m point mousse de chaque côté), puis vous continuerez avec juste 1 m lisière au point mousse de chaque côté. Bon tricot!
13.05.2022 - 08:09Inge-Lise Laursen wrote:
Jeg er netop blevet færdig med trøjen og jeg har en masse garn i overskud. . Jeg har strikket i str XL det originale garn og har 8 hele nøgler for meget: 3 * Bomull-lin fv. 03, 2*Bomull-lin fv.11, 2*Paris fv 1 og 1*Paris fv 38 I bør justere i opskriften .
11.08.2021 - 16:53Ingrid Bahnsen wrote:
De 2 garnfarver i Bomull-Lin farve 03 Lys beige og farve 11 Beige er næsten identiske - men på fotoet i opskriften er der ret stor forskel i nuancen? Det påvirker resultatet, da de 2 nuancer strikkes i brede striber efter hinanden. Er der skrevet forkert i opskriften? Mvh Ingrid
18.07.2021 - 09:10DROPS Design answered:
Hej Ingrid, der kan være sket en justering i årenes løb. Men vælg de 2 farver i DROPS Bomull-Lin som passer bedst til din smag og dit arbejde :)
04.08.2021 - 11:13Maike Novobilsky wrote:
Hallo, ich habe mir die Wolle für den schönen Pullover bestellt. Leider hat Bomull-Lin Nr. 3 (hellbeige) und Nr. 11 (beige) exakt den selben Farbton, Nr. 11 fühlt sich nur etwas härter an. Ich habe schon beide Farbtöne hintereinander verstrickt und man sieht wirklich überhaupt keinen Unterschied. Welche Wolle kann ich stattdessen nehmen? Ist dies von der Charge abhängig? Nr. 11 ist viel, viel heller als auf der Abbildung. Vielen Dank
07.04.2021 - 08:58DROPS Design answered:
Liebe Frau Novobilsky, am besten wenden Sie sich direkt an Ihrem DROPS Händler, wo Sie das Garn bestellt haben, dort wird man Ihnen am besten weiterhilfen - auch telefonisch oder per E-Mail. Viel Spaß beim stricken!
07.04.2021 - 13:37Helen wrote:
Det står att tröjan stickas i både rätstickning och slätstickning med aviga ut! Vilket gäller?
26.07.2020 - 11:06DROPS Design answered:
Hej Helen, du börjar med 4 varv rätst, sedan slätst med kantmaskor i rätst. Lycka till :)
27.07.2020 - 15:53Rianne Wiesje Kompier Krijnen wrote:
Als ik deze trui in 1 kleur, dus effen zou willen breien, hoeveel garen heb ik dan nodig?
17.05.2018 - 08:04DROPS Design answered:
Hallo Rianne, Bij veel nieuwere patronen staat dit al aangegeven, maar bij dit patroon helaas niet. Je kunt je verkooppunt vragen of je overgebleven bollen in kunt leveren. Je breit dan eerst het achterpand en een mouw en aan de hand daarvan kun je uitrekenen hoeveel je in totaal nodig hebt.
21.05.2018 - 11:16Elaine Hébert wrote:
J’ai fait ce chandail avec de la laine. Mon échantillon respectait celui du patron. J’aimerais savoir quoi faire pour que la bordure inférieur en côtes mousses cesse de roulé
29.04.2018 - 20:44DROPS Design answered:
Bonjour Mme Hébert, vous pouvez bloquer votre pull: lavez-le en respectant les consignes de l'étiquette + les généralités ici. Faites le sécher bien à plat, en épinglant le bas si nécessaire. Bon tricot!
30.04.2018 - 11:02Marja wrote:
Zijn de patroonafmetingen met boordjes al in begrepen? Of moet je bijvoorbeeld voor de halsafmeting nog bijtellen indien ik geen boordje wens te breien? Dank voor uw antwoord. Groeten
01.03.2018 - 22:53DROPS Design answered:
Hoi Marja, De afmetingen in de tekening onderaan zijn altijd inclusief, boordjes, halsranden, manchetten, etc.
04.03.2018 - 17:18