
Popular categories
Looking for a yarn?


|
||||||||||||||||||||||||||||
Talvik |
||||||||||||||||||||||||||||
 |
 |
|||||||||||||||||||||||||||
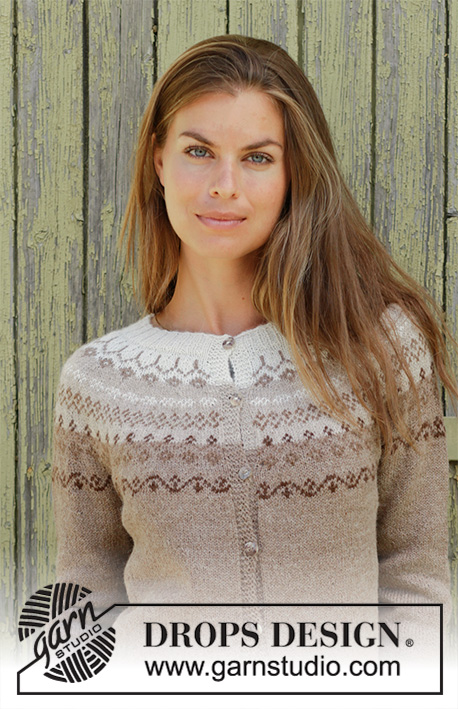
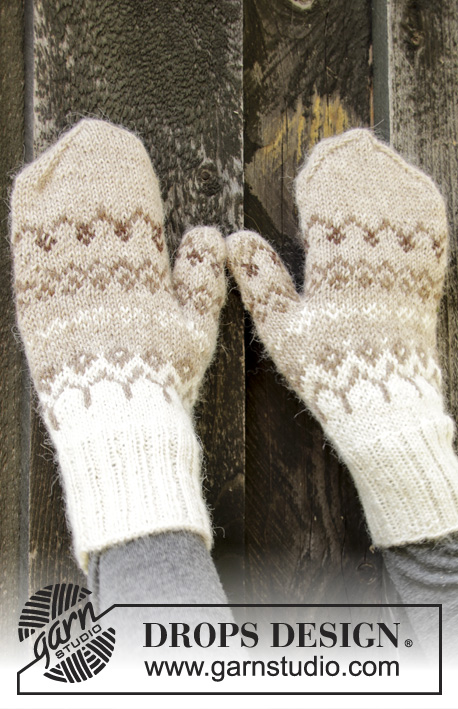
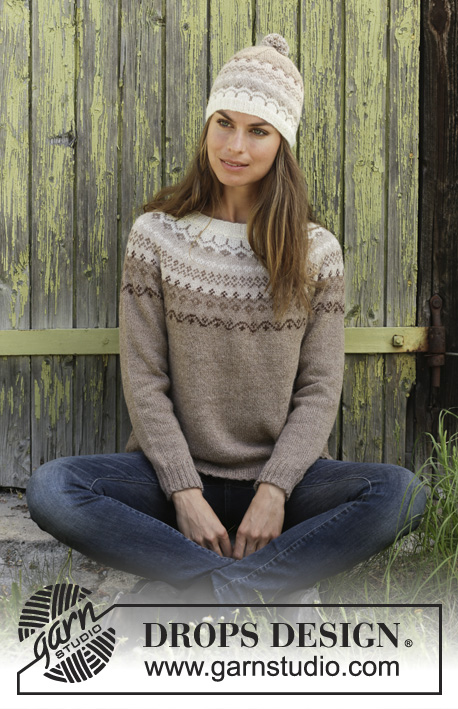
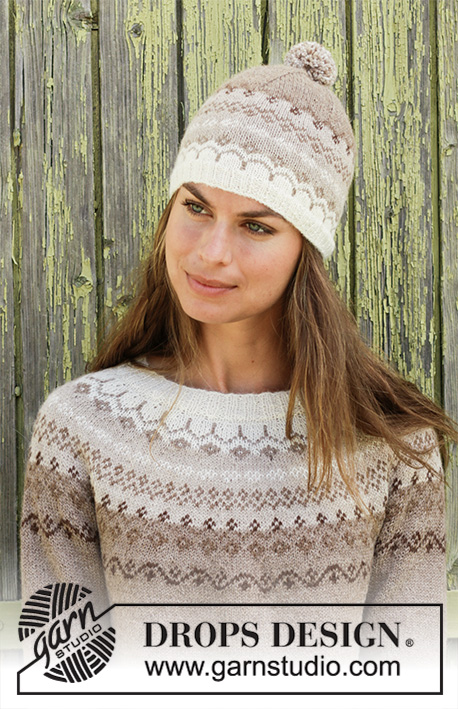
Knitted jumper with round yoke in DROPS Alpaca. Piece is knitted top down with Nordic pattern. Size: S - XXXL Knitted hat with Nordic pattern and pompom in DROPS Alpaca.
DROPS 197-10 |
||||||||||||||||||||||||||||
|
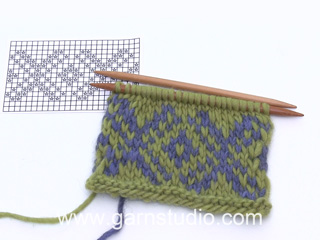
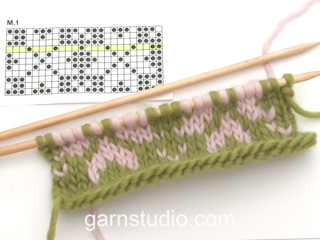
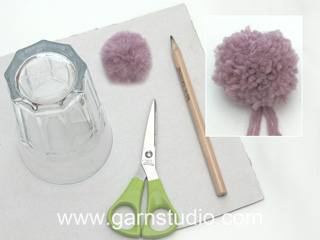
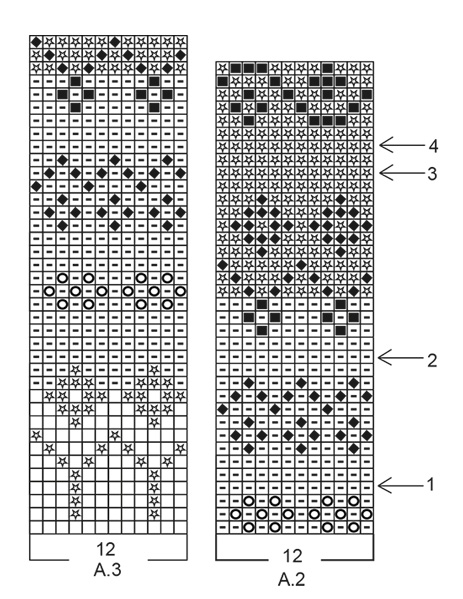
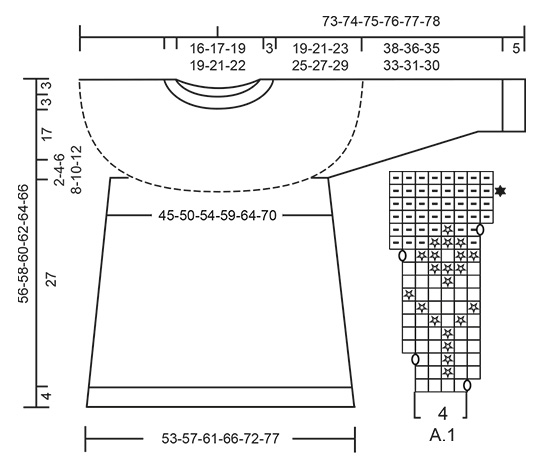
EXPLANATION FOR THE PATTERN: ---------------------------------------------------------- PATTERN: Jumper: See diagrams A.1 and A.2. Hat: See diagram A.3. Work all stitches in stocking stitch. DECREASE/INCREASE TIP (evenly): To calculate how to decrease/increase evenly, use the total number of stitches on round (e.g. 124 stitches) and divide stitches by number of decreased/increases to be done (e.g. 20) = 6.2. In this example decrease by knitting approx. every 5th and 6th stitch together. When increasing make a yarn over after approx. every 6th stitch. On next round work yarn over twisted to avoid hole. KNITTING TIP: To avoid the knitting tension to tighten when working pattern, it is important not to tighten the strands on back side of piece. Switch to a higher needle number when working pattern if the pattern is somewhat tight. INCREASE TIP (applies to sides of body): Work until 2 stitches remain before marker thread, make 1 yarn over, knit 4 (marker thread is in the middle of these stitches), make 1 yarn over (= 2 stitches increased). On next round knit yarn over twisted to avoid holes. Then work the new stitches in stocking stitch. DECREASE TIP-1 (applies to mid under sleeve): Decrease 1 stitch on each side of marker thread as follows: Work until 4 stitches remain before marker and knit 2 together, knit 4 (marker thread is between these 4 stitches), slip 1 stitch knitwise, knit 1, pass slipped stitch over stitch worked (= 2 stitches decreased). DECREASE TIP-2 (applies to hat): Work until 2 stitches remain before marker thread, knit the next 2 stitches together (= 1 stitch decreased). Repeat at each of the remaining marker threads. ---------------------------------------------------------- START THE PIECE HERE: ---------------------------------------------------------- JUMPER - SHORT OVERVIEW OF THE PIECE: Worked in the round on circular needle from mid back, work top down. Work sleeves in the round on double pointed needles/a short circular needle. NECK EDGE: Cast on 124-128-136-140-148-152 stitches on a short circular needle size 2.5 mm with off white. Knit 1 round. Now work rib (= knit 2/purl 2) for 3 cm. Knit 1 round while decreasing 20-20-20-20-20-20 stitches evenly - read DECREASE/INCREASE TIP = 104-108-116-120-128-132 stitches. Knit 1 round. YOKE: Switch to circular needle size 3 mm. Read KNITTING TIP and REMEMBER THE KNITTING TENSION! Now work pattern A.1 (= 4 stitches) 26-27-29-30-32-33 times in total on round. On round with black star in A.1 increase 20-24-20-24-32-36 stitches evenly – remember DECREASE/INCREASE TIP = 228-240-252-264-288-300 stitches (including the 4 stitches increased in every repetition of A.1. Now work pattern A.2 in the round, AT THE SAME TIME on round with arrow increase evenly as follows: ARROW-1: Increase 24-36-36-36-36-36 stitches = 252-276-288-300-324-336 stitches. ARROW-2: Increase 24-24-36-36-36-36 stitches = 276-300-324-336-360-372 stitches. ARROW-3: Increase 24-24-24-36-36-36 stitches = 300-324-348-372-396-408 stitches. ARROW-4: Increase 12-24-24-24-24-24 stitches = 312-348-372-396-420-432 stitches. When entire A.2 has been worked vertically, piece measures 20 cm from cast-on edge. Now work piece in light beige and stocking stitch, AT THE SAME TIME on first round increase 14-10-14-17-20-14 stitches evenly. Increase like this every 4th-4th-5th-6th-8th-8th round 1-2-2-2-2-4 times in total = 326-368-400-430-460-488 stitches. Then work until piece measures 22-24-26-28-30-32 cm from cast-on edge. Work next round as follows: Knit 49-54-58-64-70-75 (= half back piece), slip the next 64-75-83-86-90-93 stitches on a stitch holder for sleeve, cast on 10-10-12-12-14-16 new stitches on needle (= in the side under sleeve), knit 99-109-117-129-140-151 (= front piece), slip the next 64-75-83-86-90-93 stitches on a stitch holder for sleeve, cast on 10-10-12-12-14-16 new stitches on needle (= in the side under sleeve) and knit the remaining 50-55-59-65-70-76 stitches (= half back piece). Finish body and sleeves separately. NOW MEASURE PIECE FROM HERE! BODY: = 218-238-258-282-308-334 stitches. Insert 1 marker thread in the middle of the 10-10-12-12-14-16 new stitches that were cast on under sleeves. Move the marker threads upwards when working. Continue in the round with light beige and stocking stitch. When piece measures 4 cm from division, increase 1 stitch on each side of both marker threads - read INCREASE TIP (= 4 stitches increased). Increase like this every 8th round 9 times in total = 254-274-294-318-344-370 stitches. Continue like this until piece measures 27 cm. Knit 1 round while increasing 82-86-94-106-116-122 stitches evenly - remember DECREASE/INCREASE TIP = 336-360-388-424-460-492 stitches. Switch to circular needle size 2.5 mm and work rib = knit 2/purl 2 for 4 cm. Cast off with knit over knit and purl over purl but to avoid at tight cast-off edge make 1 yarn over after every 4th stitch (cast off yarn overs as stitches). Jumper measures approx. 56-58-60-62-64-66 cm from shoulder and down. SLEEVE: Slip the 64-75-83-86-90-93 stitches from stitch holder in one side of piece double pointed needles/a short circular needle size 3 mm and pick in addition up 1 stitch in each of the 10-10-12-12-14-16 new stitches cast on under sleeve = 74-85-95-98-104-109 stitches. Insert 1 marker thread in the middle of the 10-10-12-12-14-16 stitches under sleeve. Begin round here and work in stocking stitch in the round. When sleeve measures 4 cm from division, decrease 2 stitches mid under sleeve - read DECREASE TIP-1! Decrease like this every 10th-8th-6th-6th-6th-4th round 7-3-9-5-1-18 times and every 8th-6th-4th-4th-4th-2nd round 4-12-10-14-20-4 times = 52-55-57-60-62-65 stitches. When sleeve measures 38-36-35-33-31-30 cm from division (shorter measurements in the larger sizes because of longer yoke), knit 1 round while increasing 16-17-19-20-18-19 stitches evenly - remember DECREASE/INCREASE TIP = 68-72-76-80-80-84 stitches. Switch to double pointed needles size 2.5 mm and work rib in the round = knit 2/purl 2. When rib measures 5 cm, cast off with knit over knit and purl over purl but to avoid a tight cast-off edge make 1 yarn over after every 4th stitch (cast off yarn overs as regular stitches). Sleeve measures approx. 43-41-40-38-36-35 cm from division. Work the other sleeve the same way. ---------------------------------------------------------- HAT - SHORT OVERVIEW OF THE GARMENT: Work in the round on a short circular needle. Switch to double pointed needles when needed. HAT: Cast on 120-132 stitches on circular needle size 2.5 mm with off white. Knit 1 round. Then work rib (= knit 2/purl 2) for 2 cm. Switch to circular needle size 3 mm and work pattern A.3 (= 12 stitches) 10-11 times in total on round. REMEMBER THE KNITTING TENSION! When A.3 has been worked vertically, piece measures approx. 14-14 cm. Then work in stocking stitch in the round with light beige. When piece measures 15-15 cm, insert 6 marker threads in the piece, 20-22 stitches apart each marker thread. On next round, decrease 1 stitch before every marker thread – read DECREASE TIP-2. Decrease like this every other round 14-17 times in total = 36-30 stitches. Knit 2 and 2 stitches together until there are 9-8 stitches on needle. Cut the yarn and pull it through the remaining stitches, tighten tog and fasten. Hat measures approx. 24-26 cm. Make a pompom approx. 6 cm in diameter. Use 3 strand light camel, 1 strand off white and 1 strand light beige to make pompom and fasten at the top of hat. |
||||||||||||||||||||||||||||
Diagram explanations |
||||||||||||||||||||||||||||
|
||||||||||||||||||||||||||||
|
||||||||||||||||||||||||||||
|
||||||||||||||||||||||||||||
|
Have you made this or any other of our designs? Tag your pictures in social media with #dropsdesign so we can see them! Do you need help with this pattern?You'll find tutorial videos, a Comments/Questions area and more by visiting the pattern on garnstudio.com. © 1982-2024 DROPS Design A/S. We reserve all rights. This document, including all its sub-sections, has copyrights. Read more about what you can do with our patterns at the bottom of each pattern on our site. |
||||||||||||||||||||||||||||


With over 40 years in knitting and crochet design, DROPS Design offers one of the most extensive collections of free patterns on the internet - translated to 17 languages. As of today we count 304 catalogues and 11422 patterns - 11422 of which are translated into English (UK/cm).
We work hard to bring you the best knitting and crochet have to offer, inspiration and advice as well as great quality yarns at incredible prices! Would you like to use our patterns for other than personal use? You can read what you are allowed to do in the Copyright text at the bottom of all our patterns. Happy crafting!
Comments / Questions (84)
Hi, is there an A1 pattern? Just looking on the page and only seeing A2 and 3
28.05.2024 - 02:06DROPS Design answered:
Hi Marie, The diagram for A.1 is to the right of the size sketch at the bottom of the page. Happy crafting!
28.05.2024 - 06:36Bonsoir pourriez-vous me dire si les rang envers sont marqués sur les diagrammes merci
01.05.2024 - 18:36DROPS Design answered:
Bonjour Mme Darchis, tout à fait, tous les rangs figurent dans les diagrammes, comme on tricote en rond, on va lire tous les rangs/tours de droite à gauche, en commençant par le bas. Bon tricot!
02.05.2024 - 08:21Pouvez-vous m'expliquer dans le schéma A.1 ce que signifie l'ovale au début du 1er et 13eme rangs ? Et à la fin du 3eme et 11eme rangs ? Quelle différence entre le carré=naturel et carré avec un rond=naturel ? Merci beaucoup.
29.04.2024 - 15:49DROPS Design answered:
Bonjour Mme Grauls, l'ovale correspond au 7ème symbole de la légende des diagrammes, autrement dit, il s'agit d'1 jeté tricoté torse au tour suivant pour éviter un trou. On augmente ainsi 4 mailles au total dans chaque A.1 tout le tour + 20-24-20-24-32-36 mailles à intervalles réguliers au tour avec une étoile pour avoir ainsi 228-240-252-264-288-300 mailles quand A.1 est terminé. Bon tricot!
30.04.2024 - 07:39Je suis arrivée au dos et devant à 274mailles mais je trouve que c'est déjà large et j'ai peur après 27cm de faire 86m d'augmentations. Je crois que je ne vais pas les faire, est-ce que c'est possible, car ce sera beaucoup trop large. Merci pour votre réponse
25.04.2024 - 18:57DROPS Design answered:
Bonjour Mr Coquelle, on va augmenter ces 86 mailles juste avant les côtes pour éviter que les côtes du bas du pull ne le resserrent, car il faut plus de mailles pour la même largeur/circonférence pour les côtes avec les aiguilles 2,5 que pour le jersey avec les aiguilles 3. Bon tricot!
26.04.2024 - 07:46Merci beaucoup pour vos explications.
08.04.2024 - 14:49Bonjour EMPIÈCEMENT: Continuer avec l'aiguille circulaire 3. Voir ASTUCE TRICOT et DIMINUTIONS/AUGMENTATIONS = 228-240-252-264-288-300 mailles (y compris les 4 mailles augmentées dans chaque A.1 – cf diagramme Comment on fais pour avoir 240 M c,est ce que je n,arrive pas comprendre. Merci
08.04.2024 - 10:30DROPS Design answered:
Bonjour Mme Besson, après le col, vous avez 108 mailles et vous tricotez 27 fois les 4 mailles de A.1 tout le tour, en même temps, dans A.1 vous allez augmenter comme le diagramme l'indique soit 4 mailles dans chaque A.1 = on a 27 x 8 mailles quand toutes ces augmentations sont faites soit 216 mailles, puis on va augmenter 24 mailles à intervalles réguliers (cf cette leçon) au tour avec l'étoile noire, on a ainsi: 216+24=240 mailles. Bon tricot!
08.04.2024 - 12:51Bonjour Pourriez vous me dire s’il vous plaît à quoi correspond les 240 mailles ( 128M-10M =108M ) ensuite j’augmente 24 Mailles il y a 136maillles et c’est à partir de là que je bloque merci de m’expliquer .
07.04.2024 - 20:10DROPS Design answered:
Bonjour Mme Besson, je ne suis pas bien sûre de comprendre à quel niveau/quelle taille vous en êtes, pouvez-vous nous donner ces précisions? Merci pour votre compréhension.
08.04.2024 - 08:25I just finished this talvik sweater, and I loved knitting it. It fits perfectly. I likely do it again with different colours.
10.03.2024 - 20:30Hej, Vill sticka detta mönster men färg 403 verkar ha utgått. Vilken färg skulle ni rekommendera istället?
25.01.2024 - 14:05DROPS Design answered:
Hej Pernilla, du kan buge DROPS Nord farve 22 kastanje :)
02.02.2024 - 12:36Neuleen helmasta, resoriosasta, tulee kauniimpi, kun siihen ei lisätä silmukoita.
11.01.2024 - 15:42