
Popular categories
Looking for a yarn?


|
|||||||||||||||||||
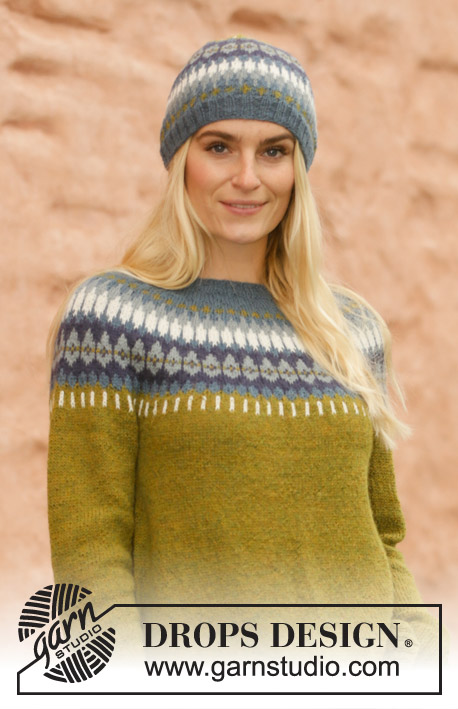
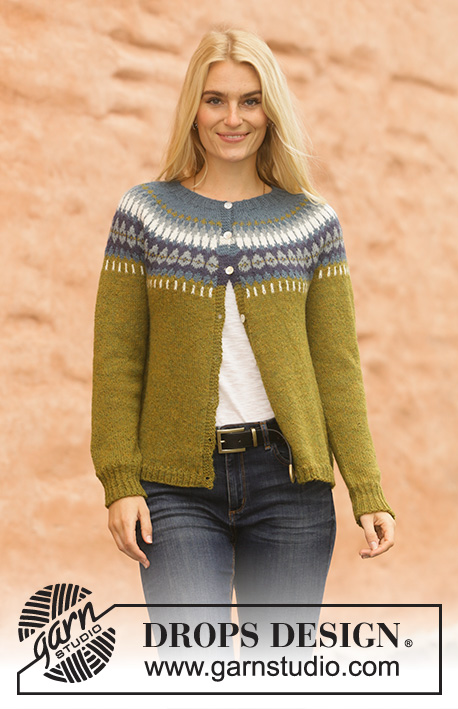
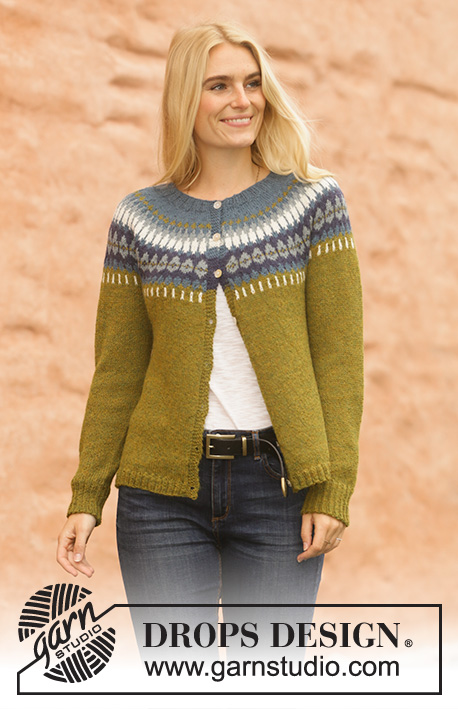
Heim Jacket |
|||||||||||||||||||
 |
 |
||||||||||||||||||
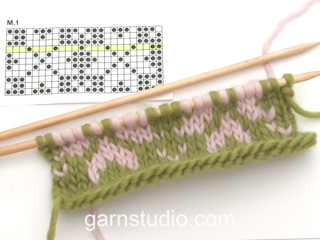
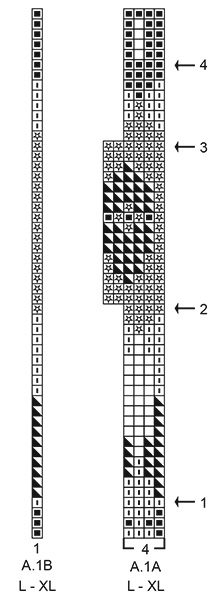
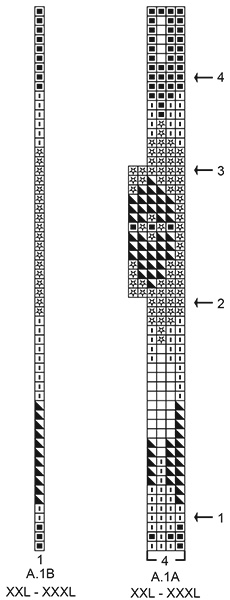
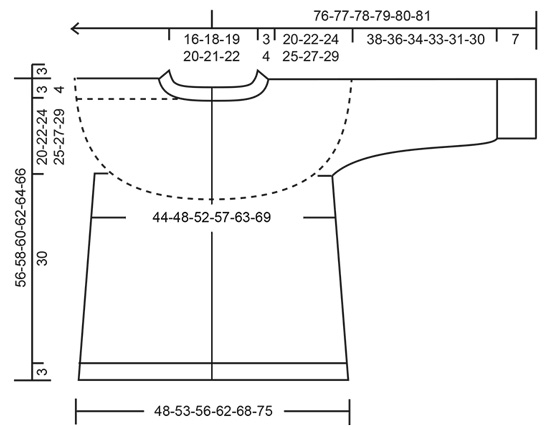
Knitted jacket in DROPS Alpaca. The piece is worked top down with round yoke and Nordic pattern on the yoke. Sizes S - XXXL.
DROPS 207-2 |
|||||||||||||||||||
|
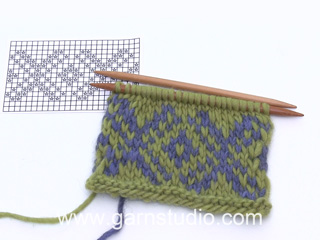
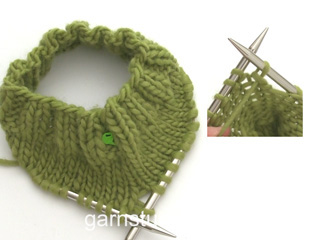
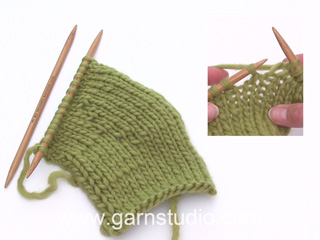
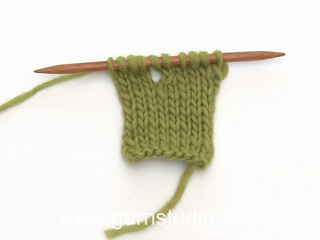
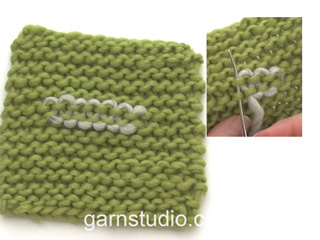
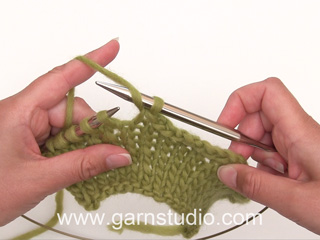
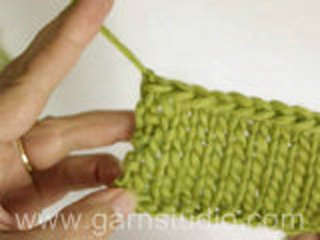
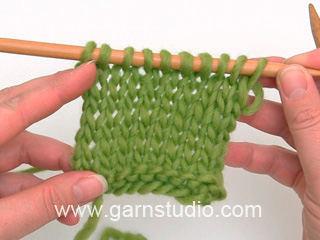
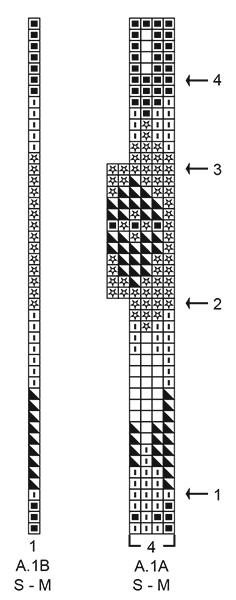
------------------------------------------------------- EXPLANATIONS FOR THE PATTERN: ------------------------------------------------------- RIDGE/GARTER STITCH (worked back and forth): Knit all rows. 1 ridge in height = Knit 2 rows. ELEVATION (back of neck): To make the jacket slightly higher at the back of the neck when working yoke you can work an elevation as described here. Skip this section if you do not want an elevation. Insert 1 marker in the middle of the round (mid back). Start from the right side with medium petrol and knit 11-12-12-13-13-14 stitches past the marker, turn, tighten strand and purl 22-24-24-26-26-28 stitches back. Turn, tighten strand and knit 33-36-36-39-39-42 stitches, turn, tighten strand and purl 44-48-48-52-52-56 stitches back. Turn, tighten strand and knit 55-60-60-65-65-70 stitches, turn, tighten strand and purl 66-72-72-78-78-84 stitches. Turn, tighten the strand and knit to end of row, turn and purl 1 row back (the bands are worked in garter stitch). Then work YOKE as described in the text. PATTERN: See diagram A.1. Choose diagram for your size. The whole pattern is worked in stocking stitch. KNITTING TIP-1: To avoid the knitting tension becoming tighter when working pattern it is important that the strands at the back are not tight. Use a size larger needle when working pattern if this is a problem. KNITTING TIP-2 (for bands): On the rows with 2-coloured pattern use the background colour over the 5 band stitches on each side. INCREASE TIP-1 (evenly spaced): To work out how to increase evenly, count the total number of stitches on the needle (e.g. 112 stitches) minus bands (e.g. 10 stitches) and divide the remaining stitches by the number of increases to be made (e.g. 34) = 3. In this example, increase by making 1 yarn over after each 3rd stitch. Do not increase on bands. On the next row work the yarn overs twisted to avoid holes. INCREASE TIP-2 (for sides of body): All increases are worked from the right side! Work until there are 3 stitches left before the marker thread, make 1 yarn over, knit 6 (marker thread sits between these 6 stitches) make 1 yarn over (= 2 stitches increased at each marker thread; 4 stitches increased on row). On the next row (wrong side) purl the yarn overs twisted to avoid holes. Then work the new stitches in stocking stitch. DECREASE TIP (for mid under sleeve): Work until there are 3 stitches left before the marker thread, knit 2 together, knit 2 (marker thread sits between these 2 stitches), slip 1 stitch as if to knit, knit 1 and pass the slipped stitch over the knitted stitch (2 stitches decreased). BUTTONHOLES (top down): Work buttonholes on the right band (when the garment is worn). Work from the right side when there are 3 stitches left on the row as follows: Make 1 yarn over, knit 2 together and knit 1. On the next row (wrong side), knit the yarn over to leave a hole. The first buttonhole is worked when the rib on the neck measures approx. 1½-2 cm. Then work the other 7-7-7-7-8-8 buttonholes with approx. 7½-7½-8-8-7½-7½ cm between each one. CASTING OFF TIP: To avoid the cast-off edge being tight you can cast off with a larger size needle or make 1 yarn over after approx. each 8th stitch at the same time as casting off (yarn overs cast off as normal stitches). ------------------------------------------------------- START THE PIECE HERE: ------------------------------------------------------- JACKET – SHORT OVERVIEW OF THE PIECE: The neck and yoke are worked back and forth with circular needle from mid front, top down. The yoke is divided for body and sleeves and the body continued back and forth with circular needle. The sleeves are worked in the round with short circular needle/double pointed needles, top down. NECK: Cast on 112-120-124-128-132-136 stitches (including 5 band stitches on each side towards mid front) with circular needle size 3 mm and medium petrol. Purl 1 row (= wrong side). The next row is worked as follows from the right side: Work 5 band stitches in GARTER STITCH – read description above, * knit 2, purl 2 *, work from *-* until there are 7 stitches left on the row, knit 2 and finish with 5 band stitches in garter stitch. Continue this rib for 3-3-3-4-4-4 cm – remember the BUTTONHOLE on the right band – read description above. When the rib is finished knit 1 row from the right side where you increase 34-36-38-40-42-44 stitches evenly spaced – read INCREASE TIP-1 = 146-156-162-168-174-180 stitches. Purl 1 row from the wrong side (bands worked in garter stitch). Change to circular needle size 3.5 mm. Insert 1 marker after band at the beginning of the row mid front; the yoke will be measured from this marker! Now you can work an ELEVATION in the back of the neck – read description above. If you do not want an elevation, go straight to YOKE. YOKE: Work stocking stitch back and forth with medium petrol and 5 band stitches in garter stitch on each side towards mid front. When the piece measures 1½-1½-2-2-2-2 cm from the marker on the neck increase 34-36-40-46-48-52 stitches evenly spaced = 180-192-202-214-222-232 stitches. When the piece measures 2½-2½-3-3-3-3 cm from the marker on the neck, increase 31-35-37-41-45-47 stitches evenly spaced = 211-227-239-255-267-279 stitches. When the piece measures 3-3-4-4-4-4 cm from the marker on the neck, start the pattern by working as follows from the right side: Work 5 band stitches in garter stitch, work A.1A until there are 6 stitches left on the row (= 50-54-57-61-64-67 repeats of 4 stitches), A.1B (= 1 stitch) and finish with 5 band stitches in garter stitch. Continue this pattern. Read KNITTING TIP-1, KNITTING TIP-2 and REMEMBER THE KNITTING TENSION! AT THE SAME TIME increase stitches evenly spaced on each row marked with an arrow in A.1A as described below – remember INCREASE TIP-1 - NOTE: The first increase-row is from the wrong side and the 3 next increase-rows are from the right side. Arrow-1: Increase 36-36-40-44-44-52 stitches evenly spaced = 247-263-279-299-311-331 stitches (there is now room for 59-63-67-72-75-80 repeats of A.1 with 4 stitches). Arrow-2: Increase 40-42-50-54-60-64 stitches evenly spaced = 287-305-329-353-371-395 stitches (there is now room for 46-49-53-57-60-64 repeats of A.1 with 6 stitches). Arrow-3: Increase 20-26-30-34-44-48 stitches evenly spaced = 307-331-359-387-415-443 stitches (there is now room for 74-80-87-94-101-108 repeats of A.1 with 4 stitches). Arrow-4: Increase 12-20-24-24-28-32 stitches evenly spaced = 319-351-383-411-443-475 stitches (there is now room for 77-85-93-100-108-116 repeats of A.1 with 4 stitches). When A.1 has been completed continue with stocking stitch and olive, with 5 band stitches in garter stitch on each side. AT THE SAME TIME on the first row after A.1, increase 2-6-6-10-6-14 stitches evenly spaced = 321-357-389-421-449-489 stitches. Work until the piece measures 20-22-24-25-27-29 cm from the marker on the neck. Divide the yoke for body and sleeves, working the next round with olive as follows: Work 52-57-60-66-72-79 stitches in garter stitch and stocking stitch as before (= front piece), place the next 62-70-80-84-86-92 stitches on 1 thread for sleeve, cast on 8-8-10-10-12-12 new stitches on the needle (= in side under sleeve), work 93-103-109-121-133-147 stitches in stocking stitch (= back piece), place the next 62-70-80-84-86-92 stitches on 1 thread for sleeve, cast on 8-8-10-10-12-12 new stitches on the needle (= in side under sleeve) and work the remaining 52-57-60-66-72-79 stitches in stocking stitch and garter stitch as before (= front piece). Body and sleeves are finished separately. THE PIECE IS NOW MEASURED FROM HERE! BODY: = 213-233-249-273-301-329 stitches. Insert 1 marker thread 56-61-65-71-78-85 stitches in from each side (= 101-111-119-131-145-159 stitches between marker threads on the back piece). Allow them to follow your work onwards; they will be used when increasing in the sides. Work stocking stitch back and forth with olive and 5 band stitches in garter stitch on each side towards mid front. When the piece measures 5 cm from the division in all sizes increase 1 stitch on each side of both marker threads – read INCREASE TIP (= 4 stitches increased). Increase like this every 5-5-5-4-4-4 cm a total of 5-5-5-6-6-6 times on each side = 233-253-269-297-325-353 stitches. Continue working until the piece measures 30 cm from the division (there is approx. 3 cm to finished length; you can try the jacket on and continue working to desired length). Knit 1 row from the right side where you increase 75-83-87-99-107-115 stitches evenly spaced = 308-336-356-396-432-468 stitches (this is done so the rib is not tight). Change to circular needle size 3 mm. The next row is worked as follows from the wrong side: Work 5 band stitches in garter stitch, * purl 2, knit 2 *, work from *-* until there are 7 stitches left on the row, purl 2 and finish with 5 band stitches in garter stitch. Continue this rib for 3 cm. Loosely cast off with garter stitch over garter stitch, knit over knit and purl over purl – read CASTING OFF TIP! The jacket measures approx. 56-58-60-62-64-66 cm from the shoulder down. SLEEVE: Place the 62-70-80-84-86-92 stitches from the thread on the one side of the piece on short circular needle/double pointed needles size 3.5 mm and knit up 1 stitch in each of the 8-8-10-10-12-12 stitches cast on under the sleeve = 70-78-90-94-98-104 stitches. Insert 1 marker thread in the middle of the 8-8-10-10-12-12 stitches and allow it to follow your work onwards; it will be used when decreasing mid under sleeve. Start the round at the marker thread and work stocking stitch in the round with olive. When the piece measures 3 cm from the division in all sizes decrease 2 stitches mid under sleeve – read DECREASE TIP. Decrease like this every 3½-2½-1½-1½-1½-1 cm a total of 10-13-18-19-19-22 times = 50-52-54-56-60-62 stitches. Continue working until the sleeve measures 38-36-34-33-31-30 cm from the division (there is approx. 7 cm to finished length; you can try the jacket on and continue working to desired length). NOTE: Shorter measurements in larger sizes due to wider neck and longer yoke. Knit 1 round where you increase 18-20-18-20-20-22 stitches evenly spaced = 68-72-72-76-80-80 stitches. Change to double pointed needles size 3 mm and work rib (= knit 2 / purl 2) for 7 cm. Cast off with knit over knit and purl over purl – remember CASTING OFF TIP. The sleeve measures approx. 45-43-41-40-38-37 cm from the division. Work the other sleeve in the same way. ASSEMBLY: Sew buttons onto the left band. |
|||||||||||||||||||
Diagram explanations |
|||||||||||||||||||
|
|||||||||||||||||||
|
|||||||||||||||||||
|
|||||||||||||||||||
|
|||||||||||||||||||
|
|||||||||||||||||||
|
Have you made this or any other of our designs? Tag your pictures in social media with #dropsdesign so we can see them! Do you need help with this pattern?You'll find tutorial videos, a Comments/Questions area and more by visiting the pattern on garnstudio.com. © 1982-2024 DROPS Design A/S. We reserve all rights. This document, including all its sub-sections, has copyrights. Read more about what you can do with our patterns at the bottom of each pattern on our site. |
|||||||||||||||||||


With over 40 years in knitting and crochet design, DROPS Design offers one of the most extensive collections of free patterns on the internet - translated to 17 languages. As of today we count 304 catalogues and 11422 patterns - 11422 of which are translated into English (UK/cm).
We work hard to bring you the best knitting and crochet have to offer, inspiration and advice as well as great quality yarns at incredible prices! Would you like to use our patterns for other than personal use? You can read what you are allowed to do in the Copyright text at the bottom of all our patterns. Happy crafting!
Comments / Questions (13)
Om dit vest met een verhoging aan de achterkant ( bij de nek) te breien: die extra toeren voor de verhoging brei ik nadat het halsboord gebreid is? Vgr Trudy
06.10.2023 - 20:00DROPS Design answered:
Dag Trudy,
Ja klopt. Je breit eerst de halsboord en dan de verhoging.
08.10.2023 - 16:31Habe die Jacke in XXL gestrickt. 19cm länger als in der Anleitung. Es blieben in der Farbe gelbgrün 100g und noch ein Knäuel mit 40g übrig.
06.11.2022 - 11:47Hej! Jag tänker använda mig av garnet Drops alpacka för att sticka denna kofta. Jag undrar om jag kan sticka på rundsticka, enbart rätstickning, klippa upp framstycket/framsidan och plocka upp maskor och sticka ”knappkanten” efter? (Istället för att sticka aviga och räta maskor) Hälsningar Carin
25.01.2022 - 18:21DROPS Design answered:
Hej Carin. Ja det kan du göra, kom ihåg att lägga till några "uppklippningsmaskor" bara. Se gärna denna video för tips. Mvh DROPS Design
26.01.2022 - 10:49Bonjour, Sur le diagramme taille L il faut démarrer le diagramme sur l'endroit mais la première augmentation correspond à un rang envers alors qu'elle doit être faite à l'endroit selon les explications. Pouvez vous m'aider svp ? Dois je faire les augmentations sur un rang envers ou un rang endroit ? Merci d'avance !.
16.10.2021 - 21:50DROPS Design answered:
Bonjour Nathalie, le diagramme se commence sur l'endroit dans toutes les tailles, le 1er rang d'augmentation se fera effectivement sur l'envers, faites les jetés entre 2 m envers (cf cette vidéo) et tricotez ces jetés torse à l'endroit au rang suivant. Bon tricot!
18.10.2021 - 08:59Ik ben tot nu toe niet tevreden met het antwoord! Want.... In het patroon staat wel degelijk, dat er onderaan het lijf (zie regel 12: brei 1 naald recht aan de goede kant ...etc etc.) 99 steken moeten worden gemeerderd. Zou u daar nogmaals uw licht over willen laten schijnen? Ik vin het aantal van 99 steken nogal veel om te moeten meerderen om de boordsteek niet té strak te laten zijn. Bvd
11.08.2021 - 09:25DROPS Design answered:
Dag Marjo,
Dan had ik je vraag in eerste instantie verkeerd begrepen. Er worden inderdaad 99 steken gemeerderd vlak voordat je de boord breit. De boord wordt vervolgens met een dunnere naald gebreid en om te voorkomen dat de boord te strak wordt (wat normaliter vaak wel de bedoeling is bij bijvoorbeeld een trui) moeten er zoveel steken gemeerderd worden. Op die manier blijft het lijf doorlopen in een lichte A-lijn.
17.08.2021 - 13:04Ik ben tot nu toe niet tevreden met het antwoord! Want.... In het patroon staat wel degelijk, dat er onderaan het lijf (zie regel 12: brei 1 naald recht aan de goede kant ...etc etc.) 99 steken moeten worden gemeerderd. Zou u daar nogmaals uw licht over willen laten schijnen? Ik vin het aantal van 99 steken nogal veel om te moeten meerderen om de boordsteek niet té strak te laten zijn. Bvd
05.08.2021 - 10:32Zojuist de pasafgerond en ben dus nu aan het zgn. lijf. Tot mijn verbazing zie ik, dat er bij een lengte van 30cm vanaf het meetpunt in het oksel, voor XL 99 steken moeten worden gemeerderd. Is dit niet héél erg veel l?? Tot dit punt bestaat het aantal steken uit 297. Dan is 99 steken dus 1/3 x zoveel . Ik twijfel heel erg of ik dít wel moet gaan doen. Kunt mij raad geven? Bij voorbaat dank. Mvrgr. Marjo
01.08.2021 - 20:07DROPS Design answered:
Dag Marjo,
Voor maar xl meerder je op het lijf van 273 naar 297 steken, dat zijn 24 steken in totaal.
02.08.2021 - 21:01Hei. Ser desverre ikke hvor jeg ser målene på størrelser?? Så finner ikke ut hvilken str jeg skal velge? På forhånd takk.
06.02.2021 - 12:38DROPS Design answered:
Hei May Anita. Målene til de forskjellige størrelsene finner du på målskissen nederst på oppskriften. mvh DROPS design
08.02.2021 - 13:41Ik zie dat dit vest met naalddikte 3 en 3,5 wordt gebreid, terwijl naalddikte 3 bij deze wol geldt. Het vergelijkbaar vest Blueberry Fizz wordt met naaldiktes 2,5 en 3 gebreid. Wordt dit vest niet erg los met naalddikte 3,5?
04.01.2021 - 13:42DROPS Design answered:
Dag Christiane,
Als je de juiste stekenverhouding hebt, zoals aangegeven in het patroon, kun je de aantallen steken aanhouden zoals beschreven. Per patroon kan de naalddikte soms inderdaad ietsje afwijken van wat normaal voor het garen geadviseerd wordt.
09.01.2021 - 16:13Jeg kan ikke finne at det står noe sted hvilken farge man skal ha på stolpene. Har jeg oversett noe? Går jo an å se på bildet, men hadde vært fint om det stod beskrevet.
07.04.2020 - 21:48DROPS Design answered:
Hei Marit. Ditt ønske er oversendt til designavdelingen, slik at de kan ta en titt og evnt forbedre / lage en tekst ang farger og stolpen. mvh DROPS design
20.04.2020 - 13:27