
Popular categories
Looking for a yarn?


|
|||||||||||||
Winter's Night Enchantment |
|||||||||||||
 |
 |
||||||||||||
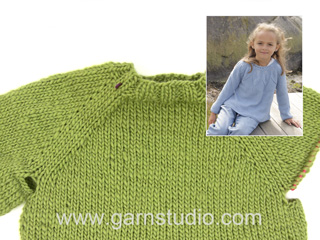
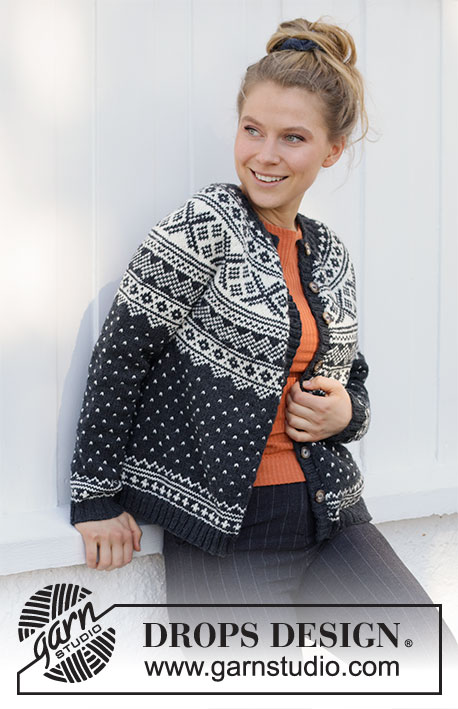
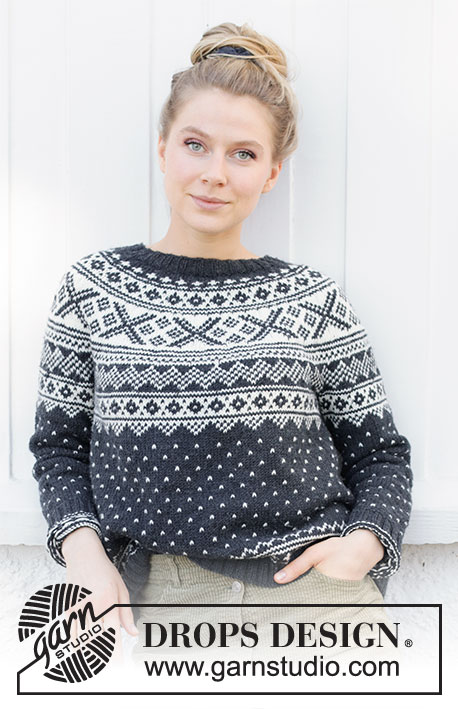
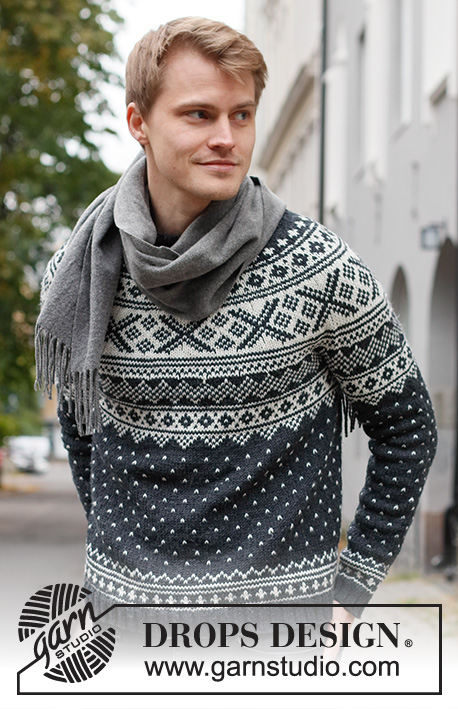
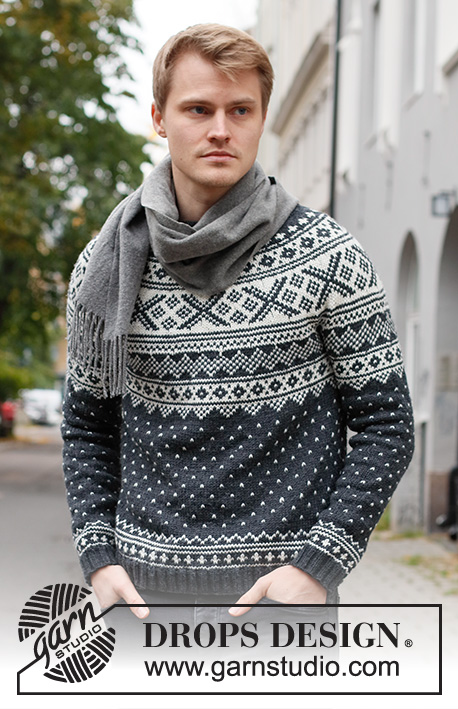
Knitted jumper for men in DROPS Karisma. The piece is worked top down with round yoke and Nordic pattern. Sizes S - XXXL.
DROPS 219-15 |
|||||||||||||
|
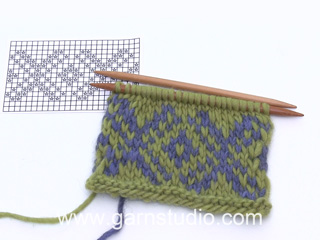
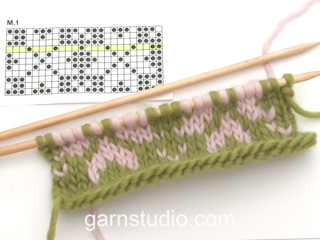
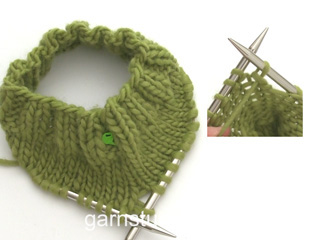
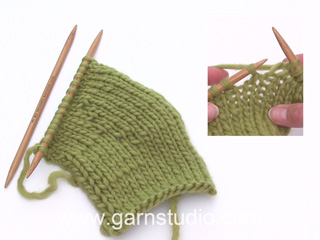
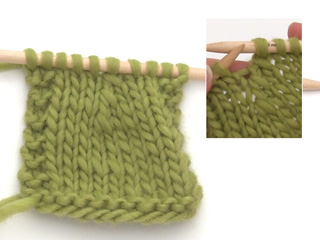
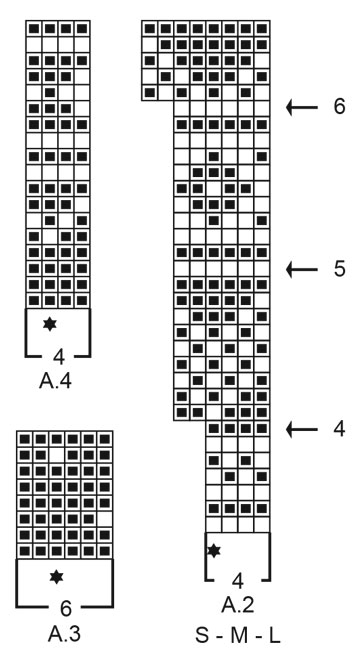
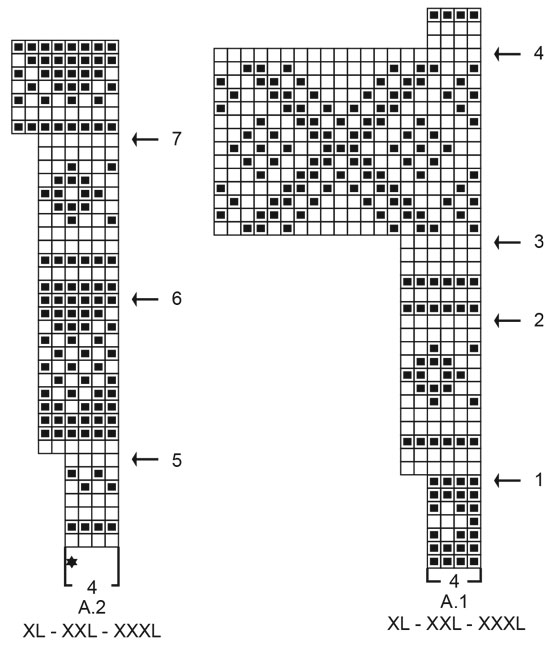
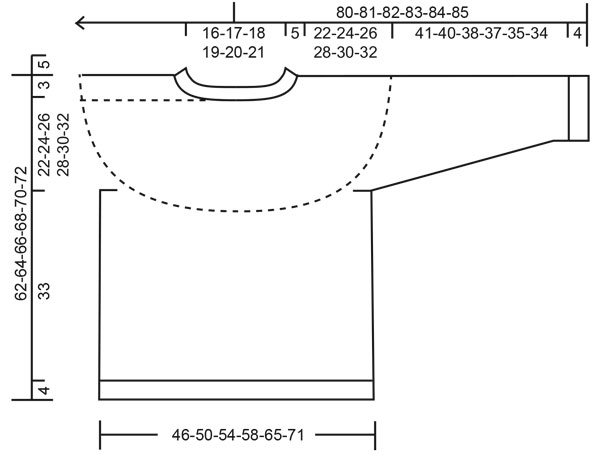
------------------------------------------------------- EXPLANATIONS FOR THE PATTERN: ------------------------------------------------------- INCREASE/DECREASE TIP (evenly spaced): To work out how to increase/decrease evenly, count the total number of stitches on needle (e.g. 92 stitches) and divide by the number of increases/decreases to be made (e.g. 28) = 3.3. In this example, increase by making 1 yarn over after approx. each 3rd stitch. On the next round knit the yarn overs twisted to avoid holes. When decreasing, knit together approx. each 2nd and 3rd stitch. ELEVATION (back of neck): To make the back of the neck slightly higher when working the yoke, you can work an elevation as described here. Skip this section if you do not want an elevation. Insert 1 marker at the start of the round = mid-back. Start from the right side with anthracite and knit 12-13-14-15-15-16 stitches past the marker-stitch, turn, tighten strand and purl 24-26-28-30-30-32 stitches back. Turn, tighten strand and knit 36-39-42-45-45-48 stitches, turn, tighten strand and purl 48-52-56-60-60-64 stitches back. Turn, tighten strand and knit 60-65-70-75-75-80 stitches, turn, tighten strand and purl 72-78-84-90-90-96 stitches back. Turn, tighten the strand and knit back to mid-back. Then work YOKE as described in the text. PATTERN: See diagrams A.1 to A.4. Choose diagram for your size (applies to A.1 and A.2). The whole pattern is worked in stocking stitch. KNITTING TIP: To avoid the knitting tension becoming tighter when working the pattern, it is important that the strands at the back are not tight. Use a size larger needle when working pattern if this is a problem. If the knitting tension is too tight in height, the garment will be short and the armholes too small – you can correct this by regularly working an extra row in the one-coloured sections. If your work is loose, the garment will be too long and the armholes too big – you can correct this by regularly working one less row in the one-coloured sections. DECREASE TIP (for sleeves): Decrease 2 stitches mid-under the sleeve as follows: S: Work until there are 2 stitches left before the marker under the sleeve, knit 2 together with anthracite, marker, knit 2 twisted together with anthracite (= 2 stitches decreased). M, L, XL, XXL and XXXL: Work until there are 2 stitches left before the marker-stitch under the sleeve, knit 2 together with anthracite, knit the marker stitch with anthracite and knit 2 twisted together with anthracite (= 2 stitches decreased). CASTING-OFF TIP: To avoid the cast-off edge being tight you can cast off with a larger size needle. If the edge is still tight, make 1 yarn over after approx. each 4th stitch at the same time as casting off; the yarn overs are cast off as normal stitches. ------------------------------------------------------- START THE PIECE HERE: ------------------------------------------------------- JUMPER – SHORT OVERVIEW OF THE PIECE: The neck and yoke are worked in the round with circular needle, from mid back and top down. The yoke is divided for body and sleeves and the body is continued in the round with circular needle. The sleeves are worked with short circular needle/double pointed needles, top down. NECK: Cast on 92-96-100-104-108-112 stitches with short circular needle size 3 mm and anthracite. Knit 1 round then work rib in the round (knit 2, purl 2) for 5 cm. Change to circular needle size 4 mm and knit 1 round where you increase 28-28-32-32-36-40 stitches evenly spaced – read INCREASE/DECREASE TIP = 120-124-132-136-144-152 stitches. Insert 1 marker mid-front; the yoke is measured from this marker! Now you can work an ELEVATION at the back of the neck – read description above. If you do not want an elevation, go straight to YOKE. YOKE: Work 0-0-2-2-4-6 rounds of stocking stitch with anthracite. Read KNITTING TIP and work A.1 in the round (= 30-31-33-34-36-38 repeats of 4 stitches). Continue this pattern and when A.1 has been completed, work A.2 in the same way REMEMBER THE KNITTING TENSION! AT THE SAME TIME on each round marked with an arrow in A.1 and A.2 increase stitches as described below – remember INCREASE/DECREASE TIP: SIZES S, M and L: Arrow-1: Increase 36-38-42 stitches evenly spaced = 156-162-174 stitches (there is now room for 26-27-29 repeats of 6 stitches). Arrow-2: Increase 64-58-66 stitches evenly spaced = 220-220-240 stitches (there is now room for 11-11-12 repeats of 20 stitches). Arrow-3: Increase 32-40-36 stitches evenly spaced = 252-260-276 stitches (there is now room for 63-65-69 repeats of 4 stitches). Arrow-4: Increase 30-34-36 stitches evenly spaced = 282-294-312 stitches (there is now room for 47-49-52 repeats of 6 stitches). Arrow-5: Increase 24-30-36 stitches evenly spaced = 306-324-348 stitches (there is now room for 51-54-58 repeats of 6 stitches). Arrow-6 (only in sizes M and L, because in S the piece is divided for the body and sleeves before this section starts): Increase 4-4 stitches evenly spaced = 306-328-352 stitches (there is now room for 41-44 repeats of 8 stitches in sizes M and L). SIZES XL, XXL and XXXL: Arrow-1: Increase 44-48-52 stitches evenly spaced = 180-192-204 stitches (there is now room for 30-32-34 repeats of 6 stitches). Arrow-2: Increase 42-48-54 stitches evenly spaced = 222-240-258 stitches (there is now room for 37-40-43 repeats of 6 stitches). Arrow-3: Increase 18-20-22 stitches evenly spaced = 240-260-280 stitches (there is now room for 12-13-14 repeats of 20 stitches). Arrow-4: Increase 60-64-68 stitches evenly spaced = 300-324-348 stitches (there is now room for 75-81-87 repeats of 4 stitches). Arrow-5: Increase 54-54-60 stitches evenly spaced = 354-378-408 stitches (there is now room for 59-63-68 repeats of 6 stitches). Arrow-6: Increase 30-30-30 stitches evenly spaced = 384-408-438 stitches (there is now room for 64-68-73 repeats of 6 stitches). Arrow-7: Increase 8-8-10 stitches evenly spaced = 392-416-448 stitches (there is now room for 49-52-56 repeats of 8 stitches. ALL SIZES: Continue working until the piece measures 22-24-26-28-30-32 cm from the marker on the neck. NOTE: In some sizes there will be a number of rows left in A.2 when you divide for the body and sleeves – the rest of A.2 will be worked on the body and sleeves. Now divide for the body and sleeves as follows: Work 45-49-52-57-63-69 stitches as before (= ½ back piece), place the next 63-66-72-82-82-86 stitches on 1 thread for the sleeve, cast on 6-6-8-8-10-10 new stitches on the needle (= in side under sleeve), work 90-98-104-114-126-138 stitches as before (= front piece), place the next 63-66-72-82-82-86 stitches on 1 thread for the sleeve, cast on 6-6-8-8-10-10 new stitches on the needle (= in side under sleeve) and work the remaining 45-49-52-57-63-69 stitches as before (= ½ back piece). Body and sleeves are finished separately. THE PIECE IS NOW MEASURED FROM HERE! BODY: = 192-208-224-244-272-296 stitches. Finish A.2 – make sure the pattern matches the A.2 on the yoke, but be aware that the pattern does not fit under the sleeves in all sizes when working the last rows in A.2. When A.2 has been completed, work A.3 in the round – AT THE SAME TIME on the first round increase 0-2-4-2-4-4 stitches evenly spaced = 192-210-228-246-276-300 stitches. There is now room for 32-35-38-41-46-50 repeats of A.3 with 6 stitches. Repeat A.3 in height until the piece measures approx. 27 cm from the division in all sizes, finishing after a row with «spots». There is approx. 10 cm left to finished length; try the jumper on and continue A.3 to desired length. Work A.4 in the round – AT THE SAME TIME on the first round decrease 0-2-4-2-4-4 stitches evenly spaced = 192-208-224-244-272-296 stitches (there is now room for 48-52-56-61-68-74 repeats of A.4 with 4 stitches). When A.4 has been completed, the piece measures approx. 33 cm from the division. The body is finished with anthracite. Knit 1 round where you increase 40-44-44-48-56-60 stitches evenly spaced = 232-252-268-292-328-356 stitches. This is done to avoid the rib being tight. Change to circular needle size 3 mm and work rib (knit 2, purl 2) for 4 cm. Cast off with knit over knit and purl over purl – read CASTING-OFF TIP! The jumper measures approx. 62-64-66-68-70-72 cm from the shoulder down. SLEEVE: Place the 63-66-72-82-82-86 stitches from the thread on the one side of the piece on double pointed needles/short circular needle size 4 mm and knit up 1 stitch in each of the 6-6-8-8-10-10 stitches cast on under the sleeve = 69-72-80-90-92-96 stitches. Insert 2 markers in the piece without working the stitches: S: Insert 1 marker mid-under the sleeve in the middle of the middle 6 stitches, count 34 stitches, insert 1 marker in the next stitch = 34 stitches left to end of round. M, L, XL, XXL and XXXL: Start mid-under the sleeve, in the middle of the 6-8-8-10-10 stitches, insert 1 marker in the first stitch after the middle, count 35-39-44-45-47 stitches, insert 1 marker in the next stitch = 35-39-44-45-47 stitches left to end of round. ALL SIZES: Allow the markers to follow your work onwards; the marker under the sleeve is used when decreasing under the sleeve. The marker on top is when positioning the start of the pattern. Continue with PATTERN at the same time as you DECREASE mid-under the sleeve as described below – read the rest of the sleeve section before continuing: PATTERN: Start the round mid-under the sleeve and finish A.2 in the same way as on the body; count from the marker on top of the sleeve to the start of the pattern – the marker-stitch matches the stitch with the star in A.2 (decrease under the sleeve at the same time as you work the pattern). When A.2 has been completed, work A.3 in the round in the same way. Repeat A.3 in height until the sleeve measures approx. 35-34-32-31-29-28 cm from the division, finishing after a round of “spots”. NOTE: Shorter measurements in larger sizes due to wider neck and longer yoke. There is approx. 10 cm left to finished length; try the jumper on and continue A.3 to desired length. Then work A.4 in the round. DECREASING: At the same time, when the sleeve measures 3 cm from the division in all sizes, decrease 2 stitches mid-under the sleeve – read DECREASE TIP. Decrease like this every 4-3½-2½-2-1½-1½ cm a total of 9-10-13-17-18-19 times = 51-52-54-56-56-58 stitches. When A.4 has been completed and the decreases are finished, the sleeve measures approx. 41-40-38-37-35-34 cm from the division. Continue with anthracite. Knit 1 round where you increase 9-8-10-8-8-10 stitches evenly spaced = 60-60-64-64-64-68 stitches. Change to double pointed needles size 3 mm and work rib (knit 2, purl 2) for 4 cm. Cast off with knit over knit and purl over purl – remember CASTING-OFF TIP. The sleeve measures approx. 45-44-42-41-39-38 cm from the division. Work the other sleeve in the same way. |
|||||||||||||
Diagram explanations |
|||||||||||||
|
|||||||||||||
|
|||||||||||||

|
|||||||||||||
|
|||||||||||||
|
|||||||||||||
|
Have you made this or any other of our designs? Tag your pictures in social media with #dropsdesign so we can see them! Do you need help with this pattern?You'll find tutorial videos, a Comments/Questions area and more by visiting the pattern on garnstudio.com. © 1982-2024 DROPS Design A/S. We reserve all rights. This document, including all its sub-sections, has copyrights. Read more about what you can do with our patterns at the bottom of each pattern on our site. |
|||||||||||||


With over 40 years in knitting and crochet design, DROPS Design offers one of the most extensive collections of free patterns on the internet - translated to 17 languages. As of today we count 304 catalogues and 11422 patterns - 11422 of which are translated into English (UK/cm).
We work hard to bring you the best knitting and crochet have to offer, inspiration and advice as well as great quality yarns at incredible prices! Would you like to use our patterns for other than personal use? You can read what you are allowed to do in the Copyright text at the bottom of all our patterns. Happy crafting!
Comments / Questions (43)
Bonjour, Y a t'il moyen de ne pas avoir de décalage dans le jacquard en fin de tour ? Merci à vous. Pia.
24.02.2021 - 13:17DROPS Design answered:
Bonjour Mme Berbett, vous pouvez jongler entre la technique des rayures tricotées en rond et serrer le fil aux tours où cette technique n'est pas applicable - en raison du motif. Bon tricot!
24.02.2021 - 15:06For the body when starting A3 it says decrease but it goes from 208 to 210 stitches, shouldn t it read increase instead? “When A.2 has been completed, work A.3 in the round – AT THE SAME TIME on the first round decrease 0-2-4-2-4-4 stitches evenly spaced = 192-210-228-246-276-300 stitches. There is now room for 32-35-38-41-46-50 repeats of A.3 with 6 stitches.”
20.02.2021 - 04:05DROPS Design answered:
Dear Celine, online pattern has been now edited, you are supposed to increase these 0-2-4-2-4-4 stitches evenly spaced on the first round in A.3 (not to decrease them). Happy knitting!
22.02.2021 - 07:45Bonjour je m’interroge sur la division dos/devant pour la taille XL. il est indiqué que on obtient 244 mailles. Mais à l’explication suivante pour le premier rang de A3 on demande de diminuer de 2 mailles et on obtiendrait 246 mailles ? Et l’erreur se poursuit ainsi jusqu’à la fin de l’ouvrage. Y a t-il erreur sur les chiffres de division pour les manches de la tailles XL ou bien juste erreur de frappe à partir des diminutions de A3 ? Très beau modèle, un vrai plaisir.
16.02.2021 - 07:47DROPS Design answered:
Bonjour Mme Yuka, merci pour votre retour, il semble qu'il s'agisse bien d'une erreur, on devrait lire ici "augmenter" et non diminuer pour avoir le bon nombre de mailles dans toutes les tailles, merci pour votre retour, une correction sera bientôt ajoutée. Bon tricot!
16.02.2021 - 09:48Bonjour, J'ai le même soucis que Marie- Claire car il me faut seulement 22 rangs en hauteur pour faire 10 cm. par contre en largeur j'ai bien 21 m pour 10cm.donc j'arrive à 24 cm ( division) bien avant la flèche 6. est-ce que je supprime plusieurs rangs de A2 ( 1 motif par exemple ) et j'augmente vite avant de diviser ou est-ce que je divise avant et continue les augmentations après ? merci de m'aider
15.02.2021 - 21:07DROPS Design answered:
Bonjour Nathalie, dans ce type de modèle, la tension en hauteur est aussi importante que celle en largeur, essayez de tricoter avec des aiguilles plus fines (lavez, laissez sécher votre échantillon et recommencez si vous n'avez toujours pas la bonne tension) - sinon il vous faudra ajuster en fonction de votre propre tension. Nous ne sommes malheureusement pas en mesure de pouvoir adapter chacun de nos modèles à chaque demande/tension, merci pour votre compréhension. Votre magasin pourra fort probablement vous aider, même par mail ou téléphone. Bon tricot!
16.02.2021 - 09:36Invece di Karisma vorrei utilizzare Lima. Ho letto che sono intercambiabili. Mi date un consiglio? Grazie
08.02.2021 - 21:29DROPS Design answered:
Buonasera Nadia, può utilizzare Lima al posto di Karisma controllando che il suo campione corrisponda a quello indicato. Buon lavoro!
09.02.2021 - 21:53Jeg har strikket denne, men syns vrangborden ble altfor vid selv om jeg byttet til p 3. Forstår ikke hvorfor jeg skal legge opp så mange masker før vrangbordene. Det blir jo ikke fint! Nå må jeg rekke den opp.
11.01.2021 - 21:31Die weiße Wolle lasse ich auf der linken Seite, bei Norweger Mustern, immer komplett mit laufen,damit es keine unschönen Löcher beim Fatbwechsel gibt. Dadurch ist der Verbrauch oft höher als angegeben, da einige Designer das nicht berücksichtigen. Die Mengenangabe der weißen Wolle erscheint mir etwas knapp bemessen.
06.01.2021 - 17:34DROPS Design answered:
Liebe Miriam, so wird es auch gestrickt und kalkuliert. Sollte Ihre Maschenprobe in der Breite sowie in der Höhe stimmen, dann sollte die Garnmenge stimmen - wenn Sie immer fürchten, nicht genügend Garne zu haben, können Sie etwas mehr bestellen - das können Sie auch mit Ihrem DROPS Laden besprechen. Viel Spaß beim stricken!
07.01.2021 - 09:35Wenn ich das weiße Garn im Muster mit einwebe, reicht mit (für Gr. XXXL) die angegebene Menge von 250g?
05.01.2021 - 07:38DROPS Design answered:
Liebe Miriam, ich verstehe leider Ihre Frage nicht, können Sie es bitte anders erklären? Danke im voraus!
05.01.2021 - 11:47Jeg får ikke maskeantallet til å stemme. Jeg har nå 288 m på pinnen etter at jeg har delt arbeidet og satt av 72m i hvert erme. Strikker str L. Skal snart ta økning pil 6 til 436m.regner jeg med de 72 +72 ermemasker eller har jeg altfor lite masker på pinnen?
26.12.2020 - 18:12DROPS Design answered:
Hei Åse. Usikker på hvor det har blitt feil hos deg, men når A.1 og A.2 er strikket + de 2 omgangene du startet med etter merket, skal arbeidet måle ca 25 cm om strikkefastheten er overholdt (str. L). Da skal alle økningene (pil 1 til 6) være strikket, fortsett å strikke til arbeidet måler 26 cm og man har 352 masker på pinnen. Nå skal arbeidet deles. 52 masker (= ½ bakstykke), 72 maskene på 1 tråd til erme, legg opp 8 nye masker , strikk 104 (= forstykke), 72 maskene på 1 tråd til erme, legg opp 8 nye masker, strikk 52 maskene (= ½ bakstykke). Du skal da ha 52+8 +104+8+52 = 224 masker på pinnen. mvh DROPS design
13.01.2021 - 10:27Heisann! Strikker denne i L hvor jeg har tatt av 72 masker til ermer, å har nå plukker opp de 8 maskene man skal ha med = 80 masker. Men så står et at jeg skal sette et merke i midten og telle 44 masker også er det 44 masker igjen, så får det ikke til å gå opp? Hva kan feilen være?
16.12.2020 - 18:10