
Popular categories
Looking for a yarn?


|
|||||||||||||||||||||||||||||||
Timeless Textures |
|||||||||||||||||||||||||||||||
 |
 |
||||||||||||||||||||||||||||||
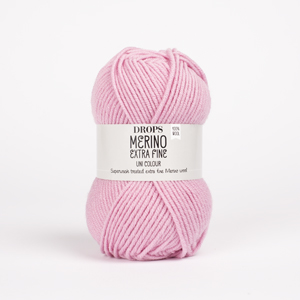
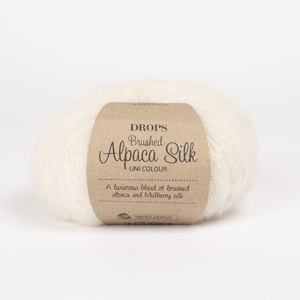
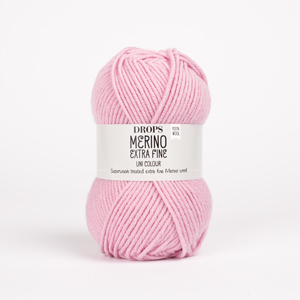
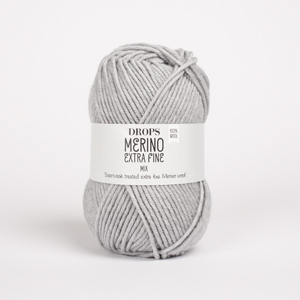
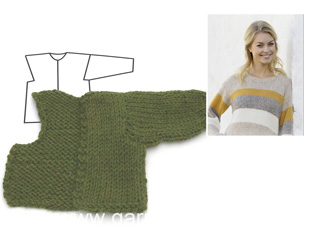
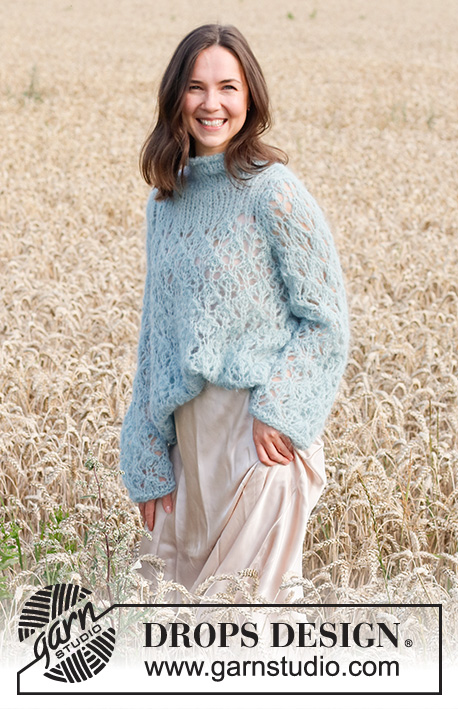
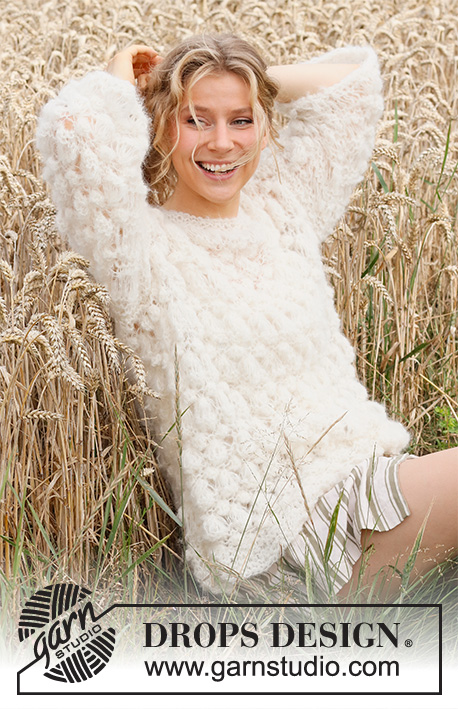
Knitted jumper in DROPS Merino Extra Fine and DROPS Brushed Alpaca Silk. The piece is worked with cables and textured pattern. Sizes S - XXXL.
DROPS 220-18 |
|||||||||||||||||||||||||||||||
|
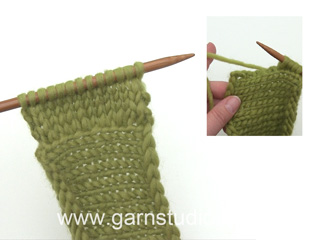
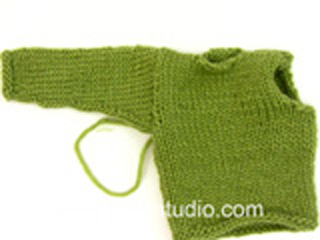
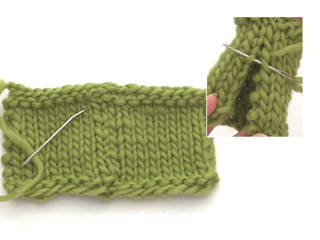
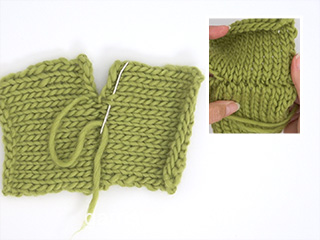
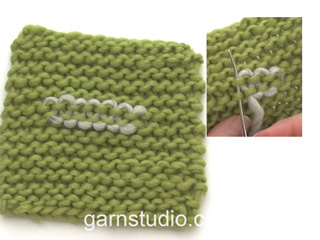
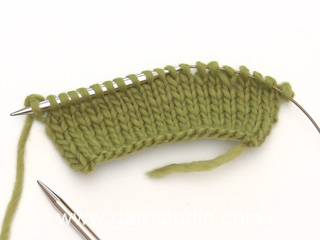
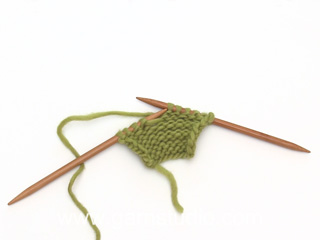
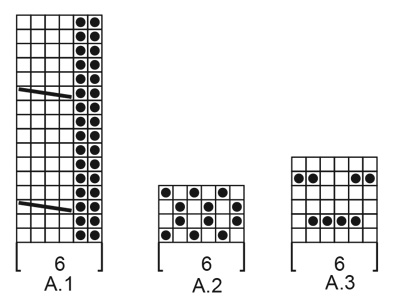
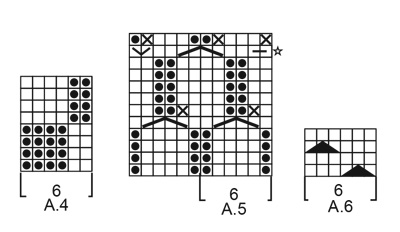
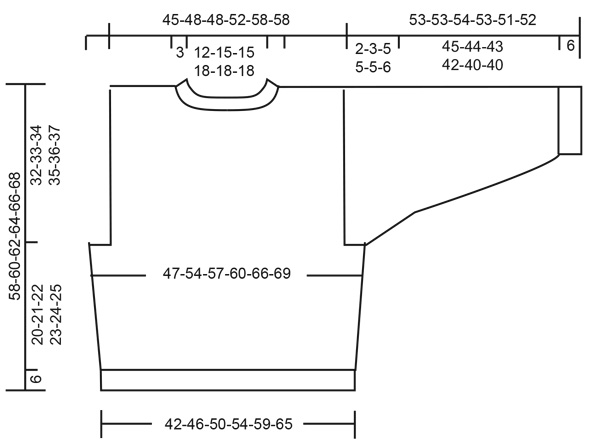
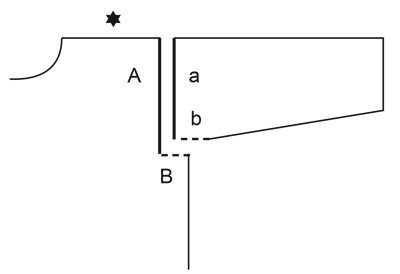
------------------------------------------------------- EXPLANATIONS FOR THE PATTERN: ------------------------------------------------------- RIDGE/GARTER STITCH (worked back and forth): Knit all rows. 1 ridge in height = Knit 2 rows. PATTERN: See diagrams A.1 to A.6. The diagrams show all rows in the pattern from the right side. STRIPES BODY: The stripes are worked with 1 edge stitch in garter stitch on each side. STRIPE 1: Already worked (= A.1) STRIPE 2: (with Merino Extra Fine), work A.2 until the piece measures 18-18-18-19-19-20 cm – adjust so you finish after row 2 or 4 in the diagram. Knit 4 rows (= 2 ridges). STRIPE 3: Change to Brushed Alpaca Silk. Work A.3 until the piece measures 26-27-27-28-28-30 cm – adjust so you finish after a row from the wrong side. STRIPE 4: Change to Merino Extra Fine. Knit 4 rows (= 2 ridges). Work A.4 two times in height, knit 4 rows (= 2 ridges). STRIPE 5: Work A.5 one time in height, then work the first 8 rows in the diagram. Knit 4 rows (= 2 ridges). STRIPE 6: Work A.2 until the piece measures 48-50-50-52-52-55 cm – adjust so you finish after row 2 or 4 in the diagram. Knit 4 rows (= 2 ridges). STRIPE 7: Change to Brushed Alpaca Silk. Work A.6 to finished length. STRIPES SLEEVES: The stripes are worked with 1 edge stitch in garter stitch on each side. STRIPE 1: Work A.1 one time in height, then work the first 8 rows in the diagram. STRIPE 2: Change to Merino Extra Fine. Knit 4 rows (= 2 ridges). Work A.2 until the piece measures 25-25-26-25-24-25 cm – adjust so you finish after row 2 or 4 in the diagram, knit 4 rows (= 2 ridges). STRIPE 3: Change to Brushed Alpaca Silk. Work A.3 until the piece measures 36-36-37-36-34-35 cm – adjust so you finish after a row from the wrong side. STRIPE 4: Change to Merino Extra Fine. Knit 4 rows (= 2 ridges). Work A.4 two times in height. Knit 4 rows (= 2 ridges). STRIPE 5: Work A.5 one time in height, then work the first 8 rows in the diagram. INCREASE/DECREASE TIP (evenly spaced): To work out how to increase/decrease evenly, count the total number of stitches on needle (e.g. 87 stitches), minus the edge stitches (i.e. 2 stitches) and divide the remaining stitches by the number of increases/decreases to be made (e.g. 19) = 4.5. In this example, increase by making 1 yarn over after alternately each 4th and 5th stitch. Do not increase over the edge stitches. On the next row work the yarn overs twisted to avoid holes. When decreasing, knit together alternately each 3rd and 4th stitch and each 4th and 5th stitch. INCREASE TIP (for sleeves): Increase by making 1 yarn over inside the 1 edge stitch on each side. All increase are made from RS! On the next row work the yarn overs twisted to avoid holes. Then work the new stitches in pattern as described in the text. ------------------------------------------------------- START THE PIECE HERE: ------------------------------------------------------- JUMPER – SHORT OVERVIEW OF THE PIECE: The front and back pieces and the sleeves are worked separately back and forth, then sewn together to finish. The neck is worked in the round with short circular needle. BACK PIECE: Cast on 87-95-103-111-121-135 stitches with circular needle size 4 mm and Merino Extra Fine. Purl 1 row (= wrong side). Then work rib as follows: ROW 1 (right side): 1 edge stitch in GARTER STITCH – read description above, * knit 1 twisted, purl 1 *, work from *-* until there are 2 stitches left, knit 1 twisted and work 1 edge stitch in garter stitch. ROW 2 (wrong side): 1 edge stitch in garter stitch * purl 1 twisted, knit 1 *, work from *-* until there are 2 stitches left, purl 1 twisted and 1 edge stitch in garter stitch. Repeat rows 1 and 2 until the rib measures 6 cm – adjust so the last row is worked from the right side. Change to circular needle size 5 mm and Brushed Alpaca Silk. Purl 1 row from the wrong side where you increase 19-23-21-25-21-19 stitches evenly spaced – read INCREASE/DECREASE TIP = 106-118-124-136-142-154 stitches. Now work pattern as follows: 1 edge stitch in garter stitch, A.1 until there are 3 stitches left (= 17-19-20-22-23-25 repeats of 6 stitches), purl 2 and 1 edge stitch in garter stitch. Continue this pattern back and forth until A.1 has been completed in height. REMEMBER THE KNITTING TENSION! Change to Merino Extra Fine. Knit 1 row from the right side where you decrease 14-14-14-20-14-20 stitches evenly spaced = 92-104-110-116-128-134 stitches. Knit 3 more rows (= 2 ridges). Start with stripe 2 in STRIPES BODY – read description above and continue with stripes. AT THE SAME TIME when the piece measures 26-27-28-29-30-31 cm, cast off 3-6-9-9-9-12 stitches at the beginning of the next 2 rows for the armholes = 86-92-92-98-110-110 stitches. When the piece measures 56-58-60-62-64-66 cm cast off the middle 32-38-38-44-44-44 stitches for the neck and each shoulder is finished separately. Then cast off 1 stitch from the neck = 26-26-26-26-32-32 stitches. Continue with pattern and 1 edge stitch in garter stitch on each side until the piece measures 58-60-62-64-66-68 cm from the shoulder down. Cast off. Work the other shoulder in the same way. FRONT PIECE: Cast on 87-95-103-111-121-135 stitches with circular needle size 4 mm and Merino Extra Fine. Purl 1 row (= wrong side). Then work rib as follows: ROW 1 (right side): 1 edge stitch in garter stitch, * knit 1 twisted, purl 1 *, work from *-* until there are 2 stitches left, knit 1 twisted and 1 edge stitch in garter stitch. ROW 2 (wrong side): 1 edge stitch in garter stitch * purl 1 twisted, knit 1 *, work from *-* until there are 2 stitches left, purl 1 twisted and 1 edge stitch in garter stitch. Repeat rows 1 and 2 until the rib measures 6 cm – adjust so the last row is worked from the right side. Change to circular needle size 5 mm and Brushed Alpaca Silk. Purl 1 row from the wrong side where you increase 19-23-21-25-21-19 stitches evenly spaced = 106-118-124-136-142-154 stitches. Work pattern and decrease stitches in the same way as on the back piece = 92-104-110-116-128-134 stitches (when you reach the armholes). When the piece measures 26-27-28-29-30-31 cm, cast off 3-6-9-9-9-12 stitches at the beginning of the next 2 rows for the armholes = 86-92-92-98-110-110 stitches. When the piece measures 51-53-55-56-58-59 cm, place the middle 26-32-32-38-38-38 stitches on a thread for the neck and finish each shoulder separately. Continue by casting off on each row from the neck as follows: Cast off 2 stitches 1 time and 1 stitch 2 times – the stitches which do not fit into the pattern after decreasing, are worked in stocking stitch = 26-26-26-26-32-32 stitches. Continue with this pattern and 1 edge stitch in garter stitch on each side until the piece measures 58-60-62-64-66-68 cm from the shoulder down. Cast off. Work the other shoulder in the same way. SLEEVES: Cast on 44-48-50-52-54-56 stitches (including 1 edge stitch on each side) with circular needle size 4 mm and Merino Extra Fine. Purl 1 row (= wrong side). Then work rib as follows: ROW 1 (right side): 1 edge stitch in garter stitch, * knit 1 twisted, purl 1 *, work from *-* until there is 1 stitch left, knit 1 twisted and 1 edge stitch in garter stitch. ROW 2 (wrong side): 1 edge stitch in garter stitch * purl 1 twisted, knit 1 *, work from *-* until there is 1 stitch left, purl 1 twisted and 1 edge stitch in garter stitch. Repeat rows 1 and 2 until the rib measures 6 cm – adjust so the last row is worked from the right side. Change to circular needle size 5 mm and Brushed Alpaca Silk. Purl 1 row from the wrong side where you increase 18-20-18-22-20-24 stitches evenly spaced = 62-68-68-74-74-80 stitches. Now work STRIPE SLEEVES – read description above, and when the piece measures 13 cm, start to increase on both sides – read INCREASE TIP. Increase like this every 2-2-1½-2-1½- 1½ cm a total of 9-8-10-8-10-9 times = 80-84-88-90-94-98 stitches. Work pattern as far as possible out to each side, the remaining stitches are worked in stocking stitch. When the sleeve measures 33-32-31-30-28-28 cm, continue the increases, but now on each row from the right side, a total of 22 times = 124-128-132-134-138-142 stitches. When the stripes are finished, the sleeve measures 53-53-54-53-51-52 cm. Cast off. Insert a marker in each side 2-3-5-5-5-6 cm from the top. These are used when sewing the sleeves to the body. Work the other sleeve in the same way. ASSEMBLY: Sew the shoulder seams with grafting stitches, inside the cast-off edge. Sew the sleeves to the body – see illustration. Sew the sleeve seams and the side seams in one go, inside the 1 edge stitch. NECK: Start with Brushed Alpaca Silk and short circular needle size 4 mm. Knit up from the right side 92 to 120 stitches inside 1 stitch around the neck (stitch count includes the stitches from the thread in front and should be divisible by 2). Change to Merino Extra Fine and work rib (knit 1 twisted, purl 1) in the round for 7 cm. Cast off with knit over knit and purl over purl. Make sure the cast-off edge is not tight. Fold the neck to the inside and sew down; to avoid the neck being tight and rolling outwards, it is important the seam is elastic. |
|||||||||||||||||||||||||||||||
Diagram explanations |
|||||||||||||||||||||||||||||||
|
|||||||||||||||||||||||||||||||
|
|||||||||||||||||||||||||||||||
|
|||||||||||||||||||||||||||||||
|
|||||||||||||||||||||||||||||||
|
|||||||||||||||||||||||||||||||
|
Have you made this or any other of our designs? Tag your pictures in social media with #dropsdesign so we can see them! Do you need help with this pattern?You'll find tutorial videos, a Comments/Questions area and more by visiting the pattern on garnstudio.com. © 1982-2024 DROPS Design A/S. We reserve all rights. This document, including all its sub-sections, has copyrights. Read more about what you can do with our patterns at the bottom of each pattern on our site. |
|||||||||||||||||||||||||||||||


With over 40 years in knitting and crochet design, DROPS Design offers one of the most extensive collections of free patterns on the internet - translated to 17 languages. As of today we count 304 catalogues and 11422 patterns - 11422 of which are translated into English (UK/cm).
We work hard to bring you the best knitting and crochet have to offer, inspiration and advice as well as great quality yarns at incredible prices! Would you like to use our patterns for other than personal use? You can read what you are allowed to do in the Copyright text at the bottom of all our patterns. Happy crafting!
Comments / Questions (66)
Hallo , ich begreife Ihre Anleitung zu Diagramm A5 , nicht.Zu konfus erklärt.Können Sie bitte ein Video davon machen? Ich komm sonst nicht weiter . Danke schön ..
13.11.2022 - 12:28DROPS Design answered:
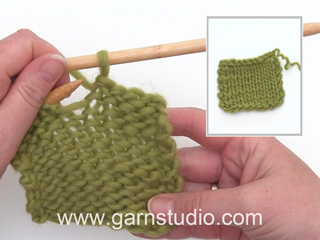
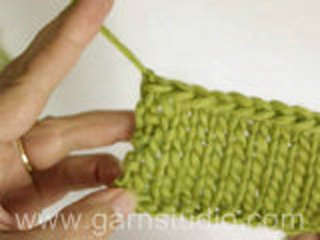
Liebe Gudrun, bei der 5. Reihe (Hinreihe) sollen Sie diei Nadel zwischen die 4. und die 5. Masche auf die linke Nadel = 1 Zunahme, dann stricken Sie 1 M re, 2 M li, 1 M re; bei der Rückreihe stricken Sie diese 5 Maschen so: 1 li, 2 re, 1 li, dann die zusätzliche Masche stricken Sie links verschränkt mit der nächsten Masche. So sind es wieder 4 Maschen rechts zwischen de 2 Maschen links (von der Vorderseite gesehen). Viel Spaß beim stricken!
14.11.2022 - 09:58Bonjour, j’ai réalisé le modèle 220/18 avec la laine adequate et j’aimerais savoir si il faut bloquer ce modèle ,merci.
05.10.2022 - 14:00DROPS Design answered:
Bonjour Mme Tramasure, certaines tricoteuses bloquent leurs ouvrages, d'autres non, c'est juste une question de choix personnel, n'hésitez pas à demander conseil à votre magasin si besoin. Bon tricot!
06.10.2022 - 07:51Hallo Ich bin nun beim Diagramm A.5 Leider verstehe ich nicht wie ich in die 4. + 5. Masche einstechen soll. Von hinten oder vorne. Normal oder verschränkt. Links oder rechts. Und dann hab ich zwar eine neue Masche auf der re Nadel, die anderen aber immernoch links auf der Nadel. Und wo strick ich dann eine re/2 li/1 re weiter Dankeschön :-)
16.08.2022 - 10:40DROPS Design answered:
Liebe Jamilah, hier sollen Sie die Nadel zwischen den 4. und 5. Masche auf der linke Nadel von vorne nach hinten einstechen und den Faden durchziehen, jetzt haben Sie 1 neue Masche auf der rechte Nadel. Stricken Sie jetzt 1 Masche rechts, 2 Maschen links und 1 Masche rechts (= die 4 nächsten Maschen auf der linke Nadel). Bei der nächsten Reihe stricken Sie zusammen die neue Masche und die nächste Masche (= siehe 5. Symbol) damit die Maschenanzahl wieder wie zuvor wird. Viel Spaß beim stricken!
16.08.2022 - 17:03Est il possible de recommander une pelote de laine « Alpaca Silk - colour 8 - délot 518989 pour me permettre de terminer mon pull car je vais manquer de cette laine ?
20.07.2022 - 12:09DROPS Design answered:
Bonjour Catherine, vous devez contacter un de nos magaisins (leur liste complete est disponible ICI. Ou meme demandez a nos clientes sur notre groupe sur Facebook DROPS Workshop. Bon travail!
24.07.2022 - 15:12Je n'arrive pas à réaliser le point indiqué au diagramme À.5, pouvez me donner des explications complémentaires pour le réaliser. Le texte dit ceci : insérer l'aiguille entre la 4ème et la 5ème maille sur l'aiguille gauche, ramener le fil (=1 maille en plus), tricoter 1 maille endroit, 2 mailles envers, 1 maille endroit.
24.06.2022 - 15:15DROPS Design answered:
Bonjour Mme Desprez, vous devez insérer l'aiguille droite entre la 4ème et la 5ème maille sur l'aiguille gauche (bien entre ces mailles, on va créer une maille en plus), attrapez le fil sur l'envers et ramenez-le entre ces 2 mailles pour former une nouvelle maille sur l'aiguille droite, tricotez maintenant les 4 mailles suivantes ainsi: 1 m end, 2 m env, 1 m end. Au rang suivant (sur l'envers), vous tricoterez ensemble torse à l'envers la maille indiquée par le diagramme et cette nouvelle maille crée au rang sur l'endroit. Bon tricot!
27.06.2022 - 07:58Je souhaite des explications sur le point suivant : tricoter 3 mailles à l’envers, mais sans les lâcher de l’aiguille , tricoter ces mailles encore une fois ensemble à l’endroit puis ensemble à l’envers, lâcher ces mailles de l’aiguille gauche. Et également sur : insérer l’aiguille entre la 2ème et la 3ème maille sur l’aiguille gauche, ramener le fil, tricoter 1 maille endroit, 1 maille envers
14.06.2022 - 15:22DROPS Design answered:
Bonjour Mme Desprez, cette vidéo montre comment tricoter ce petit noeud en tricotant 3 fois 3 mailles ensemble (alternativement à l'envers, à l'endroit et à l'envers); pour l'autre symbole, suivez exactement l'explication: vous allez piquer l'aiguille entre 2 mailles (de l'avant vers l'arrière et ramener le fil pour avoir 1 maille en plus sur l'aiguille droite; tricotez les 2 mailles suivantes ainsi: 1 m end, 1 m env (vous avez 3 mailles sur l'aiguille à ce niveau, vous diminuerez 1 m au rang suivant). Bon tricot!
14.06.2022 - 16:54Bonjour, je vois que vous tricotez ce pull avec 2 qualités de fils différents. L'un est lavable en machine et l'autre non. Pourriez-vous m'indiquer un fil qui puisse remplacer celui qui n'est pas lavable en machine svp ? Merci
21.04.2022 - 12:03DROPS Design answered:
Bonjour Mme Fournier, vous pourriez peut-être essayer de remplacer DROPS Brushed Alpaca Silk par une laine superwash, soit 2 fils du groupe A soit 1 fil du groupe C - mais pensez bien à faire votre échantillon au préalable pour vérifier si vous aimez la texture obtenue. Votre magasin pourra vous conseiller - même par mail ou téléphone si besoin. Bon tricot!
21.04.2022 - 13:32Bonjour, je voudrais faire ce modèle mais avec un coll en V pas trop profond. Pensez vous que c'est possible et pourriez-vous me donner des explications svp . Merci beaucoup
21.04.2022 - 11:21DROPS Design answered:
Bonjour Mme Fournier, nous ne sommes malheureusement pas en mesure de pouvoir adapter chacun de nos modèles à chaque demande; n'hésitez pas à demander conseil à votre magasin DROPS ou à un forum spécialisé. Merci pour votre compréhension. Bon tricot!
21.04.2022 - 13:33Brei je deze trui nu met dubbele draad of enkele draad met wisselingen tussen beide draden?
08.03.2022 - 20:10DROPS Design answered:
Dag Monique,
Het hele werk wordt met steeds met 1 draad gebreid. Steeds in één van de beide kwaliteiten. In beschrijving staat steeds aangegeven waarmee je moet breien.
10.03.2022 - 12:00Pour l'instant, je réfléchi à tout défaire puisque la dentelle A5 ne fonctionne pas.
12.02.2022 - 00:57