DROPS Merino Extra Fine
100% Wool
from 19.00 RON /50g
DROPS Brushed Alpaca Silk
77% Alpaca, 23% Silk
from 16.00 RON /25g
Get the yarn to make this pattern from 162.00RON.

The yarn cost is calculated from the pattern’s smallest size and the yarn’s cheapest product type. Looking for an even better price? You might find it on the DROPS Deals!

DROPS SS24

Timeless Textures

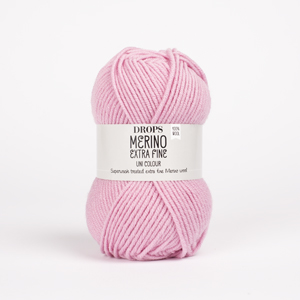
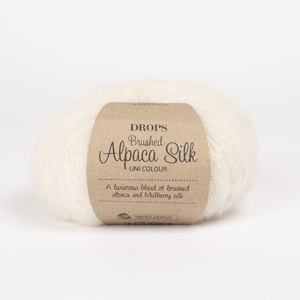
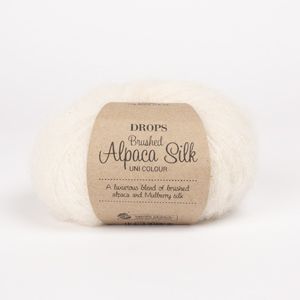
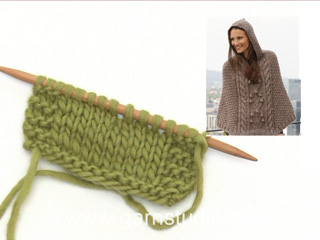
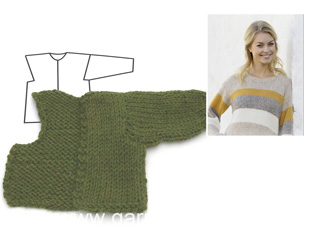
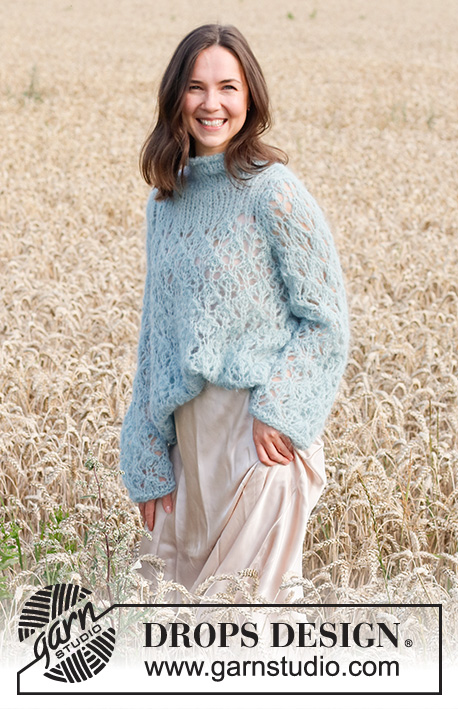
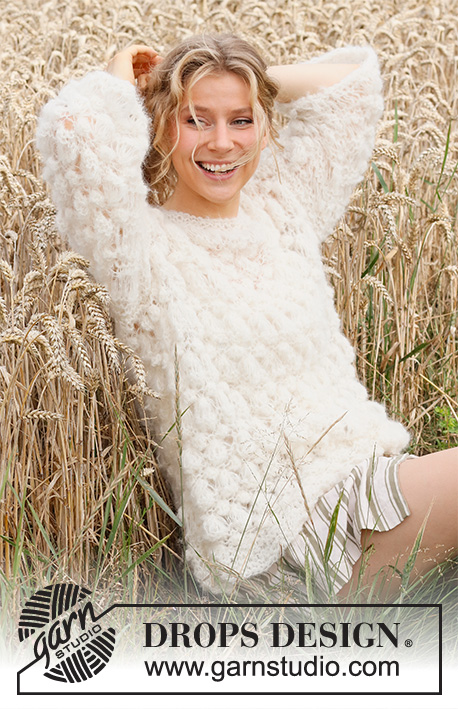
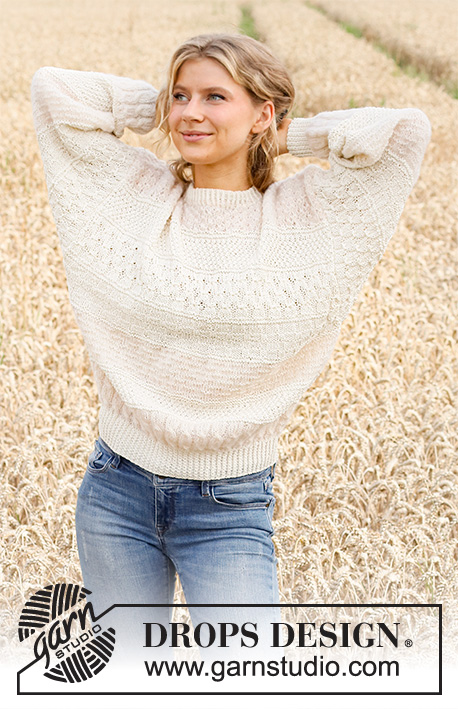
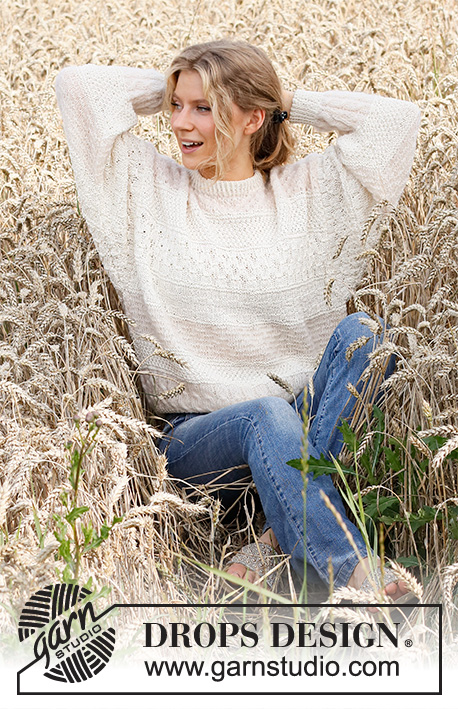
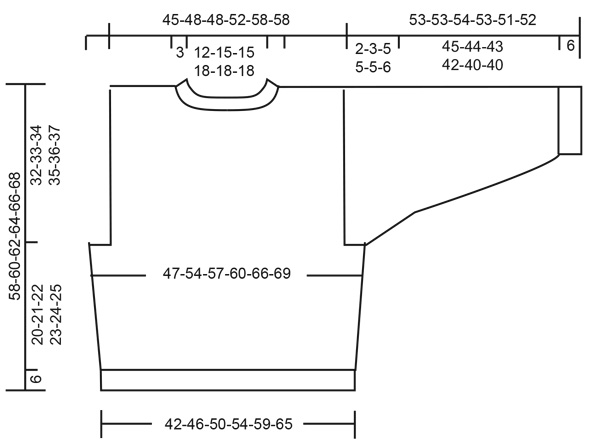
Knitted jumper in DROPS Merino Extra Fine and DROPS Brushed Alpaca Silk. The piece is worked with cables and textured pattern. Sizes S - XXXL.

DROPS 220-18
DROPS Design: Pattern no me-222
Yarn group B and C
-------------------------------------------------------

SIZES:
S - M - L - XL - XXL - XXXL

MATERIALS:
DROPS MERINO EXTRA FINE from Garnstudio (belongs to yarn group B)
300-350-400-450-450-500 g colour 01, off white
And use:
DROPS BRUSHED ALPACA SILK from Garnstudio (belongs to yarn group C)
75-75-100-100-125-125 g colour 01, off white

KNITTING TENSION:
19 stitches in width and 25 rows in height with stocking stitch and Merino Extra Fine = 10 x 10 cm.

NEEDLES:
DROPS CIRCULAR NEEDLE SIZE 5 MM: Length 40 cm and 80 cm for pattern.
DROPS CIRCULAR NEEDLE SIZE 4 MM: Length 80 cm for rib.
DROPS CABLE NEEDLE – for cables.
Needle size is only a guide. If you get too many stitches on 10 cm, change to a larger needle size. If you get too few stitches on 10 cm, change to a smaller needle size.

-------------------------------------------------------

Alternative Yarn – See how to change yarns here
Yarn Groups A to F – Use the same pattern and change the yarn here
Yarn usage using an alternative yarn – Use our yarn converter here

-------------------------------------------------------

DROPS Merino Extra Fine
100% Wool
from 19.00 RON /50g
DROPS Brushed Alpaca Silk
77% Alpaca, 23% Silk
from 16.00 RON /25g
Get the yarn to make this pattern from 162.00RON.

The yarn cost is calculated from the pattern’s smallest size and the yarn’s cheapest product type. Looking for an even better price? You might find it on the DROPS Deals!

Pattern instructions

-------------------------------------------------------

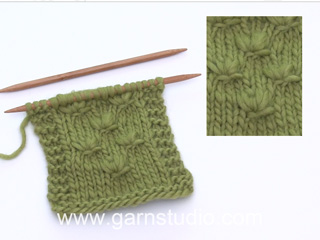
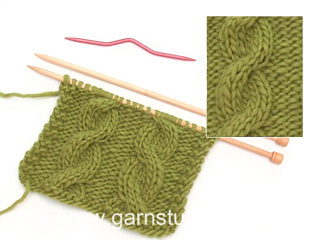
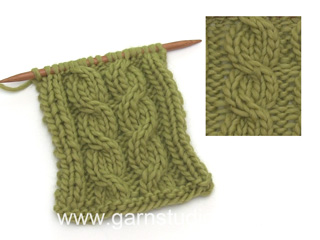
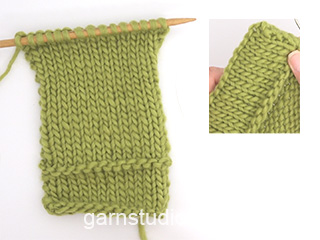
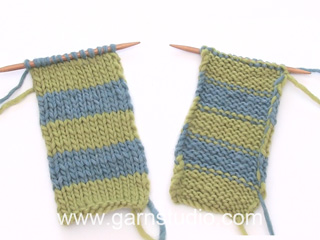
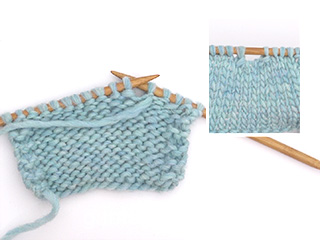
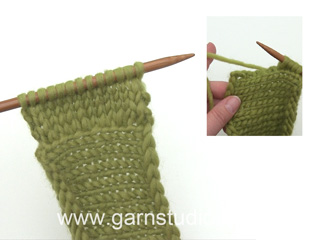
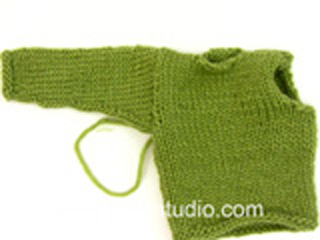
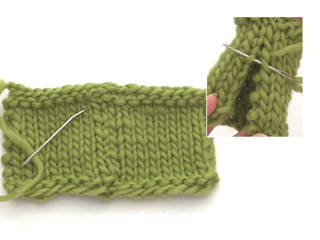
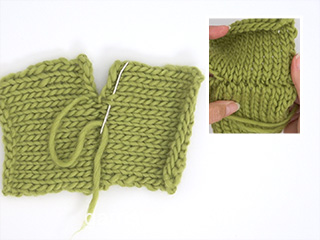
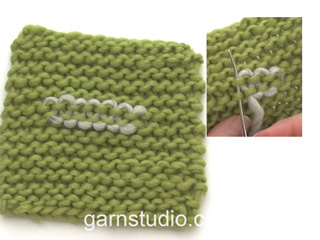
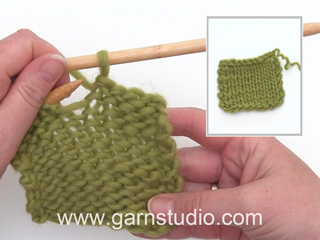
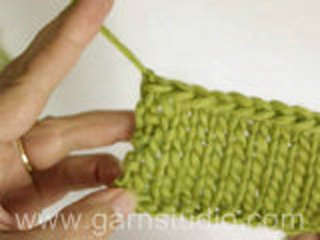
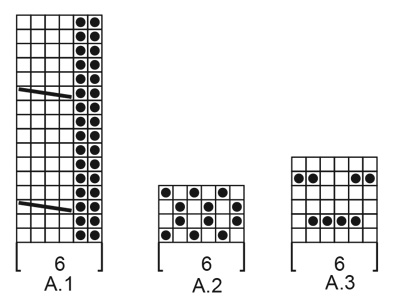
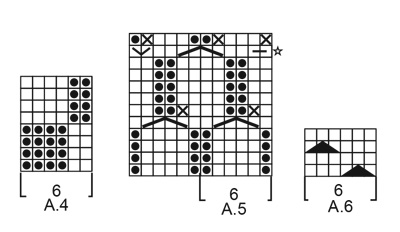
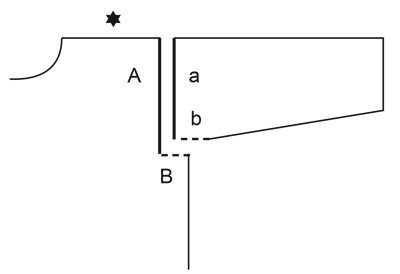
EXPLANATIONS FOR THE PATTERN:

-------------------------------------------------------

RIDGE/GARTER STITCH (worked back and forth):
Knit all rows.
1 ridge in height = Knit 2 rows.

PATTERN:
See diagrams A.1 to A.6. The diagrams show all rows in the pattern from the right side.

STRIPES BODY:
The stripes are worked with 1 edge stitch in garter stitch on each side.
STRIPE 1: Already worked (= A.1)
STRIPE 2: (with Merino Extra Fine), work A.2 until the piece measures 18-18-18-19-19-20 cm – adjust so you finish after row 2 or 4 in the diagram.
Knit 4 rows (= 2 ridges).
STRIPE 3: Change to Brushed Alpaca Silk. Work A.3 until the piece measures 26-27-27-28-28-30 cm – adjust so you finish after a row from the wrong side.
STRIPE 4: Change to Merino Extra Fine. Knit 4 rows (= 2 ridges). Work A.4 two times in height, knit 4 rows (= 2 ridges).
STRIPE 5: Work A.5 one time in height, then work the first 8 rows in the diagram. Knit 4 rows (= 2 ridges).
STRIPE 6: Work A.2 until the piece measures 48-50-50-52-52-55 cm – adjust so you finish after row 2 or 4 in the diagram. Knit 4 rows (= 2 ridges).
STRIPE 7: Change to Brushed Alpaca Silk. Work A.6 to finished length.

STRIPES SLEEVES:
The stripes are worked with 1 edge stitch in garter stitch on each side.
STRIPE 1: Work A.1 one time in height, then work the first 8 rows in the diagram.
STRIPE 2: Change to Merino Extra Fine. Knit 4 rows (= 2 ridges). Work A.2 until the piece measures 25-25-26-25-24-25 cm – adjust so you finish after row 2 or 4 in the diagram, knit 4 rows (= 2 ridges).
STRIPE 3: Change to Brushed Alpaca Silk. Work A.3 until the piece measures 36-36-37-36-34-35 cm – adjust so you finish after a row from the wrong side.
STRIPE 4: Change to Merino Extra Fine. Knit 4 rows (= 2 ridges). Work A.4 two times in height. Knit 4 rows (= 2 ridges).
STRIPE 5: Work A.5 one time in height, then work the first 8 rows in the diagram.

INCREASE/DECREASE TIP (evenly spaced):
To work out how to increase/decrease evenly, count the total number of stitches on needle (e.g. 87 stitches), minus the edge stitches (i.e. 2 stitches) and divide the remaining stitches by the number of increases/decreases to be made (e.g. 19) = 4.5.
In this example, increase by making 1 yarn over after alternately each 4th and 5th stitch. Do not increase over the edge stitches. On the next row work the yarn overs twisted to avoid holes. When decreasing, knit together alternately each 3rd and 4th stitch and each 4th and 5th stitch.

INCREASE TIP (for sleeves):
Increase by making 1 yarn over inside the 1 edge stitch on each side. All increase are made from RS!
On the next row work the yarn overs twisted to avoid holes. Then work the new stitches in pattern as described in the text.

-------------------------------------------------------

START THE PIECE HERE:

-------------------------------------------------------

JUMPER – SHORT OVERVIEW OF THE PIECE:
The front and back pieces and the sleeves are worked separately back and forth, then sewn together to finish. The neck is worked in the round with short circular needle.

BACK PIECE:
Cast on 87-95-103-111-121-135 stitches with circular needle size 4 mm and Merino Extra Fine. Purl 1 row (= wrong side). Then work rib as follows:
ROW 1 (right side): 1 edge stitch in GARTER STITCH – read description above, * knit 1 twisted, purl 1 *, work from *-* until there are 2 stitches left, knit 1 twisted and work 1 edge stitch in garter stitch.
ROW 2 (wrong side): 1 edge stitch in garter stitch * purl 1 twisted, knit 1 *, work from *-* until there are 2 stitches left, purl 1 twisted and 1 edge stitch in garter stitch.
Repeat rows 1 and 2 until the rib measures 6 cm – adjust so the last row is worked from the right side.
Change to circular needle size 5 mm and Brushed Alpaca Silk. Purl 1 row from the wrong side where you increase 19-23-21-25-21-19 stitches evenly spaced – read INCREASE/DECREASE TIP = 106-118-124-136-142-154 stitches.
Now work pattern as follows: 1 edge stitch in garter stitch, A.1 until there are 3 stitches left (= 17-19-20-22-23-25 repeats of 6 stitches), purl 2 and 1 edge stitch in garter stitch.
Continue this pattern back and forth until A.1 has been completed in height.
REMEMBER THE KNITTING TENSION!
Change to Merino Extra Fine.
Knit 1 row from the right side where you decrease 14-14-14-20-14-20 stitches evenly spaced = 92-104-110-116-128-134 stitches. Knit 3 more rows (= 2 ridges).
Start with stripe 2 in STRIPES BODY – read description above and continue with stripes.
AT THE SAME TIME when the piece measures 26-27-28-29-30-31 cm, cast off 3-6-9-9-9-12 stitches at the beginning of the next 2 rows for the armholes = 86-92-92-98-110-110 stitches.
When the piece measures 56-58-60-62-64-66 cm cast off the middle 32-38-38-44-44-44 stitches for the neck and each shoulder is finished separately. Then cast off 1 stitch from the neck = 26-26-26-26-32-32 stitches.
Continue with pattern and 1 edge stitch in garter stitch on each side until the piece measures 58-60-62-64-66-68 cm from the shoulder down. Cast off. Work the other shoulder in the same way.

FRONT PIECE:
Cast on 87-95-103-111-121-135 stitches with circular needle size 4 mm and Merino Extra Fine. Purl 1 row (= wrong side). Then work rib as follows:
ROW 1 (right side): 1 edge stitch in garter stitch, * knit 1 twisted, purl 1 *, work from *-* until there are 2 stitches left, knit 1 twisted and 1 edge stitch in garter stitch.
ROW 2 (wrong side): 1 edge stitch in garter stitch * purl 1 twisted, knit 1 *, work from *-* until there are 2 stitches left, purl 1 twisted and 1 edge stitch in garter stitch.
Repeat rows 1 and 2 until the rib measures 6 cm – adjust so the last row is worked from the right side.
Change to circular needle size 5 mm and Brushed Alpaca Silk. Purl 1 row from the wrong side where you increase 19-23-21-25-21-19 stitches evenly spaced = 106-118-124-136-142-154 stitches.
Work pattern and decrease stitches in the same way as on the back piece = 92-104-110-116-128-134 stitches (when you reach the armholes). When the piece measures 26-27-28-29-30-31 cm, cast off 3-6-9-9-9-12 stitches at the beginning of the next 2 rows for the armholes = 86-92-92-98-110-110 stitches.
When the piece measures 51-53-55-56-58-59 cm, place the middle 26-32-32-38-38-38 stitches on a thread for the neck and finish each shoulder separately. Continue by casting off on each row from the neck as follows: Cast off 2 stitches 1 time and 1 stitch 2 times – the stitches which do not fit into the pattern after decreasing, are worked in stocking stitch = 26-26-26-26-32-32 stitches.
Continue with this pattern and 1 edge stitch in garter stitch on each side until the piece measures 58-60-62-64-66-68 cm from the shoulder down. Cast off. Work the other shoulder in the same way.

SLEEVES:
Cast on 44-48-50-52-54-56 stitches (including 1 edge stitch on each side) with circular needle size 4 mm and Merino Extra Fine. Purl 1 row (= wrong side). Then work rib as follows:
ROW 1 (right side): 1 edge stitch in garter stitch, * knit 1 twisted, purl 1 *, work from *-* until there is 1 stitch left, knit 1 twisted and 1 edge stitch in garter stitch.
ROW 2 (wrong side): 1 edge stitch in garter stitch * purl 1 twisted, knit 1 *, work from *-* until there is 1 stitch left, purl 1 twisted and 1 edge stitch in garter stitch.
Repeat rows 1 and 2 until the rib measures 6 cm – adjust so the last row is worked from the right side.
Change to circular needle size 5 mm and Brushed Alpaca Silk. Purl 1 row from the wrong side where you increase 18-20-18-22-20-24 stitches evenly spaced = 62-68-68-74-74-80 stitches.
Now work STRIPE SLEEVES – read description above, and when the piece measures 13 cm, start to increase on both sides – read INCREASE TIP. Increase like this every 2-2-1½-2-1½- 1½ cm a total of 9-8-10-8-10-9 times = 80-84-88-90-94-98 stitches. Work pattern as far as possible out to each side, the remaining stitches are worked in stocking stitch. When the sleeve measures 33-32-31-30-28-28 cm, continue the increases, but now on each row from the right side, a total of 22 times = 124-128-132-134-138-142 stitches. When the stripes are finished, the sleeve measures 53-53-54-53-51-52 cm.
Cast off. Insert a marker in each side 2-3-5-5-5-6 cm from the top. These are used when sewing the sleeves to the body.
Work the other sleeve in the same way.

ASSEMBLY:
Sew the shoulder seams with grafting stitches, inside the cast-off edge.
Sew the sleeves to the body – see illustration. Sew the sleeve seams and the side seams in one go, inside the 1 edge stitch.

NECK:
Start with Brushed Alpaca Silk and short circular needle size 4 mm. Knit up from the right side 92 to 120 stitches inside 1 stitch around the neck (stitch count includes the stitches from the thread in front and should be divisible by 2).
Change to Merino Extra Fine and work rib (knit 1 twisted, purl 1) in the round for 7 cm. Cast off with knit over knit and purl over purl. Make sure the cast-off edge is not tight.
Fold the neck to the inside and sew down; to avoid the neck being tight and rolling outwards, it is important the seam is elastic.

This pattern has been corrected.

Updated online: 10.05.2021
New increase tips to the sleeves.

Updated online: 15.11.2021
Sleeves: ... ROW 1 (right side): 1 edge stitch in garter stitch, * knit 1 twisted, purl 1 *, work from *-* until there is 1 stitch left, work 1 edge stitch in garter stitch.
ROW 2 (wrong side): 1 edge stitch in garter stitch * purl 1 twisted, knit 1 *, work from *-* until there is 1 stitch left, work 1 edge stitch in garter stitch....

Diagram

symbols = knit from right side, purl from wrong side
symbols = purl from right side, knit from wrong side
symbols = place 2 stitches on cable needle in front of piece, knit 2, knit 2 from cable needle
symbols = insert needle between stitches 4 and 5, pull the strand through (= 1 new stitch), knit 1, purl 2, knit 1.
symbols = purl this and the next stitch (= the stitch that were increased on the previous row) twisted together (= 1 stitch decreased)
symbols = on this row work the first 3 stitches one time, then repeat the next 6 stitches until there are 4 stitches left, finish with the last 3 stitches and 1 edge stitch in garter stitch.
symbols = this symbol applies to the beginning of the row: insert needle between stitches 2 and 3, pull the strand through (= 1 new stitch), purl 1, knit 1
symbols = this symbol applies to the end of the row: insert needle between stitches 2 and 3, pull the strand through (= 1 new stitch), knit 1, purl 1.
symbols = purl 3 together, but do not slip the stitches from the needle, knit these stitches together, then purl them together again, now slip the stitches from the left needle
symbols = sleeve cap sewn to the armhole as follows: Sew a to A and b to B
diagram
diagram
diagram
diagram

Each of our patterns has specific tutorial videos to help you.

Do you have a question? See a list of frequently asked questions (FAQ)

Knitting tension is what determines the final measurements of your work, and is usually measured per 10 x 10 cm. It is provided like so: number of stitches in width x number of rows in height - eg: 19 stitches x 26 rows = 10 x 10 cm.

The knitting tension is very individual; some people knit/crochet loosely while others work tightly. You adjust the knitting tension with the needle size, which is why the suggested needle size is only meant as a guide! You need to adjust this (up or down) to ensure that YOUR knitting tension matches the knitting tension provided in the pattern. If you work with a different knitting tension than provided you will have a different yarn consumption, and your work will have different measurements than what the pattern suggests.

The knitting tension also determines which yarns can replace each other. As long as you achieve the same knitting tension you can replace one yarn with another.

See DROPS lesson: How to measure your tension/gauge

See DROPS video: How to make a gauge tension swatch

The required amount of yarn is provided in grams, eg: 450 g. To calculate how many balls you’ll need you first need to know how many grams are in 1 ball (25g, 50g or 100g). This information is available if you click on the individual yarn quality on our pages. Divide the amount required with the amount of each ball. For example, if each ball is 50g (the most common amount), the calculation will be as follows: 450 / 50 = 9 balls.

The important thing when changing from one yarn to another is that the knitting/crochet tension remains the same. This is so that the measurements of the finished piece will be the same as on the sketch provided. It is easier to achieve the same knitting tension using yarns from the same yarn group. It is also possible to work with multiple strands of a thinner yarn to achieve the knitting tension of a thicker one. Please try our yarn converter. We recommend you to always work a test swatch.

Please NOTE: when changing yarn the garment might have a different look and feel to the garment in the photo, due to individual properties and qualities of each yarn.

See DROPS lesson: Can I use a different yarn than the one mentioned in the pattern?

All our yarns are categorised into yarn groups (from A to F) according to thickness and knitting tension – group A contains the thinnest yarns and group F the thickest. This makes it easier for you to find alternative yarns to our patterns, should you wish to switch yarn. All yarns within the same group have a similar knitting tension and can easily replace each other. However, different yarn qualities have different structures and properties which will give the finished work a unique look and feel.

Click here for an overview of the yarns in each yarn group

At the top of all our patterns you’ll find a link to our yarn calculator, which is a helpful tool should you wish to use a different yarn than suggested. By filling in the yarn quality you wish to replace, the amount (in your size) and number of strands, the calculator will present good alternative yarns with the same knitting tension. Additionally it will tell you how much you’ll require in the new qualities and whether you’ll need to work with multiple strands. Most skeins are 50g (some are 25g or 100g).

If the pattern is worked with multiple colours, every colour will have to be calculated separately. Similarly, if the pattern is worked with several strands of different yarns (for example 1 strand Alpaca and 1 strand Kid-Silk) you will have to find alternatives for each, individually.

Click here to see our yarn calculator

Since different yarns have different qualities and textures we have chosen to keep the original yarn in our patterns. However, you can easily find options among our available qualities by using our yarn calculator, or simply pick a yarn from the same yarn group.

It is possible that some retailers still have discontinued yarns in stock, or that someone has a few skeins at home that they would like to find patterns for.

The yarn calculator will provide both alternative yarn as well as required amount in the new quality.

If you think it's hard to decide what size to make, it can be a good idea to measure a garment you own already and like the size of. Then you can pick the size by comparing those measures with the ones available in the pattern's size chart.

You'll find the size chart at the bottom of the pattern.

See DROPS lesson: How to read size chart

The needle size provided in the pattern serves only as a guide, the important thing is to follow the knitting tension. And since knitting tension is very individual, you will have to adjust the needle size to ensure that YOUR tension is the same as in the pattern – maybe you’ll have to adjust 1, or even 2 needle sizes, up or down to achieve the correct tension. For this, we recommend that you work test swatches.

Should you work with a different knitting tension than the one provided, the measurements of the finished garment might deviate from the measurement sketch.

See DROPS lesson: How to measure your tension/gauge

See DROPS video: How to make a tension/gauge swatch

Working a garment top-down provides more flexibility and room for personal adjustment. For example it is easier to try the garment on while working, as well as making adjustments to length of yoke and shoulder caps.

The instructions are carefully explaining every step, in the correct order. Diagrams are adjusted to the knitting direction and are worked as usual.

The diagram depicts all rows/rounds, and every stitch seen from the right side. It is read from bottom to top, from right to left. 1 square = 1 stitch.

When working back and forth, every other row is worked from the right side and every other row is worked from the wrong side. When working from the wrong side, the diagram will have to be worked reversed: from left to right, knit stitches are purled, purl stitches are knit etc.

When working in the round every round is worked from the right side and the diagram are worked from right to left on all rounds.

See DROPS lesson: How to read knitting diagrams

The diagram depicts all rows/rounds, and every stitch seen from the right side. It is worked from bottom to top, from right to left.

When working back and forth every other row is worked from the right side: from right to left and every other row is worked from the wrong side: from left to right.

When working in the round, every row in the diagram are worked from the right side, from right to left.

When working a circular diagram you start in the middle and work your way outwards, counter clockwise, row by row.

The rows usually start with a given number of chain stitches (equivalent to the height of the following stitch), this will either be depicted in the diagram or explained in the pattern.

See DROPS lesson: How to read crochet diagrams

Instructions for working several diagrams after each other on the same row/round, will often be written like so: “work A.1, A.2, A.3 a total of 0-0-2-3-4 times". This means you work A.1 once, then A.2 is worked once, and A.3 is repeated (in width) the number of times provided for your size – in this case like so: S = 0 times, M = 0 times, L=2 times, XL= 3 times and XXL = 4 times.

The diagrams are worked as usual: begin with the first row in A.1, then work the first row in A.2 etc.

See DROPS lesson: How to read knitting diagrams

See DROPS lesson: How to read crochet diagrams

The total width of the garment (from wrist-to-wrist) will be larger in the larger sizes, despite the actual sleeves being shorter. The larger sizes have longer sleeve caps and wider shoulders, so there will be a good fit in all sizes.

The measurement sketch/schematic drawing provides information regarding the full length of the garment. If it’s a jumper or a jacket the length is measured from the highest point on the shoulder closest to the neckline, and straight down to the bottom of the garment. It is NOT measured from the tip of shoulder. Similarly, the length of yoke is measured from the highest point on the shoulder and down to where yoke is split into body and sleeves.

On a jacket measures are never taken along bands, unless specifically stated. Always measure inside band stitches when measuring the length.

See DROPS lesson: How to read a schematic drawing

Diagrams are often repeated on the round or in height. 1 repeat is the diagram the way it appears in the pattern. If it says to work 5 repeats of A.1 in the round, then you work A.1 a total of 5 times after/next to each other in the round. If it says to work 2 repeats of A.1 vertically/in height you work the entire diagram once, then begin again at the start and work the entire diagram one more time.

Chain stitches are slightly narrower than other stitches and to avoid working the cast-on edge too tight, we simply chain more stitches to begin with. The stitch count will be adjusted on the following row to fit the pattern and measurement sketch.

The rib edge is more elastic and will contract slightly compared to, for example, stocking stitch. By increasing before the rib edge, you avoid a visible difference in width between the rib edge and the rest of the body.

It’s very easy to cast off too tightly, and by making yarn overs while casting off (and simultaneously casting these off) you avoid a too tight cast off edge.

See DROPS video: How to bind off with yarn overs (yo)

To achieve an even increase (or decrease) you can increase on, for example: every 3rd and 4th row alternately, like so: work 2 rows and increase on the 3rd row, work 3 rows and increase on the 4th. Repeat this until the increase is complete.

See DROPS lesson: Increase or decrease 1 st on every 3rd and 4th row alternately

Should you prefer to work in the round instead of back and forth, you may of course adjust the pattern. You’ll need to add steeks mid-front (usually 5 stitches), and follow the instructions. When you would normally turn and work from the wrong side, simply work across the steek and continue in the round. At the end you’ll cut the piece open, pick up stitches to work bands, and cover the cut edges.

See DROPS video: How to knit steeks and cut open

Should you prefer to work back and forth instead of in the round, you may of course adjust the pattern so you work the pieces separately and then assemble them at the end. Divide the stitches for the body in 2, add 1 edge stitch in each side (for sewing) and work the front and back pieces separately.

See DROPS lesson: Can I adapt a pattern for circular needles into straight needles?

Pattern repeats can vary slightly in the different sizes, in order to get the correct proportions. If you’re not working the exact same size as the garment in the photo, yours might deviate slightly. This has been carefully developed and adjusted so that the complete impression of the garment is the same in all sizes.

Make sure to follow instructions and diagrams for your size!

If you have found a pattern you like which is available in women’s size it’s not very difficult to convert it to men’s size. The biggest difference will be the length of sleeves and body. Start working on the women size that you think would fit across the chest. The additional length will be worked right before you cast off for the armhole/sleeve cap. If the pattern is worked top-down you can add the length right after the armhole or before the first decrease on sleeve.

Regarding additional yarn amount, this will depend on how much length you add, but it is better with a skein too many than too few.

All yarns will have excess fibres (from production) that might come off as lint or shedding. Brushed yarns (ie hairier yarns) have more of these loose, excess fibres, causing more shedding.

Shedding also depends on what is worn under or over the garment, and whether this pulls at the yarn fibres. It’s therefore not possible to guarantee that there will be no shedding

Below are some tips on how to get the best result when working with hairier yarns:

1. When the garment is finished (before you wash it) shake it vigorously so the looser hairs come off. NOTE: do NOT use a lint roller, brush or any method that pulls at the yarn.

2. Place the garment in a plastic bag and put it in your freezer - the temperature will cause the fibres to become less attached to each other, and excess fibres will come off easier.

3. Leave in the freezer for a few hours before taking it out and shaking it again.

4. Wash the garment according to the instructions on the yarn label.

Pilling is a natural process that happens to even the most exclusive of fibers. It's a natural sign of wear and tear that is hard to avoid, and that is most visible in high friction areas of your garment like a sweater's arms and cuffs.

You can make your garment look as new by removing the pilling, using a fabric comb or a pill/lint remover.

Still can't find the answer you need? Then scroll down and leave your question so one of our experts can try to help you. This will be done normally within 5 to 10 working days.
In the meantime, you can read the questions and answers that others have left to this pattern or join the DROPS Workshop on Facebook to get help from fellow knitters/crocheters!

You might also like...

Post a comment to pattern DROPS 220-18

We would love to hear what you have to say about this pattern!

If you want to leave a question, please make sure you select the correct category in the form below, to speed up the answering process. Required fields are marked *.

Comments / Questions (66)

country flag Annie wrote:

Bonjour, je n'arrive pas à faire le diagramme A5, le rendu ne fonctionne pas du tout. Y a t'il une erreur dans le diagramme ou auriez vous un vidéo expliquant le point? Merci à l'avance

12.02.2022 - 00:55

DROPS Design answered:

Bonjour Annie, j'ai testé le diagramme et j'ai bien réussi à obtenir le même résultat, essayez de vous entraîner sur un petit échantillon de mailles (par exemple les 12 m du diagramme + 1 m lis de chaque côté) et soyez bien attentive aux mailles, au 5ème rang, vous ajoutez 1 maille (4ème symbole), que vous diminuez au 6ème rang (= 5ème symbole); au 11ème rang, augmentez 1 m au début du rang, puis 1 maille à chaque triangle, et 1 m à la fin du rang. Au 12ème rang, vous diminuerez aussi ces mailles en plus. Bon tricot!

14.02.2022 - 09:25

country flag Linn wrote:

Ja, jag har sett videon, men det verkar ändå inte stämma med mönstret och bilden?

09.02.2022 - 18:57

DROPS Design answered:

Hej Linn, prøv at strikke en lille prøve først med 26 masker, så kan du strikke A.5 4 gange + 1 kantmaske i hver side, så kan du se hvordan det kommer til at se ud :)

11.02.2022 - 13:09

country flag Linn wrote:

Forts: Svårt att förklara, men på bilden så går liksom den långa extramaskan längre ut åt höger och de 4 slätstickade m sitter liksom inte ”ihop” utan det ser ut som att den tredje rm från höger liksom går in i extramaskan?

07.02.2022 - 04:51

DROPS Design answered:

Hej Linn, har du set videoen om hvordan man strikker smockmønster: Smockmønster

09.02.2022 - 10:15

country flag Linn wrote:

1: Jag får inte ihop det gällande A5. Jag får ihop själva mönstret och diagrammet, men problemet är att det inte blir som på bilden? Har gjort om och testat flera olika sätt, men det ska stämma, men det ser ut som att det är stickat på ett annat sätt på bilden. Kan det stämma?

07.02.2022 - 04:50

country flag Maria wrote:

Strikkes delene med brushed alpaca silk, i dobbelt tråd eller enkelt?

04.01.2022 - 12:04

DROPS Design answered:

Hei Maria. Delene med DROPS Brushed Alpaca Silk strikkes med 1 tråd. mvh DROPS Design

04.01.2022 - 12:53

country flag Anette Tranborh wrote:

Jeg forstår ikke, hvordan jeg skal strikke diagram A5. Jeg kan ikke få retpind og vrangpind til at passe. Det drejer sig om 5. og 6. pind. Altså hentning af ny maske mellem 4. og 5. maske og på 6. pind hvor der skal strikkes drejet ret. Maskerne passer ikke over hinanden???

06.12.2021 - 17:38

DROPS Design answered:

Hej Anette, jo her ser du hvordan du gør: Smock mønster

07.12.2021 - 15:47

country flag Marjut wrote:

Hihan silmukooden lisäysvinkissä(hihan alla) lukee:Neulo kunnes merkkilankaa edeltää 2 silmukkaa,tee langan kierto jne.Mikä ihme tuo merkkilanka on,missä kohtaan se on jos tasona neulotaan hiha?Ja tasona ohjeen mukaan hiha neulotaankin?!

05.12.2021 - 09:55

DROPS Design answered:

Hei, hihoissa on nyt uusi lisäysvinkki.

08.12.2021 - 17:01

country flag Nataliya wrote:

Hei. Ser at dere svarer på en kommentar i august 2021 at dere vil lage video som forklarer hvordan A6 strikkes. Håper at dere har gjort det, for jeg trenger hjelp med samme mønster. På forhånd takk.

02.12.2021 - 20:46

DROPS Design answered:

Hej Nataliya. Du hittar videon här. Mvh DROPS Design

03.12.2021 - 12:15

country flag Emmi wrote:

6 kerää (300g) merino extra fine lankaa ei riittänyt lähellekään kokoon S, vaan tarvitsin vielä yhden kerän lisää. Aloitin 6. kerän kun ensimmäistä hihaa oli vielä ~8cm neulomatta.

18.11.2021 - 12:50

country flag Victoria Edwards wrote:

I am confused with the sleeves. The ribbing worked fine for the front and back (when casting on an odd number of stitches). I’m doing the second size so have cast on 48 and done a purl row. Row 1 says knit first stitch as garter stitch edge and then continue with twisted knit stitch and purl until last two stitches, do one twisted knit and garter stitch edge. This works fine with an odd number of stitches but not with an even, as the penultimate stitch is a purl? Where am I going wrong?

13.11.2021 - 19:07

DROPS Design answered:

Dear Victoria, there is a mistake in the English version; thank you for pointing it out. We'll try to correct it as soon as possible. You work 1 twisted knit and purl 1 until 1 stitch is left and then the last stitch is worked in garter stitch (the edge stitch).

14.11.2021 - 19:54