
Popular categories
Looking for a yarn?


|
||||||||||||||||||||||
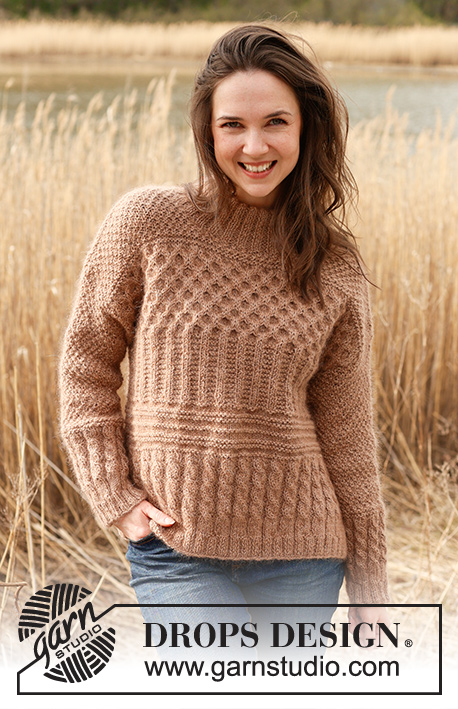
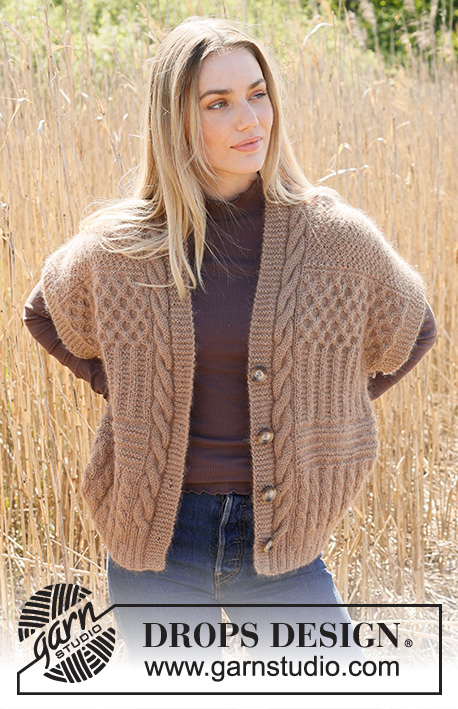
Cracked Walnuts Vest |
||||||||||||||||||||||
 |
 |
|||||||||||||||||||||
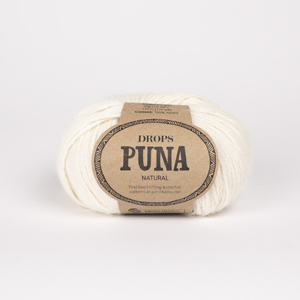
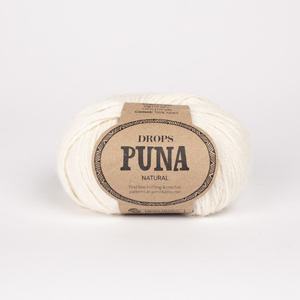
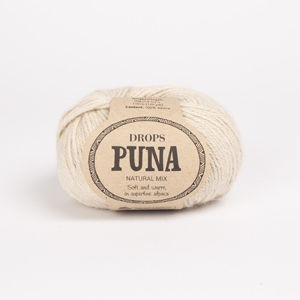
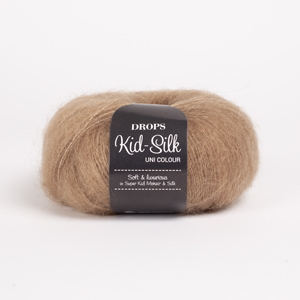
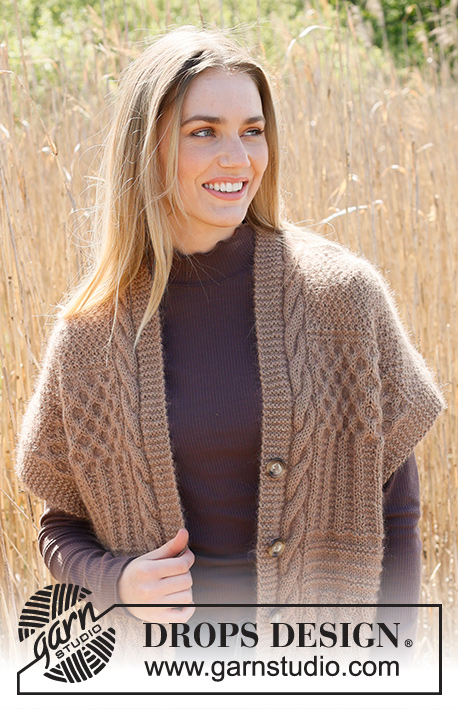
Knitted vest in DROPS Kid-Silk and DROPS Puna / DROPS Merino Extra Fine. Piece is knitted bottom up with textured pattern, ridges, cables and rib. Size XS – XXL.
DROPS 237-10 |
||||||||||||||||||||||
|
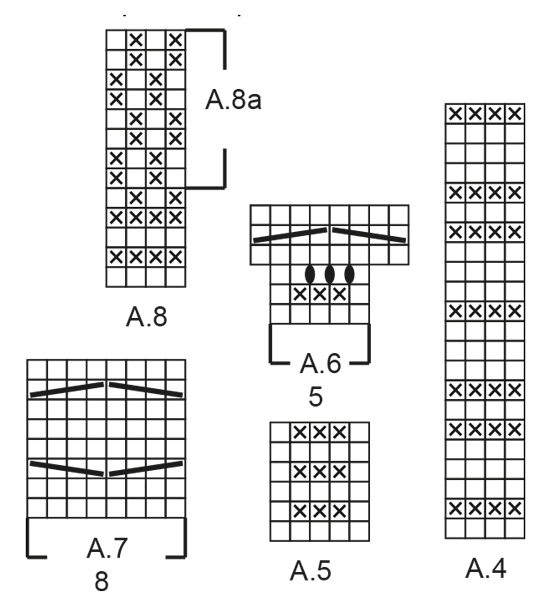
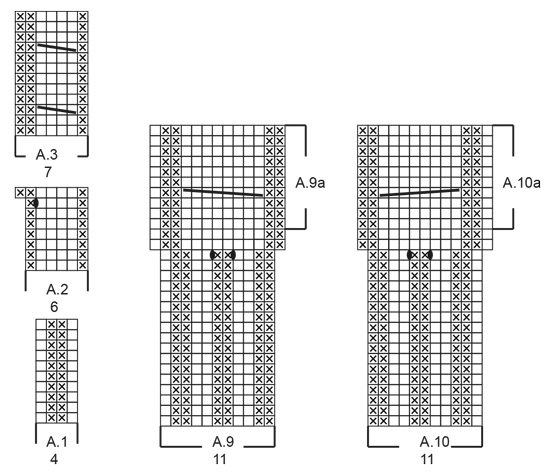
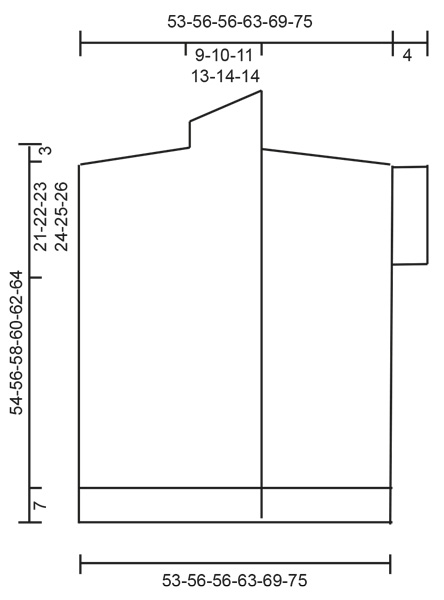
---------------------------------------------------------- EXPLANATION FOR THE PATTERN: ---------------------------------------------------------- GARTER STITCH (back and forth): Knit all rows. 1 ridge vertically = knit 2 rows. PATTERN: See diagrams A.1 to A.10. Diagrams show all rows in pattern seen from the right side. KNIT TOGETHER: FROM RIGHT SIDE: Slip 1 stitch knitwise, knit 1, pass slipped stitch over stitch worked. FROM WRONG SIDE: Purl 2 together. STOCKING STITCH: When working from wrong side, purl and when working from right side, knit. BUTTONHOLES (bottom up): Decrease for buttonholes on right band. 1 BUTTONHOLE = knit third and fourth stitch from edge together and make 1 yarn over. On next row knit yarn over to make hole. Decrease for buttonholes when piece measures: XS: 6, 14, 22 and 30 cm S: 6, 14, 22 and 30 cm M: 6, 14, 23 and 32 cm L: 7, 16, 25 and 34 cm XL: 6, 14, 22, 29 and 36 cm. XXL: 6, 14, 22, 29 and 36 cm. ---------------------------------------------------------- START THE PIECE HERE: ---------------------------------------------------------- VEST – SHORT OVERVIEW OF PIECE: Work front and back piece bottom up, back and forth in parts. BACK PIECE: Cast on 98-110-110-122-134-146 stitches on circular needle size 4 mm with 1 strand of each quality (2 strands). Purl 1 row from wrong side. Work next row as follows from right side: 1 edge stitch in GARTER STITCH – read explanation above, work A.1 until 1 stitch remain, 1 stitch in garter stitch. When A.1 has been worked 1 time vertically, work pattern as follows: 1 edge stitch in garter stitch, work A.2 until 1 stitch remains, 1 edge stitch in garter stitch. When A.2 has been worked 1 time vertically, there are 114-128-128-142-156-170 stitches on needle. Switch to circular needle size 5.5 mm. Work pattern as follows: 1 edge stitch in garter stitch, work A.3 until 1 stitch remains, 1 edge stitch in garter stitch. REMEMBER THE KNITTING TENSION! Repeat A.3 vertically until piece measures 16-17-19-19-21-22 cm. Work pattern, begin from right side as follows: 1 edge stitch in garter stitch, work A.4 until 1 stitch remains and decrease at the same time 27-36-36-40-44-48 stitches evenly, 1 edge stitch in garter stitch = 87-92-92-102-112-122 stitches. When A.4 has been worked 1 time vertically, work pattern as follows: 1 edge stitch in garter stitch, work A.5 until 1 stitch remains, 1 edge stitch in garter stitch. Repeat A.5 vertically. When piece measures 30-31-32-33-34-35 cm, cast on 6 new stitches at the end of the next 2 rows = 99-104-104-114-124-134 stitches. Work the new stitches in garter stitch until finished measurements. Continue pattern like this until piece measures 33-35-36-38-39-41 cm. Work pattern, begin from right side as follows: 7 stitches in garter stitch, work A.6 until 7 stitches remain, 7 stitches in garter stitch. When A.6 has been worked 1 time vertically, there are 150-158-158-174-190-206 stitches on needle. Work pattern as follows: 7 stitches in garter stitch, work A.7 until 7 stitches remain, 7 stitches in garter stitch. Work A.7 3 times in total vertically. Piece measures approx. 45-47-48-50-51-53 cm. Work pattern as follows: 7 stitches in garter stitch, work A.8 until 7 stitches remain and decrease at the same time 51-54-54-60-66-72 stitches evenly, 7 stitches in garter stitch = 99-104-104-114-124-134 stitches. When A.8 has been worked 1 time vertically, work A.8a vertically until finished measurements. When piece measures 49-51-53-55-57-59 cm, cast off the middle 13-14-16-18-20-20 stitches and finish each shoulder (43-45-44-48-52-57 stitches) separately. On next row from neck cast off 1 stitch at the beginning of row = 42-44-43-47-51-56 stitches. On next row from the neck cast off the first 7 stitches = 35-37-36-40-44-49 stitches. Then work diagonal shoulder, begin on next row from the neck as follows: * Work pattern as before until 8-9-9-10-11-12 stitches remain, turn and work back *, work from *-* 3 times in total. I.e. work 8-9-9-10-11-12 stitches less on every row from the neck. On last row towards neck, cast on 2 new stitches at the end of row = 37-39-38-42-46-51 stitches. Now work and cast off with an edge over shoulder stitches. Work stitches cast on with shoulder stitches as follows: Work * 1 stitch in STOCKING STITCH – read explanation above, work next stitch together with first/next stitch from shoulder – read KNIT TOGETHER, pass the 2 stitches back on the needle they came from with strand on wrong side of piece, make sure not to tighten yarn too much *, work from *-* until all stitches from shoulder have been worked together with the 2 new stitches that were cast on. Cast off the 2 stitches. Work the other shoulder the same way. RIGHT FRONT PIECE: Cast on 61-67-67-73-79-85 stitches on circular needle size 4 mm with 1 strand of each quality. Purl until 7 stitches remain, 7 band stitches in garter stitch. On next row from right side work pattern as follows: 7 band stitches in garter stitch, work A.9, purl 1-0-0-1-0-1, knit 1-0-0-1-0-1, work A.1 until 1 stitch remains, 1 edge stitch in garter stitch. When A.1 has been worked 1 time vertically, work pattern from right side as follows: 7 band stitches in garter stitch, A.9 as before, work A.2 until 1 stitch remains, 1 edge stitch in garter stitch. Decrease for BUTTONHOLES - read explanation above. When A.2 has been worked 1 time vertically, there are 70-77-77-84-91-98 stitches on needle. Switch to circular needle size 5.5 mm. Work pattern as follows: 7 band stitches in garter stitch, A.9a, make 1 yarn over (this is done so that the pattern is the same mid front on both front pieces), work A.3 until 1 stitch remains, 1 edge stitch in garter stitch = 71-78-78-85-92-99 stitches. Knit yarn over twisted on next row, then purl from right side and knit from wrong side. Repeat A.3 vertically until piece measures 16-17-19-19-21-22 cm. Work pattern, begin from right side as follows: 7 band stitches in garter stitch, A.9a as before, work A.4 until 1 stitch remains and decrease at the same time 15-17-17-19-21-23 stitches evenly, 1 edge stitch in garter stitch = 56-61-61-66-71-76 stitches. When A.4 has been worked 1 time vertically, work pattern as follows: 7 band stitches in garter stitch, A.9a as before, work A.5 until 1 stitch remains, 1 edge stitch in garter stitch. Repeat A.5 vertically. When piece measures 30-31-32-33-34-35 cm, cast on 6 new stitches at the end of next row from right side = 62-67-67-72-77-82 stitches. Work the new stitches in garter stitch until finished measurements. Continue pattern like this until piece measures 33-35-36-38-39-41 cm. Work pattern, begin from right side as follows: 7 band stitches in garter stitch, A.9a as before, work A.6 until 7 stitches remain, 7 stitches in garter stitch. When A.6 has been worked 1 time vertically, there are 83-91-91-99-107-115 stitches on needle. Work pattern as follows: 7 band stitches in garter stitch, A.9a as before, work A.7 until 7 stitches remain, 7 stitches in garter stitch. Work A.7 3 times in total vertically. Piece measures approx. 45-47-48-50-51-53 cm. Work pattern as follows: 7 band stitches in garter stitch, A.9a as before, work A.8 until 7 stitches remain and decrease at the same time 21-24-24-27-30-33 stitches evenly, 7 stitches in garter stitch = 62-67-67-72-77-82 stitches. When A.8 has been worked 1 time vertically, work A.8a vertically until finished measurements. When piece measures 50-52-54-56-58-60 cm, cast off the first 7 stitches on next row from wrong side = 55-60-60-65-70-75 stitches. Then work diagonal shoulder, begin on next row from the neck as follows: * Work pattern as before until 8-9-9-10-11-12 stitches remain, turn and work back *, work from *-* 3 times in total. I.e. work 8-9-9-10-11-12 stitches less on every row from the neck. On last row towards the neck work until 20-23-24-25-26-26 stitches remain, slip the last 20-23-24-25-26-26 stitches on a thread for shawl collar and cast on 2 new stitches on needle = 37-39-38-42-46-51 stitches. Now work and cast off with an edge over shoulder stitches. Work stitches cast on with shoulder stitches as follows: Work * 1 stitch in stocking stitch, work next stitch together with first/next stitch from shoulder – remember KNIT TOGETHER, pass the 2 stitches back on the needle they came from with strand on wrong side of piece, make sure not to tighten yarn too much *, work from *-* until all stitches from shoulder have been worked together with the 2 new stitches that were cast on. Cast off the 2 stitches. SHAWL COLLAR: Slip the 20-23-24-25-26-26 stitches from stitch holder on circular needle size 5.5 mm. Work as follows, begin from wrong side: 0-2-3-3-5-5 stitches in garter stitch, knit over knit and purl over purl until 7 stitches remain, 7 band stitches in garter stitch. Continue like this (i.e. cables are done) and work short rows as follows: ROW 1 (= right side): Work the first 16-19-20-21-22-22 stitches, turn and tighten yarn. ROW 2 (= wrong side): Work 16-19-20-21-22-22 stitches. ROW 3 (= right side): Work over all stitches, turn and tighten yarn. ROW 4 (= wrong side): Work over all stitches. Work 1st to 4th row until shawl collar measures approx. 7-8-8-9-9-9 cm on the shortest. Work 1 ridge over all stitches. Cast off. LEFT FRONT PIECE: Cast on 61-67-67-73-79-85 stitches on circular needle size 4 mm with 1 strand of each quality. Work 7 band stitches in garter stitch, purl the rest of row. On next row from right side work pattern as follows: 1 edge stitch in garter stitch, work A.1 until 20-18-18-20-18-20 stitches remain, knit 1-0-0-1-0-1, purl 1-0-0-1-0-1, A.10, 7 band stitches in garter stitch. When A.1 has been worked 1 time vertically, work pattern from right side as follows: 1 edge stitch in garter stitch, work A.2 until 18 stitches remain, A.10 as before, 7 band stitches in garter stitch. When A.2 has been worked 1 time vertically, there are 70-77-77-84-91-98 stitches on needle. Switch to circular needle size 5.5 mm. Work pattern as follows: 1 edge stitch in garter stitch, work A.3 until 20 stitches remain, A.10a, 7 band stitches in garter stitch. Repeat A.3 vertically until piece measures 16-17-19-19-21-22 cm. Work pattern, begin from right side as follows: 1 edge stitch in garter stitch, work A.4 until 20 stitches remain and decrease at the same time 14-16-16-18-20-22 stitches evenly, A.10a as before, 7 band stitches in garter stitch = 56-61-61-66-71-76 stitches. When A.4 has been worked 1 time vertically, work pattern as follows: 1 edge stitch in garter stitch, work A.5 until 20 stitches remain, A.10a as before, 7 band stitches in garter stitch. Repeat A.5 vertically. When piece measures 30-31-32-33-34-35 cm, cast on 6 new stitches at the end of next row from wrong side = 62-67-67-72-77-82 stitches. Work the new stitches in garter stitch until finished measurements. Continue pattern like this until piece measures 33-35-36-38-39-41 cm. Work pattern, begin from right side as follows: 7 stitches in garter stitch, work A.6 until 20 stitches remain, A.10a as before, 7 band stitches in garter stitch. When A.6 has been worked 1 time vertically, there are 83-91-91-99-107-115 stitches on needle. Work pattern as follows: 7 stitches in garter stitch, work A.7 until 20 stitches remain, A.10a as before, 7 band stitches in garter stitch. Work A.7 3 times in total vertically. Piece measures approx. 45-47-48-50-51-53 cm. Work pattern as follows: 7 stitches in garter stitch, work A.8 until 20 stitches remain and decrease at the same time 21-24-24-27-30-33 stitches evenly, A.10a as before, 7 band stitches in garter stitch = 62-67-67-72-77-82 stitches. When A.8 has been worked 1 time vertically, work A.8a vertically until finished measurements. When piece measures 50-52-54-56-58-60 cm, cast off the first 7 stitches on next row from right side = 55-60-60-65-70-75 stitches. Then work diagonal shoulder, begin on next row from the neck as follows: * Work pattern as before until 8-9-9-10-11-12 stitches remain, turn and work back *, work from *-* 3 times in total. I.e. work 8-9-9-10-11-12 stitches less on every turn from the neck. On last row towards the neck work until 20-23-24-25-26-26 stitches remain, slip the last 20-23-24-25-26-26 stitches on a thread for shawl collar and cast on 2 new stitches on needle = 37-39-38-42-46-51 stitches. Now work and cast off with an edge over shoulder stitches. Work stitches cast on with shoulder stitches as follows: Work * 1 stitch in stocking stitch, work next stitch together with first/next stitch from shoulder – remember KNIT TOGETHER, pass the 2 stitches back on the needle they came from with strand on wrong side of piece, make sure not to tighten yarn too much *, work from *-* until all stitches from shoulder have been worked together with the 2 new stitches that were cast on. Cast off the 2 stitches. SHAWL COLLAR: Slip the 20-23-24-25-26-26 stitches from stitch holder on circular needle size 5.5 mm. Work as follows, begin from right side: 0-2-3-3-5-5 stitches in garter stitch, knit over knit and purl over purl until until 7 stitches remain, 7 band stitches in garter stitch. Continue like this (i.e. cables are done) and work short rows as follows: ROW 1 (= wrong side): Work the first 16-19-20-21-22-22 stitches, turn and tighten yarn. ROW 2 (= right side): Work 16-19-20-21-22-22 stitches. ROW 3 (= wrong side): Work over all stitches, turn and tighten yarn. ROW 4 (= right side): Work over all stitches. Work 1st to 4th row until shawl collar measures approx. 7-8-8-9-9-9 cm on the shortest. Work 1 ridge over all stitches. Cast off. ASSEMBLY: Sew shoulder seams inside 1 stitch on i-cord edge. Sew stitches in garter stitch together. Sew shawl collar tog mid back and sew on to neck line at the back of neck. Sew side seams inside 1 edge stitch. Sew the buttons on to left front piece. |
||||||||||||||||||||||
Diagram explanations |
||||||||||||||||||||||
|
||||||||||||||||||||||
|
||||||||||||||||||||||
|
||||||||||||||||||||||
|
||||||||||||||||||||||
|
Have you made this or any other of our designs? Tag your pictures in social media with #dropsdesign so we can see them! Do you need help with this pattern?You'll find tutorial videos, a Comments/Questions area and more by visiting the pattern on garnstudio.com. © 1982-2024 DROPS Design A/S. We reserve all rights. This document, including all its sub-sections, has copyrights. Read more about what you can do with our patterns at the bottom of each pattern on our site. |
||||||||||||||||||||||


With over 40 years in knitting and crochet design, DROPS Design offers one of the most extensive collections of free patterns on the internet - translated to 17 languages. As of today we count 304 catalogues and 11422 patterns - 11422 of which are translated into English (UK/cm).
We work hard to bring you the best knitting and crochet have to offer, inspiration and advice as well as great quality yarns at incredible prices! Would you like to use our patterns for other than personal use? You can read what you are allowed to do in the Copyright text at the bottom of all our patterns. Happy crafting!
Comments / Questions (46)
Beste, \r\nBij rechter voorpand moet je volgens patroon dit breien\r\n7 voorbiessteken in ribbelsteek, brei A.9, 1-0-0-1-0-1 averecht, 1-0-0-1-0-1 recht, brei A.1 tot er 1 steek over is, 1 kantsteek in ribbelsteek. \r\n\r\nIk begrijp niet wat jullie hiermee bedoelen \"1-0-0-1-0-1 averecht, 1-0-0-1-0-1 recht\" ? waar staat de 1 en de 0 voor? \r\n\r\nMet dank voor de bijkomende uitleg\r\nRoos
08.03.2023 - 21:31DROPS Design answered:
Dag Roos,
De reeks getallen slaan steeds op de verschillende maten. Het eerste getal geldt voor maat XS, het tweede getal voor S, enzovoort.
09.03.2023 - 20:31Les explications ne sont pas claires et trop longues , on ne se rend pas compte de l effet produit
22.02.2023 - 07:43Peut-on voir une photo du dos pour comprendre le début ?
22.02.2023 - 07:39DROPS Design answered:
Bonjour Françoise, le dos se tricote exactement pas les devants, sauf que l'on n'aura pas de torsade comme celle qui se trouve près des bordures des devants; autrement dit, le dos ressemblera au devant de la version du pull sans manches. Bon tricot!
22.02.2023 - 09:04Le début du dos n est pas fait de torsades mais de côtes au point mousse ???
22.02.2023 - 07:32DROPS Design answered:
Bonjour Mme Miclo, le devant se tricote comme le dos: on commence par des côtes (A.1 puis A.2), puis des torsades (A.3) puis on continue les diagrammes dans l'ordre indiqué. Je ne suis pas certaine de voir de côtes mousse dans les explications, juste 1 maille lisière au point mousse de chaque côté des diagrammes. Mais n'hésitez pas à préciser votre question si je l'ai mal comprise, merci pour votre compréhension.
22.02.2023 - 09:03Hei, Jeg strikker 237-10 Small. Jeg er på ryggen, neders i oppskriften. Jeg har felr av 13 m til hals, så lengre ned står det "på neste pinne fra halsen felles 1 m......., Så, på neste pinne fra mot halsen felles de første 7 masker av = 35 m" Skal jeg felle rillekantmaskene, de neste 7 eller 7 m ved halsen? Jeg blir veldig glad for svar. Tusen takk
15.02.2023 - 13:21DROPS Design answered:
Hej Sol, du feller 1 maske af mod halsen. De 7 masker masker lukkes af yderst på skulderen. Når du strikker vendepinde, vender du inden de yderste masker på skulderen, så du får flere pinde over maskerne mod halsen :)
24.02.2023 - 10:59Scusate ma ho risolto. Ho capito che in A1 NON VA FATTO ALCUN AUMENTO. Si passa in A2 lavorando sulle stesse maglie. Si aumenta 1 maglia solo alla fine di A2. SCUSATE IL DISTURBO
20.01.2023 - 00:28DROPS Design answered:
Buonasera Margherita, corretto: l'unico aumento è alla fine di A.2. Buon lavoro!
21.01.2023 - 22:27Sono in difficoltà sul numero di maglie sul ferro alla fine del diagramma A2 sul dietro. Ho iniziato il mio lavoro con 110 maglie di cui 2 di vivagno. Sulle 108 maglie ho lavorato 27 gruppi di 4 maglie (A1). Alla fine di A2 le maglie sono diventate 7 (aumentate 3 maglie). Quindi ora sul ferro ho 27 gruppi x 7 maglie = 189+2 =191 maglie e non 128 come detto nelle spiegazioni. COSA STO SBAGLIANDO?
19.01.2023 - 22:29DROPS Design answered:
Buonasera Margherita, sulle 110 maglie deve lavorare A.1 (27 ripetizioni) e poi proseguire con A.2 (18 ripetizioni) + 2 maglie di A.2. Sul penultimo ferro di A.2 aumenta 1 maglia per ripetizione, passando così da 110 a 128 maglie. Buon lavoro!
21.01.2023 - 22:27Forse non sono stata abbastanza chiara. Nel passaggio dal diagramma A1 al diagramma A2 (davanti e dietro) si passa da 4 maglie a 6. Come è possibile se non ci sono aumenti?
19.01.2023 - 14:06DROPS Design answered:
Buonasera Margherita, non ci sono aumenti tra A.1 e A.2, cambia semplicemente il numero di ripetizioni del motivo: A.1 è di 4 maglie e si lavora per 27 ripetizioni, mentre A.2 è di 6 maglie e si lavora per 18 ripetizioni. Buon lavoro!
21.01.2023 - 22:31Sul davanti sinistro si passa da A1 a A2 senza aumenti ma ciò non è possibile. Secondo me va aumentata una maglia nel penultimo giro di A1.
18.01.2023 - 23:20DROPS Design answered:
Buonasera Margherita, non ci sono aumenti tra A.1 e A.2, cambia semplicemente il numero di ripetizioni del motivo: A.1 è di 4 maglie e si lavora per 27 ripetizioni, mentre A.2 è di 6 maglie e si lavora per 18 ripetizioni. Buon lavoro!
21.01.2023 - 22:32Hej igenigen Str M .Jeg skrev forkert i mit første spørgsmål . Det er højre forstykket jeg strikker ( ikke strikket venstre endnu) Jeg kan ikke få det til at stemme. Har nu 8 rapporter i A3 og 1 i A9a Er det korrekt at sidste m i A9 er en ret og første m i A2 er vrang ? Og hvor i A9 a skal omslaget være. Jeg plejer ikke have sådanne problemer med et mønster
10.01.2023 - 20:44DROPS Design answered:
Hej Grethe, du har nu 77 masker. 7 kantm, A.9a=13m, 1 omslag, strik A.3=7m (8 gange=56m), 1 kantmaske 78 masker. (7+13+1+56+1=78m). Omslaget skal være i samme rækkefølge som beskrevet.
12.01.2023 - 14:36