
Popular categories
Looking for a yarn?


|
|||||||||||||||||||
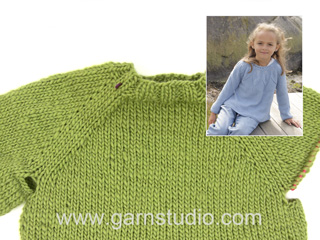
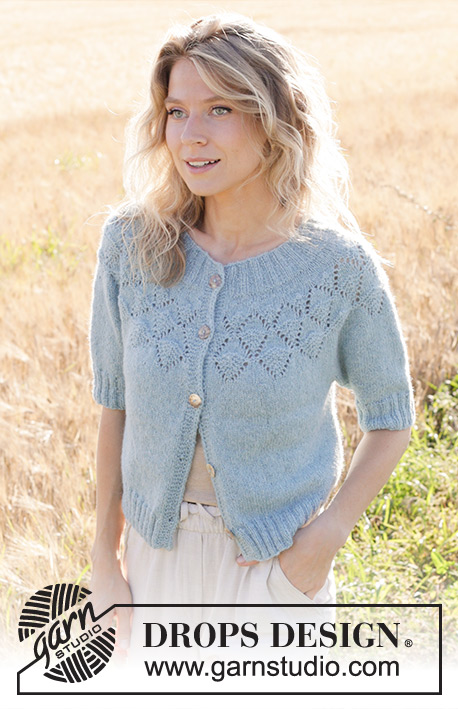
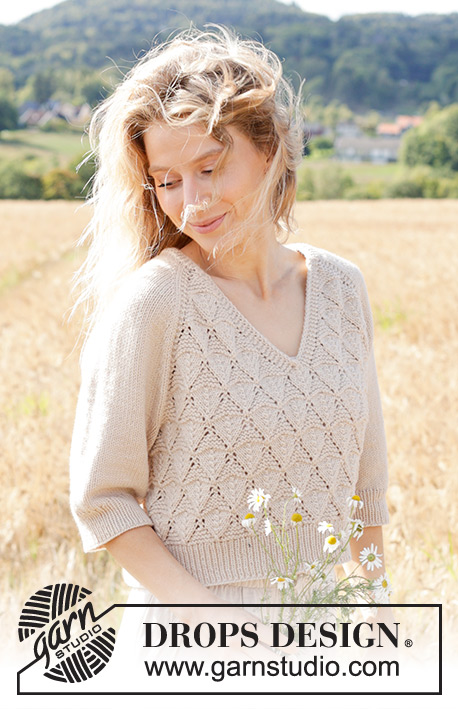
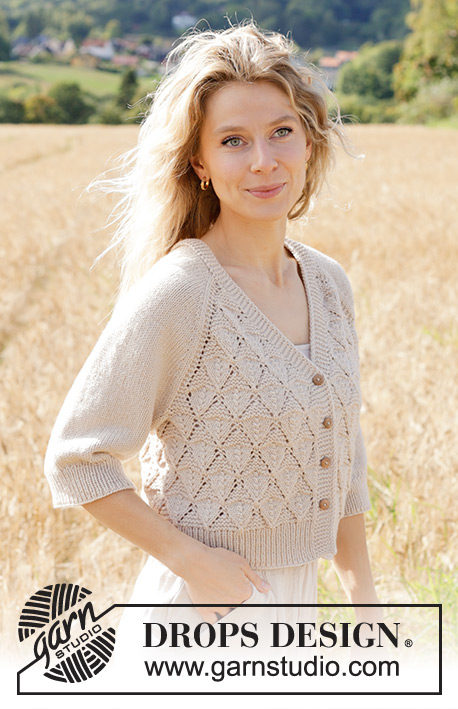
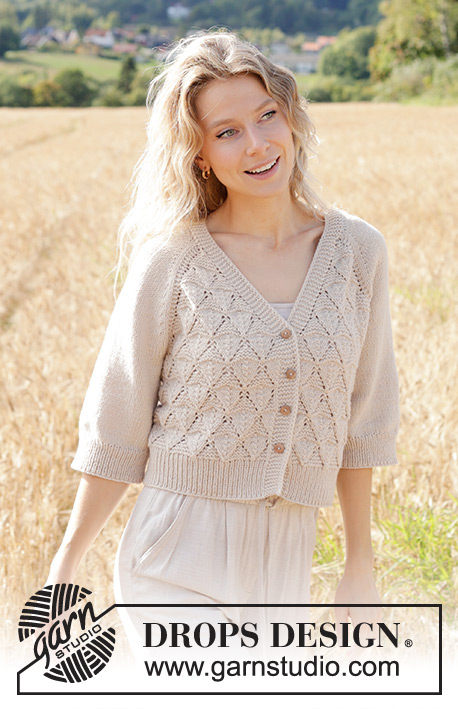
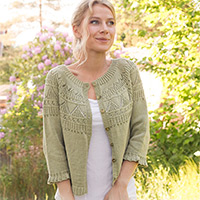
Sand Diamond Cardigan |
|||||||||||||||||||
 |
 |
||||||||||||||||||
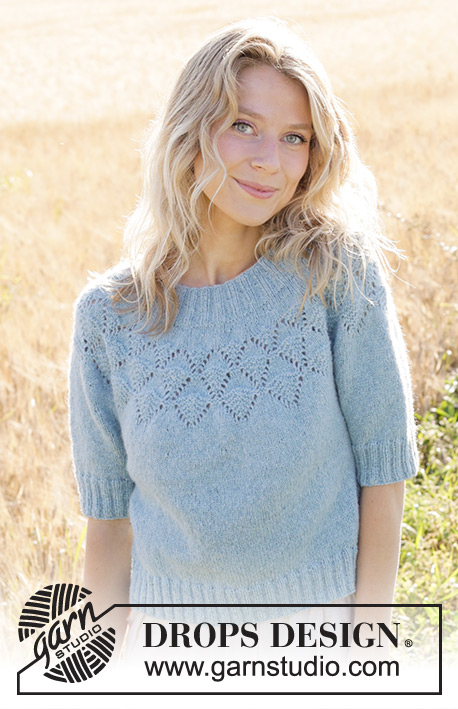
Knitted jacket in DROPS Daisy or DROPS Merino Extra Fine. The piece is worked top down with raglan, V-neck, lace pattern and ¾-length sleeves. Sizes S - XXXL.
DROPS 248-5 |
|||||||||||||||||||
|
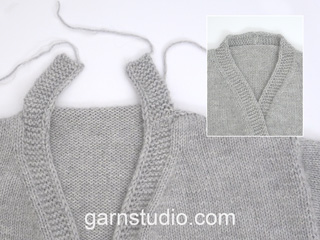
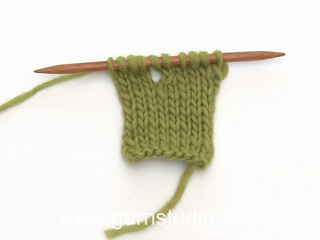
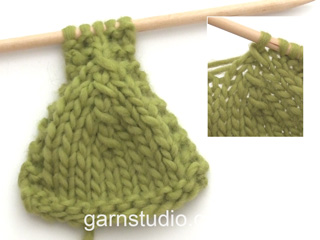
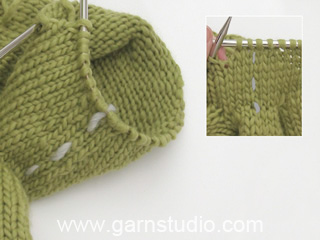
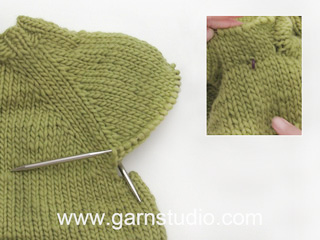
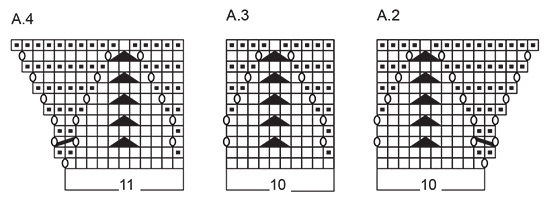
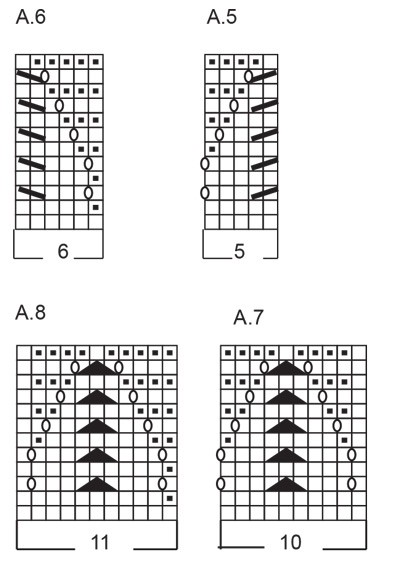
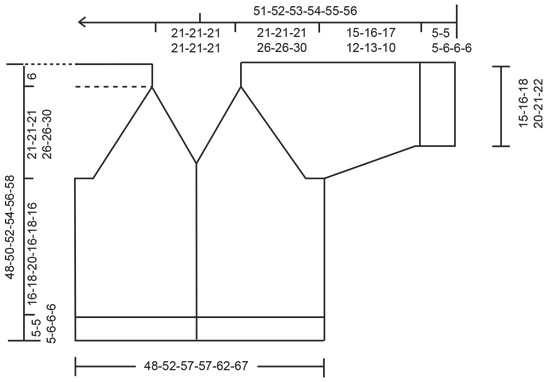
------------------------------------------------------- EXPLANATIONS FOR THE PATTERN: ------------------------------------------------------- GARTER STITCH (worked back and forth): Knit all rows, from both the right and wrong side. 1 ridge in height = knit 2 rows. PATTERN: See diagrams A.1 to A.8. The diagrams show all the rows in the pattern seen from the right side. RIGHT BAND WITH I-CORD: RIGHT SIDE: Work 10 garter stitches, slip 1 stitch purl-wise with strand in front, knit 1. WRONG SIDE: Slip 1 stitch purl-wise with strand in front, knit 1, 10 garter stitches. LEFT BAND WITH I-CORD: RIGHT SIDE: Slip 1 stitch purl-wise with strand in front, knit 1, 10 garter stitches. WRONG SIDE: Work 10 garter stitches, slip 1 stitch purl-wise with strand in front, knit 1. RAGLAN: Increase 1 stitch by making 1 yarn over, which is worked twisted on the next row. The new stitches are then worked in stocking stitch. BUTTONHOLES: Work the buttonholes on the right band from the right side. ROW 1: Work until there are 4 stitches left on the row, make 1 yarn over, knit 2 together, finish the band as before. ROW 2: Knit the yarn over (other band-stitches as before) to leave a hole. The first buttonhole is worked when the increases for V-neck are finished (front piece measures approx. 23 cm, from top of shoulder). The other buttonholes are worked when the front piece measures (from top of shoulder): S: 29, 36 and 43 cm M: 30, 38 and 45 cm L: 30, 39 and 47 cm XL: 30, 39 and 48 cm XXL: 31, 40 and 50 cm XXXL: 31, 41 and 52 cm (= the last buttonhole is worked in the transition between the stocking stitch and rib at the bottom of the front piece). DECREASE TIP (for sleeves): Decrease 1 stitch on each side of the marker-stitch as follows: Work until there are 2 stitches left before the marker-stitch, knit 2 together, knit 1 (= marker-stitch), slip 1 stitch knit-wise, knit 1 and pass the slipped stitch over the knitted stitch. ------------------------------------------------------- START THE PIECE HERE: ------------------------------------------------------- JACKET - SHORT OVERVIEW OF THE PIECE: The pattern uses both long and short needles; start with the length which fits the number of stitches and change when necessary. The piece is worked back and forth with circular needle, top down. Start by working 2 loose bands, then cast on stitches for the neckline between the bands and work the yoke back and forth. When the yoke is finished, divide for the body and sleeves. Continue the body back and forth, while the sleeves wait. The sleeves are then worked in the round. The bands are sewn together mid-back and sewn to the neckline. RIGHT BAND (when the garment is worn): Cast on 12 stitches with circular needle size 4 mm and DROPS Daisy or DROPS Merino Extra Fine. Work RIGHT BAND WITH I-CORD – read description above, back and forth for 4 cm. Now knit together the first 2 stitches from the right side (opposite side to the I-cord). Decrease like this every 3 cm a total of 5 times = 7 band stitches. Continue working until the band measures 21cm, finishing after a row from the wrong side. Cut the strand and lay the piece to one side. LEFT BAND (when the garment is worn): Cast on 12 stitches with circular needle size 4 mm. Work LEFT BAND WITH I-CORD – read description above, back and forth for 4 cm. Now knit together the last 2 stitches from the right side (opposite side to the I-cord). Decrease like this every 3 cm a total of 5 times = 7 band stitches. Continue working until the band measures 21 cm, finish after a row from the right side. Do not cut the strand. Cast on 99-99-99-103-103-103 stitches at the end of the row, then work the 7 stitches from the right band = 113-113-113-117-117-117 stitches. Work 1 row from the wrong side, purling the 99-99-99-103-103-103 cast on stitches and working the 7 band-stitches on each side as before. INFORMATION BEFORE CONTINUING. FRONT AND BACK PIECES: Lace pattern is now worked on the front and back pieces according to the diagrams.. The increases for the V-neck and raglan are drawn into the diagrams. When A.2, A.3 and A.4 have been worked 1 time in height, work 1 more repeat of A.3 between A.2 and A.4. SLEEVES: The sleeves are worked in stocking stitch and increased as described under RAGLAN. YOKE: Work the first row as follows from the right side: 7 band stitches as before, A.1, work 2 GARTER STITCHES – read description above, knit 2, increase 1 stitch for RAGLAN - read description above, 20-20-20-22-22-22 stocking stitches, increase 1 stitch for raglan, knit 2, 2 garter stitches, A,2, A.3 over the next 20 stitches, A.4, 2 garter stitches, knit 2, increase 1 stitch for raglan, 20-20-20-22-22-22 stocking stitches, increase 1 stitch for raglan, knit 2, 2 garter stitches, A.1 and 7 band stitches as before. REMEMBER THE KNITTING TENSION! FIND YOUR SIZE: Pattern is now worked differently in the different sizes. Continue from the section for your size. SIZE S: Increase for raglan and work pattern simultaneously as follows – read both RAGLAN and PATTERN before continuing. RAGLAN: Increase inside 2 stocking stitches on each side of the sleeves every 2nd row 4 times, then every 4th row 10 times = 14 increases on each side of each sleeve. PATTERN: When A.1 has been worked 1 time in height all increases are finished = 289 stitches. Work as follows from the right side: 7 band stitches, A.3 over the next 40 stitches, work the first stitch in A.3, 2 garter stitches, stocking stitch over the sleeve, 2 garter stitches, A.3 over the next 80 stitches, work the first stitch in A.3, 2 garter stitches, stocking stitch over the sleeve, 2 garter stitches, A.3 over the next 40 stitches, work the first stitch in A.3 and 7 band stitches – AT THE SAME TIME on this row work the first BUTTONHOLE – read description above! Work A.3 one time in height, the yoke measures approx. 27 cm from the shoulder. Continue from DIVIDE FOR BODY AND SLEEVES SIZES M-L: Increase for raglan and work pattern simultaneously as follows – read both RAGLAN and PATTERN before continuing. RAGLAN: Increase inside 2 stocking stitches on each side of the sleeves every 2nd row 3-2 times, then every 4th row 13-13 times = 16-15 increases on each side of each sleeve. PATTERN: When A.1 has been worked 1 time in height, the increases towards mid-front are finished; continue increasing for raglan in each transition between body and sleeves, working as follows from the right side: 7 band stitches, A.3 over the next 30 stitches, work A.4, 2 garter stitches, work and increase as before over the sleeve, 2 garter stitches, A.2, A.3 over the next 60 stitches, A.4, 2 garter stitches, work and increase as before over the sleeve, 2 garter stitches, A.2, A.3 over the next 30 stitches, work the first stitch in A.3 and 7 band stitches - AT THE SAME TIME on this row work the first BUTTONHOLE – read description above! Continue increasing like this until A.2, A.3 and A.4 have been worked 1-1 time in height. All increases are finished. There are 317-313 stitches and the yoke measures approx. 27-27 cm from the shoulder. Continue from DIVIDE FOR BODY AND SLEEVES. SIZES XL - XXL: Increase for raglan and work pattern simultaneously as follows – read both RAGLAN and PATTERN before continuing. RAGLAN: Increase inside 2 stocking stitches on each side of the sleeves every 2nd row 11-7 times, then every 4th row 12-14 times = 23-21 increases on each side of each sleeve. PATTERN: When A.1 has been worked 1 time in height, the increases towards mid-front are finished; continue increasing for raglan in each transition between body and sleeves, working as follows from the right side: 7 band stitches, A.3 over the next 30 stitches, work A.4, 2 garter stitches, work and increase as before over the sleeve, 2 garter stitches, A.2, A.3 over the next 60 stitches, A.4, 2 garter stitches, work and increase as before over the sleeve, 2 garter stitches, A.2, A.3 over the next 30 stitches, work the first stitch in A.3 and 7 band stitches - AT THE SAME TIME on this row work the first BUTTONHOLE – read description above! Continue increasing like this until A.2, A.3 and A.4 have been worked 1-1 time in height. Work as follows from the right side: 7 band stitches, A.5, A.3 over the next 30 stitches, work A.4, 2 garter stitches, work and increase as before over the sleeve, 2 garter stitches, A.2, A.3 over the next 70 stitches, A.4, 2 garter stitches, work and increase as before over the sleeve, 2 garter stitches, A.2, A.3 over the next 30 stitches, A.6 and 7 band stitches. Continue increasing like this until A.2, A.3 and A.4 have been worked 1-1 time in height. All increases are finished. There are 369-361 stitches and the yoke measures approx. 32-32 cm from the shoulder. Continue from DIVIDE FOR BODY AND SLEEVES. SIZE XXXL: Increase for raglan and work pattern simultaneously as follows – read both RAGLAN and PATTERN before continuing. RAGLAN: Increase inside 2 stocking stitches on each side of the sleeves every 2nd row 6 times, then every 4th row 17 times = 23 increases on each side of each sleeve. PATTERN: When A.1 has been worked 1 time in height, the increases towards mid-front are finished; continue increasing for raglan in each transition between body and sleeves, working as follows from the right side: 7 band stitches, A.3 over the next 30 stitches, work A.4, 2 garter stitches, work and increase as before over the sleeve, 2 garter stitches, A.2, A.3 over the next 60 stitches, A.4, 2 garter stitches, work and increase as before over the sleeve, 2 garter stitches, A.2, A.3 over the next 30 stitches, work the first stitch in A.3 and 7 band stitches - AT THE SAME TIME on this row work the first BUTTONHOLE – read description above! Continue increasing like this until A.2, A.3 and A.4 have been worked 1 time in height. Work as follows from the right side: 7 band stitches, A.5, A.3 over the next 30 stitches, work A.4, 2 garter stitches, work and increase as before over the sleeve, 2 garter stitches, A.2, A.3 over the next 70 stitches, A.4, 2 garter stitches, work and increase as before over the sleeve, 2 garter stitches, A.2, A.3 over the next 30 stitches, A.6 and 7 band stitches. Continue increasing like this until A.2, A.3 and A.4 have been worked 1 time in height. Work as follows from the right side: 7 band stitches, A.3 over the next 40 stitches, work A.4, 2 garter stitches, work and increase as before over the sleeve, 2 garter stitches, A.2, A.3 over the next 80 stitches, A.4, 2 garter stitches, work and increase as before over the sleeve, 2 garter stitches, A.2, A.3 over the next 40 stitches, work the first stitch in A.3 and 7 band stitches. Continue increasing like this until A.2, A.3 and A.4 have been worked 1 time in height. All increases are finished. There are 389 stitches and the yoke measures approx. 36 cm from the shoulder. Continue from DIVIDE FOR BODY AND SLEEVES. DIVIDE FOR BODY AND SLEEVES – ALL SIZES: Work as follows from the right side: Over the first 50-55-55-60-60-65 stitches, work the band and knit the other stitches (= left front piece), place the next 52-56-54-72-68-72 stitches on a thread for the sleeve, cast on 15-15-25-15-25-25 stitches under the sleeve, knit 85-95-95-105-105-115 stitches, place the next 52-56-54-72-68-72 stitches on a thread for the sleeve, cast on 15-15-25-15-25-25 stitches under the sleeve, knit and work the band over the last 50-55-55-60-60-65 stitches (= right front piece). BODY – ALL SIZES: = 215-235-255-255-275-295 stitches. From the wrong side, work row 2 in A.3 with 7 band stitches as before on each side. FIND YOUR SIZE: Work the section for your size below. SIZES S - M - L- XXXL: NOTE! Start on row 3 in the diagrams. * Work 7 band stitches as before, A.5, A.3 until there are 13 stitches left, A.6 and 7 band stitches as before. Work the diagrams 1 time in height. Continue with 7 band stitches as before, A.7, A.3 until there are 18 stitches left, A.8 and 7 band stitches as before. Work the diagrams 1 time in height *. Work from *-* until the body measures 16-18-20-16 cm, finishing after a complete repeat of A.3 in height. Go to ALL SIZES. SIZES XL - XXL: NOTE! Start on row 3 in the diagrams. * Work 7 band stitches as before, A.7, A.3 until there are 18 stitches left, A.8 and 7 band stitches as before. Work the diagrams 1 time in height. Work 7 band stitches as before, A.5, A.3 until there are 13 stitches left, A.6 and 7 band stitches as before. Work the diagrams 1 time in height *. Work from *-* until the body measures 18-16 cm, finishing after a complete repeat of A.3 in height. Go to ALL SIZES. ALL SIZES: On the next row (= right side) begin the rib, AT THE SAME TIME increase 42-42-48-48-48-58 stitches evenly on the row = 257-277-303-303-323-353 stitches, working as follows: Change to circular needle size 3 mm, work 7 band stitches as before, rib (knit 1, purl 1 – remember the increases) until there are 8 stitches left, knit 1 and 7 band stitches as before. When the rib measures 5-5-5-6-6-6 cm, cast off. The jacket measures approx. 48-50-52-54-56-58 cm from the shoulder. SLEEVES: Place the 52-56-54-72-68-72 stitches from the thread on one side of the piece on circular needle size 4 mm and knit up 1 stitch in each of the 15-15-25-15-25-25 stitches cast on under the sleeve = 67-71-79-87-93-97 stitches. Insert 1 marker in the middle stitch of the 15-15-25-15-25-25 stitches under the sleeve – start the round just before this marker-stitch. Work stocking stitch in the round. When the sleeve measures 3 cm from the division, decrease under the sleeve – read DECREASE TIP, repeat this decrease when the sleeve measures 8-8-9-6-6-6 cm = 63-67-75-83-89-93 stitches. Work until the sleeve measures 15-16-17-12-13-10 cm from the division. Change to double pointed needles size 3 mm. Work rib (knit 1, purl 1), AT THE SAME TIME increase 13-13-15-17-19-19 stitches evenly on round 1 = 76-80-90-100-108-112 stitches. Cast off when the rib measures 5-5-5-6-6-6 cm. ASSEMBLY: Sew the buttons onto the left band. Sew the bands together mid-back, then sew the bands to the neckline. |
|||||||||||||||||||
Diagram explanations |
|||||||||||||||||||
|
|||||||||||||||||||

|
|||||||||||||||||||
|
|||||||||||||||||||
|
|||||||||||||||||||
|
|||||||||||||||||||
|
Have you made this or any other of our designs? Tag your pictures in social media with #dropsdesign so we can see them! Do you need help with this pattern?You'll find tutorial videos, a Comments/Questions area and more by visiting the pattern on garnstudio.com. © 1982-2024 DROPS Design A/S. We reserve all rights. This document, including all its sub-sections, has copyrights. Read more about what you can do with our patterns at the bottom of each pattern on our site. |
|||||||||||||||||||


With over 40 years in knitting and crochet design, DROPS Design offers one of the most extensive collections of free patterns on the internet - translated to 17 languages. As of today we count 304 catalogues and 11422 patterns - 11422 of which are translated into English (UK/cm).
We work hard to bring you the best knitting and crochet have to offer, inspiration and advice as well as great quality yarns at incredible prices! Would you like to use our patterns for other than personal use? You can read what you are allowed to do in the Copyright text at the bottom of all our patterns. Happy crafting!
Comments / Questions (62)
Buongiorno, le maglie sul ferro sono 113 ma il primo giro dello sprone na prevede 103. Come mai? Grazie
23.05.2024 - 07:50Hallo, in de pas staat: 2 rechte steken, 2 ribbelsteken, meerder voor raglan. Als ik A1 1x in de hoogte heb gebreid kan ik deze '2 rechte steken' niet meer vinden in de omschrijving. Betekent dit dat deze steken bij de mouw horen?
23.05.2024 - 07:09Nel bordo sinistro ho avviato 99 maglie ma il primo ferro dello sprone, oltre le maglie del bordo, mi risultano lavorate 89 maglie . Dove vanno le 10 maglie mancanti?
22.05.2024 - 10:34DROPS Design answered:
Buonasera Lucia, prima della lavorazione dello sprone ha 113 maglie sul ferro: in quale punto trova difficoltà? Buon lavoro!
22.05.2024 - 23:26Hoi! Ik brei dit patroon in maat S. Ik heb in de pas nu 1 x de hoogte van A2/A3/A4 gebreid. In A1 zit ik in de 13e naald. In het begin hebben A2/2 x A3/A4 samen 41 steken. Aan het eind (als 1 x de hoogte is gebreid) hebben ze 51 steken. In de instructie staat bij de VOOR- EN ACHTERPANDEN dat als A2, A3 en A4 1 x in de hoogte gebreid zijn A3 nog maar 1 herhaling tussen A2 en A4 heeft. Dat zijn dan 31 steken. Of gaat dit niet over de pas? Wat moet ik nu dan wel breien op de plaats van A2/A3/A4?
21.05.2024 - 13:32Har stickat första varvet efter A1 och gjort ett knapphål. Ska A3 stickas 2 gånger i fortsättningen tillsamman med A1 och A4.Hur många maskor ska mönsterdelen, ärmar och ok bestå av innan delning? Stolek M
19.05.2024 - 21:15DROPS Design answered:
Hej Pia, Når du har strikket A.1 en gang i højden, fortsætter du forstykket med A.3 over A.1 men du fortsætter udtagningen til raglan mod ærmet ifølge A.2 og A.4. Udtagningerne på bagstykket fortsætter du også til du har ialt 317 masker og arbejdet måler 27 cm. Du starter med 113 m, tager 20 masker ud mod midt foran i hver side, tager 16x2=32 masker ud på hvert ærme og tager 25 masker ud i hver af de øvrige 4 raglan overgange (ifølge diagrammerne) = 100 (113+20+20+32+32+25+25+25+25=317masker som det står i opskriften.)
22.05.2024 - 15:17Hej! Skrev fel förra gången, men så här ska det vara: Stickar stl L och är på sista mönsterrapporten före delningen. Hur menar man här? "A.3 över de nästa 30 maskorna, sticka första maskan i A.3, 7 framkantsmaskor"? Jag får en maska över på sista rapporten i A3. Vilken maska räknas som första maskan? Hur får jag mönstret att stämma mot framkanten? Mvh Anna-Karin
16.05.2024 - 07:18DROPS Design answered:
Hej Anna-Karin, du strikker første masken i diagram A.3 (1.m er den til højre i diagrammet) igen og så de 7 kantmasker. Det er den maske du får över som du strikker ifølge 1.m i A.3, når du gør det skal det stemme mod forkanten :)
17.05.2024 - 12:15Tack för återkoppling. Tyvärr förstår jag fortfarande inte förklaringen i svaret 8 maj. Har ju stickat A1 en gång på höjden. I mönstret står inget om att man ska sticka A1 igen. Där talas det om A3 och A4 som jag förmodar skall vara över mönsterstickningen d v s=41 m. Tacksam för ytterligare förklaring om hur jag skall komma vidare.(tråkigt att behöva ge upp) 113 maskor??Storlek och maskantal angivet tidigare
14.05.2024 - 21:15DROPS Design answered:
Hej Maggan, Når du har strikket A.1 en gang i højden, fortsætter du forstykket med A.3 over A.1 men du fortsætter udtagningen til raglan mod ærmet ifølge A.2 og A.4. Udtagningerne på bagstykket fortsætter du også til du har ialt 317 masker og arbejdet måler 27 cm. Du starter med 113 m, tager 20 masker ud mod midt foran i hver side, tager 16x2=32 masker ud på hvert ærme og tager 25 masker ud i hver af de øvrige 4 raglan overgange (ifølge diagrammerne) = 100 (113+20+20+32+32+25+25+25+25=317masker som det står i opskriften.)
17.05.2024 - 12:09Tacksam för återkoppling av mina frågor och inlägg från den 1 och och 3 maj.
08.05.2024 - 11:19DROPS Design answered:
Hej. Stickar M Har sammanlagt 259 m.(7,41,2,56,2,43,2,56,2,41,7) Du starter med 7kantm, A.1 (1m), 2 retstrik, 2 ret, tag 1 maske ud til RAGLAN, 20 glatstrik, tag 1 maske ud til raglan, 2 ret, 2 retstrik, A,2 (10m), A.3 over de næste 20 masker, A.4 (11m), 2 retstrik, 2 ret, tag 1 maske ud til raglan, 20 glatstrik, tag 1 maske ud til raglan, 2 ret, 2 retstrik, A.1 (1m), 7 kantmasker som før. = 7+1+2+2+20+2+2+10+20+11+2+2+20+2+2+1+7= 113 masker du tager ud i A.1 og i A.2 og A.4 + de 4 raglanudtagninger som beskrevet her.
08.05.2024 - 12:07Jag stickar storlek L och får inte antalet maskor att stämma när jag ska sticka oket. Det blir 10 maskor över på stickan. När man räknar enligt beskrivningen blir det 103 maskor + ökningar, men det ska vara 113 m+ökningar.
08.05.2024 - 09:26DROPS Design answered:
Hej Anna-Karin, du har 113 masker: 7kantm, A.1 (1m), 2 retstrik, 2 ret, tag 1 maske ud til RAGLAN, 20 glatstrik, tag 1 maske ud til raglan, 2 ret, 2 retstrik, A,2 (10m), A.3 over de næste 20 masker, A.4 (11m), 2 retstrik, 2 ret, tag 1 maske ud til raglan, 20 glatstrik, tag 1 maske ud til raglan, 2 ret, 2 retstrik, A.1 (1m), 7 kantmasker som før. = 7+1+2+2+20+2+2+10+20+11+2+2+20+2+2+1+7= 113 masker + udtagningerne til raglan ifølge udtagningerne her og udtagningerne i diagrammet.
08.05.2024 - 11:55Mit spørgsmål fra igår er løst. Men jeg kan ikke få de 99 masker til at passe med opskriften i str M. Som jeg ser det er der 56 m til ærmer (iregnet 4 m før og 4 m efter altså 16 m ialt) plus 33 m til mønster og 8 til raglan ialt kun 97. Hvad er der galt ?????????
06.05.2024 - 21:25DROPS Design answered:
Hej Susanne, du har 113 masker: 7, A.1 (1m), 2 retstrik, 2 ret, tag 1 maske ud til RAGLAN, 20 glatstrik, tag 1 maske ud til raglan, 2 ret, 2 retstrik, A,2 (10m), A.3 over de næste 20 masker, A.4 (11m), 2 retstrik, 2 ret, tag 1 maske ud til raglan, 20 glatstrik, tag 1 maske ud til raglan, 2 ret, 2 retstrik, A.1 (1m), 7 kantmasker som før. = 7+1+2+2+20+2+2+10+20+11+2+2+20+2+2+1+7= 113 masker + udtagningerne til raglan ifølge udtagningerne her og udtagningerne i diagrammet.
08.05.2024 - 11:51