-------------------------------------------------------
Alternative Yarn – See how to change yarns here
Yarn Groups A to F – Use the same pattern and change the yarn here
Yarn usage using an alternative yarn – Use our yarn converter here
-------------------------------------------------------
= pink | |
= red | |
= yellow | |
= blue | |
= light yellow |
Each of our patterns has specific tutorial videos to help you.
These step-by-step tutorials might also help you:
Why is the knitting/crochet tension so important?
Knitting tension is what determines the final measurements of your work, and is usually measured per 10 x 10 cm. It is provided like so: number of stitches in width x number of rows in height - eg: 19 stitches x 26 rows = 10 x 10 cm.
The knitting tension is very individual; some people knit/crochet loosely while others work tightly. You adjust the knitting tension with the needle size, which is why the suggested needle size is only meant as a guide! You need to adjust this (up or down) to ensure that YOUR knitting tension matches the knitting tension provided in the pattern. If you work with a different knitting tension than provided you will have a different yarn consumption, and your work will have different measurements than what the pattern suggests.
The knitting tension also determines which yarns can replace each other. As long as you achieve the same knitting tension you can replace one yarn with another.
See DROPS lesson: How to measure your tension/gauge
See DROPS video: How to make a gauge tension swatch
How do I know how many balls of yarn I need?
The required amount of yarn is provided in grams, eg: 450 g. To calculate how many balls you’ll need you first need to know how many grams are in 1 ball (25g, 50g or 100g). This information is available if you click on the individual yarn quality on our pages. Divide the amount required with the amount of each ball. For example, if each ball is 50g (the most common amount), the calculation will be as follows: 450 / 50 = 9 balls.
Can I use a different yarn than what the pattern suggests?
The important thing when changing from one yarn to another is that the knitting/crochet tension remains the same. This is so that the measurements of the finished piece will be the same as on the sketch provided. It is easier to achieve the same knitting tension using yarns from the same yarn group. It is also possible to work with multiple strands of a thinner yarn to achieve the knitting tension of a thicker one. Please try our yarn converter. We recommend you to always work a test swatch.
Please NOTE: when changing yarn the garment might have a different look and feel to the garment in the photo, due to individual properties and qualities of each yarn.
See DROPS lesson: Can I use a different yarn than the one mentioned in the pattern?
What are the yarn groups?
All our yarns are categorised into yarn groups (from A to F) according to thickness and knitting tension – group A contains the thinnest yarns and group F the thickest. This makes it easier for you to find alternative yarns to our patterns, should you wish to switch yarn. All yarns within the same group have a similar knitting tension and can easily replace each other. However, different yarn qualities have different structures and properties which will give the finished work a unique look and feel.
How do I use the yarn calculator?
At the top of all our patterns you’ll find a link to our yarn calculator, which is a helpful tool should you wish to use a different yarn than suggested. By filling in the yarn quality you wish to replace, the amount (in your size) and number of strands, the calculator will present good alternative yarns with the same knitting tension. Additionally it will tell you how much you’ll require in the new qualities and whether you’ll need to work with multiple strands. Most skeins are 50g (some are 25g or 100g).
If the pattern is worked with multiple colours, every colour will have to be calculated separately. Similarly, if the pattern is worked with several strands of different yarns (for example 1 strand Alpaca and 1 strand Kid-Silk) you will have to find alternatives for each, individually.
Why do you show discontinued yarns in the patterns?
Since different yarns have different qualities and textures we have chosen to keep the original yarn in our patterns. However, you can easily find options among our available qualities by using our yarn calculator, or simply pick a yarn from the same yarn group.
It is possible that some retailers still have discontinued yarns in stock, or that someone has a few skeins at home that they would like to find patterns for.
The yarn calculator will provide both alternative yarn as well as required amount in the new quality.
What size should I knit?
If you think it's hard to decide what size to make, it can be a good idea to measure a garment you own already and like the size of. Then you can pick the size by comparing those measures with the ones available in the pattern's size chart.
You'll find the size chart at the bottom of the pattern.
See DROPS lesson: How to read size chart
Why do I get the wrong knitting tension with the suggested needle size?
The needle size provided in the pattern serves only as a guide, the important thing is to follow the knitting tension. And since knitting tension is very individual, you will have to adjust the needle size to ensure that YOUR tension is the same as in the pattern – maybe you’ll have to adjust 1, or even 2 needle sizes, up or down to achieve the correct tension. For this, we recommend that you work test swatches.
Should you work with a different knitting tension than the one provided, the measurements of the finished garment might deviate from the measurement sketch.
See DROPS lesson: How to measure your tension/gauge
See DROPS video: How to make a tension/gauge swatch
Why is the pattern worked top-down?
Working a garment top-down provides more flexibility and room for personal adjustment. For example it is easier to try the garment on while working, as well as making adjustments to length of yoke and shoulder caps.
The instructions are carefully explaining every step, in the correct order. Diagrams are adjusted to the knitting direction and are worked as usual.
How do I work according to a knitting diagram?
The diagram depicts all rows/rounds, and every stitch seen from the right side. It is read from bottom to top, from right to left. 1 square = 1 stitch.
When working back and forth, every other row is worked from the right side and every other row is worked from the wrong side. When working from the wrong side, the diagram will have to be worked reversed: from left to right, knit stitches are purled, purl stitches are knit etc.
When working in the round every round is worked from the right side and the diagram are worked from right to left on all rounds.
See DROPS lesson: How to read knitting diagrams
How do I work according to a crochet diagram?
The diagram depicts all rows/rounds, and every stitch seen from the right side. It is worked from bottom to top, from right to left.
When working back and forth every other row is worked from the right side: from right to left and every other row is worked from the wrong side: from left to right.
When working in the round, every row in the diagram are worked from the right side, from right to left.
When working a circular diagram you start in the middle and work your way outwards, counter clockwise, row by row.
The rows usually start with a given number of chain stitches (equivalent to the height of the following stitch), this will either be depicted in the diagram or explained in the pattern.
See DROPS lesson: How to read crochet diagrams
How do I work several diagrams simultaneously on the same row/round?
Instructions for working several diagrams after each other on the same row/round, will often be written like so: “work A.1, A.2, A.3 a total of 0-0-2-3-4 times". This means you work A.1 once, then A.2 is worked once, and A.3 is repeated (in width) the number of times provided for your size – in this case like so: S = 0 times, M = 0 times, L=2 times, XL= 3 times and XXL = 4 times.
The diagrams are worked as usual: begin with the first row in A.1, then work the first row in A.2 etc.
See DROPS lesson: How to read knitting diagrams
See DROPS lesson: How to read crochet diagrams
Why are the sleeves shorter in larger sizes?
The total width of the garment (from wrist-to-wrist) will be larger in the larger sizes, despite the actual sleeves being shorter. The larger sizes have longer sleeve caps and wider shoulders, so there will be a good fit in all sizes.
Where on the garment is the length measured?
The measurement sketch/schematic drawing provides information regarding the full length of the garment. If it’s a jumper or a jacket the length is measured from the highest point on the shoulder closest to the neckline, and straight down to the bottom of the garment. It is NOT measured from the tip of shoulder. Similarly, the length of yoke is measured from the highest point on the shoulder and down to where yoke is split into body and sleeves.
On a jacket measures are never taken along bands, unless specifically stated. Always measure inside band stitches when measuring the length.
See DROPS lesson: How to read a schematic drawing
What is a repeat?
Diagrams are often repeated on the round or in height. 1 repeat is the diagram the way it appears in the pattern. If it says to work 5 repeats of A.1 in the round, then you work A.1 a total of 5 times after/next to each other in the round. If it says to work 2 repeats of A.1 vertically/in height you work the entire diagram once, then begin again at the start and work the entire diagram one more time.
Why does the piece start with more chain stitches than it’s worked with?
Chain stitches are slightly narrower than other stitches and to avoid working the cast-on edge too tight, we simply chain more stitches to begin with. The stitch count will be adjusted on the following row to fit the pattern and measurement sketch.
Why increase before the rib edge when the piece is worked top-down?
The rib edge is more elastic and will contract slightly compared to, for example, stocking stitch. By increasing before the rib edge, you avoid a visible difference in width between the rib edge and the rest of the body.
Why increase in the cast-off edge?
It’s very easy to cast off too tightly, and by making yarn overs while casting off (and simultaneously casting these off) you avoid a too tight cast off edge.
See DROPS video: How to bind off with yarn overs (yo)
How do I increase/decrease on every 3rd and 4th row/round alternately?
To achieve an even increase (or decrease) you can increase on, for example: every 3rd and 4th row alternately, like so: work 2 rows and increase on the 3rd row, work 3 rows and increase on the 4th. Repeat this until the increase is complete.
See DROPS lesson: Increase or decrease 1 st on every 3rd and 4th row alternately
How can I work a jacket in the round instead of back and forth?
Should you prefer to work in the round instead of back and forth, you may of course adjust the pattern. You’ll need to add steeks mid-front (usually 5 stitches), and follow the instructions. When you would normally turn and work from the wrong side, simply work across the steek and continue in the round. At the end you’ll cut the piece open, pick up stitches to work bands, and cover the cut edges.
See DROPS video: How to knit steeks and cut open
Can I work a jumper back and forth instead of in the round?
Should you prefer to work back and forth instead of in the round, you may of course adjust the pattern so you work the pieces separately and then assemble them at the end. Divide the stitches for the body in 2, add 1 edge stitch in each side (for sewing) and work the front and back pieces separately.
See DROPS lesson: Can I adapt a pattern for circular needles into straight needles?
Why is the pattern slightly different than what I see in the photo?
Pattern repeats can vary slightly in the different sizes, in order to get the correct proportions. If you’re not working the exact same size as the garment in the photo, yours might deviate slightly. This has been carefully developed and adjusted so that the complete impression of the garment is the same in all sizes.
Make sure to follow instructions and diagrams for your size!
How do I make a women’s size garment into a men’s size one?
If you have found a pattern you like which is available in women’s size it’s not very difficult to convert it to men’s size. The biggest difference will be the length of sleeves and body. Start working on the women size that you think would fit across the chest. The additional length will be worked right before you cast off for the armhole/sleeve cap. If the pattern is worked top-down you can add the length right after the armhole or before the first decrease on sleeve.
Regarding additional yarn amount, this will depend on how much length you add, but it is better with a skein too many than too few.
How do I prevent a hairy garment from shedding?
All yarns will have excess fibres (from production) that might come off as lint or shedding. Brushed yarns (ie hairier yarns) have more of these loose, excess fibres, causing more shedding.
Shedding also depends on what is worn under or over the garment, and whether this pulls at the yarn fibres. It’s therefore not possible to guarantee that there will be no shedding
Below are some tips on how to get the best result when working with hairier yarns:
1. When the garment is finished (before you wash it) shake it vigorously so the looser hairs come off. NOTE: do NOT use a lint roller, brush or any method that pulls at the yarn.
2. Place the garment in a plastic bag and put it in your freezer - the temperature will cause the fibres to become less attached to each other, and excess fibres will come off easier.
3. Leave in the freezer for a few hours before taking it out and shaking it again.
4. Wash the garment according to the instructions on the yarn label.
Why does my garment pill?
Pilling is a natural process that happens to even the most exclusive of fibers. It's a natural sign of wear and tear that is hard to avoid, and that is most visible in high friction areas of your garment like a sweater's arms and cuffs.
You can make your garment look as new by removing the pilling, using a fabric comb or a pill/lint remover.
Beary Cute Friend |
||||||||||||||||
|
||||||||||||||||
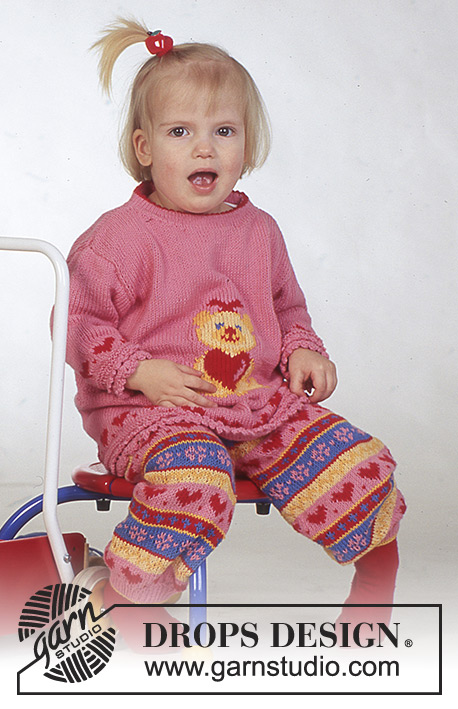
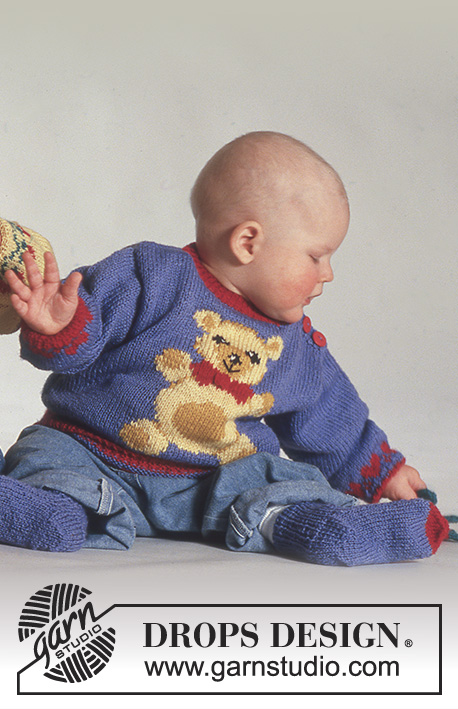
DROPS Teddy soft toy and jumper in “Karisma”.
DROPS Baby 4-22 |
||||||||||||||||
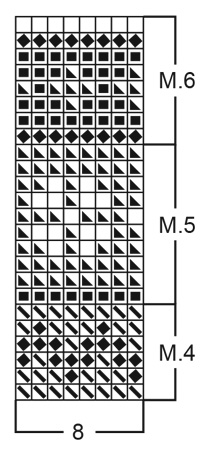
Knitting tension: 20 sts x 26 rows on needles size 4 mm in stocking st = 10 x 10 cm. Garter st, back and forth on needle: K all rows Garter st on circular needle: K 1 round, P 1 round. TEDDY: Knitted in one piece from top to bottom. Therefore fasten ends and fill the teddy with cotton wool as you go along. Cast on 8 sts distributed on 4 needles and knit stocking st, at the same time inc to 16 sts on next round by knitting 2 sts in each st. Inc to 32 sts on next round the same way, knit 1 round without inc. Inc to 48 sts on next round by knitting 2 sts in every other st. Knit 6 rounds without inc. Now increase for snout: insert a MT between 2 sts on one of the needles, knit 2 sts in each of the 3 sts before and after MT = 6 new sts on needle. Finish the round. Now inc on both sides of snout inside the last st on every round: 1 st 4 times and then dec inside the last st on every round: 1 st 4 times. Now dec on both sides of MT on every other round by K2 tog into back of st before MT and K2 tog after MT: 1 st 3 times = 48 sts. Knit 2 rounds, and then knit all sts tog 2 by 2 on next round = 24 sts. Knit a further 4 rounds. There are now 6 sts on each needle and front of teddy is mid on of the needles - head and neck are now completed. Knit 1 round inc 1 st in the first and last st on each needle = 32 sts. Continue this inc on every other round another 8 times = 96 sts (24 sts on each needle). Arms: = 24 sts on either side of head. Keep 24 sts on one side of head on needle and put remaining sts on a thread. Cast on 2 sts either end of needle = 28 sts and distribute these on all 4 needles. Knit 24 rounds and then K tog all sts 2 by 2 = 14 sts. Knit another 2 rounds, cut the thread and pull through remaining sts. Repeat on 24 sts on the other side of head. Body: Put sts from thread back on needle and cast on 2 new sts each side of back and front (= 4 new sts under each arm) = 56 sts in total. Insert a MT mid front on stomach and now knit 2 sts in each of the 3 sts before and after MT = 6 new sts on needle. Finish the round and knit another 4 rounds. Now inc on either side of the stomach inside the last st on needle on every other round: 1 st 2 times. Knit 7 rounds. Now dec on both sides of MT on every round: 1 st 5 times = 56 sts. Knit 3 rounds and continue with legs. Legs: Divide piece mid front and mid back = 28 sts on each leg. Put sts from 1 leg on a thread. Knit 24 rounds and continue knitting heel as follows: 5 rows stocking st on 14 sts mid back, at the same time dec each side on every row: 1 st 5 times = 4 sts left. Pick up 5 sts on each side of heel and knit 6 rounds on all 28 sts. Now K tog all sts 2 by 2 = 14 sts, and then 2 rounds without dec. Cut the thread, pull through remaining sts and fasten. Put sts from thread back on needle and knit the other leg. Ears: Pick up 1 st in each st from round 6-16 = 10 sts on either side of the head (= equal number of sts between ears back and front). Knit 8 rows garter st back and forth on needle, on next row K all sts tog 2 by 2, knit 2 rows and cast off. Crochet a row of dc round the ears on crochet hook size 3.5 mm. Assembly: Sew opening at top of head, under arms and between legs. Crochet a bow on crochet hook size 2.5 mm with red as follows: Crochet 16 ch and form a loop with a dc. Crochet another 16 ch and form another loop with a dc in the dc from first loop (a number 8). Crochet 16 ch in each loop. Attach bow to top of head. Embroider eyes, nose and mouth with loop sts as follows: Place eyes inside the inc and dec on the top of both sides of snout, use blue Safran and make eyes approx 1 cm in diameter. Place nose right below the eyes, use red Safran and cover the width of 4 sts and the height of 2 sts. Make 2 loop sts from middle of nose towards the mouth and form the mouth from the middle with 3 loop sts either side. JUMPER FOR TEDDY: Materials: Safran remnants in pink, red, yellow, blue and light yellow DROPS double pointed needles size 3 mm. Knitting tension: 24 sts x 32 rows on needle size 3 mm in pattern = 10 x 10 cm Garter st back and forth on needle: knit all rows. Cast on 88 sts on double pointed needles size 3 mm with pink and knit 4 rounds garter st. Continue in pattern as follows: M.4, 3 rounds pink, M.5, 3 rounds pink, M.6 and complete piece in pink. At the same time when piece measures 5 cm divide piece and complete front and back pieces separately back and forth on needle. Front piece: = 44 sts. Inc 12 sts each side for sleeves and continue in pattern. When piece measures 10 cm cast off the middle 12 sts for neck. Cast off remaining sts when piece measures 13 cm. Back piece: = 44 sts. Inc 12 sts each side for sleeves and continue in pattern. When piece measures 7 cm divide piece for split mid back and complete each side separately. When piece measures 10 cm cast off 5 sts towards neckline. Cast off remaining sts when piece measures 13 cm. Assembly: Sew shoulder seam. Pick up approx 30 sts round sleeve edges on needle size 3 mm with pink and knit 4 rows garter st. Sew sleeve seam. Now crochet a row of dc on crochet hook size 3 mm with pink round the neck and split mid back. Crochet a chain measuring approx 10 cm each and attach at top of split each side. |
||||||||||||||||
Diagram explanations |
||||||||||||||||
|
||||||||||||||||
Have you made this or any other of our designs? Tag your pictures in social media with #dropsdesign so we can see them! Do you need help with this pattern?You'll find tutorial videos, a Comments/Questions area and more by visiting the pattern on garnstudio.com. © 1982-2024 DROPS Design A/S. We reserve all rights. This document, including all its sub-sections, has copyrights. Read more about what you can do with our patterns at the bottom of each pattern on our site. |
With over 40 years in knitting and crochet design, DROPS Design offers one of the most extensive collections of free patterns on the internet - translated to 17 languages. As of today we count 304 catalogues and 11422 patterns - 11422 of which are translated into English (UK/cm).
We work hard to bring you the best knitting and crochet have to offer, inspiration and advice as well as great quality yarns at incredible prices! Would you like to use our patterns for other than personal use? You can read what you are allowed to do in the Copyright text at the bottom of all our patterns. Happy crafting!
Comments / Questions (17)
Annelize wrote:
I Just LOVE it
02.08.2019 - 07:09Sylvie wrote:
Bonjour. Après avoir terminé les bras et qu'on arrive au corps, faut il continuer avec les 4 aiguilles doubles pointes ? Merci pour votre aide.
23.05.2019 - 09:52DROPS Design answered:
Bonjour Sylvie, tout à fait, le corps se tricote en rond. Bon tricot!
23.05.2019 - 10:02Sylvie wrote:
Bonjour. Quand il faut augmenter 1 m de chaque côté du museau, c'est a dire qu'il faut augmenter 1m de chaque côté du marqueur ou avant les mailles augmenter après et avant le marqueur. Merci pour votre aide
09.05.2019 - 14:47DROPS Design answered:
Bonjour Sylvie, les augmentations se font de part et d'autre des mailles du museau: vous tricotez deux fois la 1ère et la dernière m du museau. (le marqueur est au milieu) - les diminutions se feront ensuite de chaque côté du marqueur (= avant + après le marqueur). Bon tricot!
09.05.2019 - 15:45Sylvie wrote:
Bonjour. Ne sachant pas tricoter avec des aiguilles doubles pointes je souhaiterais savoir si il est possible de faire ce modèle en aller retour avec des aiguilles droites ?Merci pour votre réponse
09.05.2019 - 10:12DROPS Design answered:
Bonjour Sylvie, vous trouverez ici, comment adapter un modèle sur aiguilles droites, si vous êtes à l'aise avec une aiguille circulaire, pensez à utiliser la technique du magic loop. Bon tricot!
09.05.2019 - 11:05Astrid Herzog wrote:
Hartelijk bedankt voor het telpatroon. Ik heb nog een vraag. Misschien staat het antwoord ergens. Ik kon het niet vinden. Hoe groot is de beer als hij klaar is? Ik heb een beer en ik wil weten of dat truitje past
14.11.2017 - 10:12DROPS Design answered:
Hallo Astrid, Dat staat er inderdaad niet bij, maar ik zie dat de trui ongeveer 13 cm hoog is, dus ik denk dat de beer dan ongeveer 30 cm hoog is (op basis van de foto)
15.11.2017 - 10:22Astrid Herzog wrote:
Ik wil dat berentruitje breien maar kan nergens het telpatroon vinden.
13.11.2017 - 13:43DROPS Design answered:
Hallo Astrid, Het telpatroon is er inmiddels bij gezet ;)
13.11.2017 - 20:56Anni wrote:
Hej Undrar bara hur stor nallen blir
21.10.2016 - 00:16DROPS Design answered:
Hej Anni. Det ved jeg desvaerre ikke, da det ikke specifikt staar i mönstret.
25.10.2016 - 16:16Maria wrote:
Wie strickt man die Ferse? Nimmt man in jeder Hin-Reihe vorne und hinten 1 M. ab und strikt dann linke M. zurück? Ich habe es so gestrickt, aber es sieht komisch aus. Danke für die Hilfe.
21.08.2015 - 22:39DROPS Design answered:
Sie stricken die Ferse ja in Hin- und Rück-R über die 14 Maschen. Sie nehmen in jeder der 5 R, die Sie stricken, an beiden Seiten der 14 M je 1 M ab, also in jeder R 2 M = 10 M insgesamt in den 5 R. Die Anleitung wird gleich an dieser Stelle präzisiert.
01.09.2015 - 09:57Maria wrote:
Beim Körper muss es lauten, danach 7 Runden - nicht 7 M. Für Magen könnte man auch Bauch schreiben - ist aber ok. Ich bin jetzt gerade bei den Beinen. Wie groß wird der Teddy insgesamt?
16.08.2015 - 10:21Berit wrote:
Luftmaschen-schnur.
09.08.2015 - 19:03