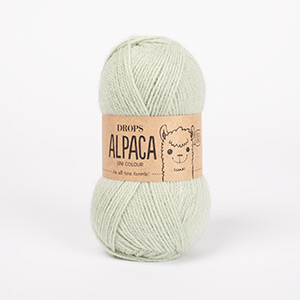
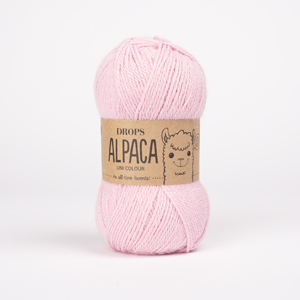
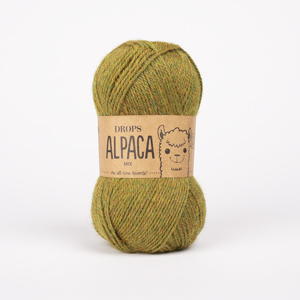
The yarn cost is calculated from the pattern’s smallest size and the yarn’s cheapest product type. Looking for an even better price? You might find it on the DROPS Deals!
-------------------------------------------------------
Alternative Yarn – See how to change yarns here
Yarn Groups A to F – Use the same pattern and change the yarn here
Yarn usage using an alternative yarn – Use our yarn converter here
-------------------------------------------------------
The yarn cost is calculated from the pattern’s smallest size and the yarn’s cheapest product type. Looking for an even better price? You might find it on the DROPS Deals!
= maroon | |
= dark pink | |
= light brown eco | |
= dark blue | |
= rust | |
= dark brown eco | |
= off white |
Each of our patterns has specific tutorial videos to help you.
These step-by-step tutorials might also help you:
Why is the knitting/crochet tension so important?
Knitting tension is what determines the final measurements of your work, and is usually measured per 10 x 10 cm. It is provided like so: number of stitches in width x number of rows in height - eg: 19 stitches x 26 rows = 10 x 10 cm.
The knitting tension is very individual; some people knit/crochet loosely while others work tightly. You adjust the knitting tension with the needle size, which is why the suggested needle size is only meant as a guide! You need to adjust this (up or down) to ensure that YOUR knitting tension matches the knitting tension provided in the pattern. If you work with a different knitting tension than provided you will have a different yarn consumption, and your work will have different measurements than what the pattern suggests.
The knitting tension also determines which yarns can replace each other. As long as you achieve the same knitting tension you can replace one yarn with another.
See DROPS lesson: How to measure your tension/gauge
See DROPS video: How to make a gauge tension swatch
How do I know how many balls of yarn I need?
The required amount of yarn is provided in grams, eg: 450 g. To calculate how many balls you’ll need you first need to know how many grams are in 1 ball (25g, 50g or 100g). This information is available if you click on the individual yarn quality on our pages. Divide the amount required with the amount of each ball. For example, if each ball is 50g (the most common amount), the calculation will be as follows: 450 / 50 = 9 balls.
Can I use a different yarn than what the pattern suggests?
The important thing when changing from one yarn to another is that the knitting/crochet tension remains the same. This is so that the measurements of the finished piece will be the same as on the sketch provided. It is easier to achieve the same knitting tension using yarns from the same yarn group. It is also possible to work with multiple strands of a thinner yarn to achieve the knitting tension of a thicker one. Please try our yarn converter. We recommend you to always work a test swatch.
Please NOTE: when changing yarn the garment might have a different look and feel to the garment in the photo, due to individual properties and qualities of each yarn.
See DROPS lesson: Can I use a different yarn than the one mentioned in the pattern?
What are the yarn groups?
All our yarns are categorised into yarn groups (from A to F) according to thickness and knitting tension – group A contains the thinnest yarns and group F the thickest. This makes it easier for you to find alternative yarns to our patterns, should you wish to switch yarn. All yarns within the same group have a similar knitting tension and can easily replace each other. However, different yarn qualities have different structures and properties which will give the finished work a unique look and feel.
How do I use the yarn calculator?
At the top of all our patterns you’ll find a link to our yarn calculator, which is a helpful tool should you wish to use a different yarn than suggested. By filling in the yarn quality you wish to replace, the amount (in your size) and number of strands, the calculator will present good alternative yarns with the same knitting tension. Additionally it will tell you how much you’ll require in the new qualities and whether you’ll need to work with multiple strands. Most skeins are 50g (some are 25g or 100g).
If the pattern is worked with multiple colours, every colour will have to be calculated separately. Similarly, if the pattern is worked with several strands of different yarns (for example 1 strand Alpaca and 1 strand Kid-Silk) you will have to find alternatives for each, individually.
Why do you show discontinued yarns in the patterns?
Since different yarns have different qualities and textures we have chosen to keep the original yarn in our patterns. However, you can easily find options among our available qualities by using our yarn calculator, or simply pick a yarn from the same yarn group.
It is possible that some retailers still have discontinued yarns in stock, or that someone has a few skeins at home that they would like to find patterns for.
The yarn calculator will provide both alternative yarn as well as required amount in the new quality.
What size should I knit?
If you think it's hard to decide what size to make, it can be a good idea to measure a garment you own already and like the size of. Then you can pick the size by comparing those measures with the ones available in the pattern's size chart.
You'll find the size chart at the bottom of the pattern.
See DROPS lesson: How to read size chart
Why do I get the wrong knitting tension with the suggested needle size?
The needle size provided in the pattern serves only as a guide, the important thing is to follow the knitting tension. And since knitting tension is very individual, you will have to adjust the needle size to ensure that YOUR tension is the same as in the pattern – maybe you’ll have to adjust 1, or even 2 needle sizes, up or down to achieve the correct tension. For this, we recommend that you work test swatches.
Should you work with a different knitting tension than the one provided, the measurements of the finished garment might deviate from the measurement sketch.
See DROPS lesson: How to measure your tension/gauge
See DROPS video: How to make a tension/gauge swatch
Why is the pattern worked top-down?
Working a garment top-down provides more flexibility and room for personal adjustment. For example it is easier to try the garment on while working, as well as making adjustments to length of yoke and shoulder caps.
The instructions are carefully explaining every step, in the correct order. Diagrams are adjusted to the knitting direction and are worked as usual.
How do I work according to a knitting diagram?
The diagram depicts all rows/rounds, and every stitch seen from the right side. It is read from bottom to top, from right to left. 1 square = 1 stitch.
When working back and forth, every other row is worked from the right side and every other row is worked from the wrong side. When working from the wrong side, the diagram will have to be worked reversed: from left to right, knit stitches are purled, purl stitches are knit etc.
When working in the round every round is worked from the right side and the diagram are worked from right to left on all rounds.
See DROPS lesson: How to read knitting diagrams
How do I work according to a crochet diagram?
The diagram depicts all rows/rounds, and every stitch seen from the right side. It is worked from bottom to top, from right to left.
When working back and forth every other row is worked from the right side: from right to left and every other row is worked from the wrong side: from left to right.
When working in the round, every row in the diagram are worked from the right side, from right to left.
When working a circular diagram you start in the middle and work your way outwards, counter clockwise, row by row.
The rows usually start with a given number of chain stitches (equivalent to the height of the following stitch), this will either be depicted in the diagram or explained in the pattern.
See DROPS lesson: How to read crochet diagrams
How do I work several diagrams simultaneously on the same row/round?
Instructions for working several diagrams after each other on the same row/round, will often be written like so: “work A.1, A.2, A.3 a total of 0-0-2-3-4 times". This means you work A.1 once, then A.2 is worked once, and A.3 is repeated (in width) the number of times provided for your size – in this case like so: S = 0 times, M = 0 times, L=2 times, XL= 3 times and XXL = 4 times.
The diagrams are worked as usual: begin with the first row in A.1, then work the first row in A.2 etc.
See DROPS lesson: How to read knitting diagrams
See DROPS lesson: How to read crochet diagrams
Why are the sleeves shorter in larger sizes?
The total width of the garment (from wrist-to-wrist) will be larger in the larger sizes, despite the actual sleeves being shorter. The larger sizes have longer sleeve caps and wider shoulders, so there will be a good fit in all sizes.
Where on the garment is the length measured?
The measurement sketch/schematic drawing provides information regarding the full length of the garment. If it’s a jumper or a jacket the length is measured from the highest point on the shoulder closest to the neckline, and straight down to the bottom of the garment. It is NOT measured from the tip of shoulder. Similarly, the length of yoke is measured from the highest point on the shoulder and down to where yoke is split into body and sleeves.
On a jacket measures are never taken along bands, unless specifically stated. Always measure inside band stitches when measuring the length.
See DROPS lesson: How to read a schematic drawing
What is a repeat?
Diagrams are often repeated on the round or in height. 1 repeat is the diagram the way it appears in the pattern. If it says to work 5 repeats of A.1 in the round, then you work A.1 a total of 5 times after/next to each other in the round. If it says to work 2 repeats of A.1 vertically/in height you work the entire diagram once, then begin again at the start and work the entire diagram one more time.
Why does the piece start with more chain stitches than it’s worked with?
Chain stitches are slightly narrower than other stitches and to avoid working the cast-on edge too tight, we simply chain more stitches to begin with. The stitch count will be adjusted on the following row to fit the pattern and measurement sketch.
Why increase before the rib edge when the piece is worked top-down?
The rib edge is more elastic and will contract slightly compared to, for example, stocking stitch. By increasing before the rib edge, you avoid a visible difference in width between the rib edge and the rest of the body.
Why increase in the cast-off edge?
It’s very easy to cast off too tightly, and by making yarn overs while casting off (and simultaneously casting these off) you avoid a too tight cast off edge.
See DROPS video: How to bind off with yarn overs (yo)
How do I increase/decrease on every 3rd and 4th row/round alternately?
To achieve an even increase (or decrease) you can increase on, for example: every 3rd and 4th row alternately, like so: work 2 rows and increase on the 3rd row, work 3 rows and increase on the 4th. Repeat this until the increase is complete.
See DROPS lesson: Increase or decrease 1 st on every 3rd and 4th row alternately
How can I work a jacket in the round instead of back and forth?
Should you prefer to work in the round instead of back and forth, you may of course adjust the pattern. You’ll need to add steeks mid-front (usually 5 stitches), and follow the instructions. When you would normally turn and work from the wrong side, simply work across the steek and continue in the round. At the end you’ll cut the piece open, pick up stitches to work bands, and cover the cut edges.
See DROPS video: How to knit steeks and cut open
Can I work a jumper back and forth instead of in the round?
Should you prefer to work back and forth instead of in the round, you may of course adjust the pattern so you work the pieces separately and then assemble them at the end. Divide the stitches for the body in 2, add 1 edge stitch in each side (for sewing) and work the front and back pieces separately.
See DROPS lesson: Can I adapt a pattern for circular needles into straight needles?
Why is the pattern slightly different than what I see in the photo?
Pattern repeats can vary slightly in the different sizes, in order to get the correct proportions. If you’re not working the exact same size as the garment in the photo, yours might deviate slightly. This has been carefully developed and adjusted so that the complete impression of the garment is the same in all sizes.
Make sure to follow instructions and diagrams for your size!
How do I make a women’s size garment into a men’s size one?
If you have found a pattern you like which is available in women’s size it’s not very difficult to convert it to men’s size. The biggest difference will be the length of sleeves and body. Start working on the women size that you think would fit across the chest. The additional length will be worked right before you cast off for the armhole/sleeve cap. If the pattern is worked top-down you can add the length right after the armhole or before the first decrease on sleeve.
Regarding additional yarn amount, this will depend on how much length you add, but it is better with a skein too many than too few.
How do I prevent a hairy garment from shedding?
All yarns will have excess fibres (from production) that might come off as lint or shedding. Brushed yarns (ie hairier yarns) have more of these loose, excess fibres, causing more shedding.
Shedding also depends on what is worn under or over the garment, and whether this pulls at the yarn fibres. It’s therefore not possible to guarantee that there will be no shedding
Below are some tips on how to get the best result when working with hairier yarns:
1. When the garment is finished (before you wash it) shake it vigorously so the looser hairs come off. NOTE: do NOT use a lint roller, brush or any method that pulls at the yarn.
2. Place the garment in a plastic bag and put it in your freezer - the temperature will cause the fibres to become less attached to each other, and excess fibres will come off easier.
3. Leave in the freezer for a few hours before taking it out and shaking it again.
4. Wash the garment according to the instructions on the yarn label.
Why does my garment pill?
Pilling is a natural process that happens to even the most exclusive of fibers. It's a natural sign of wear and tear that is hard to avoid, and that is most visible in high friction areas of your garment like a sweater's arms and cuffs.
You can make your garment look as new by removing the pilling, using a fabric comb or a pill/lint remover.
Dazzle |
||||||||||||||||||||||
|
||||||||||||||||||||||
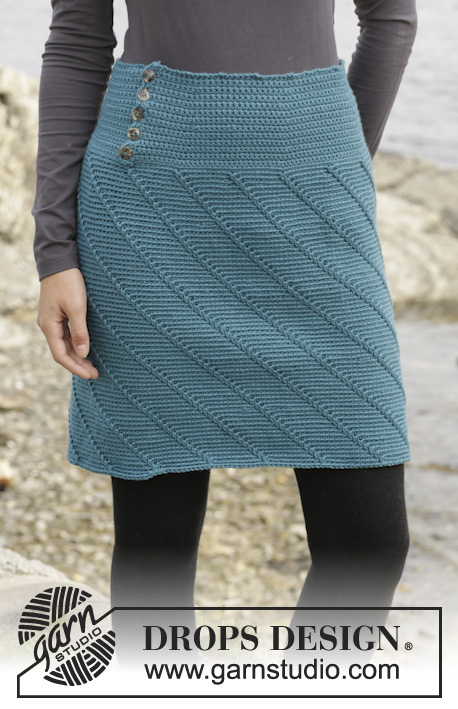
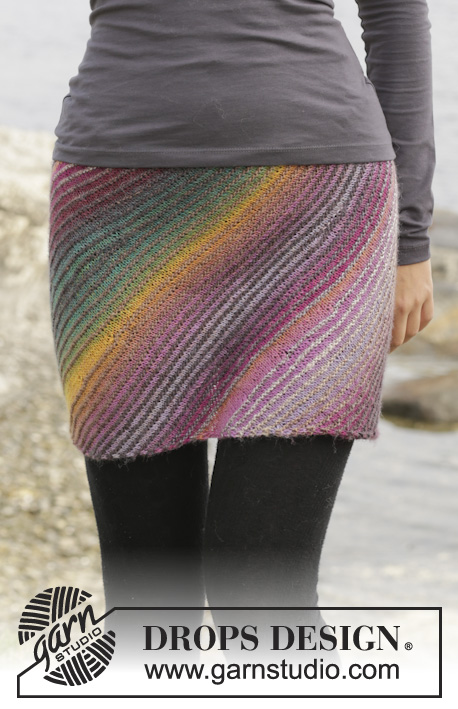
Crochet DROPS skirt with zigzag pattern in ”Alpaca”. Size S-XXXL
DROPS 144-5 |
||||||||||||||||||||||
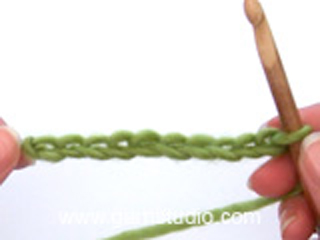
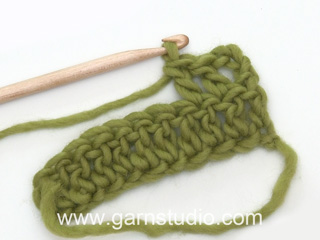
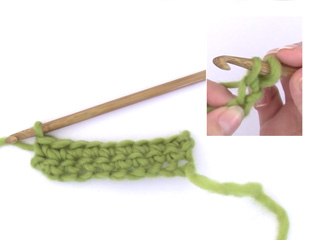
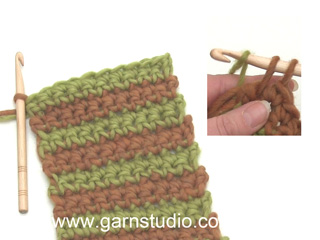
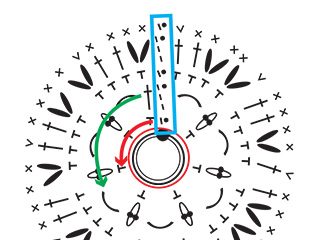
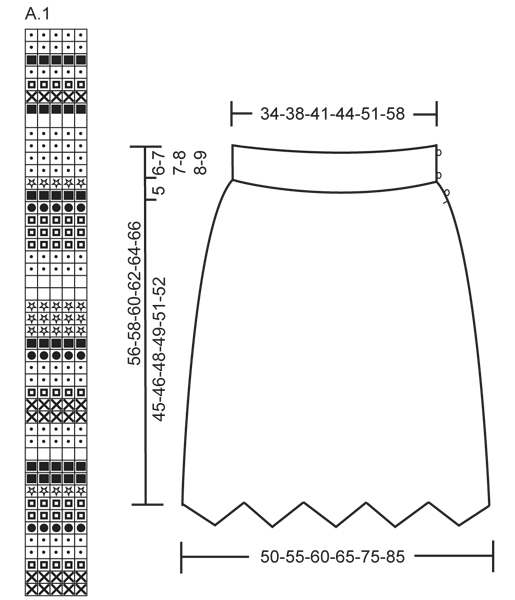
CROCHET INFO 1: Turn every dc row with 1 ch, this ch does not replace first dc. CROCHET INFO 2: Replace 1st tr at beg of every round with zigzag pattern with 3 ch and finish every round with 1 sl st in 3rd ch from beg of round. STRIPES: See diagram A.1. 1 row in diagram = 1 row with tr and zigzag pattern. ---------------------------------------------------------- SKIRT: The piece is worked top down. Work back and forth from the side until after vent is done, then work in the round. Work 175-192-210-227-262-297 ch on hook size 3.5 mm with dark brown eco. Work first row as follows: 1 dc in 2nd ch from hook and 1 dc in each of the next 5-1-5-1-1-1 ch, * skip 1 ch, 1 dc in each of the next 6 ch *, repeat from *-* the entire row = 150-164-180-194-224-254 dc, turn piece – READ CROCHET INFO 1. Work 2 rows back and forth with 1 dc in every dc. Switch to light brown eco. Work next row as follows: 2 ch, skip first dc, 1 dc in next dc, * 1 ch, skip 1 dc, 1 dc in next dc *, repeat from *-* the entire row = 75-82-90-97-112-127 dc with 1 ch before every dc. Work next row as follows: 2 ch, skip first dc from previous row and work 1 dc in first ch, * 1 ch, skip 1 dc, 1 dc in next ch *, repeat from *-* the entire row. Repeat this last row until piece measures 5-6-6-7-7-8 cm. REMEMBER THE CROCHET TENSION! Now work 1 row with 1 dc in every dc and 1 dc in every ch = 150-164-180-194-224-254 dc. On next row inc evenly as follows: * 1 dc in each of the first 2 dc, 2 dc in next dc *, repeat from *-* until 0-2-0-2-2-2 dc remain, work 2 dc in each of these dc = 200-220-240-260-300-340 dc. Then work STRIPES according to A.1 – see explanation above, AT THE SAME TIME work zigzag pattern back and forth as follows: ROW 1: Work 3 ch (= 1 tr) in first dc, 1 tr in each of the next 8 dc, * skip 2 dc, 1 tr in each of the next 9 dc, 3 ch, 1 tr in each of the next 9 dc *, repeat from *-* 8-9-10-11-13-15 more times, skip 2 dc, 1 tr in each of the last 9 dc = 180-198-216-234-270-306 tr. ROW 2: Work 3 ch (= 1 tr) + 1 tr in first tr, 2 tr in next 2 tr, 1 tr in each of the next 4 tr, * skip 4 tr, 1 tr in each of the next 7 tr, 3 tr in ch-loop, 3 ch, 3 tr in same ch-loop, 1 tr in each of the next 7 tr *, repeat from *-* 8-9-10-11-13-15 more times, skip 4 tr, finish with 1 tr in each of the next 4 tr and 2 tr in each of the last 3 tr = 200-220-240-260-300-340 tr. ROW 3: Work 3 ch (= 1 tr) + 1 tr in first tr, 2 tr in next tr, 1 tr in each of the next 6 tr, * skip 4 tr, 1 tr in each of the next 8 tr, 2 tr in ch-loop, 3 ch, 2 tr in same ch-loop, 1 tr in each of the next 8 tr *, repeat from *-* 8-9-10-11-13-15 more times, skip 4 tr, finish with 1 tr in each of the next 6 tr and 2 tr in each of the last 2 tr = 200-220-240-260-300-340 tr. Repeat 3rd row 1 more time, turn piece. Piece now measures approx. 11-12-12-13-13-14 cm. Vent ends here, work next row as follows: 3 ch + 1 tr in first tr, 2 tr in next tr, 1 tr in each of the next 6 tr, * skip 4 tr, 1 tr in each of the next 8 tr, 2 tr in ch-loop, 3 ch, 2 tr in same ch-loop, 1 tr in each of the next 8 tr *, repeat from *-* 8-9-10-11-13-15 more times, skip 4 tr, 1 tr in each of the next 6 tr, 2 tr in each of the last 2 tr on round, 3 ch, 1 sl st in 3rd ch from beg of round = 200-220-240-260-300-340 tr. Work next round as follows - READ CROCHET INFO 2: * 1 tr in each of the first 8 tr, skip 4 tr, 1 tr in each of the next 8 tr, 2 tr in ch-loop, 3 ch, 2 tr in same ch-loop *, repeat from *-* the entire round. Continue in the round with zigzag pattern. AT THE SAME TIME on next round inc 2 tr in every repetition by working 3 tr + 3 ch + 3 tr in every ch-loop instead of 2 tr + 3 ch + 2 tr (i.e. inc from 10 to 11 tr along every angle the entire round) = 220-242-264-286-330-374 tr. Repeat inc the same way every 4th round 5 more times = 320-352-384-416-480-544 tr (after last inc there are 16 tr along every angle). Then work until skirt measures approx. 56-58-60-62-64-66 cm at the longest (continue with light brown eco until finished measurements if you want a longer skirt when A.1 is done). Cut and fasten the threads. BUTTONHOLE LOOPS: Along the opening in the side faced towards front piece work a band with buttonhole loops as follows: Work 3 rows with dc and dark brown eco back and forth. Then work 3-3-3-4-4-4 buttonhole loops evenly on next row – 1 buttonhole loop = 3 ch, skip 1 cm. Bottom loop should be approx. 1 cm from bottom edge of vent and upper loop approx. 1 cm from the top. Work back as follows: 1 dc in every dc and 3 dc in every ch-loop, cut and fasten the thread. BUTTON PLEAT: Along the other side of the opening work 5 rows with dc and dark brown eco back and forth, cut the thread. Sew the buttons on to 1st row of button pleat so that they match the buttonhole loops. |
||||||||||||||||||||||
Diagram explanations |
||||||||||||||||||||||
|
||||||||||||||||||||||
Have you made this or any other of our designs? Tag your pictures in social media with #dropsdesign so we can see them! Do you need help with this pattern?You'll find tutorial videos, a Comments/Questions area and more by visiting the pattern on garnstudio.com. © 1982-2024 DROPS Design A/S. We reserve all rights. This document, including all its sub-sections, has copyrights. Read more about what you can do with our patterns at the bottom of each pattern on our site. |
With over 40 years in knitting and crochet design, DROPS Design offers one of the most extensive collections of free patterns on the internet - translated to 17 languages. As of today we count 304 catalogues and 11422 patterns - 11422 of which are translated into English (UK/cm).
We work hard to bring you the best knitting and crochet have to offer, inspiration and advice as well as great quality yarns at incredible prices! Would you like to use our patterns for other than personal use? You can read what you are allowed to do in the Copyright text at the bottom of all our patterns. Happy crafting!
Comments / Questions (18)
Mari wrote:
Hei! Jeg jobber med dette mønsteret nå. Jeg bruker viking bamboo garn. Når jeg skal legge opp de første luftmaskene (Medium størrelse), så opplever jeg at den blir alt for lang. Den rekker nesten to ganger rundt livet, er dette meningen?
13.08.2022 - 16:07DROPS Design answered:
Hei Mari. Du startet med 192 luftmasker og etter 1 rad minskes maskeantallet til 165 masker. Dette skjørtet er heklet i DROPS Aplaca, hekler du i et annet garn må du husk å få den samme heklefasthet som er oppgitt i oppskriften. mvh DROPS Design
15.08.2022 - 10:44Lilian wrote:
Have saved this skirt would make it right away but have so much on my hands but a summer version with brighter colours in cotton.
26.05.2022 - 12:54Ellis wrote:
Promise this is the last one! I have finished the vent, completed the row to make the skirt in the round and I have completed one full round row, however as I sl st into the first 3ch at the beginning of round to complete and start the next one, I only have 8tr to use, so when I skip 4, the pattern changes. I have3 counted stitches and there is 200 as previous. Do I assume when I start the next round that I am in the middle of the instruction to make sure the pattern falls the same place?
25.05.2022 - 14:39DROPS Design answered:
Dear Ellis, make sure that you end the last row with 3 chains before the slip stitch in the 3rd chain from beg of the row, so that you get one ch-space at the end of this round, then work pattern in the round as before, you will continue as before, but the beg of the round will be now at the beg of the repeat, continue working as before, skipping always the same 4 sts (last 2 sts + first 2 sts) so that the ch-spaces are lined up. Happy crocheting!
27.05.2022 - 08:52Ellis wrote:
Hi There Just working on the start of the pattern now, when it says to do a row of '2 ch, skip first dc from previous row and work 1 dc in first ch' - Are you trying to work into the actual chain stitch itself and to get one loop on the hook or are you working the space under the chain ? Many Thanks
16.05.2022 - 18:28DROPS Design answered:
Dear Ellis, you work in the space under the chain, since you can't work inside the chain stitch. Happy crocheting!
16.05.2022 - 23:09Ellis wrote:
Hi There This is great pattern, I am excited to start! Is there any modification I could do so that I do not have the vent at the start? So its just the chevron skirt? Best Wishes
05.05.2022 - 00:10DROPS Design answered:
Dear Elis, we are unfortunately not able to adjust every pattern to every single request, please contact your yarn store or any crochet forum for any further help. Thanks for your comprehension. Happy crocheting!
05.05.2022 - 09:08Josie wrote:
Rebonjour Est ce qu'après je fais 4/3/4 et 5/3/5 etc...? Et comment crocheter en rond ? Merci
29.11.2019 - 16:20DROPS Design answered:
Bonjour Josie, je ne comprends pas ce que vous entendez par 4/3/4 ni 5/3/5. Vous devez augmenter en crochetant dans la pointe de chaque zigzag 3 brides, 3 ml, 3 brides, là où auparavant vous crochetez 2 brides, 3 ml, 2 brides, et toujours 1 bride dans chaque bride, et vous sautez toujours 4 brides comme avant. Commencez les tours par 3 ml (= 1ère bride), et terminez par 1 mc dans la 3ème ml du début du tour (cf vidéo. Bon crochet!
02.12.2019 - 08:05Josie wrote:
Bonjour Je suis en train de réaliser la jupe DROPS 144.5, comment faire pour crocheter en rond,et que veux dire augmenter dans chaque rapport ? Merci d'avance et bon week-end.
29.11.2019 - 15:01DROPS Design answered:
Bonjour Josie, 1 rapport correspond à un motif à répéter, pour augmenter, vous crochetez 3 brides + 3 ml + 3 brides dans chaque arceau (au lieu de crocheter 2 brides, 3 ml, 2 brides comme avant). Bon crochet!
29.11.2019 - 15:50Dorothy Ann Foggie wrote:
I am confused about the start of the vent for this pattern. I don't see any instructions prior to the start.
17.08.2018 - 00:08DROPS Design answered:
Dear Mrs Foggie, the skirt is first worked in rows until piece measures approx. 11-12-12-13-13-14 cm / 4½"-4 3/4"-4 3/4"-5"-5"-5½". Then you work in the round as explained on next row starting with "Vent ends here". Happy crocheting!
17.08.2018 - 11:03Linn wrote:
Hei, kan dere hjelpe med dette: "Neste omg hekles slik- LES HEKLEINFO-2: * 1 st i hver av de første 8 st, hopp over 4 st, 1 st i hver av de 8 neste st, 2 st om lm-buen, 3 lm, 2 st om samme lm-bue *, gjenta fra *-* omg rundt." Skal man ikke hekle 2 staver i hver av de 2 første stavene, slik at man får 10 staver på begynnelsen av omgangen? Det vil være nødvendig for så å kunne hoppe over 4 staver?
02.07.2017 - 11:44DROPS Design answered:
Hei Linn. Når jeg hekler dette skjørtet får jeg, etter LES HEKLEINFO-2, at det kun skal hekles stav i stav/8 staver i begynnelsen av omgangen (nå hekles det rundt og ikke frem og tilbake)for å kunne hoppe over 4 staver, slik at sikk-sakk mønstret blir riktig. Om jeg skal hekle 10 staver før jeg hopper over 4 staver vil sikk-sakk mønstret forskyve seg.
05.07.2017 - 14:13Laura wrote:
HOLA, ME GUSTARÍA SABER A QUE VUELTA HAY QUE VOLVER CUANDO EL PATRÓN TE DICE QUE HAGAS LOS AUMENTOS A CADA 4 VUELTAS Y SIGAS CON EL PATRÓN ZIG ZAG, A QUE HILERA HAY QUE VOLVER? GRACIAS.
22.09.2016 - 13:24DROPS Design answered:
Hola Laura. Los aumentos se trabajan de la siguiente manera: en la primera vta has hecho los aum, trabajar las sig tres vtas sin aum y en la 4ª vta trabajas otra vez los aum de la misma manera. El patrón del zigzag lo trabajas según las explicaciones del patrón. Para controlar mejor, te recomiendo marcar con los MP (marcapuntos) la vta con los aum.
23.09.2016 - 19:30