
Popular categories
Looking for a yarn?


|
||||||||||
Enchanted Evening |
||||||||||
 |
 |
|||||||||
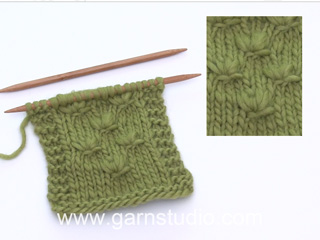
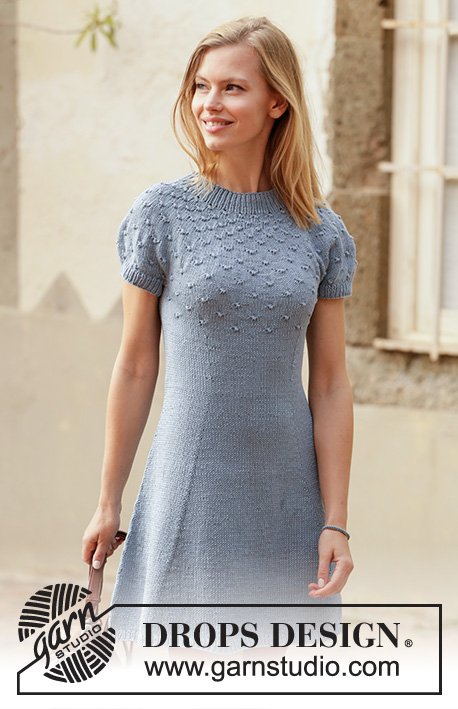
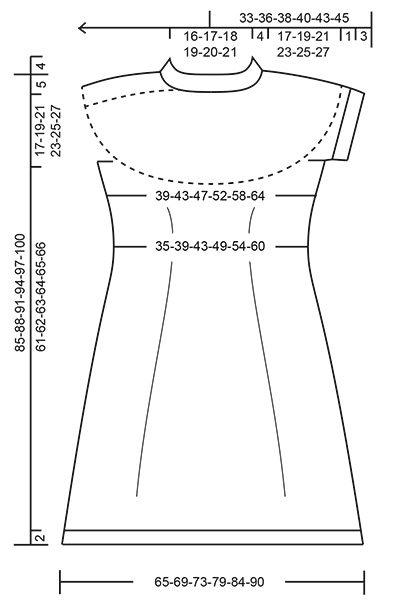
Knitted dress in DROPS Muskat. Piece is knitted top down with round yoke, knot pattern and short sleeves. Size: S - XXXL
DROPS 211-1 |
||||||||||
|
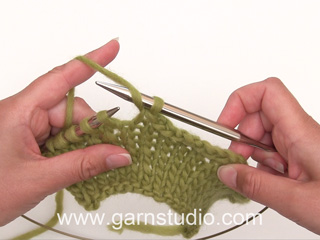
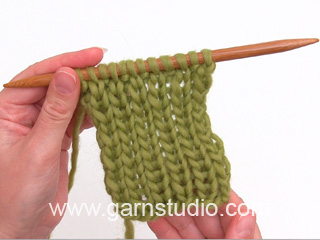
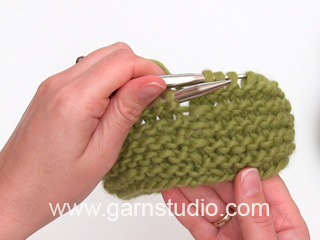
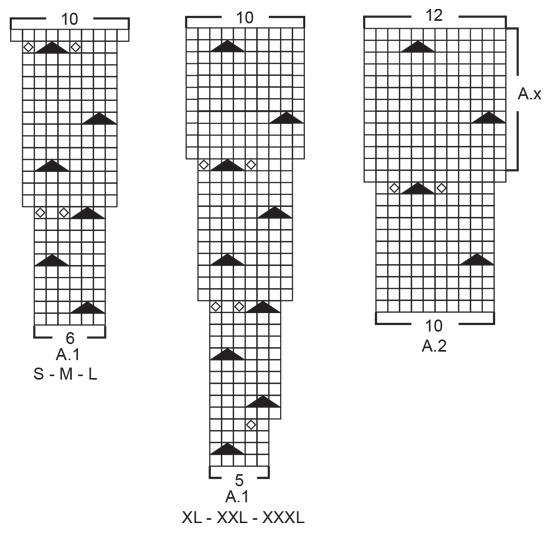
---------------------------------------------------------- EXPLANATION FOR THE PATTERN: ---------------------------------------------------------- PATTERN: See diagrams A.1 and A.2. Choose diagram for your size (applies to A.1). INCREASE/DECREASE TIP (evenly): To calculate how to increase/decrease evenly use the total number of stitches on row (e.g. 120 stitches) , and divide stitches by number of increases/decreases to be done (e.g. 18) = 6.7. In this example increase by making 1 yarn over after alternately approx. every 6th and 7th stitch. On next round knit yarn overs twisted to avoid holes. If decreasing knit in this example alternately approx. every 5th and 6th stitch and every 6th and 7th stitch together. INCREASE TIP-1 (applies to waist on body): Increase 1 stitch after 1st and 3rd marker thread and before 2nd and 4th marker thread as explained below. INCREASE AS FOLLOWS AFTER MARKER THREAD: Knit 1 stitch in loop around first stitch on left needle (i.e. In stitch from previous round). INCREASE AS FOLLOWS BEFORE MARKER THREAD: Work until marker thread, then knit 1 stitch around outermost stitch on right needle (i.e. in stitch from previous round). INCREASE TIP-2 (applies to sides of body): Increase the same way before and after marker as explained in INCREASE TIP-1, but increase alternately before and after marker. I.e. increase only 1 time in each side every 1½ cm and this happen alternately before and after marker (not on each side). DECREASE TIP (applies to waist of body): The first decreases will be at the same time as working pattern. Adjust to decrease on a round without knots, and note that there will be fewer stitches in stocking stitch between 2 knots after a decrease. Decrease 1 stitch after 1st and 3rd marker thread and before 2nd and 4th marker thread as explained below. DECREASE AS FOLLOWS AFTER MARKER THREAD: Slip 1 stitch knitwise, knit 1, pass slipped stitch over stitch worked DECREASE AS FOLLOWS BEFORE MARKER THREAD: Work until 2 stitches remain before marker thread, knit 2 together. CAST-OFF TIP: To avoid a tight cast-off edge you may use a larger needle size. If this also is too tight, work a 1 yarn over after approx. every 8th stitch while casting off (cast off yarn overs as regular stitches). ---------------------------------------------------------- START THE PIECE HERE: ---------------------------------------------------------- DRESS - SHORT OVERVIEW OF THE PIECE: Work neck edge and yoke in the round on circular needle from mid back, top down. Divide yoke for body and sleeve edges. Body is worked in the round on circular needle, top down. Work sleeve edges in the round on double pointed needles, top down. NECK EDGE: Cast on 120-124-130-134-138-140 stitches on a short circular needle size 3 mm with Muskat. Knit 1 round. Then work rib in the round (= knit 1/purl 1) for 4 cm. Knit 1 round while increasing 18-26-32-16-22-35 stitches evenly - read INCREASE/DECREASE TIP = 138-150-162-150-160-175 stitches. Knit 1 round where yarn overs are knitted twisted. Insert 1 marker in the middle of round (= mid front). Measure yoke from this marker! Then work yoke as explained below. YOKE: Switch to circular needle size 4 mm and work A.1 in the round (= 23-25-27-30-32-35 repetitions of 6-6-6-5-5-5 stitches). Continue pattern like this , and increase as shown in A.1. REMEMBER THE KNITTING TENSION! When A.1 has been worked, there are 230-250-270-300-320-350 stitches on needle. Then work A.2 in the round (= 23-25-27-30-32-35 repetitions of 10 stitches). Continue pattern like this and increase as shown in A.2. After last increase in A.2 there are 276-300-324-360-384-420 stitches on needle. Work until piece measures 17-19-21-23-25-27 cm from marker at the neck - NOTE: Work A.2 as far as you can until correct measurements and in some sizes A.x must be repeated vertically until correct measurements (pattern should continue on body). Now divide yoke for body and sleeves, i.e. work next round as follows from mid back: Work 38-42-45-51-56-62 stitches as before (= ½ back piece), slip the next 62-66-72-78-80-86 stitches on 1 stitch holder for sleeve edge, cast on 6-6-8-8-10-10 new stitches on row (= in the side under sleeve), work 76-84-90-102-112-124 stitches as before (= front piece), slip the next 62-66-72-78-80-86 stitches on 1 stitch holder for sleeve edge, cast on 6-6-8-8-10-10 new stitches on row (= in the side under sleeve) and work the remaining 38-42-45-51-56-62 stitches as before (= ½ back piece). Cut the yarn. Finish body and sleeve edges separately. NOW MEASURE PIECE FROM HERE! BODY: = 164-180-196-220-244-268 stitches. Insert 1 marker in each side on body, in the middle of the 6-6-8-8-10-10 stitches cast on under each sleeve. Insert in addition 4 marker threads in the piece as follows: Count 21-24-27-32-37-42 stitches from marker in one side of piece, insert 1st marker thread before next marker, count 40-42-44-46-48-50 stitches, insert 2nd marker thread before next stitch, count 42-48-54-64-74-84 stitches (maker in the side is in the middle of these stitches), insert 3rd marker thread before next stitch, count 40-42-44-46-48-50 stitches, insert 4th marker thread before next stitch. 21-24-27-32-37-42 stitches remain on round after last marker thread. Move the marker threads upwards when working; they should be used for decrease and increase later. Now continue A.x while AT THE SAME TIME decreasing in the sides on body as explained below: Begin round at marker in one side of piece and work A.x in the round, but make sure to continue on correct row in diagram according to where piece was divided, and make sure to place knots correctly over knots on yoke. Work 6-6-8-8-10-10 stitches cast on under each sleeve in stocking stitch. When piece measures 6 cm from division in all sizes, finish A.x, but finish after 1 round with knots. Continue to work stocking stitch in the round over all stitches. AT THE SAME TIME when piece measures approx. 3 cm from division in all sizes, decrease 1 stitch after 1st and 3rd marker thread and before 2nd and 4th marker thread – read DECREASE TIP (= 4 stitches decreased). Decrease like this every 2½ cm 4 times in total vertically = 148-164-180-204-228-252 stitches. When piece measures 16 cm from division in all sizes, increase 1 stitch after 1st and 3rd marker thread and before 2nd and 4th marker thread – read INCREASE TIP-1. Increase in addition 1 stitch at marker in each side - read INCREASE TIP-2 (= 6 stitches increased in total on round). Increase like this every 2 cm 21 times vertically in all sizes = 274-290-306-330-354-378 stitches. Work without increases until piece measures approx. 61-62-63-64-65-66 cm from division (approx. 2 cm remain until finished measurements, try the dress on and work to desired length). Knit 1 round while increasing 20-22-24-26-26-28 stitches evenly = 294-312-330-356-380-406 stitches (increase a little to avoid the rib to be worked from contracting the edge). Switch to circular needle size 3 mm. Work rib in the round = knit 1/purl 1 for 2 cm. Cast off with knit over knit and purl over purl - read CAST-OFF TIP. Dress measures approx. 85-88-91-94-97-100 cm from shoulder and down. SLEEVE EDGE: Slip the 62-66-72-78-80-86 stitches from stitch holder in one side of piece on double pointed needles size 4 mm and pick in addition up 1 stitch in each of the 6-6-8-8-10-10 new stitches cast on under sleeve = 68-72-80-86-90-96 stitches. Begin round in the middle of the 6-6-8-8-10-10 stitches that were cast on under sleeve and work 3 rounds in stocking stitch. AT THE SAME TIME on last round decrease 4-4-4-4-2-2 stitches evenly - remember INCREASE/DECREASE TIP = 64-68-76-82-88-94 stitches. Switch to double pointed needles size 3 mm. Work rib in the round = knit 1/purl 1 for 3 cm. Cast off with knit over knit and purl over purl - remember CAST-OFF TIP! Sleeve edge measures approx. 4 cm from division. Work the other sleeve edge the same way. |
||||||||||
Diagram explanations |
||||||||||
|
||||||||||
|
||||||||||
|
||||||||||
|
Have you made this or any other of our designs? Tag your pictures in social media with #dropsdesign so we can see them! Do you need help with this pattern?You'll find tutorial videos, a Comments/Questions area and more by visiting the pattern on garnstudio.com. © 1982-2024 DROPS Design A/S. We reserve all rights. This document, including all its sub-sections, has copyrights. Read more about what you can do with our patterns at the bottom of each pattern on our site. |
||||||||||


With over 40 years in knitting and crochet design, DROPS Design offers one of the most extensive collections of free patterns on the internet - translated to 17 languages. As of today we count 304 catalogues and 11422 patterns - 11422 of which are translated into English (UK/cm).
We work hard to bring you the best knitting and crochet have to offer, inspiration and advice as well as great quality yarns at incredible prices! Would you like to use our patterns for other than personal use? You can read what you are allowed to do in the Copyright text at the bottom of all our patterns. Happy crafting!
Comments / Questions (63)
Hej, Jag har stickat Enchanted evening men har problem med att mudden längst ner på kjolen viker upp sig. Det är inte att den rullar sig utan hela mudden viker upp sig (den viker sig i brytningen mellan slätstickning och mudd) Vad kan jag göra för att få den att inte vika upp sig?
17.12.2022 - 16:34DROPS Design answered:
Hei Helena. Prøv å dampe kanten lett eller fukte den og sett den fast med nåler og la den tørke flatt. mvh DROPS Design
19.12.2022 - 08:21"lisää 1. ja 3.merkkilangan jälkeen 1 silmukka ja lisää ennen 2. ja 4.merkkilankaa 1 silmukka Lisää myös kummankin sivun merkin molemmin puolin 1 silmukka (= työhön lisättiin yhteensä 6 silmukkaa)" Eikö silmukoita tule lisää 8 eikä 6?
07.12.2022 - 15:16DROPS Design answered:
Hei, ohjeessa oli virhe. Merkkien kohdalla lisätään vain 1 silmukka, eli työhön lisätään yhteensä 6 silmukkaa. Ohjeeseen on tehty korjaus.
16.01.2023 - 18:11Hello! How large is the waist of different sizes? I can't find the measurements in the pattern.
23.04.2022 - 14:36DROPS Design answered:
Dear Eva, the waist measurements are in the chart below the pattern instructions, in cm. They are: 35-39-43-49-54-60. Happy knitting!
23.04.2022 - 16:34Drops enchanted evening . Hi I am now at section where I have put the sleeve stitches on waste yarn . Why would I cut the thread after knitting the last 45 stitches of back ? Wouldn’t I knit to the middle of the 8 stitches under the arm and that would be the new beginning of the round ? Also is it necessary to use thread marker or can I use regular stitch markers for the 4 markers where thread would be ? In addition to the 2 side markers in contrasting color so I would know difference?
24.11.2021 - 20:23DROPS Design answered:
Dear Debbie, you cut the thread at the end of yoke so that you can start again with pattern from on of both sides; you can use markers if you like to, most important is to place anything to mark these places to increase on the right places - and good idea to use different colours for both kind of markers. Happy knitting!
25.11.2021 - 08:51Drops enchanted evening . Yes ! That helps . Yay , I finally figured it out . Next question is on the first increase round . How many stitches should I have on needles after this round? Knot over 3, make 1, k, m1. \\r\\nShould that be an increase of 54 stitches ? 27x2? Thank you so much for your help .
17.11.2021 - 13:24DROPS Design answered:
Dear Debbie, yes correct :) On the 10th round in A.1 you will increase 2 sts = there will be 8 sts in every A.1 x 27 repeats = 216 sts (162 sts + 54 sts increased). And in the next to last row inA.1 you increase 2 more sts = 10 sts x 27 = 270 sts (again 54 sts increased + 216). Happy knitting!
17.11.2021 - 16:44Drops enchanted evening . So perhaps I am following chart incorrect . From what you say now: for first round would it be all knit ? Since it’s 6 knits ? Next round would be knot over 3 , k3- repeat to end of round ? Next round 3 rounds are knit , next round is repeat of k3, knot over 3 etc? By the top of the chart that would be 25 rounds and then would I start at bottom again and do 2 more rounds to make 27? Otherwise I don’t know what 27 reps mean ? Sorry to be such a bother .
16.11.2021 - 18:10DROPS Design answered:
Dear Debbie, that's exactly how to read the diagram A.1 and how to work it. When it says to repeat A.1 a total of 27 times, it means to work: row 1: K6 x 27 (= 6*27= 162 sts); Round 2: (Knot, K3) x 27 = still 162 sts and 27 knots etc... After these 25 rows are done, work now A.2 (there were 10 sts at the end of each A.1, work now A.2 lined up over each A.1: the knots in A.2 will be lined up over the knots in A.1. And you will still repeat A.2 a total of 27 times in the round. Can this help somewhat more?
17.11.2021 - 07:35Drops enchanted evening . Yes that does help. I believe I’m following chart correct . My original question was : following the 5th repetition of the chart and starting the 6th repetition , should the row match up exactly? K6, knot over 3, k3 etc... ? I found it odd to be back at same starting point of the chart over top of the 5th repetition. Also , I feel my knots look more Spread out than in the picture . I am just going to follow the chart without knots the 27 reps til 270 stitches-size L
16.11.2021 - 14:17DROPS Design answered:
Dear Debbie, I'm still not sure to understand what you mean here with "repetition", diagram will be worked the same way all the round, ie repeat row 1 to the end of the round, then repeat row 2 to the end of the round (= 1 knot x 27 repeats in L) etc.. If you mean 5th knot in height (= 18th row in diagram) then work (from right to left: *1 knot, K5* and repeat from *-* all the round). Can this help?
16.11.2021 - 16:26Drops enchanted evening . Sorry , perhaps I’m not following chart properly . I am following from bottom right to left . Next row again from left to right . Ex . Start with K 6 , Make knot over next 3,stitches , knit 24, make knot over next 3, k24, knot over next 3 stitches , make 1, k1, M1, K8 etc following up. By repetition I meant the 5th and 6th reps in repeating the chart 27 times . Following the chart , the beginning of the round continues to change. Am I following incorrectly?
16.11.2021 - 04:50DROPS Design answered:
Dear Debbie, since diagram is worked in the round, you will always read it from the right towards the left, ie the knot on 2nd row will be worked over the first 3 sts, then knit 3. Can this help?
16.11.2021 - 09:13Drops enchanted evening . Sorry I still am confused by the knots . I am being very careful to count and place knots in correct spaces. But does it make sense. That on the 6th repetition and starting the row That below it is exact same stitches ? Sorry if I’m not explaining clearly. I may just follow the chart without making knots at all . I’ve unripped too many times now .
12.11.2021 - 21:46DROPS Design answered:
Dear Debbie, I'm sorry, I'm not sure what you call here "repetition", do you mean the 6th knot in height? Then you have 8 sts in every repetition of A.1 and work: K3, increase 1 stitch (last symbol), 1 knot over the next 3 sts, increase 1 st (= 8 sts worked and increased to 10 sts). Can this help?
15.11.2021 - 07:15Drops enchanted evening . Just to clarify , do you mean yes the 4th and 5th row of the chart repeat each other (lined up over precious repeat ) or have I miscounted somewhere ? It’s pretty hard to do those make one stitches over the previous row if it is correct that these rows align. Thank you
12.11.2021 - 14:06DROPS Design answered:
Dear Debbie, knots should be lined up just as shown in diagram, ie the 4th in height (= 14th row in A.1 smaller sizes) over the 2nd ( = 6th row in same diagram), the 3rd (= 10th row in same diagram) over the 1st (2nd row same diagram), just follow the stitches as shown in diagram to locate the knots over the correct sts. Hope this will help. Happy knitting!
12.11.2021 - 14:19