
Popular categories
Looking for a yarn?


|
|||||||||||||||||||
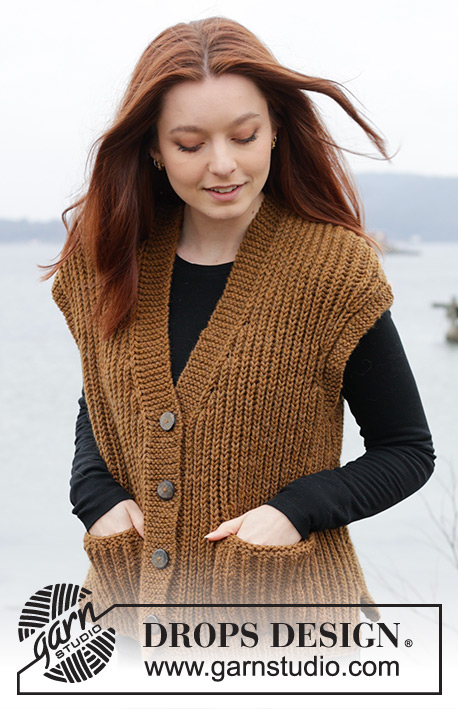
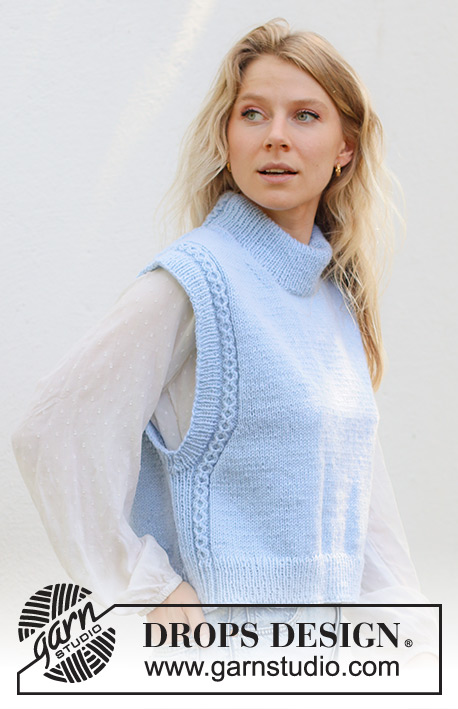
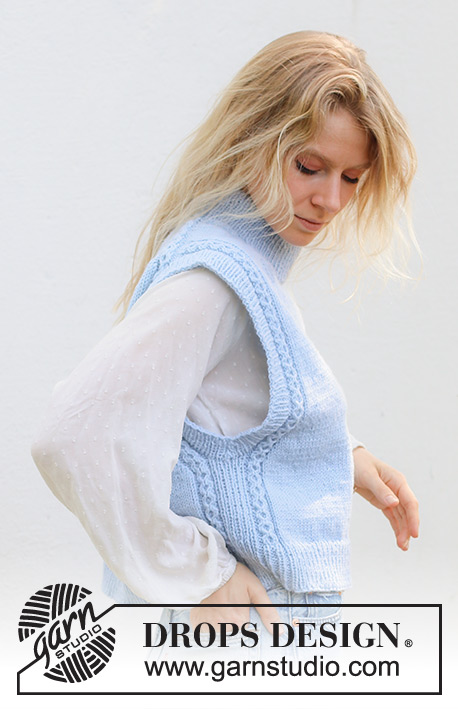
Clear Day Vest |
|||||||||||||||||||
 |
 |
||||||||||||||||||
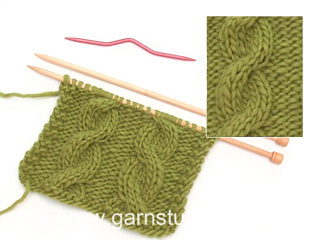
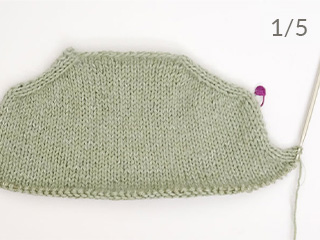
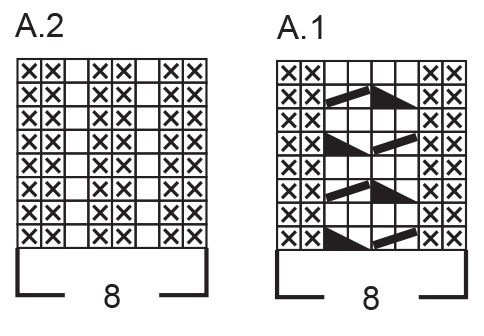
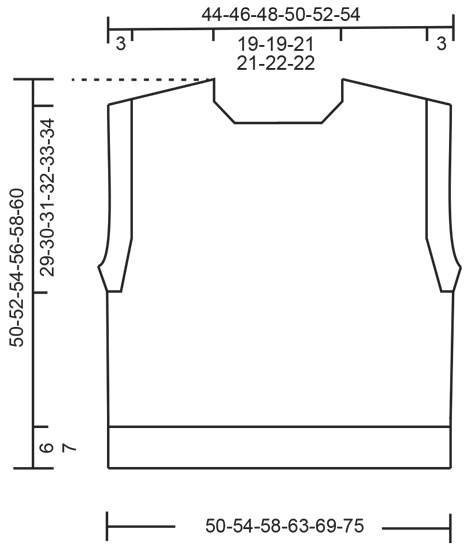
Knitted vest in DROPS Karisma or DROPS Daisy. The piece is worked top down with European/diagonal shoulders, double neck and cables. Sizes S - XXXL.
DROPS 243-33 |
|||||||||||||||||||
|
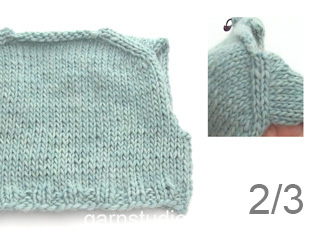
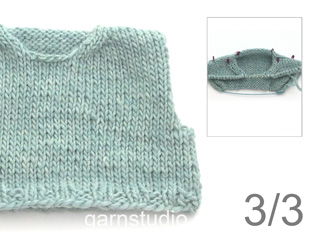
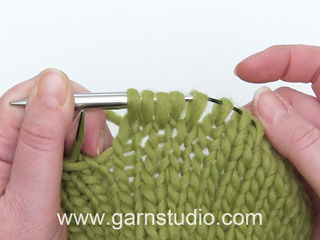
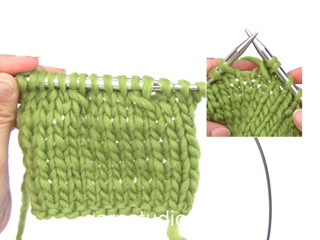
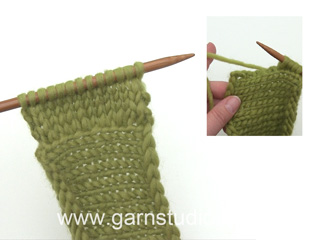
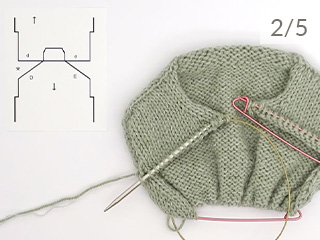
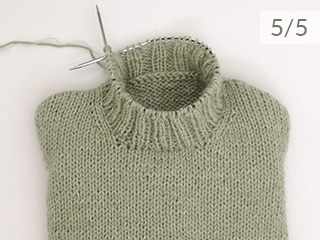
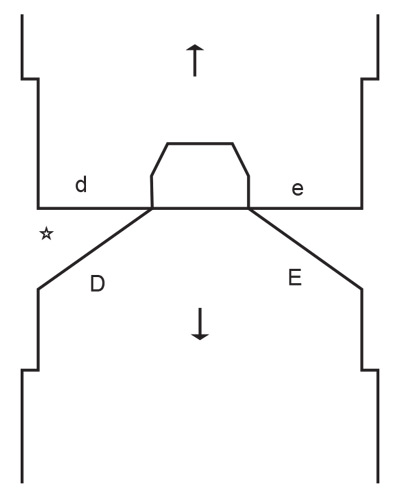
------------------------------------------------------- EXPLANATIONS FOR THE PATTERN: ------------------------------------------------------- EDGE STITCHES: 1 edge stitch is worked on each side of the piece. These edge stitches are knitted both from the right and wrong side (garter stitch). PATTERN: See diagrams A.1 and A.2. The diagrams show all rows in the pattern from the right side. INCREASE TIP FROM RIGHT SIDE: TOWARDS LEFT AFTER MARKER: Use left needle to pick up thread between 2 stitches from row below, pick up thread from front and knit stitch in back loop. TOWARDS RIGHT BEFORE MARKER: Use left needle to pick up thread between 2 stitches from row below, pick up thread from behind and knit stitch in front loop. INCREASE TIP FROM WRONG SIDE: TOWARDS LEFT AFTER MARKER: Use left needle to pick up thread between 2 stitches from row below, pick up thread from behind and purl stitch in front loop. TOWARDS RIGHT BEFORE MARKER: Use left needle to pick up thread between 2 stitches from row below, pick up thread from front and purl stitch in back loop. INCREASE TIP-1 (for armholes): All increases are worked from the right side! Increase 1 stitch inside 9 stitches (1 edge stitch + A.1) by making 1 yarn over. On the next row work the yarn over twisted to avoid a hole. Then work the new stitches in stocking stitch. INCREASE TIP-2 (evenly spaced): Increase 1 stitch by making 1 yarn over which is worked twisted on the next round to avoid a hole. ------------------------------------------------------- START THE PIECE HERE: ------------------------------------------------------- VEST - SHORT OVERVIEW OF THE PIECE: The back piece is worked back and forth with circular needle, top down until the armholes are finished. Stitches are knitted up along each shoulder for the front piece, stitches cast on for the neck and the front piece is worked back and forth with circular needle, top down until the armholes are finished. The front and back pieces are joined and the body continued in the round with circular needle. Stitches are knitted up around the armholes and neckline and the sleeve edges and neck are worked in the round with circular needle. BACK PIECE: Cast on 40-40-44-44-46-46 stitches with circular needle 4.5 mm and DROPS Karisma or DROPS Daisy. Purl 1 row from the wrong side. Insert 1 marker inside the 9 outermost stitches on each side and keep them in this position on each following row. Work as follows from the right side: 1 EDGE STITCH – read description above, work A.1, increase 1 stitch AFTER the marker – read INCREASE TIP FROM RIGHT SIDE, work stocking stitch until there are 9 stitches left, increase 1 stitch BEFORE the marker– read INCREASE TIP FROM RIGHT SIDE, work A.1, 1 edge stitch. Increase in the same way on the next row (wrong side), i.e. AFTER the marker at the beginning of the row and BEFORE the marker at the end of the row – read INCREASE TIP FROM WRONG SIDE (the increased stitches are worked in stocking stitch). Continue the pattern and increase from both the right and wrong side a total of 21-23-23-25-26-28 times. REMEMBER THE KNITTING TENSION! After the last increase, there are 82-86-90-94-98-102 stitches. Work 2 rows without increasing. Move the markers to the outermost stitch on each side – the piece is now measured from here. Continue with stocking stitch, A.1 and 1 edge stitch on each side. When the piece measures 20-20-20-20-17-16 cm from the markers, increase 1 stitch on each side for the armholes – read INCREASE TIP-1. Increase like this every 2nd row (each row from the right side) a total of 7-8-9-11-14-17 times (the increased stitches are worked in stocking stitch) = 96-102-108-116-126-136 stitches. After the last increase, work back from the wrong side. The piece measures approx. 25-26-27-28-28-29 cm, measured from the markers along the armholes. Cut the strand and place the stitches on a stitch holder. FRONT PIECE: Start on the left shoulder (when the garment is worn). Knit up 23-25-25-27-28-30 stitches inside the outermost stitch along the left shoulder on the back piece (ie starting by the neck pick up 1 stitch in each of the 21-23-23-25-26-28 rows + 2 stitches to the marker). Work back as follows from the wrong side: 1 edge stitch, A.1 (starting with row 2 in the diagram), work stocking stitch to the end of the row. Continue this pattern back and forth. When the piece measures 7-7-8-8-9-9 cm from the knitted-up stitches, increase towards the left at the beginning of each row from the right side, after the first 4 stitches – remember INCREASE TIP FROM RIGHT SIDE. Increase like this, 4 more times (the increased stitches are worked in stocking stitch) = 28-30-30-32-33-35 stitches. After the last increase, work the last row from the wrong side. Cut the strand and place the stitches on a stitch holder. Work the right shoulder as described below. Start at the marker and knit up 23-25-25-27-28-30 stitches inside the outermost stitch along the right shoulder on the back piece. Work back from the wrong side as follows: Stocking stitch until there are 9 stitches left, work A.1 (starting with row 2 in the diagram) and 1 edge stitch. Continue this pattern until the piece measures 7-7-8-8-9-9 cm from the knitted-up stitches. Now increase towards the right at the end of each row from the right side (before the last 4 stitches – remember INCREASE TIP FROM RIGHT SIDE. Increase like this, 4 more times (the increased stitches are worked in stocking stitch) = 28-30-30-32-33-35 stitches. Work back from the wrong side. Work as follows from the right side: Work the stitches from the right front piece, cast on 26-26-30-30-32-32 stitches, then work the 28-30-30-32-33-35 stitches on the left front piece = 82-86-90-94-98-102 stitches. Continue with stocking stitch, A.1 and 1 edge stitch on each side. When the piece measures 28-28-28-28-27-26 cm from the knitted-up stitches, increase for the armholes in the same way as on the back piece = 96-102-108-116-126-136 stitches. After the last increase, work back from the wrong side. The piece measures approx. 33-34-35-36-38-39 cm, measured from the knitted-up stitches and measured along the armholes. BODY: Now join the front and back pieces: Work pattern as before over the 96-102-108-116-126-136 stitches on the front piece, cast on 7-9-11-13-15-17 stitches, work the 96-102-108-116-126-136 stitches from the back piece, cast on 7-9-11-13-15-17 stitches = 206-222-238-258-282-306 stitches. Work in the round, with stocking stitch and pattern as before – the 9-11-13-15-17-19 stitches on each side between A.1, are worked in rib (knit 1, purl 1 – starting and ending with knit 1). Work until the piece measures 44-46-48-49-51-53 cm, measured from the top of the front shoulder. Change to circular needle size 3 mm. On the next round, increase evenly as follows: Knit 1, work A.2 over A.1, stocking stitch over the next 78-84-90-98-108-118 stitches and increase 31-33-37-39-43-47 stitches evenly over these stitches – read INCREASE TIP-2, work A.2 over A.1, rib as before over the next 9-11-13-15-17-19 stitches, work A.2 over A.1, stocking stitch over the next 78-84-90-98-108-118 stitches and increase 31-33-37-39-43-47 stitches evenly over these stitches, work A.2 over A.1 and rib as before over the last 8-10-12-14-16-18 stitches = 268-288-312-336-368-400 stitches. Continue as follows: Rib on each side, A.2 as before, in addition work rib (knit 1, purl 1) over the 109-117-127-137-151-165 stitches between A.2 on the front and back pieces (start and end the rib with knit 1). When the rib measures 6-6-6-7-7-7 cm, cast off – you can use Italian cast off. The vest measures approx. 50-52-54-56-58-60 cm from the top of the shoulder. SLEEVE EDGES: Lay the piece flat and insert 1 marker at the top of each armhole (mid shoulder). Start from the right side at the bottom of the armhole and knit up 140-146-152-160-166-172 stitches, around the armhole, inside 1 edge stitch with short circular needle size 3 mm (with equal numbers of stitches on each side of the marker). Work rib in the round (knit 1, purl 1). AT THE SAME TIME every 2nd round, decrease 2 stitches under the sleeve as follows: Work until there is 1 stitch left before the first knitted stitch mid-under the sleeve, slip 2 stitches as if to knit together, knit 1 and pass the slipped stitches over the knitted stitch (= 2 stitches decreased). The sleeve edge will now lie neatly and not roll outwards. Work and decrease like this until the sleeve edge measures 3 cm. Cast off in the same way as on the body. Work the other sleeve edge in the same way. NECK: Using short circular needle size 3 mm, start from the right side just before A.1 on the left back shoulder, and knit up inside 1 edge stitch as follows: Knit up 1 stitch in each of the 8 stitches in A.1, 83-83-91-91-97-97 stitches around the neckline to A.1 on the right back shoulder (this stitch count must be divisible by 2 + 1), knit up 1 stitch in each of the 8 stitches in A.1 and 25-25-29-29-31-31 stitches along the back (stitch count must be divisible by 2 + 1) = 124-124-136-136-144-144 stitches. Work as follows: A.1 over the first 8 stitches, * knit 1, purl 1 *, work from *-* until there is 1 stitch left before the next A.1, knit 1, A.1, * knit 1, purl 1 *, work from *-* until there is 1 stitch left on the round, knit 1. Continue this pattern until the neck measures 11-11-11-13-13-13 cm. Cast off a little loosely. Fold the neck double to the inside and sew down. To avoid the neck being tight and rolling outwards, it is important that the seam is elastic. |
|||||||||||||||||||
Diagram explanations |
|||||||||||||||||||
|
|||||||||||||||||||
|
|||||||||||||||||||
|
|||||||||||||||||||
|
|||||||||||||||||||
|
Have you made this or any other of our designs? Tag your pictures in social media with #dropsdesign so we can see them! Do you need help with this pattern?You'll find tutorial videos, a Comments/Questions area and more by visiting the pattern on garnstudio.com. © 1982-2024 DROPS Design A/S. We reserve all rights. This document, including all its sub-sections, has copyrights. Read more about what you can do with our patterns at the bottom of each pattern on our site. |
|||||||||||||||||||


With over 40 years in knitting and crochet design, DROPS Design offers one of the most extensive collections of free patterns on the internet - translated to 17 languages. As of today we count 304 catalogues and 11422 patterns - 11422 of which are translated into English (UK/cm).
We work hard to bring you the best knitting and crochet have to offer, inspiration and advice as well as great quality yarns at incredible prices! Would you like to use our patterns for other than personal use? You can read what you are allowed to do in the Copyright text at the bottom of all our patterns. Happy crafting!
Comments / Questions (14)
Powder Blue Tank
03.08.2023 - 21:58Śliczna kamizelka, może być uzupełnieniem zarówno sportowych jak i eleganckich stylizacji. Chciałabym mieć taką w swojej szafie
03.08.2023 - 19:14Dieses Modell würde ich gerne Stricken. Vielleicht auch mit einem anderen Garn.
03.08.2023 - 15:10Baby
03.08.2023 - 14:44