
Popular categories
Looking for a yarn?


|
||||||||||||||||||||||||||||||||||||||||||||||||||||||||||||||||
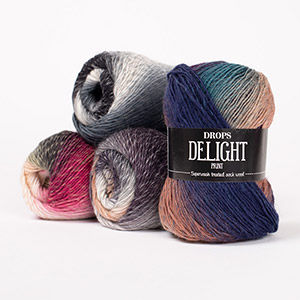
Memories |
||||||||||||||||||||||||||||||||||||||||||||||||||||||||||||||||
|
|
||||||||||||||||||||||||||||||||||||||||||||||||||||||||||||||||
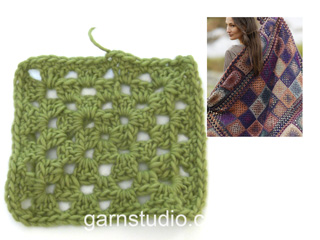
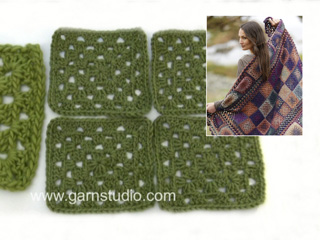
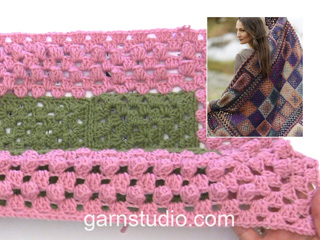
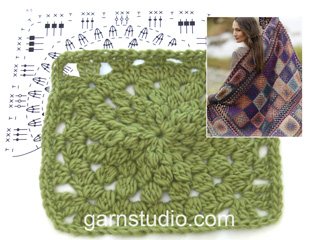
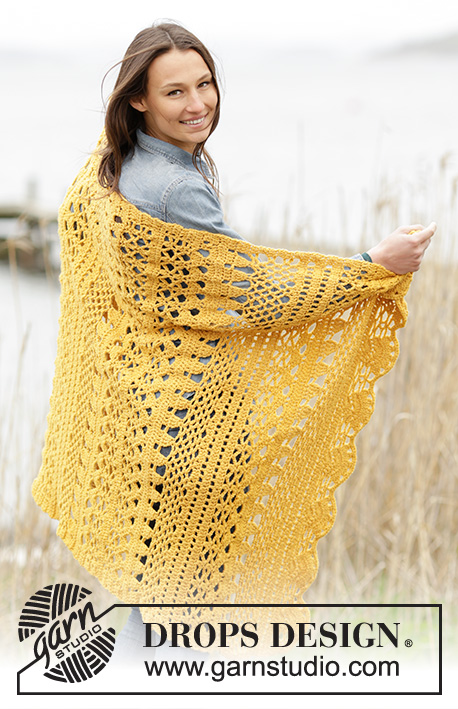
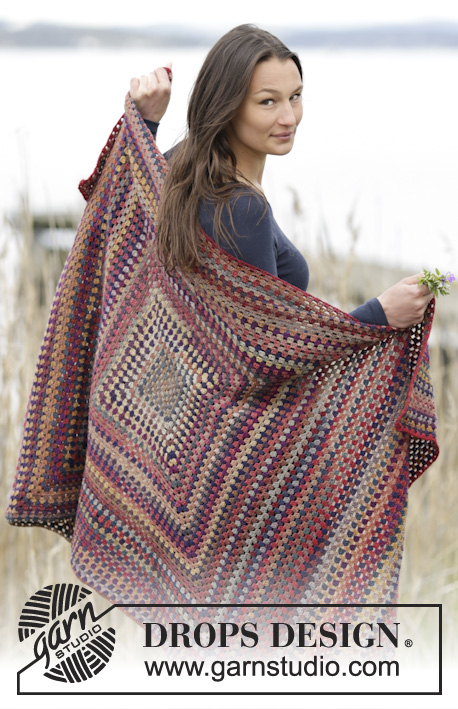
Crochet DROPS blanket with granny squares, circle squares and borders with bobbles in ”Delight”.
DROPS 163-1 |
||||||||||||||||||||||||||||||||||||||||||||||||||||||||||||||||
|
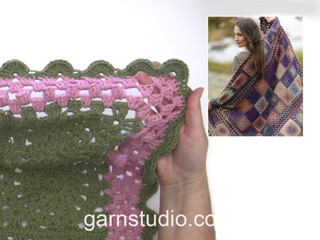
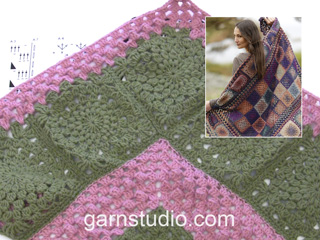
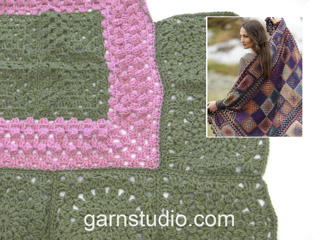
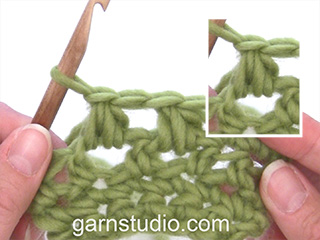
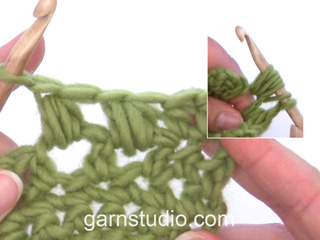
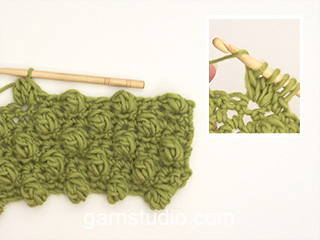
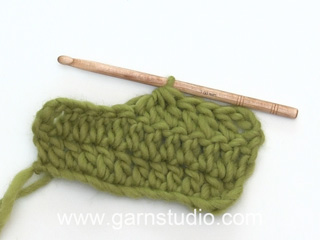
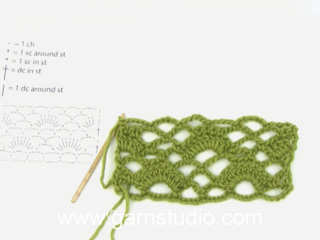
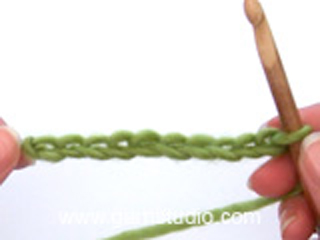
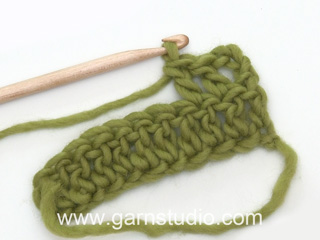
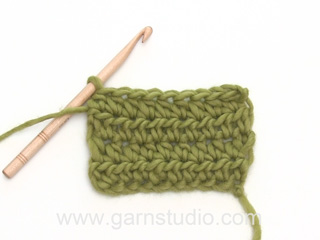
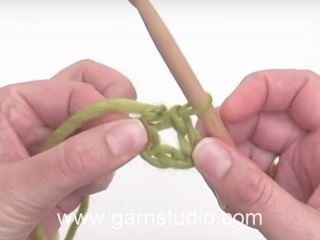
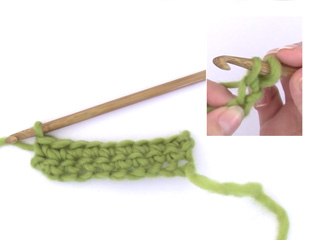
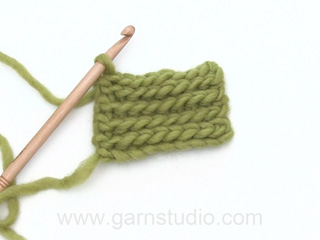
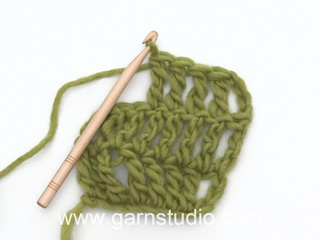
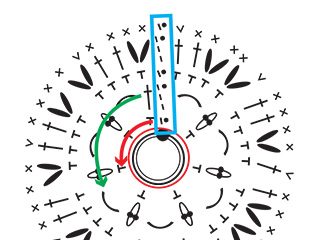
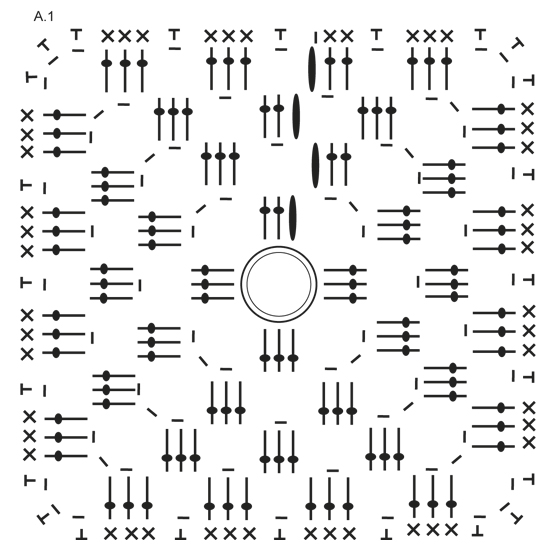
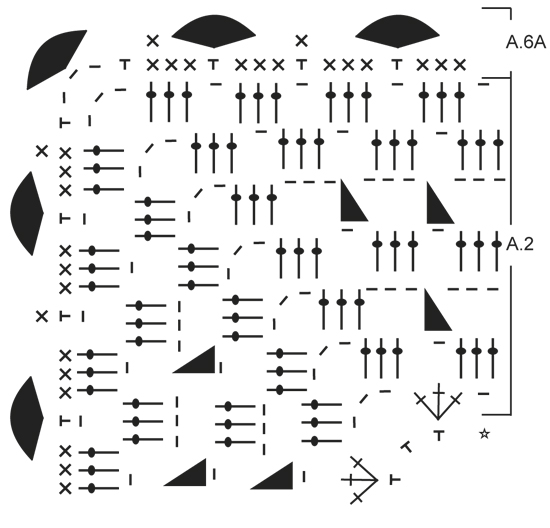
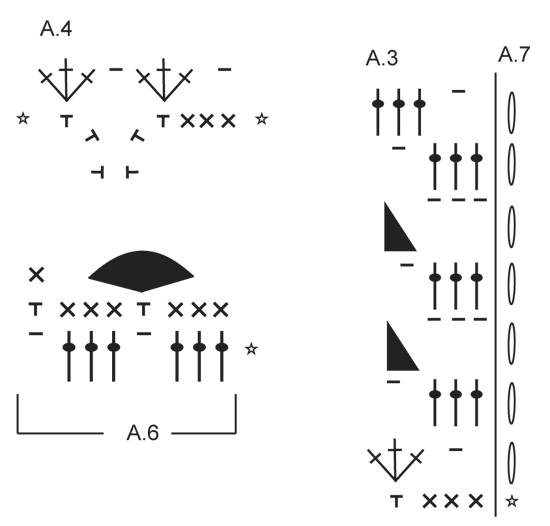
PATTERN: See diagrams A.1 to A.7. CROCHET INFO: A.7 shows beg of round in A.3 and is in addition to repetition (i.e. 3 ch do not replace a tr). BOBBLE: Work 6 tr around same ch, then work 1 sl st in the first of the 6 tr. 2 HTR TOG: Make 1 YO, insert hook under ch-space and get yarn, make 1 YO, insert hook below same ch-space and get yarn, make 1 YO and pull yarn through all 5 sts on hook. 3 HTR TOG: Make 1 YO, insert hook under ch-space and get yarn, * make 1 YO, insert hook below same ch-space and get yarn *, repeat from *-* 2 times in total, make 1 YO and pull yarn through all 7 sts on hook. 2 TR TOG: Work 1 tr around ch-space but wait with last YO and pull through, work next tr around same ch-space but pull last YO through all 3 sts on hook. 3 TR TOG: Work 1 tr around ch-space but wait with last YO and pull through, work next tr around same ch-space but wait with last YO and pull through, work last tr around same ch-space but now pull last YO through all 4 sts on hook. 4 TR TOG: Work 1 tr around ch-space but wait with last YO and pull through, * work next tr around same ch-space but wait with last YO and pull through *, repeat from *-* 2 times in total, work last tr around same ch-space but now pull last YO through all 5 sts on hook. ---------------------------------------------------------- BLANKET: Blanket consists of granny squares in the middle and sew tog one by one. Then work an edge with bobbles outside these squares. Then work larger circle squares that are sewn tog one by one into a frame that is sewn to edge on blanket, before working a finishing edge around the entire blanket with bobbles and fans. GRANNY SQUARE: Work 4 ch on hook size 5 mm with Delight and form 1 ring with 1 sl st in first ch. Then work in the round but alternately from RS and WS as shown in diagram A.1. I.e. work as follows: ROUND 1: 3 ch (= 1 tr), 2 tr around ch-space, * 3 ch, 3 tr around ch-space *, repeat from *-* 3 times in total and finish with 3 ch and 1 sl st in 3rd ch from beg of round, turn piece. ROUND 2: 3 ch (= 1 tr), 2 tr + 3 ch + 3 tr around same ch-space (= corner), * 1 ch, around next ch-space work 3 tr + 3 ch + 3 tr (= corner) *, repeat from *-* 3 times in total and finish with 1 ch and 1 sl st in 3rd ch at beg of round, turn piece. ROUND 3: 3 ch (= 1 tr), 2 tr around same ch-space, * 1 ch, 3 tr + 3 ch + 3 tr around next ch-space (= corner), 1 ch, 3 tr around next ch-space *, repeat from *-* 3 times in total, 1 ch, 3 tr + 3 ch + 3 tr around next ch-space (= corner), 1 ch and 1 sl st in 3rd ch from beg of round, turn piece. REMEMBER THE CROCHET TENSION! ROUND 4: 3 ch (= 1 tr), 2 tr around same ch-space, * 1 ch, 3 tr + 3 ch + 3 tr around next ch-space (= corner), 1 ch, 3 tr around next ch-space, 1 ch, 3 tr around next ch-space *, repeat from *-* 3 times in total, 1 ch, 3 tr + 3 ch + 3 tr around next ch-space (= corner), 1 ch, 3 tr around next ch, 1 ch and 1 sl st in 3rd ch from beg of round, turn piece. ROUND 5: 1 ch, then work 1 dc around every ch and 1 dc in every tr the entire round (around ch-space in each corner work 3 dc), finish round with 1 sl st in first ch at beg of round. Fasten off. ASSEMBLY: Work 32 granny squares in total. Place the squares with 4 squares in width and 8 squares in height. Sew squares tog edge to edge with neat little stitches - NOTE: Sew a stitch in every dc and make sure to avoid a tight seam (sew with yarn from the ball that fits square's colour to avoid marked lines). EDGE WITH BOBBLES: ROUND 1: Beg with 1 sl st in the last of the 3 dc in a corner on blanket, work 3 ch (= diagram A.7) – READ CROCHET INFO. Then work as shown in diagram A.3, i.e. work as follows: * 1 ch, skip 3 dc, 3 tr in next dc *, repeat from *-* around the entire edge on blanket - NOTE: In every transition between 2 squares work as shown in diagram A.4, i.e. work 3 tr in the first of the 3 dc in corner on first square, 1 ch, 3 tr in 3rd dc of the 3 dc in corner on next square. In every corner on the blanket work as shown in diagram A.2, i.e. work 1 ch, 3 tr in the first of the 3 dc in the corner, 3 ch, 3 tr in third dc of the 3 dc in same corner (i.e. the last time work in same dc as the 3 ch at beg of round). Finish round with 1 sl st in 3rd ch from beg of round. ROUND 2: 3 ch (= A.7), * (3 tr around ch, 1 ch), repeat from (-) until corner, work 3 tr + 3 ch + 3 tr around ch-space in corner, 1 ch *, repeat from *-* around the entire blanket and finish with 1 sl st in 3rd ch at beg of round. ROUND 3: 3 ch, * (3 ch, skip 3 tr, 1 BOBBLE – see explanation above, around next ch), repeat from (-) until corner, work 3 ch, 3 tr + 3 ch + 3 tr around ch-space in corner *, repeat from *-* around the entire blanket and finish round with 1 sl st in 3rd ch at beg of round. ROUND 4: 3 ch, then work 3 tr around every ch-space and 1 ch between every tr-group the entire round (work corners as before with 3 tr + 3 ch + 3 tr) and finish round with 1 sl st in 3rd ch at beg of round. ROUND 5: 3 ch, * (3 ch, skip 3 tr, 1 bobble, around next ch), repeat from (-) until corner, work 3 ch + 3 tr + 3 ch + 3 tr around ch-space in corner *, repeat from *-* around the entire blanket and finish round with 1 sl st in 3rd ch at beg of round. ROUNDS 6-7: Work tr-groups as on 4th round. Fasten off. CIRCLE SQUARE: Work 4 ch on hook size 5 mm with Delight and form a ring with 1 sl st in first ch. Then work as shown in diagram A.5, i.e. work as follows: ROUND 1: 4 ch (= 1 tr + 1 ch), * 1 tr in ch-ring, 1 ch *, repeat from *-* a total of 15 times, finish with 1 sl st in 3rd ch from beg of round (= 16 tr with 1 ch between each). ROUND 2: 1 sl st around first ch, 2 ch (= 1 htr), work 2 HTR TOG around same ch-space – see explanation above, * 1 ch, 3 HTR TOG around next ch-space – see explanation above *, repeat from *-* 15 times in total and finish with 1 ch and 1 sl st in 2nd ch at beg of round (= 16 htr-groups with 1 ch between each). ROUND 3: 1 sl st around first ch-space, 3 ch (= 1 tr), 2 TR TOG around same ch-space - see explanation above, * 2 ch, 3 TR TOG around next ch-space *, repeat from *-* 15 times in total, and finish with 2 ch and 1 sl st in 3rd ch from beg of round (= 16 tr-groups with 2 ch between each). ROUND 4: 1 sl st around first ch-space, 3 ch (= 1 tr), 3 tr tog around same ch-space, * 3 ch, 4 TR TOG around next ch-space *, repeat from *-* 15 times in total, and finish with 3 ch and 1 sl st in 3rd ch from beg of round (= 16 tr-groups with 3 ch between each). ROUND 5: 1 sl st around first ch-space, 3 ch (= 1 tr), 2 tr tog + 2 ch + 3 tr tog around same ch-space, * 1 ch + 3 tr tog + 2 ch + 3 tr tog around next ch-space *, repeat from *-* 15 times in total and finish with 1 ch and 1 sl st in 3rd ch at beg of round (32 tr-groups on round). ROUND 6: 1 sl st around first ch-space, 4 ch (= 1 dtr), 2 dtr + 3 ch + 3 dtr around same ch-space (= first corner), * 1 ch, 3 tr around next 2-ch-space, 1 ch, 3 htr around next 2-ch-space, 1 ch, 3 tr around next 2-ch-space, 1 ch, 3 dtr + 3 ch + 3 dtr around next 2-ch-space (= corner) *, repeat from *-* 4 times in total but finish last repetition with 1 sl st in 4th ch at beg of round (instead of 3 dtr + 3 ch + 3 dtr around next 2-ch-space). ROUND 7: 1 ch (= 1 dc), then work 1 dc in every st and 1 dc around every ch the entire round (around ch-space in each corner work 3 dc), finish round with 1 sl st in first ch at beg of round. Fasten off. MORE ASSEMBLY: Work 26 circle squares in total. Place the squares to form a frame. There should be 4 circle squares along each short side on blanket, 7 circle squares along each long side on blanket and 1 circle square in each corner. Sew squares tog two by two with neat little stitches – sew edge to edge with one stitch in every dc and make sure to avoid a tight seam. Work 1 round with dc inside the frame (work 1 dc in every st). Place frame around the blanket and fasten dc-round on frame to edge with bobbles - sew edge to edge with neat little stitches and make sure to avoid a tight seam. FINISHING EDGE AROUND BLANKET: Beg from RS with 1 sl st in the last of the 3 dc in a corner on blanket. Then work 4th-7th round on EDGE WITH BOBBLES (i.e. work 1 round with tr-groups, 1 round with bobbles and 2 rounds with tr-groups). FAN EDGE: Work sl sts until ch before first tr-group, work 1 ch, then work as shown in diagram A.6, i.e. work as follows: ROUND 1: Work 1 dc in every tr and 1 dc around every ch from previous round, finish round with 1 sl st in ch at beg of round. ROUND 2: * Skip 3 dc, 10 tr in next dc (= 1 fan), skip 3 dc, 1 dc in next dc *, repeat from *-* the entire round but adjust so that there is a fan in each corner on blanket (as shown in A.6A). Fasten off. |
||||||||||||||||||||||||||||||||||||||||||||||||||||||||||||||||
Diagram explanations |
||||||||||||||||||||||||||||||||||||||||||||||||||||||||||||||||
|
||||||||||||||||||||||||||||||||||||||||||||||||||||||||||||||||
|
||||||||||||||||||||||||||||||||||||||||||||||||||||||||||||||||
|
||||||||||||||||||||||||||||||||||||||||||||||||||||||||||||||||
|
||||||||||||||||||||||||||||||||||||||||||||||||||||||||||||||||

|
||||||||||||||||||||||||||||||||||||||||||||||||||||||||||||||||
|
Have you made this or any other of our designs? Tag your pictures in social media with #dropsdesign so we can see them! Do you need help with this pattern?You'll find tutorial videos, a Comments/Questions area and more by visiting the pattern on garnstudio.com. © 1982-2024 DROPS Design A/S. We reserve all rights. This document, including all its sub-sections, has copyrights. Read more about what you can do with our patterns at the bottom of each pattern on our site. |
||||||||||||||||||||||||||||||||||||||||||||||||||||||||||||||||


With over 40 years in knitting and crochet design, DROPS Design offers one of the most extensive collections of free patterns on the internet - translated to 17 languages. As of today we count 304 catalogues and 11422 patterns - 11422 of which are translated into English (UK/cm).
We work hard to bring you the best knitting and crochet have to offer, inspiration and advice as well as great quality yarns at incredible prices! Would you like to use our patterns for other than personal use? You can read what you are allowed to do in the Copyright text at the bottom of all our patterns. Happy crafting!
Comments / Questions (50)
Hei. Jeg hekler teppet "Memories" med en kombinasjon av Delight nr. 18 og nr. 20. Synes de heklede kantene rundt ser ensfargede ut og lurer på om jeg kan kombinere Delight med med Baby Alpaca Silk? Passser farge 0100 natuur og 1760 grålilla i denne garntype til Dellight 18 og 20? Evt Flora , farge Petol micII ? Er ikke så flink med farger og er takknemlig for råd.
29.12.2020 - 16:34DROPS Design answered:
Hei Kristin. DROPS Baby AlpacaSilk og DROPS Flora kan fint erstatte DROPS Delight. Ved å velge natur til kanten vil det bli en større fargekontrast enn om du velger en farge som er ton-i-ton med et av fargene du har på teppet. Hvilken dominerende farge ønsker du at teppet skal ha? Da kan du velge den fargen til kanten. Eller hva syns du vil passe best inn der hvor teppet skal "bo" (i go`stolen, sofaen?). Fargevalg er ganske personlig så det er litt vanskelig å gi fargeråd. mvh DROPS design
13.01.2021 - 12:53Hallo de wol besteld maar dan nr 9, blijkt dat hier niet alle kleuren inzitten die op de foto staat, nou heb ik mooi 22 knotten nr 9 (dit omdat ik hem groter maak) alleen jammer vrij donker en niet de mooie kleurschakeringen wat op de foto afgebeeld staat, de wol is wel heel erg mooi het zou fijn zijn als jullie de verschillende kleuren en hoeveelheid erbij konden vermelden, zodat het patroon passend wordt en niet meer haaksters dezelfde fout maken. Groetjes Maria
08.11.2020 - 16:28Before ordering the yarn I wonder if you could get me instructions to make the blanket bigger.
13.10.2019 - 22:33DROPS Design answered:
Dear Mrs Scampa, we are unfortunately not able to adjust every pattern to every single request, please contact your DROPS store for any individual assistance. Happy crocheting!
14.10.2019 - 10:49Bonjour, en aucun cas cette couverture n'a pu être réalisée avec le coloris 18 forêt d'automne . Et il ne peut s'agir d'un problème d'écran les couleurs sont trop radicalement différentes Paf ailleurs les contrastes sont voulus et non laissés au hasard du déroulé de la pelote J'ai donc obtenu une couverture très sombre, terne et triste. Tout ça est bien mensonger et je suis très déçue
29.09.2019 - 12:49DROPS Design answered:
Bonjour Mme Hengelmann, la couleur utilisée est juste, toutefois, des nuances différentes peuvent apparaître entre les différents bains, et les couleurs peuvent apparaître différentes également en fonction de la luminosité lors du shooting, et de l'écran de tout un chacun. En cas de doute avec une couleur, n'hésitez pas à contacter votre magasin, même par mail ou téléphone, il vous conseillera au mieux de vos envies. Bon crochet!
30.09.2019 - 12:02Bonjour Je ne comprends pas bien .sur la photo on voit que les couleurs sont bien délimitées Comment est-ce possible avec une seule couleur de laine ? J'aimerais faire ce magnifique modèle mais cela m'inquiète ...je ne comprends pas comment on fait les changements de couleur
30.08.2019 - 16:53DROPS Design answered:
Bonjour Mme Hengie, on ne change pas de couleur, DROPS Delight se compose de différentes couleurs qui vont former d'eux-mêmes les changements de couleur que l'on voit sur la photo. Bon crochet!
02.09.2019 - 08:31Kan jeg gange opskriften op, så tæppet bliver cirka 180 gange 120? Jeg har regnet ud, at der skal være omtrent 6 gange 12 tern bedstemorruder, men jeg er usikker på, om det kan gå op med de store cirkelruder, som skal hækles rundt om?
01.01.2019 - 23:19Kan jeg gange opskriften “Drops Design: Model nr de-140” op, så tæppet bliver cirka 180 gange 120? Jeg har regnet ud, at der skal være omtrent 6 gange 12 tern bedstemorruder, men jeg er usikker på, om det kan gå op med de store cirkelruder, som skal hækles rundt om?
01.01.2019 - 23:18DROPS Design answered:
Hei Lisbeth. Du må gjerne endre oppskriften om du ønsker det, men vi har dessverre ikke mulighet til å regne den om for deg. Kanten med bobler rundt bestemorrutene er ca 8 cm bred og en sirkelrute måler ca 14 x 14 cm. Håper dette kan hjelpe deg. God fornøyelse
08.01.2019 - 11:06Ik heb onlangs een babydekentje gehaakt met drops design (nl Drops Baby 20/22 Denim Days). Dat werd gehaakt met 2 draden drops delight en een haaknaald n° 5.\r\nNu zou ik graag (ook in Drops Delight) Code 163-1 (maar nu in kleur herfstbos) haken. Er staat bij de beschrijving dat ik moet werken met haaknaald n° 5 maar nu precies maar met één enkele draad. Hoe zit dat juist? Zal deze deken dan niet te \'los\' zijn?\r\nBrigitte
14.03.2018 - 17:51DROPS Design answered:
Hallo Brigitte, Je hebt inderdaad ongeveer naald nr 5 nodig voor deze deken. Maak evt. een proeflapje om te controleren of de stekenverhouding klopt en neem, indien nodig, een naald van een andere dikte, zodat de stekenverhouding klopt.
19.03.2018 - 08:39Ho comprato il set di lana per una copertina , pensando che i colori fossero uguali, invece non sono come nell’immagine! Mi spiace , perché voi indicavate proprio quel tipo di colore! Cioè il n 18 foresta d’autunno
16.02.2018 - 09:57Pensavo di ingrandire la coperta, preparando tanti quadrati con cerchio all’interno per fare un altro giro o due. Ma ho un dubbio riguardante il BORDO INTORNO ALLA COPERTA e il BORDO CON VENTAGLI: ho paura che aggiungendo un altro giro o due di quadrati con cerchio, il conteggio degli schemi A.6 e A.6A non venga rispettato. I miei dubbi sono fondati o mi preoccupo per niente? Grazie
04.05.2017 - 13:32DROPS Design answered:
Buongiorno Stefania. Gli schemi A6 e A6a vengono lavorati sui lati dei quadrati, indipendentemente dal numero di maglie / quadrati che ci sono. Quindi riesce a lavorarli anche se aggiunge una o due giri di quadrati intorno alla coperta. Buon lavoro!
04.05.2017 - 14:01