
Popular categories
Looking for a yarn?


|
|
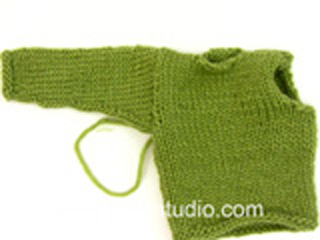
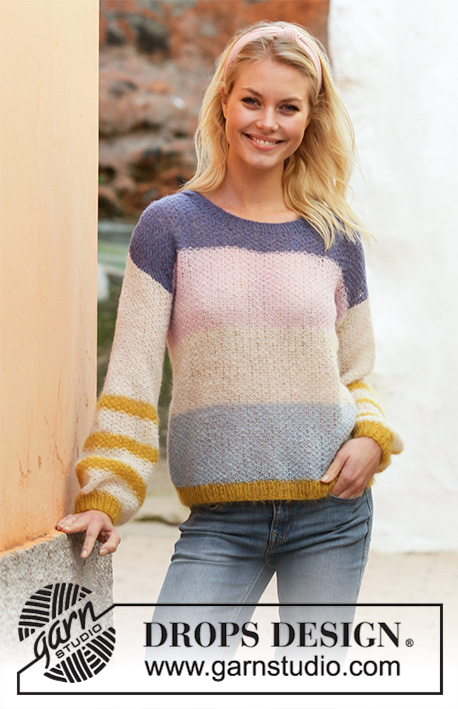
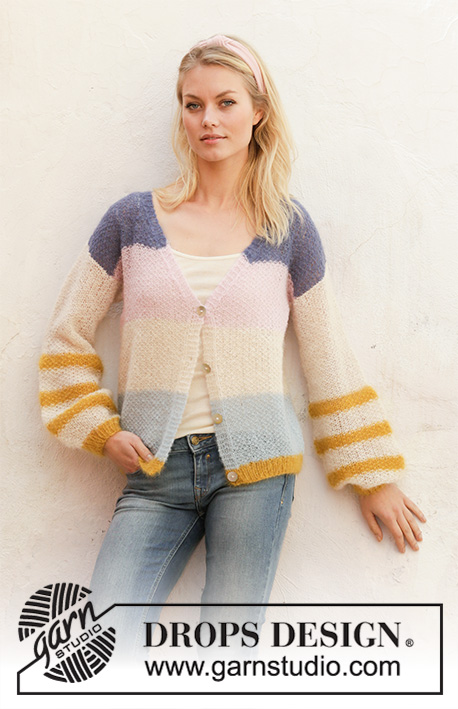
Mardi Gras Jacket |
|
 |
 |
Knitted jacket with balloon sleeves, V-neck and stripes in DROPS Brushed Alpaca Silk. Sizes: S-XXXL
DROPS 201-21 |
|
|
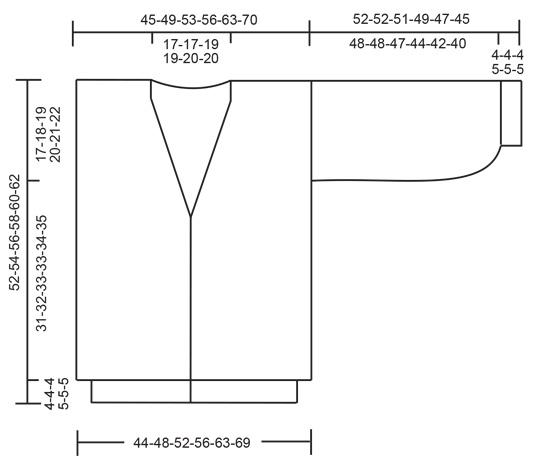
------------------------------------------------------ EXPLANATIONS FOR THE PATTERN: ------------------------------------------------------- MOSS STITCH (worked in the round): Round 1: * Knit 1, purl 1*, repeat from *-*. Round 2: Knit over purl and purl over knit. Repeat round 2 onwards. MOSS STITCH (worked back and forth): Row 1: * Knit 1, purl 1 *, repeat from *-*. Row 2: Knit over purl and purl over knit. Repeat row 2 onwards. STRIPES BODY: Work 12-12.5-13-13,5-13.5-14 cm light grey green, 12-12.5-13-13-14-14.5 cm off-white, 12-12.5-13-13,5-13.5-14 cm powder pink and then finish with denim blue = 12-12.5-13-13-14-14.5 cm. STRIPES SLEEVES: Work 4.5 cm off-white, 3 cm curry, 4.5 cm off-white, 3 cm curry, 4.5 cm off-white and 3 cm curry. BANDS ON FRONT PIECES: The outermost 6 stitches towards mid front = bands. Work as follows: Knit the 5 outermost stitches towards mid front on all rows and the 6th stitch is worked in stocking stitch seen from the right side. DECREASE TIP-1: Decrease only from the right side, inside the bands towards mid front as follows: Knit 5, slip the next stitch as if to knit, knit 1 and pass the slipped stitch over the knitted stitch (= 1 stitch decreased). DECREASE TIP-2: Decrease only from the right side, inside the bands towards mid front as follows: Work moss stitch until there are 7 stitches left on row. Decrease 1 stitch by knitting together the 7th and 6th stitch. Knit the remaining 5 stitches. DECREASE TIP-3: Knit together the 3 middle stitches under the sleeve (= 2 stitches decreased). INCREASE TIP-1: Work 2 stitches in 1 stitch as follows: Work 1 stitch but do not slip this stitch off the left needle, work 1 more stitch in same stitch - working in the back loop this time = 1 stitch increased. INCREASE TIP-2: (evenly spaced at bottom of sleeve): To work out how to increase evenly, count the total number of stitches on the needle (e.g. 44 stitches) and divide by the number of increases to be made (e.g. 20) = 2.2. In this example, increase by making 1 yarn over after approx. each 2nd stitch. On the next round knit the yarn overs to leave a small hole. BUTTONHOLES (bottom up): Work buttonholes on right band. 1 BUTTONHOLE = Cast off the 3rd and 4th stitch from the edge. On the next row cast on 2 new stitches over the cast-off stitches. Work buttonholes when the piece measures approx.: S: 1, 10, 19 and 28 cm M: 1.5, 10.5, 19.5 and 28.5 cm L: 1, 10.5, 20 and 29.5 cm XL: 1, 11, 21 and 31 cm XXL: 1, 11, 21 and 31 cm XXXL: 1.5, 11.5, 21.5 and 31.5 cm CASTING-OFF TIP: To avoid the cast-off edge being tight you can cast off with a larger size needle; or make 1 yarn over after approx. each 8th stitch at the same time as casting off( yarn overs cast off as normal stitches). ------------------------------------------------------ START THE PIECE HERE: ------------------------------------------------------- JACKET - SHORT OVERVIEW OF THE PIECE: Front and back pieces are worked separately, back and forth with circular needle and bottom up. The sleeves are worked in the round with double pointed needles or short circular needle, bottom up. BACK PIECE: Cast on 66-72-78-86-94-104 stitches with circular needle size 4 mm and curry. Work rib ( = knit 1, purl 1) for 4-4-4-5-5-5 cm. Change to circular needle size 6 mm and light grey green and continue with MOSS STITCH – read description above – AT THE SAME TIME as you work STRIPES BODY – read description above. REMEMBER THE KNITTING TENSION! When the piece measures 35-36-37-38-39-40 cm increase 1 stitch on each side for sleeve-seams – read INCREASE TIP-1 = 68-74-80-88-96-106 stitches. When the piece measures 46-48-50-52-54-56 cm work garter stitch over the middle 38-38-40-40-42-42 stitches; the remaining stitches are continued in moss stitch as before. When the piece measures 48-50-52-54-56-58 cm cast off the middle 26-26-28-28-30-30 stitches and each shoulder is finished separately = 21-24-26-30-33-38 stitches on each shoulder. Continue with garter stitch over the outermost 6 stitches towards the neck and moss stitch over the other stitches. When the piece measures 52-54-56-58-60-62 cm loosely cast off with knit over knit and purl over purl - read CASTING-OFF TIP above. Work the other shoulder in the same way. RIGHT FRONT PIECE: When working the right front piece you also work buttonholes on the band – read description above. Cast on 39-42-45-49-53-58 stitches (including 6 band stitches) with circular needle size 4 mm and curry. Work rib (= knit 1, purl 1) for 4-4-4-5-5-5 cm at the same time as you work BANDS – read description above. After the rib is finished, change to circular needle size 6 mm, light grey green and work MOSS STITCH, STRIPES BODY and BANDS onwards. When the piece measures 28-29-30-31-31-32 cm start to decrease to V-neck: Decrease 1 stitch every 1 cm a total of 19-19-20-20-21-21 times - read DECREASE TIP-1 = 20-23-25-29-32-37 stitches on needle - AT THE SAME TIME, when the piece measures 35-36-37-38-39-40 cm increase 1 stitch for the sleeve-seam, outermost towards the armhole - read INCREASE TIP-1 = 21-24-26-30-33-38 stitches. When the piece measures 52-54-56-58-60-62 cm loosely cast off with knit over knit and purl over purl - read CASTING-OFF TIP above. LEFT FRONT PIECE Work as for right front piece, but without buttonholes and with the band at the other end of the row. At V-neck, read DECREASE TIP-2. SLEEVE: Cast on 36-38-40-42-44-46 stitches with double pointed needles size 4 mm and curry. Work rib ( = knit 1, purl 1) for 4-4-4-5-5-5 cm. Change to double pointed needles size 6 mm and off-white and knit 1 round, AT THE SAME TIME as you increase 24-22-22-22-20-20 stitches evenly spaced – read INCREASE TIP-2 = 60-60-62-64-64-66 stitches. Continue with MOSS STITCH and STRIPES SLEEVES – read description above. When STRIPES SLEEVES are finished continue with off-white to finished length. When the piece measures 25-25-25-25-25-25 cm decrease 2 stitches mid under sleeve - read DECREASE TIP-3, repeat this decrease every 4-6-5-5-0-0 cm a total of 4-3-2-2-0-0 times = 52-54-58-60-64-66 stitches. Continue working until the piece measures 52-52-51-49-47-45 cm (shorter measurements in larger sizes due to broader shoulders) and then loosely cast off the remaining stitches with knit over knit and purl over purl - read CASTING-OFF TIP. Work the other sleeve in the same way. ASSEMBLY Sew the pieces together in the outermost loop of the outermost stitch so the seams are flat - the bands on each front piece are sewn to the garter stitch along the neck on the back piece. Sew sleeves to body inside the 1 edge stitch on the front and back pieces. Sew buttons onto left band. |
|
|
|
|
Have you made this or any other of our designs? Tag your pictures in social media with #dropsdesign so we can see them! Do you need help with this pattern?You'll find tutorial videos, a Comments/Questions area and more by visiting the pattern on garnstudio.com. © 1982-2024 DROPS Design A/S. We reserve all rights. This document, including all its sub-sections, has copyrights. Read more about what you can do with our patterns at the bottom of each pattern on our site. |
|


With over 40 years in knitting and crochet design, DROPS Design offers one of the most extensive collections of free patterns on the internet - translated to 17 languages. As of today we count 304 catalogues and 11422 patterns - 11422 of which are translated into English (UK/cm).
We work hard to bring you the best knitting and crochet have to offer, inspiration and advice as well as great quality yarns at incredible prices! Would you like to use our patterns for other than personal use? You can read what you are allowed to do in the Copyright text at the bottom of all our patterns. Happy crafting!
Comments / Questions (22)
Hvor meget garn går der til str m i ensfarvet garn?
15.04.2024 - 14:01DROPS Design answered:
Hei Pernille. Det har vi dessverre ikke oversikten over. Men sammelign jakken med lignende ensfarget akker i Brushed Alpaca Silk, så får du en ca garnmengde. mvh DROPS Design
15.04.2024 - 14:36Hello! Thank you for this nice pattern! I am using Drops brushed alpaca silk. My gauge swatch with this yarn, 6mm needle, moss stitch 15st x 24rows is 10cm x 9cm (but in case I knit very loosely). If I cast-on 66st (very loosely) for size S (my size), back piece with 4cm needle rib 1x1, the length is 31cm. If I cast-on 66st with 6cm needle, the length is 34cm. If I cast-on 78st with 6cm needle, the length is 42cm. I am confused whether I make a mistake and which size should I knit. Thank you!:)
29.01.2024 - 18:05DROPS Design answered:
Dear Svetla, don't work too loosely; the correct width is more important than the correct length in the gauge. So work with exactly the same gauge as the one in the swatch and it should be the correct cm for your size. You need to cast on with the 4mm needle, for the rib. This is tighter than the calculated gauge but it will start to stretch once you finish the rib and change needle size so you don't need to worry about it. Then continue with the 6mm needle, with the same gauge as in the swatch and following the instructions for your size (S). Happy knitting!
29.01.2024 - 23:24Dag, als ik dit vest in één kleur wil breien, hoeveel garen zou ik dan ongeveer nodig hebben?
31.12.2023 - 11:27Pattern says 'cast on ... stitches with circular needle size ... and curry. What does 'curry' mean? Thank you.
05.02.2023 - 03:26DROPS Design answered:
Dear Ann, "curry" is the color used for casting on (colour 19). Happy knitting!
05.02.2023 - 23:30Hoe brei ik de mouwen aan het lijf? Met welke steek? Hebben daar een filmpje van want dit moet met 2 kleuren , blauw aan wit ! Ik probeerde het maar je zag steeds heel goed het kleur in het andere werk . Dank je
08.11.2022 - 19:39DROPS Design answered:
Dag Katelijne,
In een van de video's die bij het patroon staan wordt uitgelegd hoe je een mouw innaait in een trui met tricotsteek. Deze techniek kun je ook gebruiken voor dit patroon.
10.11.2022 - 17:22Brei ik deze trui met enkele draad ?
19.10.2022 - 16:43DROPS Design answered:
Dag Katelijne,
Ja, als je Brushed Alpaca Silk gekozen hebt brei je met een enkele draad. (Als je als vervangend garen een garen uit categorie A hebt gekozen, dan brei je met een dubbele draad.)
19.10.2022 - 19:52Nie rozumiem ostatniego etapu tyłu. Po zamknięciu środkowych 26 oczek, w jakiś sposób mam przerabiać dalej normalnie pozostałe oczka? Powstanie wtedy wielka dziura. Nie mogłam znaleźć żadnego wideo z instrukcjami.
09.03.2022 - 18:39DROPS Design answered:
Witaj Roksano, jak zamkniesz oczka środkowe, dalej przerabiaj oczka lewego ramienia do podanej wysokości. Zakończ i odetnij nitkę. Dołącz nitkę na prawe ramię na lewej stronie robótki od strony dekoltu i wykonaj prawe ramię tak samo jak lewe. Pozdrawiamy!
10.03.2022 - 09:01Je souhaiterais faire ce gilet en une seule couleur. Pourriez-vous m’indiquer combien de pelotes faudra-t-il que j’achète. Merci pour votre aide.
26.11.2021 - 14:59DROPS Design answered:
Bonjour Mme Vu, malheureusement, nous avons seulement la quantité indiquée, c'est-à-dire avec les rayures, et nous n'avons plus le gilet pour vérifier. Vous pouvez additionner les couleurs, vous aurez fort probablement besoin de moins, votre magasin DROPS saura vous aider, même par mail ou téléphone, n'hésitez pas à le contacter. Bon tricot!
26.11.2021 - 15:56Bonjour, Puis je travailler ce modèle avec des aiguilles droites ? En vous remerciant Bien cdt Aurore Fouillet
15.10.2021 - 15:18DROPS Design answered:
Bonjour Mme Fouillet, tout à fait, vous trouverez dans cette leçon quelques astuces pour les manches. Bon tricot!
15.10.2021 - 16:18I str XL står der striberne på kroppen skal være 12 cm, men det giver ikke logisk mening, da det er kortere end størrelse L. Hvor mange cm skal striberne være?
12.05.2021 - 15:02DROPS Design answered:
Hej Line, så er striberne i XL rettet. Tak for info :)
14.05.2021 - 09:05