
Popular categories
Looking for a yarn?


|
|||||||
City Streets |
|||||||
 |
 |
||||||
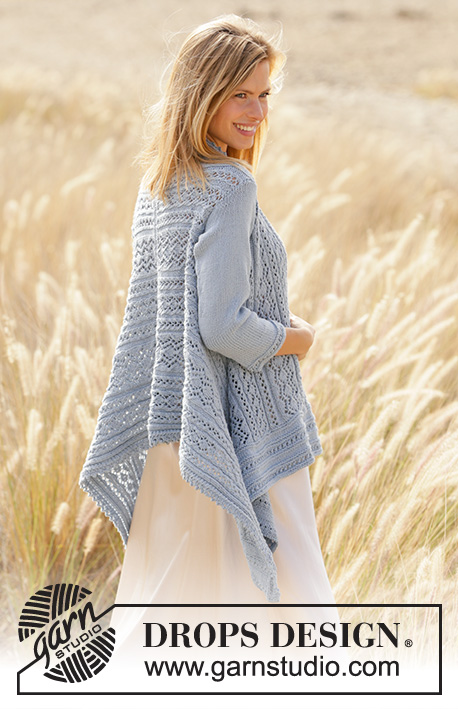
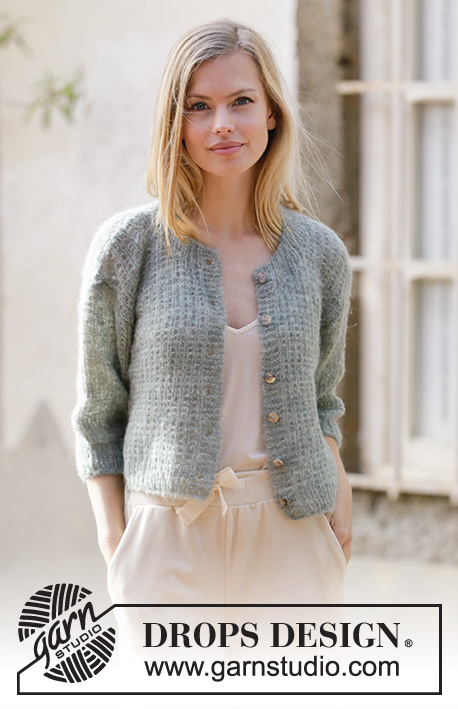
Knitted jacket in DROPS Brushed Alpaca Silk. The piece is worked with textured pattern and short sleeves. Sizes XS - XXL.
DROPS 210-18 |
|||||||
|
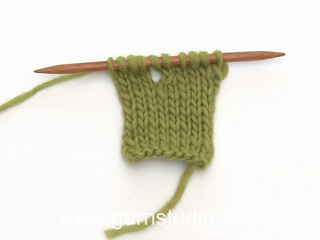
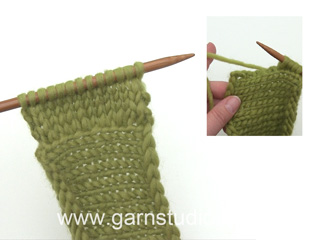
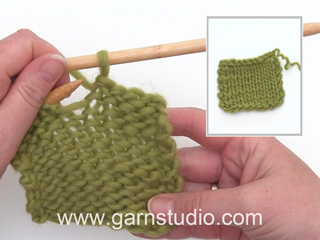
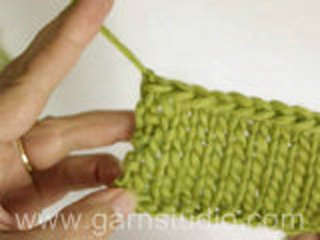
------------------------------------------------------- EXPLANATIONS FOR THE PATTERN: ------------------------------------------------------- RIDGE/GARTER STITCH (worked back and forth): Knit all rows. 1 ridge in height = Knit 2 rows. PATTERN: See diagram A.1. The diagram shows all rows in the pattern seen from the right side. INCREASE TIP (for sides of body and mid under sleeves): All increases are worked from the right side! Work as far as the stitch with the marker, make 1 yarn over, work the stitch with the marker in garter stitch as before, 1 yarn over (= 2 stitches increased at marker). On the next row/round work the yarn overs twisted to avoid holes. The new stitches are worked into A.1 as you go. BUTTONHOLES: Work buttonholes on the right band. 1 BUTTONHOLE = start from the right side and knit together the 3rd and 4th stitch from the edge then make 1 yarn over. On the next row (wrong side) knit the yarn over = hole. Work buttonholes when the piece measures: XS: 2, 8, 14½, 20½, 27 and 34 cm S: 2, 8½, 15, 21½, 28 and 35 cm M: 2, 9, 16, 23, 30 and 36 cm L: 2, 9, 16, 23, 30 and 38 cm XL: 2, 9, 16½, 23½, 31 and 39 cm XXL: 2, 9½, 17, 24½, 32 and 40 cm NOTE: The last buttonhole is worked on the neck. ------------------------------------------------------- START THE PIECE HERE: ------------------------------------------------------- JACKET – SHORT OVERVIEW OF THE PIECE: The body is worked back and forth with circular needle, bottom up as far as the armholes. You then cast off for armholes and the back and front pieces are finished separately back and forth. The sleeves are worked in the round with double pointed needles/short circular needle, bottom up to the beginning of the sleeve cap. Then the sleeve cap is worked back and forth with circular needle to finish. The piece is sewn together at the shoulders and the sleeves are sewn in. The neck is worked in rib to finish. BODY: Cast on 137-153-163-177-195-217 stitches (including 5 band stitches on each side towards mid front) with circular needle size 4 mm and Brushed Alpaca Silk. Purl 1 row (= wrong side). The next row is worked as follows from the right side: Work 5 band stitches in GARTER STITCH – read description above, * knit 1, purl 1 *, work from *-* until there are 6 stitches left on the row, knit 1 and finish with 5 band stitches in garter stitch. Continue this rib for 4 cm – remember BUTTONHOLES on the right band – read description above. When the rib is finished, change to circular needle size 5 mm. Insert 1 marker in the 37th-41st-43rd-47th-51st-57th stitch in from each side (i.e. in a purled stitch seen from the right side). There are 63-71-77-83-93-103 stitches on the back piece between the stitches with markers. The markers should follow upwards in the piece; they will be used when increasing in the sides of the body. The next row is worked as follows from the right side: Work 5 band stitches in garter stitch, A.1A until there are 6 stitches left on the row, A.1B (= 1 stitch) and finish with 5 band stitches in garter stitch. Continue this pattern. REMEMBER THE KNITTING TENSION! When the piece measures 5 cm, increase 1 stitch on each side of both markers – read INCREASE TIP (= 4 stitches increased). Increase like this every 5-5-6-6-6-7 cm a total of 4 times on each side = 153-169-179-193-211-233 stitches. Continue working without further increases until the piece measures 26-27-28-29-30-31 cm. Now cast off for the armholes on the next row as follows: Work 38-41-43-47-51-57 stitches as before (= front piece), cast off 5-7-7-7-7-7 stitches for the armhole (stitch with marker in the middle of these 5-7-7-7-7-7 stitches), work 67-73-79-85-95-105 stitches as before, cast off 5-7-7-7-7-7 stitches for the armhole and then work the remaining 38-41-43-47-51-57 stitches as before (= front piece). Finish the back and front pieces separately as described below. BACK PIECE: = 67-73-79-85-95-105 stitches. Continue A.1 back and forth as before and cast off for the armholes at the beginning of each row on each side as follows: Cast off 3 stitches 0-0-0-0-1-1 times, 2 stitches 0-1-2-2-2-3 times and 1 stitch 1-2-2-2-3-5 times = 65-65-67-73-75-77 stitches left. When the piece measures 41-43-45-47-49-51 cm, cast off the middle 23-23-25-25-25-27 stitches for the neck and each shoulder is finished separately. Continue A.1 and cast off 2 stitches on the next row from the neck = 19-19-19-22-23-23 stitches left on shoulder. Work until there is 1 row left before the piece measures 44-46-48-50-52-54 cm. Knit 1 row from the wrong side. Then cast off with knit from the right side. Work the other shoulder in the same way. RIGHT FRONT PIECE: = 38-41-43-47-51-57 stitches. Continue A.1 back and forth as before with 5 band stitches in garter stitch towards mid front. AT THE SAME TIME cast off for the armhole at the beginning of each row from the side as follows: Cast off 3 stitches 0-0-0-0-1-1 time, 2 stitches 0-1-2-2-2-3 times and 1 stitch 1-2-2-2-3-5 times. AT THE SAME TIME when the piece measures 32-33-34-36-37-38 cm, place the outermost 8-8-8-8-8-9 stitches towards mid front on 1 thread for the neck; to avoid cutting the strand work the stitches before placing them on the thread. Continue A.1 and cast off at the beginning of each row from the neck as follows: Cast off 2 stitches 3 times and 1 stitch 4-4-4-5-4-5 times. After all the decreases for armhole and neck have been finished there are 19-19-19-22-23-23 stitches left on the shoulder. Work until there is 1 row left before the piece measures 44-46-48-50-52-54 cm. Knit 1 row from the wrong side then loosely cast off with knit from the right side. LEFT FRONT PIECE: = 38-41-43-47-51-57 stitches. Continue A.1 back and forth as before with 5 band stitches in garter stitch towards mid front. AT THE SAME TIME cast off for the armhole at the beginning of each row from the side as follows: Cast off 3 stitches 0-0-0-0-1-1 time, 2 stitches 0-1-2-2-2-3 times and 1 stitch 1-2-2-2-3-5 times. AT THE SAME TIME when the piece measures 32-33-34-36-37-38 cm, place the outermost 8-8-8-8-8-9 stitches mid front on 1 thread for the neck. Continue A.1 and cast off for the neck at the beginning of each row from the neck as follows: Cast off 2 stitches 3 times and 1 stitch 4-4-4-5-4-5 times. After all the decreases for armhole and neck have been finished there are 19-19-19-22-23-23 stitches left on the shoulder. Work until there is 1 row left before the piece measures 44-46-48-50-52-54 cm. Knit 1 row from the wrong side. Then loosely cast off with knit from the right side. SLEEVE: Cast on 42-46-46-50-52-54 stitches with double pointed needles size 4 mm and Brushed Alpaca Silk. Knit 1 round then work rib in the round (= knit 1/ purl 1) for 4 cm. Change to double pointed needles size 5 mm and insert a marker in the last stitch on the round (= 1 purled stitch). Work A.1A in the round with knit over knit and garter stitch over purl. When the piece measures 6-6-6-6-8-8 cm, increase 1 stitch on each side of the stitch with the marker – read INCREASE TIP. Increase like this every 2½-2½-1½-1½-1-1 cm a total of 6-6-8-8-10-10 times = 54-58-62-66-72-74 stitches. Continue working until the sleeve measures 22-21-20-20-19-18 cm but finish the round when there are still 2-3-3-3-3-3 stitches left before the stitch with the marker. NOTE: Shorter measurements in larger sizes due to broader shoulders and longer sleeve cap. On the next round cast off the first 7 stitches, then continue with pattern as before to the end of the round. Now work the sleeve cap back and forth with circular needle as follows: Continue A.1 as before and cast off for the sleeve cap at the beginning of each row on both sides as follows: Cast off 2 stitches 2-3-3-3-3-3 times on each side and 1 stitch 1-2-2-2-2-4 times on each side. Then cast off 2 stitches on each side until the sleeve measures 27-28-28-28-28-29 cm. Cast off 3 stitches 1 time on each side and then cast off the remaining stitches. The sleeve measures approx. 28-29-29-29-29-30 cm from the top down. Work the other sleeve in the same way. ASSEMBLY: Sew the shoulder seams inside the cast-off edge. Sew in the sleeves, inside the 1 edge stitch. NECK: Knit up from the right side approx. 83 to 99 stitches around the neck (including the stitches from the threads in front) with circular needle size 4 mm and Brushed Alpaca Silk. Start from the wrong side and work as follows: 5 band stitches in garter stitch, * purl 1, knit 1 *, work from *-* until there are 6 stitches left on the row, purl 1 and finish with 5 band stitches in garter stitch. Continue this rib with knit over knit, purl over purl and garter stitch over garter stitch; remember to work the last buttonhole in the neck. Work until the neck measures 3½ to 4 cm. Cast off with knit over knit, purl over purl and garter stitch over garter stitch. ASSEMBLY: Sew the buttons onto the left band. |
|||||||
Diagram explanations |
|||||||
|
|||||||

|
|||||||
|
Have you made this or any other of our designs? Tag your pictures in social media with #dropsdesign so we can see them! Do you need help with this pattern?You'll find tutorial videos, a Comments/Questions area and more by visiting the pattern on garnstudio.com. © 1982-2024 DROPS Design A/S. We reserve all rights. This document, including all its sub-sections, has copyrights. Read more about what you can do with our patterns at the bottom of each pattern on our site. |
|||||||


With over 40 years in knitting and crochet design, DROPS Design offers one of the most extensive collections of free patterns on the internet - translated to 17 languages. As of today we count 304 catalogues and 11422 patterns - 11422 of which are translated into English (UK/cm).
We work hard to bring you the best knitting and crochet have to offer, inspiration and advice as well as great quality yarns at incredible prices! Would you like to use our patterns for other than personal use? You can read what you are allowed to do in the Copyright text at the bottom of all our patterns. Happy crafting!
Comments / Questions (100)
Jeg kan ikke finde diagrammet der skal strikkes mønster efter til denne opskrift
05.04.2024 - 19:59DROPS Design answered:
Hej Henriette, diagrammerne er til højre for måleskitsen nederst i opskriften :)
09.04.2024 - 10:24Hej! Jag förstår inte hur jag ska göra när jag kommer till att dela på bak och framstycke när jag ska börja maska av för ärmarna. Ska jag sticka bak för sig och varje framstycke för sig? Hälsningar Gudrun
11.03.2024 - 09:56DROPS Design answered:
Hej Gudrun. Ja det stämmer. Fram- och bakstycket stickas fram och tillbaka på rundsticka, nerifrån och upp till ärmhålen. Det maskas av till ärmhål. Sedan stickas bakstycket och framstyckena fram och tillbaka på rundsticka var för sig. Mvh DROPS Design
13.03.2024 - 09:31Als cadeau, wil ik dit vest breien in confectie maat 40 Nederland. Kunt u me zeggen welke maat in het patroon ik dan moet volgen? Ik kan namelijk niet vragen naar een voorbeeld vest. Vast bij voorbaat hartelijk dank. Met vriendelijke groet, Ellen Wanders
02.03.2024 - 08:40DROPS Design answered:
Dag Ellen,
Waarschijnlijk komt maat M het meest in de buurt. Je kunt ook kijken op kledingmaat.nl, welke Europese confectiematen (36, 38, 40 ect) overeenkomen met de Amerikaanse maten (S, M, L etc)
05.03.2024 - 22:53Buonasera, io non riesco a capire quali siano le 8 maglie che devo mettere in attesa più vicine allo scollo? Ma quanto più vicino allo scollo? Grazie
24.02.2024 - 18:29DROPS Design answered:
Buonasera Viviana, si, deve mettere in sospeso le maglie più esterne. Buon lavoro!
25.02.2024 - 15:23Buongiorno, utilizzando il filato suggerito, per una taglia media quanto ne occorre? grazie
29.01.2024 - 21:49DROPS Design answered:
Buonasera Franca, la quantità di filato è riportata all'inizio del modello, di fianco alla foto. Per la taglia M servono 150 g. Buon lavoro!
31.01.2024 - 18:51Combien mesure en cm le cardigan d’un à l’autre en taille Small merci?
16.01.2024 - 00:09Comment s’appelle le point fantaisie utilisé ? Merci
09.01.2024 - 23:36Hallo, Patroon 210-10 waarbij ik bij de mouw de eerste 7 steken moet afkanten . Ga dan verder in patroon zoals hiervoor tot het einde van de naald. Waarom alleen voor aan afkanten Mvg Joke
30.10.2023 - 11:58DROPS Design answered:
Dag Joke,
Vlak daarvoor staat beschreven dat je de naald een aantal steken eindigt voor de markeerdraad. Daarna kant je de 7 steken af. Dus eigenlijk kan je de 7 steken midden onder de mouw af en dus aan beide kanten.
30.10.2023 - 20:31Kan ik ook met gewone breinaalden breien? Ik ben 72 jaar en vindt zoveel steken op een ronde breinaald niet fijn. Hoe verdeel je de steken dan? Mvg Joke
18.10.2023 - 20:55DROPS Design answered:
Dag Joke,
Het maakt niet zoveel uit hoe je de steken dan verdeeld, je zou het kunnen verdelen in 2 voorpanden en het achterpand. Omdat er veel steken op de naald staan heb je wel grotere kans dat ze er af glijden, dus kan het handig zijn om dopjes of puntbeschermers op de naalden te zetten.
19.10.2023 - 19:58Combien de mailles pour chaque devant droit et gauche pourquoi on ne trouve plus de modèles comme autrefois, le dos nombre mailles, devant nombre de maille ?? merci cdlt
02.06.2023 - 18:40DROPS Design answered:
Bonjour Christine, certains modèles se tricotent en différentes pièces, d'autres, comme celui-ci se tricotent de bas en haut en une seule partie jusqu'aux emmanchures, autrement dit, vous montez les mailles du dos et des 2 devants et tricotez en augmentant sur les côtés du gilet jusqu'aux emmanchures, puis vous rabattez les mailles des emmanchures et terminez chaque partie séparément. Bon tricot!
05.06.2023 - 09:21