DROPS Merino Extra Fine
100% Wool
from 7.00 BGN /50g
Get the yarn to make this pattern from 91.00BGN.

The yarn cost is calculated from the pattern’s smallest size and the yarn’s cheapest product type. Looking for an even better price? You might find it on the DROPS Deals!

DROPS SS24

Love Links

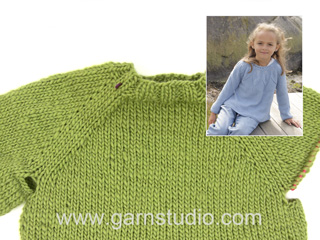
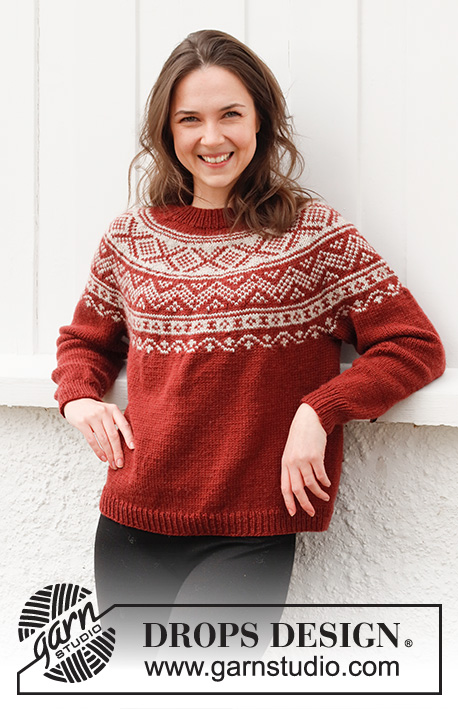
Knitted jumper in DROPS Merino Extra Fine. Piece is knitted top down with double neck edge, round yoke and Nordic pattern. Size XS–XXL.

DROPS 217-17
DROPS design: Pattern me-206
Yarn group B
-------------------------------------------------------

SIZE:
XS - S - M - L - XL - XXL

MATERIALS:
DROPS MERINO EXTRA FINE from Garnstudio (belongs to yarn group B)
400-450-450-500-550-600 g colour 42, cedar
250-250-300-300-350-350 g colour 01, off white

KNITTING TENSION:
21 stitches in width and 28 rows vertically in stocking stitch and Nordic pattern = 10 x 10 cm.

NEEDLES:
DROPS DOUBLE POINTED NEEDLES SIZE 4 mm
DROPS CIRCULAR NEEDLE SIZE 4 mm : Length 40 and 60 or 80 cm for stocking stitch and Nordic pattern.
DROPS DOUBLE POINTED NEEDLES SIZE 3 mm
DROPS CIRCULAR NEEDLE SIZE 3 mm : Length 40 and 80 cm for rib.
Needle size is only a suggestion! If you have too many stitches on 10 cm switch to a larger needle size. If you have too few stitches on 10 cm switch to a smaller needle size.

-------------------------------------------------------

Alternative Yarn – See how to change yarns here
Yarn Groups A to F – Use the same pattern and change the yarn here
Yarn usage using an alternative yarn – Use our yarn converter here

-------------------------------------------------------

DROPS Merino Extra Fine
100% Wool
from 7.00 BGN /50g
Get the yarn to make this pattern from 91.00BGN.

The yarn cost is calculated from the pattern’s smallest size and the yarn’s cheapest product type. Looking for an even better price? You might find it on the DROPS Deals!

Pattern instructions

-------------------------------------------------------

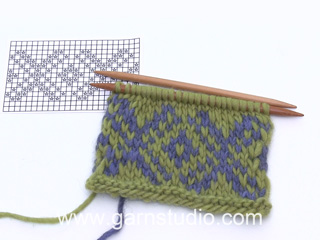
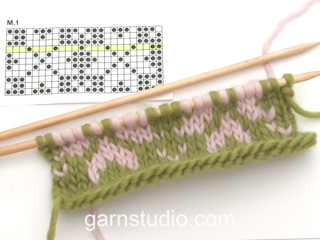
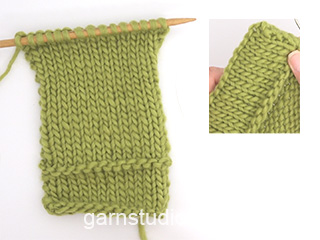
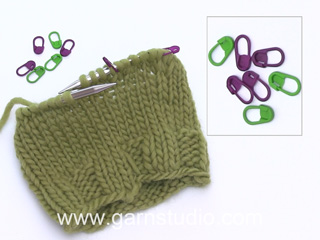
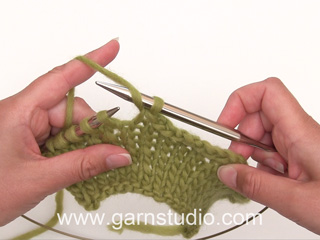
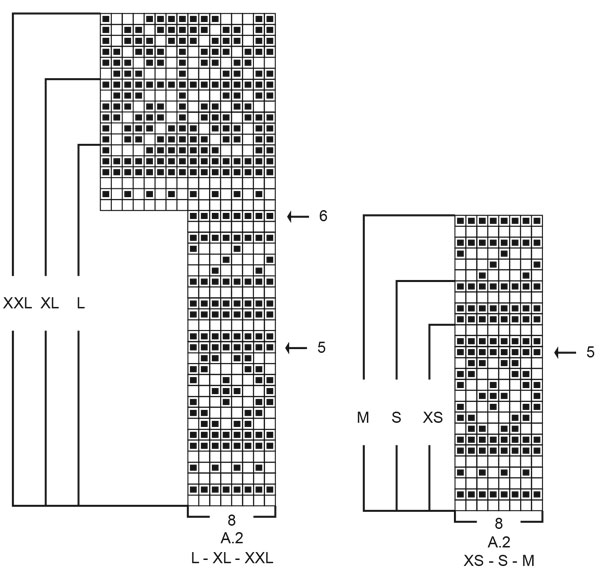
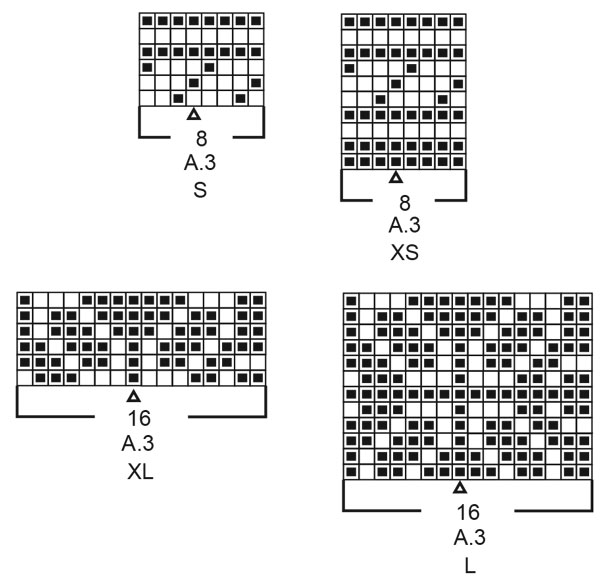
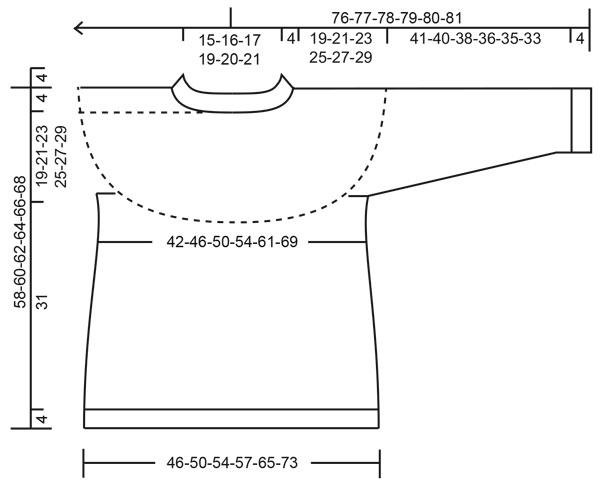
EXPLANATION FOR THE PATTERN:

-------------------------------------------------------

KNITTING TIP:
To avoid the knitting tension to tighten when working pattern, it is important not to tighten the strands on back side of piece. Switch to a higher needle number when working pattern if the pattern is somewhat tight.
If the knitting tension is too tight vertically, the garment will be too short and the armhole will be too small - this can be adjusted by working 1 row more evenly in the sections with one colour.
If the knitting tension is too loose vertically, the garment will be too long and the armhole too big, this can be adjusted by working 1 row less in the sections with one colour.

INCREASE TIP:
To calculate how to increase evenly, use the total number of stitches on row (e.g. 104 stitches) and divide stitches by number of increases to be done (e.g. 24) = 4.3.
In this example increase by making 1 yarn over after approx. every 4th stitch. On next round knit yarns over twisted to avoid holes.

PATTERN:
See diagrams A.1 to A.4. Choose diagram for your size (applies to A.2, A.3 and A.4). Work the entire pattern in stocking stitch.

DECREASE TIP (applies to mid under sleeves):
Begin 2 stitches before stitch with marker, knit 2 together, knit 1 (stitch with marker), knit 2 twisted together (= 2 stitches decreased).

CAST-OFF TIP:
To avoid a tight cast-off edge you may use a larger needle size. If this also is too tight, work a 1 yarn over after approx. every 8th stitch while casting off (cast off yarn overs as regular stitches).

-------------------------------------------------------

START THE PIECE HERE:

-------------------------------------------------------

JUMPER - SHORT OVERVIEW OF THE PIECE:
Double neck edge and yoke in the round on circular needle from mid back, top down. Now divide yoke for body and sleeves. Body is worked in the round on circular needle, top down. Work sleeves in the round on double pointed needles/short circular needle, top down.

DOUBLE NECK EDGE:
Cast on 104-108-112-120-124-132 stitches on a short circular needle size 3 mm with cedar. Knit 1 round. Then work rib in the round (= knit 2/purl 2) for 9 cm.
When rib is done, knit 1 round while increasing 24-28-32-32-36-44 stitches evenly - read INCREASE TIP = 128-136-144-152-160-176 stitches. Knit 1 round with cedar (knit yarn overs twisted).
Insert 1 marker in the middle of round (= mid front). Work yoke as explained below, measure yoke from this marker.

YOKE:
Switch to circular needle size 4 mm. Read all of the following section on yoke before working and read KNITTING TIP! Work A.1 in the round (= 32-34-36-38-40-44 repetitions of 4 stitches). Continue pattern like this. When A.1 has been worked vertically, work A.2 the same way. REMEMBER THE KNITTING TENSION!
AT THE SAME TIME on every round marked with arrow in A.1 and A.2 increase stitches evenly as explained below - remember INCREASE TIP:

Arrow-1: Increase 32-32-32-32-40-40 stitches evenly = 160-168-176-184-200-216 stitches (there is now room for 20-21-22-23-25-27 repetitions A.1 of 8 stitches).
Arrow-2: Increase 32-40-40-40-40-48 stitches evenly = 192-208-216-224-240-264 stitches (there is now room for 24-26-27-28-30-33 repetitions A.1 of 8 stitches).
Arrow-3: Increase 32-32-40-48-48-40 stitches evenly = 224-240-256-272-288-304 stitches (there is now room for 14-15-16-17-18-19 repetitions A.1 of 16 stitches).
Arrow-4: Increase 32-32-32-32-40-48 stitches evenly = 256-272-288-304-328-352 stitches (there is now room for 32-34-36-38-41-44 repetitions A.2 of 8 stitches).
Arrow-5: Increase 32-32-32-24-32-32 stitches evenly = 288-304-320-328-360-384 stitches (there is now room for 36-38-40-41-45-48 repetitions A.2 of 8 stitches). Increases in size XS, S and M are now done.
Arrow-6: Increase 24-24-32 stitches evenly (only applies to sizes L, XL and XXL) = 288-304-320-352-384-416 stitches (there is now room for 22-24-26 repetitions A.1 of 16 stitches in the 3 largest sizes).
The increases in size L, XL and XXL are done.
Then work until last round in A.2 remains in your size. Piece measures approx. 19-21-23-25-27-29 cm from marker mid front.
Now divide yoke for body and sleeves, i.e. work last round as follows: Work 40-44-46-50-56-64 stitches in stocking stitch as last round in A.2 shows (= ½ back piece), slip the next 64-64-68-76-80-80 stitches on 1 stitch holder for sleeve, cast on 8-8-12-12-16-16 new stitches on needle (= in the side under sleeve), work 80-88-92-100-112-128 stitches in stocking stitch as last round in A.2 shows (= front piece), slip the next 64-64-68-76-80-80 stitches on 1 stitch holder for sleeve, cast on 8-8-12-12-16-16 new stitches on needle (= in the side under sleeve) and work the remaining 40-44-46-50-56-64 stitches in stocking stitch as last round in A.2 shows (= ½ back piece).
Finish body and sleeves separately. NOW MEASURE PIECE FROM HERE!

BODY:
= 176-192-208-224-256-288 stitches. Begin round in one side of body, in the middle of the 8-8-12-12-16-16 stitches cast on under sleeve, and work as follows:

XS, S, L and XL:
Work A.3 in the round to finish pattern border from yoke (= 22-24-14-16 repetitions of 8-8-16-16 stitches). When A.3 has been worked vertically, work A.4 in the round (= 11-12-14-16 repetitions of 16 stitches). Then work as explained below ALL SIZES.

M and XXL:
Work A.4 in the round (= 13-18 repetitions of 16 stitches). Then work as explained below ALL SIZES.

ALL SIZES:
Continue A.4 in the round. Repeat A.4 vertically as far as you can before rib begins at the bottom of body. AT THE SAME TIME on round marked with arrow in A.4 , increase 16 stitches evenly in all sizes = 192-208-224-240-272-304 stitches (this increase is only done first time A.4 is worked vertically, and there is now room for 12-13-14-15-17-19 repetitions of 16 stitches).
Work until piece measures approx. 31 cm from division in all sizes – finish pattern nicely after a whole pattern border.
Approx. 4 cm remain until finished measurements, try the jumper on and work until desired length.
Knit 1 round with cedar while increasing 56-64-68-72-80-92 stitches evenly = 248-272-292-312-352-396 stitches. NOTE! Increase stitches to avoid the rib from contracting when working the piece together.
Switch to circular needle size 3 mm. Work rib in the round = knit 2/purl 2 for 4 cm.
Cast off with knit over knit and purl over purl - read CAST-OFF TIP.
Jumper measures approx. 58-60-62-64-66-68 cm from shoulder and down.

SLEEVE:
Slip the 64-64-68-76-80-80 stitches from stitch holder in one side of piece on double pointed needles or a short circular needle size 4 mm and pick in addition up 1 stitch in each of the 8-8-12-12-16-16 new stitches cast on under sleeve = 72-72-80-88-96-96 stitches.
Insert 1 marker in the middle of the 8-8-12-12-16-16 stitches cast on under sleeve, i.e. insert marker in first stitch after the middle, count 35-35-39-43-47-47 stitches, insert 1 marker in next stitch (= middle stitch). 35-35-39-43-47-47 stitches remain on round after last marker. Move markers upwards when working. Marker mid under sleeve is used later when decreasing stitches under sleeve and marker mid on top of sleeve should be used to count where to begin pattern.
Work last round in A.2 to finish A.2 the same way as on body - make sure that pattern fits over stitches from yoke. Read the rest of sleeve before continuing!

XS, S, L and XL:
Work A.3 in the round to finish repetition from yoke vertically but adjust to continue pattern nicely over stitches from yoke.
When A.3 has been worked, work A.4 in the round the same way - count outwards from the middle so that middle stitch in A.4 fit with stitch with marker mid on top of sleeve. Repeat A.4 vertically. Then work as explained below ALL SIZES.

M and XXL:
When last round in A.2 has been worked, work A.4 in the round - count outwards from the middle so that middle stitch in A.4 fit with stitch with marker mid on top of sleeve. Repeat A.4 vertically. Then work as explained below ALL SIZES.

ALL SIZES:
AT THE SAME TIME when sleeve measures 3 cm from division in all sizes, decrease 2 stitches mid under sleeve - read DECREASE TIP. Decrease like this every 2½-3-2-1½-1½-1½ cm 14-12-16-18-20-20 times in total = 44-48-48-52-56-56 stitches.
Work until sleeve measures approx. 41-40-38-36-35-33 cm from division – finish pattern nicely after a whole pattern border. Approx. 4 cm remains until finished measurements. Try the jumper and work to desired length. NOTE! Shorter measurements in the larger sizes because of wider neck and longer yoke.
Knit 1 round with cedar while increasing 4 stitches evenly in all sizes = 48-52-52-56-60-60 stitches.
Switch to double pointed needles size 3 mm. Work rib in the round = knit 2/purl 2 for 4 cm. Cast off with knit over knit and purl over purl - remember CAST-OFF TIP. Sleeve measures approx. 45-44-42-40-39-37 cm from division. Work the other sleeve the same way.

ASSEMBLY:
Fold rib at the top of neck double in towards wrong side of garment. Fasten rib but to avoid a tight neck edge and avoiding the edge to tip outwards, it is important to make the seam elastic.

Diagram

symbols = cedar
symbols = off white
symbols = increase row
symbols = middle stitch on sleeve
diagram
diagram
diagram
diagram

Each of our patterns has specific tutorial videos to help you.

Do you have a question? See a list of frequently asked questions (FAQ)

Knitting tension is what determines the final measurements of your work, and is usually measured per 10 x 10 cm. It is provided like so: number of stitches in width x number of rows in height - eg: 19 stitches x 26 rows = 10 x 10 cm.

The knitting tension is very individual; some people knit/crochet loosely while others work tightly. You adjust the knitting tension with the needle size, which is why the suggested needle size is only meant as a guide! You need to adjust this (up or down) to ensure that YOUR knitting tension matches the knitting tension provided in the pattern. If you work with a different knitting tension than provided you will have a different yarn consumption, and your work will have different measurements than what the pattern suggests.

The knitting tension also determines which yarns can replace each other. As long as you achieve the same knitting tension you can replace one yarn with another.

See DROPS lesson: How to measure your tension/gauge

See DROPS video: How to make a gauge tension swatch

The required amount of yarn is provided in grams, eg: 450 g. To calculate how many balls you’ll need you first need to know how many grams are in 1 ball (25g, 50g or 100g). This information is available if you click on the individual yarn quality on our pages. Divide the amount required with the amount of each ball. For example, if each ball is 50g (the most common amount), the calculation will be as follows: 450 / 50 = 9 balls.

The important thing when changing from one yarn to another is that the knitting/crochet tension remains the same. This is so that the measurements of the finished piece will be the same as on the sketch provided. It is easier to achieve the same knitting tension using yarns from the same yarn group. It is also possible to work with multiple strands of a thinner yarn to achieve the knitting tension of a thicker one. Please try our yarn converter. We recommend you to always work a test swatch.

Please NOTE: when changing yarn the garment might have a different look and feel to the garment in the photo, due to individual properties and qualities of each yarn.

See DROPS lesson: Can I use a different yarn than the one mentioned in the pattern?

All our yarns are categorised into yarn groups (from A to F) according to thickness and knitting tension – group A contains the thinnest yarns and group F the thickest. This makes it easier for you to find alternative yarns to our patterns, should you wish to switch yarn. All yarns within the same group have a similar knitting tension and can easily replace each other. However, different yarn qualities have different structures and properties which will give the finished work a unique look and feel.

Click here for an overview of the yarns in each yarn group

At the top of all our patterns you’ll find a link to our yarn calculator, which is a helpful tool should you wish to use a different yarn than suggested. By filling in the yarn quality you wish to replace, the amount (in your size) and number of strands, the calculator will present good alternative yarns with the same knitting tension. Additionally it will tell you how much you’ll require in the new qualities and whether you’ll need to work with multiple strands. Most skeins are 50g (some are 25g or 100g).

If the pattern is worked with multiple colours, every colour will have to be calculated separately. Similarly, if the pattern is worked with several strands of different yarns (for example 1 strand Alpaca and 1 strand Kid-Silk) you will have to find alternatives for each, individually.

Click here to see our yarn calculator

Since different yarns have different qualities and textures we have chosen to keep the original yarn in our patterns. However, you can easily find options among our available qualities by using our yarn calculator, or simply pick a yarn from the same yarn group.

It is possible that some retailers still have discontinued yarns in stock, or that someone has a few skeins at home that they would like to find patterns for.

The yarn calculator will provide both alternative yarn as well as required amount in the new quality.

If you think it's hard to decide what size to make, it can be a good idea to measure a garment you own already and like the size of. Then you can pick the size by comparing those measures with the ones available in the pattern's size chart.

You'll find the size chart at the bottom of the pattern.

See DROPS lesson: How to read size chart

The needle size provided in the pattern serves only as a guide, the important thing is to follow the knitting tension. And since knitting tension is very individual, you will have to adjust the needle size to ensure that YOUR tension is the same as in the pattern – maybe you’ll have to adjust 1, or even 2 needle sizes, up or down to achieve the correct tension. For this, we recommend that you work test swatches.

Should you work with a different knitting tension than the one provided, the measurements of the finished garment might deviate from the measurement sketch.

See DROPS lesson: How to measure your tension/gauge

See DROPS video: How to make a tension/gauge swatch

Working a garment top-down provides more flexibility and room for personal adjustment. For example it is easier to try the garment on while working, as well as making adjustments to length of yoke and shoulder caps.

The instructions are carefully explaining every step, in the correct order. Diagrams are adjusted to the knitting direction and are worked as usual.

The diagram depicts all rows/rounds, and every stitch seen from the right side. It is read from bottom to top, from right to left. 1 square = 1 stitch.

When working back and forth, every other row is worked from the right side and every other row is worked from the wrong side. When working from the wrong side, the diagram will have to be worked reversed: from left to right, knit stitches are purled, purl stitches are knit etc.

When working in the round every round is worked from the right side and the diagram are worked from right to left on all rounds.

See DROPS lesson: How to read knitting diagrams

The diagram depicts all rows/rounds, and every stitch seen from the right side. It is worked from bottom to top, from right to left.

When working back and forth every other row is worked from the right side: from right to left and every other row is worked from the wrong side: from left to right.

When working in the round, every row in the diagram are worked from the right side, from right to left.

When working a circular diagram you start in the middle and work your way outwards, counter clockwise, row by row.

The rows usually start with a given number of chain stitches (equivalent to the height of the following stitch), this will either be depicted in the diagram or explained in the pattern.

See DROPS lesson: How to read crochet diagrams

Instructions for working several diagrams after each other on the same row/round, will often be written like so: “work A.1, A.2, A.3 a total of 0-0-2-3-4 times". This means you work A.1 once, then A.2 is worked once, and A.3 is repeated (in width) the number of times provided for your size – in this case like so: S = 0 times, M = 0 times, L=2 times, XL= 3 times and XXL = 4 times.

The diagrams are worked as usual: begin with the first row in A.1, then work the first row in A.2 etc.

See DROPS lesson: How to read knitting diagrams

See DROPS lesson: How to read crochet diagrams

The total width of the garment (from wrist-to-wrist) will be larger in the larger sizes, despite the actual sleeves being shorter. The larger sizes have longer sleeve caps and wider shoulders, so there will be a good fit in all sizes.

The measurement sketch/schematic drawing provides information regarding the full length of the garment. If it’s a jumper or a jacket the length is measured from the highest point on the shoulder closest to the neckline, and straight down to the bottom of the garment. It is NOT measured from the tip of shoulder. Similarly, the length of yoke is measured from the highest point on the shoulder and down to where yoke is split into body and sleeves.

On a jacket measures are never taken along bands, unless specifically stated. Always measure inside band stitches when measuring the length.

See DROPS lesson: How to read a schematic drawing

Diagrams are often repeated on the round or in height. 1 repeat is the diagram the way it appears in the pattern. If it says to work 5 repeats of A.1 in the round, then you work A.1 a total of 5 times after/next to each other in the round. If it says to work 2 repeats of A.1 vertically/in height you work the entire diagram once, then begin again at the start and work the entire diagram one more time.

Chain stitches are slightly narrower than other stitches and to avoid working the cast-on edge too tight, we simply chain more stitches to begin with. The stitch count will be adjusted on the following row to fit the pattern and measurement sketch.

The rib edge is more elastic and will contract slightly compared to, for example, stocking stitch. By increasing before the rib edge, you avoid a visible difference in width between the rib edge and the rest of the body.

It’s very easy to cast off too tightly, and by making yarn overs while casting off (and simultaneously casting these off) you avoid a too tight cast off edge.

See DROPS video: How to bind off with yarn overs (yo)

To achieve an even increase (or decrease) you can increase on, for example: every 3rd and 4th row alternately, like so: work 2 rows and increase on the 3rd row, work 3 rows and increase on the 4th. Repeat this until the increase is complete.

See DROPS lesson: Increase or decrease 1 st on every 3rd and 4th row alternately

Should you prefer to work in the round instead of back and forth, you may of course adjust the pattern. You’ll need to add steeks mid-front (usually 5 stitches), and follow the instructions. When you would normally turn and work from the wrong side, simply work across the steek and continue in the round. At the end you’ll cut the piece open, pick up stitches to work bands, and cover the cut edges.

See DROPS video: How to knit steeks and cut open

Should you prefer to work back and forth instead of in the round, you may of course adjust the pattern so you work the pieces separately and then assemble them at the end. Divide the stitches for the body in 2, add 1 edge stitch in each side (for sewing) and work the front and back pieces separately.

See DROPS lesson: Can I adapt a pattern for circular needles into straight needles?

Pattern repeats can vary slightly in the different sizes, in order to get the correct proportions. If you’re not working the exact same size as the garment in the photo, yours might deviate slightly. This has been carefully developed and adjusted so that the complete impression of the garment is the same in all sizes.

Make sure to follow instructions and diagrams for your size!

If you have found a pattern you like which is available in women’s size it’s not very difficult to convert it to men’s size. The biggest difference will be the length of sleeves and body. Start working on the women size that you think would fit across the chest. The additional length will be worked right before you cast off for the armhole/sleeve cap. If the pattern is worked top-down you can add the length right after the armhole or before the first decrease on sleeve.

Regarding additional yarn amount, this will depend on how much length you add, but it is better with a skein too many than too few.

All yarns will have excess fibres (from production) that might come off as lint or shedding. Brushed yarns (ie hairier yarns) have more of these loose, excess fibres, causing more shedding.

Shedding also depends on what is worn under or over the garment, and whether this pulls at the yarn fibres. It’s therefore not possible to guarantee that there will be no shedding

Below are some tips on how to get the best result when working with hairier yarns:

1. When the garment is finished (before you wash it) shake it vigorously so the looser hairs come off. NOTE: do NOT use a lint roller, brush or any method that pulls at the yarn.

2. Place the garment in a plastic bag and put it in your freezer - the temperature will cause the fibres to become less attached to each other, and excess fibres will come off easier.

3. Leave in the freezer for a few hours before taking it out and shaking it again.

4. Wash the garment according to the instructions on the yarn label.

Pilling is a natural process that happens to even the most exclusive of fibers. It's a natural sign of wear and tear that is hard to avoid, and that is most visible in high friction areas of your garment like a sweater's arms and cuffs.

You can make your garment look as new by removing the pilling, using a fabric comb or a pill/lint remover.

Still can't find the answer you need? Then scroll down and leave your question so one of our experts can try to help you. This will be done normally within 5 to 10 working days.
In the meantime, you can read the questions and answers that others have left to this pattern or join the DROPS Workshop on Facebook to get help from fellow knitters/crocheters!

You might also like...

Love Links

Silvie

Love Links

Silvie Dědková, Czech Republic

Post a comment to pattern DROPS 217-17

We would love to hear what you have to say about this pattern!

If you want to leave a question, please make sure you select the correct category in the form below, to speed up the answering process. Required fields are marked *.

Comments / Questions (16)

country flag Meryem Bilan wrote:

1.Welche Länge muss das Seil von der Rundnadel bei den Ärmeln von Modell "love Links" haben? 2.Von wo ab wird der Ärmel begonnen? 3.Was bedeutet der Pfeil bei "A4"und wie beginnt man das Muster bei den Ärmeln zu stricken?

25.01.2021 - 04:37

DROPS Design answered:

Liebe Frau Bilan, die Ärmel können Sie zuerst mit Rundnadel 40 cm dann Nadelset stricken - "Ärmel"-Teil in der Anleitung beginnt, nach der Verteilung der Passe. Bei dem Pfeil in A.4 wird es unter Rumpfteil siehe ALLE GRÖSSEN gleichmäßig verteilt zugenommen. Viel Spaß beim stricken!

25.01.2021 - 11:48

country flag Colinda wrote:

Bij de stekenverhouding staat “21 steken in de breedte en 28 naalden in de hoogte in tricotsteek en Scandinavisch patroon = 10 x 10 cm”. Nu heb ik in een boek over noors/fair isle breien gelezen dat de steken in zo’n patroon niet langwerpig zijn maar vierkant. Dat klopt bij mij ook. Maar dan is er toch een verschil in de stekenverhouding van de tricotsteek en het Scandinavisch patroon? Waar moet ik dan op af gaan?

28.11.2020 - 12:05

DROPS Design answered:

Dag Colinda,

Je kan de stekenverhouding aanhouden zoal in het patroon, dus 21 steken in de breedte = 10 cm en 28 naalden in de hoogte is 10 cm. Als je deze stekenverhouding hebt, dan kom je goed uit met de maten en kun je het patroon gewoon volgen.

30.11.2020 - 20:14

country flag Ives DLR wrote:

Bestaat er een manier van breien of techniek die ervoor zorgt dat het "verspringen" van het patroon midden op de rug aan het begin van elke toer minder opvalt?

02.11.2020 - 22:06

DROPS Design answered:

Dag Ives DLR,

Er is wel een trucje voor wat vaak bij strepen rondbreien gebruikt wordt en dat is dat je bij de overgang de lus van de vorige toer op de linker naald zet en die samen breit met de volgende steek. Ik denk dat je dit even per toer moet bekijken of je dit wilt doen en wat voor effect het heeft. In deze video wordt dat uitgelegd.

03.11.2020 - 13:15

country flag Bernie wrote:

Where is diagrams A1 and A4?

30.09.2020 - 22:25

DROPS Design answered:

Dear Bernie, diagram A.1 and A.4 are at the bottom of the page. Happy knitting!

30.09.2020 - 22:59

country flag Lisali66 wrote:

Sehr schön, aber wo ist a1?

27.09.2020 - 17:32

country flag Mimi M Routh wrote:

So much fun to knit! I would use more blending colors.

04.06.2020 - 18:56