
Categorie popolari
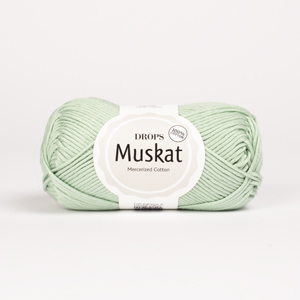
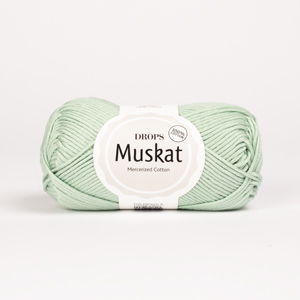
State cercando un filato?


Lasciare un commento sul modello DROPS 211-1
Noi saremmo felici di ricevere i tuoi commenti e opinioni su questo modello!
Se vuoi fare una domanda, fai per favore attenzione a selezionare la categoria corretta nella casella qui sotto per velocizzare il processo di risposta. I campi richiesti sono indicati da *.
|
||||||||||
Enchanted Evening |
||||||||||
 |
 |
|||||||||
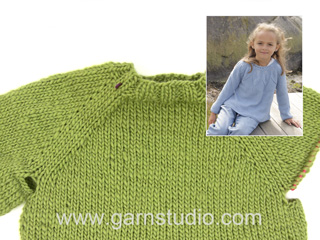
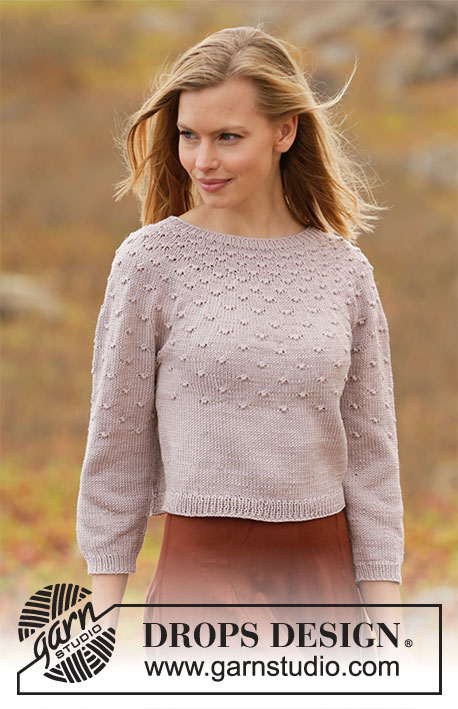
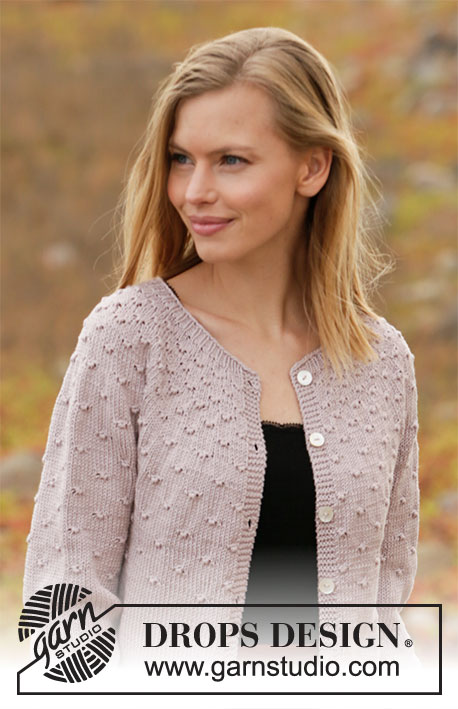
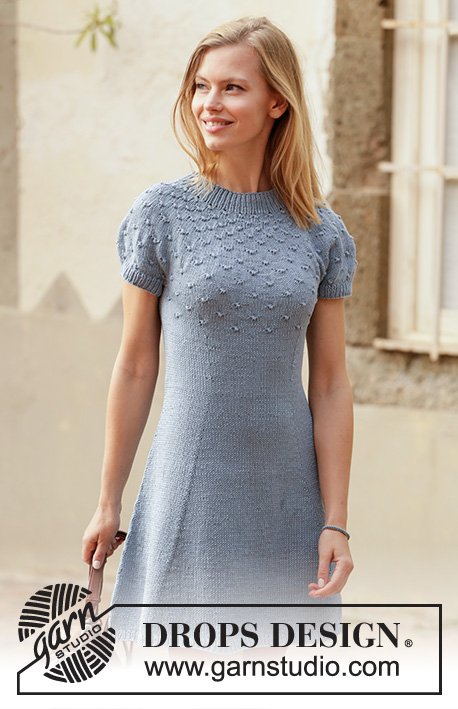
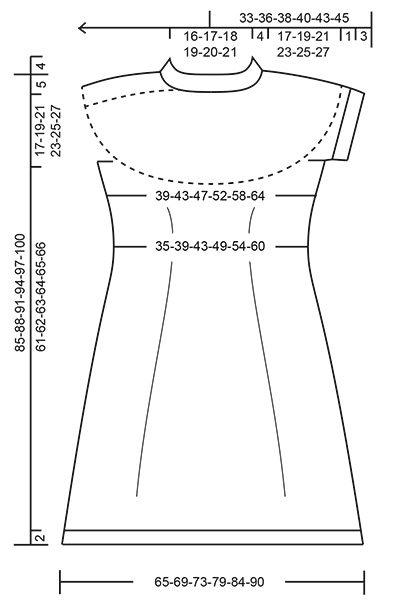
Vestito lavorato ai ferri in DROPS Muskat. Lavorato dall’alto in basso con sprone rotondo, motivo a nodi e maniche corte. Taglie: S - XXXL
DROPS 211-1 |
||||||||||
|
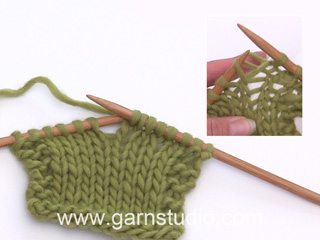
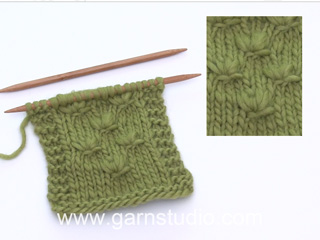
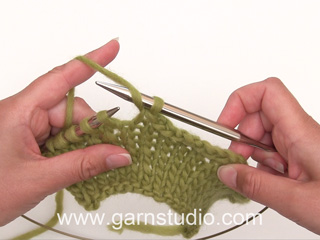
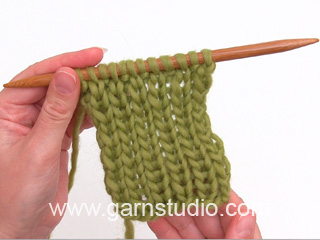
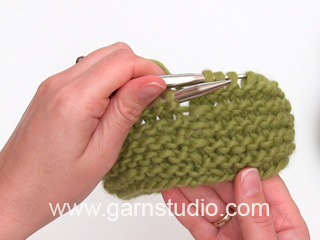
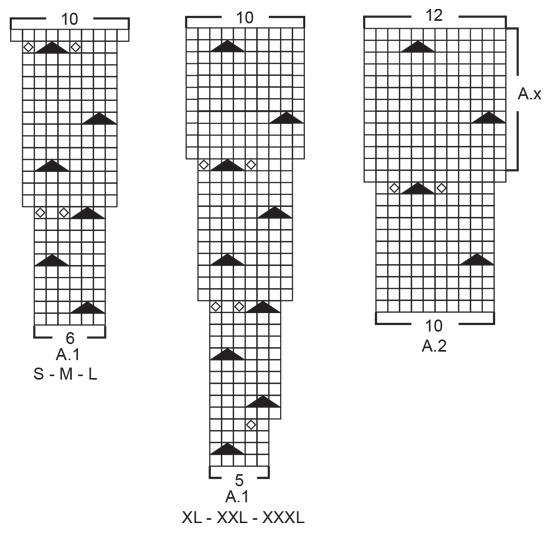
---------------------------------------------------------- TECNICHE IMPIEGATE: ---------------------------------------------------------- MOTIVO: Vedere i diagrammi A.1 e A.2. Scegliere il diagramma per la vostra taglia (applicato ad A.1). SUGGERIMENTO PER GLI AUMENTI/DIMINUZIONI (distribuiti in modo uniforme): Per stabilire ogni quanto aumentare/diminuire in modo uniforme, prendere il n° totale di maglie sul ferro (ad esempio 120 maglie) e dividerlo per il n° di aumenti/diminuzioni da fare (ad esempio 18) = 6,7. In questo esempio, aumentare facendo 1 gettato in modo alternato circa dopo ogni 6° e 7° maglia. Sul giro successivo lavorare i gettati a diritto ritorto per evitare buchi. Durante lavorare a diritto in modo alternato circa ogni 5° e 6° maglia e ogni 6° e 7° maglia. SUGGERIMENTO PER GLI AUMENTI-1 (applicato alla vita): Aumentare 1 maglia dopo il 1° e 3° segnapunti e prima del 2° e 4° segnapunti come spiegato sotto AUMENTARE COME SEGUE DOPO IL SEGNAPUNTI: Lavorare 1 maglia nell’occhiello attorno alla 1° maglia sul ferro sinistro (cioè nella maglia del giro precedente). AUMENTARE COME SEGUE PRIMA DEL SEGNAPUNTI: Lavorare fino al segnapunti, poi lavorare 1 maglia diritto attorno alla maglia più esterna sul ferro destro (cioè nella maglia del giro precedente). SUGGERIMENTO PER GLI AUMENTI-2 (applicato ai lati): Aumentare nello stesso modo prima e dopo il segnapunti come spiegato nel SUGGERIMENTO PER GLI AUMENTI-1, ma aumentare in modo alternato prima e dopo il segnapunti, cioè aumentare solo 1 volta a ogni lato ogni 1½ cm e questo succede in modo alternato prima e dopo i segnapunti (non a ogni lato). SUGGERIMENTO PER LE DIMINUZIONI-1 (applicato alla vita): Le prime diminuzioni saranno insieme alla lavorazione del motivo. Aggiustarlo per diminuire su un giro senza nodi, e notare che ci saranno meno maglie a maglia rasata tra i 2 nodi dopo una diminuzione. Diminuire 1 maglia dopo il 1° e 3° segnapunti e prima del 2° e 4° segnapunti come spiegato sotto. DIMINUIRE COME SEGUE DOPO IL SEGNAPUNTI: Passare 1 maglia a diritto senza lavorarla, 1 maglia diritto, accavallare la maglia passata sopra quella appena lavorata. DIMINUIRE COME SEGUE PRIMA DEL SEGNAPUNTI: Lavorare fino a quando rimangono 2 maglie prima del segnapunti, lavorare insieme a diritto le 2 maglie successive. SUGGERIMENTO PER LA CHIUSURA: Per evitare che il bordo di chiusura sia tirato potete intrecciare con un ferro di una misura più grande. Se il bordo risulta ancora tirato, fare 1 gettato dopo circa 8 maglie durante la chiusura (intrecciare i gettati come maglie normali). ---------------------------------------------------------- INIZIO DEL LAVORO: ---------------------------------------------------------- VESTITO – BREVE RIASSUNTO DEL LAVORO: Lavorare lo sprone e il bordo del collo in tondo con i ferri circolari, dall’alto in basso. Ora dividere lo sprone per il corpo e i bordi delle maniche. Lavorare i bordi delle maniche in tondo con i ferri a doppia punta/ferri circolari corti, dall’alto in basso. BORDO DEL COLLO: Avviare 120-124-130-134-138-140 maglie con i ferri circolari n° 3 mm con Muskat. Lavorare 1 giro diritto. Poi lavorare a coste in tondo (= 1 maglia diritto/1 maglia rovescio) per 4 cm. Lavorare 1 giro diritto in cui aumentare 18-26-32-16-22-35 maglie in modo uniforme – leggere il SUGGERIMENTO PER GLI AUMENTI/DIMINUZIONI = 138-150-162-150-160-175 maglie. Lavorare 1 giro diritto in cui lavorare i gettati a diritto ritorto. Inserire 1 segnapunti al centro del giro (= centro davanti). Misurare lo sprone da questo segnapunti! Poi lavorare lo sprone come descritto sotto. SPRONE: Passare ai ferri circolari n° 4 mm e lavorare A.1 in tondo (= 23-25-27-30-32-35 ripetizioni di 6-6-6-5-5-5 maglie). Continuare il motivo in questo modo, e aumentare come mostrato in A.1. FARE ATTENZIONE ALLA TENSIONE DEL LAVORO! Alla fine di A.1, ci sono 230-250-270-300-320-350 maglie sul ferro. Poi lavorare A.2 in tondo (= 23-25-27-30-32-35 ripetizioni di 10 maglie). Continuare il motivo in questo modo, e aumentare come mostrato in A.2. Alla fine dell’ultimo aumento di A.1, ci sono 276-300-324-360-384-420 maglie sul ferro. Lavorare fino a quando il lavoro misura 17-19-21-23-25-27 cm dal segnapunti all’altezza del collo – NOTA: lavorare A.2 fino a quando è possibile, fino alla misura corretta e per alcune taglie A.x dev’essere ripetuto in verticale fino alla misura cirretta (il motivo deve continuare sul corpo). Ora dividere lo sprone per il corpo e le maniche, cioè lavorare il giro successivo come segue dal centro dietro: lavorare 38-42-45-51-56-62 maglie come prima (= ½ dietro), trasferire le 62-66-72-78-80-86 maglie successive in sospeso per il bordo della manica, avviare 6-6-8-8-10-10 nuove maglie sul ferro (= a lato sotto la manica), lavorare 76-84-90-102-112-124 maglie come prima (= davanti), trasferire le 62-66-72-78-80-86 maglie successive in sospeso per il bordo della manica, avviare 6-6-8-8-10-10 nuove maglie sul ferro (= a lato sotto la manica) e lavorare le 38-42-45-51-56-62 maglie rimaste come prima (= ½ dietro). Tagliare il filo. Finire il corpo e il bordo delle maniche in modo separato. ORA MISURARE IL LAVORO DA QUI! CORPO: = 164-180-196-220-244-268 maglie. Inserire 1 segnapunti a ogni lato del corpo, al centro delle 6-6-8-8-10-10 maglie avviate sotto ogni manica. Inoltre inserire 4 segnapunti nel lavoro come segue: Contare 21-24-27-32-37-42 maglie dal segnapunti a un lato del lavoro, inserire il 1° segnapunti, contare 40-42-44-46-48-50 maglie, inserire il 2° segnapunti prima della maglia successiva, contare 42-48-54-64-74-84 maglie (il segnapunti laterale è al centro di queste maglie), inserire il 3° segnapunti prima della maglia successiva, contare 40-42-44-46-48-50 maglie, inserire il 4° segnapunti prima della maglia successiva Rimangono 21-24-27-32-37-42 maglie sul giro dopo l’ultimo segnapunti. Spostare i segnapunti durante il lavoro; verranno usati per gli aumenti e le diminuzioni in seguito. Ora continuare A.x e ALLO STESSO TEMPO diminuire ai lati del corpo come spiegato sotto: Iniziare il giro all’altezza del segnapunti a un lato del lavoro e lavorare A.x in tondo, ma fare in modo di continuare sul ferro corretto del diagramma secondo il punto di divisione, e fare in modo di posizionare i nodi in maniera corretta sui nodi dello sprone. Lavorare le 6-6-8-8-10-10 maglie avviate sotto ogni manica a maglia rasata. Quando il lavoro misura 6 cm dalla divisione per tutte le taglie, finire A.x, ma finire dopo 1 giro con nodi. Continuare a lavorare a maglia rasata in tondo su tutte le maglie. ALLO STESSO TEMPO quando il lavoro misura circa 3 cm dalla divisione per tutte le taglie, diminuire 1 maglia dopo il 1° e 3° segnapunti e prima del 2° e 4° segnapunti – leggere il SUGGERIMENTO PER LE DIMINUZIONI (= 4 diminuzioni). Diminuire in questo modo ogni 2½ cm 4 volte in totale in verticale = 148-164-180-204-228-252 maglie. Quando il lavoro misura 16 cm dalla divisione per tutte le taglie, aumentare 1 maglia dopo il 1° e 3° segnapunti e prima del 2° e 4° segnapunti – leggere il SUGGERIMENTO PER GLI AUMENTI-1. Inoltre aumentare 1 maglia all’altezza del segnapunti a ogni lato – leggere il SUGGERIMENTO PER GLI AUMENTI-2 (= 6 aumenti in totale sul giro). Aumentare in questo modo ogni 2 cm 21 volte in verticale per tutte le taglie = 274-290-306-330-354-378 maglie. Lavorare senza aumenti fino a quando il lavoro misura circa 61-62-63-64-65-66 cm dalla divisione (mancano circa 2 cm alla fine del lavoro, provare il vestito e lavorare fino alla lunghezza desiderata). Lavorare 1 giro diritto in cui aumentare 20-22-24-26-26-28 maglie in modo uniforme = 294-312-330-356-380-406 maglie (per evitare che le coste contraggano il bordo). Passare ai ferri circolari n° 3 mm. Lavorare a coste in tondo = 1 maglia diritto/1 maglia rovescio per 2 cm. Intrecciare con diritto su diritto e rovescio su rovescio – leggere il SUGGERIMENTO PER LA CHIUSURA. Il vestito misura circa 85-88-91-94-97-100 cm dalla spalla in giù. BORDO DELLE MANICHE: Riportare le 62-66-72-78-80-86 maglie dal fermamaglie a un lato del lavoro con i ferri a doppia punta n° 4 mm e inoltre riprendere 1 maglia in ognuna delle 6-6-8-8-10-10 nuove maglie avviate sotto la manica = 68-72-80-86-90-96 maglie. Iniziare il giro al centro delle 6-6-8-8-10-10 maglie che sono state avviate sotto la manica e lavorare 3 giri a maglia rasata. ALLO STESSO TEMPO sull’ultimo giro diminuire 4-4-4-4-2-2 maglie in modo uniforme – ricordarsi del SUGGERIMENTO PER GLI AUMENTI/DIMINUZIONE = 64-68-76-82-88-94 maglie. Passare ai ferri a doppia punta n° 3 mm. Lavorare a coste in tondo = 1 maglia diritto/1 maglia rovescio per 3 cm. Intrecciare con diritto su diritto e rovescio su rovescio – ricordarsi del SUGGERIMENTO PER LA CHIUSURA! Il bordo della manica misura circa 4 cm dalla divisione. Lavorare l’altro bordo della manica nello stesso modo. |
||||||||||
Spiegazioni del diagramma |
||||||||||
|
||||||||||
|
||||||||||
|
||||||||||
|
Avete realizzato questo o un altro dei nostri modelli? Taggate le vostre foto nei social media con #dropsdesign in modo che possiamo vederle! Avete bisogno di aiuto con questo modello?Troverete video tutorial, una sezione per i commenti/domande e molto altro guardando il modello su www.garnstudio.com © 1982-2024 DROPS Design A/S. Ci riserviamo tutti i diritti. Questo documento, compreso tutte le sue sotto-sezioni, è protetto dalle leggi sul copyright. Potete leggere quello che potete fare con i nostri modelli alla fine di ogni modello sul nostro sito. |
||||||||||


Con oltre 40 anni di esperienza nel design di modelli di maglia e uncinetto, DROPS Design offre la più estesa collezione di modelli gratuiti su internet - tradotti in 17 lingue. Ad oggi vi possiamo fornire 304 cataloghi e 11422 modelli - 8666 dei quali sono tradotti in Italiano.
Ci stiamo impegnando molto per darvi il meglio che vi possiamo offrire in termini di maglia e uncinetto, ispirazioni e consigli così come filati di grande qualità ad un prezzo incredibile! Volete utilizzare i nostri modelli per qualcosa d'altro oltre al vostro uso personale? Potete leggere tutto ciò che è consentito nel testo sul Copyright in basso su tutte le pagine dei nostri modelli. Buon lavoro!
Commenti / Domande (63)
Hej, Jag har stickat Enchanted evening men har problem med att mudden längst ner på kjolen viker upp sig. Det är inte att den rullar sig utan hela mudden viker upp sig (den viker sig i brytningen mellan slätstickning och mudd) Vad kan jag göra för att få den att inte vika upp sig?
17.12.2022 - 16:34DROPS Design answered:
Hei Helena. Prøv å dampe kanten lett eller fukte den og sett den fast med nåler og la den tørke flatt. mvh DROPS Design
19.12.2022 - 08:21"lisää 1. ja 3.merkkilangan jälkeen 1 silmukka ja lisää ennen 2. ja 4.merkkilankaa 1 silmukka Lisää myös kummankin sivun merkin molemmin puolin 1 silmukka (= työhön lisättiin yhteensä 6 silmukkaa)" Eikö silmukoita tule lisää 8 eikä 6?
07.12.2022 - 15:16DROPS Design answered:
Hei, ohjeessa oli virhe. Merkkien kohdalla lisätään vain 1 silmukka, eli työhön lisätään yhteensä 6 silmukkaa. Ohjeeseen on tehty korjaus.
16.01.2023 - 18:11Hello! How large is the waist of different sizes? I can't find the measurements in the pattern.
23.04.2022 - 14:36DROPS Design answered:
Dear Eva, the waist measurements are in the chart below the pattern instructions, in cm. They are: 35-39-43-49-54-60. Happy knitting!
23.04.2022 - 16:34Drops enchanted evening . Hi I am now at section where I have put the sleeve stitches on waste yarn . Why would I cut the thread after knitting the last 45 stitches of back ? Wouldn’t I knit to the middle of the 8 stitches under the arm and that would be the new beginning of the round ? Also is it necessary to use thread marker or can I use regular stitch markers for the 4 markers where thread would be ? In addition to the 2 side markers in contrasting color so I would know difference?
24.11.2021 - 20:23DROPS Design answered:
Dear Debbie, you cut the thread at the end of yoke so that you can start again with pattern from on of both sides; you can use markers if you like to, most important is to place anything to mark these places to increase on the right places - and good idea to use different colours for both kind of markers. Happy knitting!
25.11.2021 - 08:51Drops enchanted evening . Yes ! That helps . Yay , I finally figured it out . Next question is on the first increase round . How many stitches should I have on needles after this round? Knot over 3, make 1, k, m1. \\r\\nShould that be an increase of 54 stitches ? 27x2? Thank you so much for your help .
17.11.2021 - 13:24DROPS Design answered:
Dear Debbie, yes correct :) On the 10th round in A.1 you will increase 2 sts = there will be 8 sts in every A.1 x 27 repeats = 216 sts (162 sts + 54 sts increased). And in the next to last row inA.1 you increase 2 more sts = 10 sts x 27 = 270 sts (again 54 sts increased + 216). Happy knitting!
17.11.2021 - 16:44Drops enchanted evening . So perhaps I am following chart incorrect . From what you say now: for first round would it be all knit ? Since it’s 6 knits ? Next round would be knot over 3 , k3- repeat to end of round ? Next round 3 rounds are knit , next round is repeat of k3, knot over 3 etc? By the top of the chart that would be 25 rounds and then would I start at bottom again and do 2 more rounds to make 27? Otherwise I don’t know what 27 reps mean ? Sorry to be such a bother .
16.11.2021 - 18:10DROPS Design answered:
Dear Debbie, that's exactly how to read the diagram A.1 and how to work it. When it says to repeat A.1 a total of 27 times, it means to work: row 1: K6 x 27 (= 6*27= 162 sts); Round 2: (Knot, K3) x 27 = still 162 sts and 27 knots etc... After these 25 rows are done, work now A.2 (there were 10 sts at the end of each A.1, work now A.2 lined up over each A.1: the knots in A.2 will be lined up over the knots in A.1. And you will still repeat A.2 a total of 27 times in the round. Can this help somewhat more?
17.11.2021 - 07:35Drops enchanted evening . Yes that does help. I believe I’m following chart correct . My original question was : following the 5th repetition of the chart and starting the 6th repetition , should the row match up exactly? K6, knot over 3, k3 etc... ? I found it odd to be back at same starting point of the chart over top of the 5th repetition. Also , I feel my knots look more Spread out than in the picture . I am just going to follow the chart without knots the 27 reps til 270 stitches-size L
16.11.2021 - 14:17DROPS Design answered:
Dear Debbie, I'm still not sure to understand what you mean here with "repetition", diagram will be worked the same way all the round, ie repeat row 1 to the end of the round, then repeat row 2 to the end of the round (= 1 knot x 27 repeats in L) etc.. If you mean 5th knot in height (= 18th row in diagram) then work (from right to left: *1 knot, K5* and repeat from *-* all the round). Can this help?
16.11.2021 - 16:26Drops enchanted evening . Sorry , perhaps I’m not following chart properly . I am following from bottom right to left . Next row again from left to right . Ex . Start with K 6 , Make knot over next 3,stitches , knit 24, make knot over next 3, k24, knot over next 3 stitches , make 1, k1, M1, K8 etc following up. By repetition I meant the 5th and 6th reps in repeating the chart 27 times . Following the chart , the beginning of the round continues to change. Am I following incorrectly?
16.11.2021 - 04:50DROPS Design answered:
Dear Debbie, since diagram is worked in the round, you will always read it from the right towards the left, ie the knot on 2nd row will be worked over the first 3 sts, then knit 3. Can this help?
16.11.2021 - 09:13Drops enchanted evening . Sorry I still am confused by the knots . I am being very careful to count and place knots in correct spaces. But does it make sense. That on the 6th repetition and starting the row That below it is exact same stitches ? Sorry if I’m not explaining clearly. I may just follow the chart without making knots at all . I’ve unripped too many times now .
12.11.2021 - 21:46DROPS Design answered:
Dear Debbie, I'm sorry, I'm not sure what you call here "repetition", do you mean the 6th knot in height? Then you have 8 sts in every repetition of A.1 and work: K3, increase 1 stitch (last symbol), 1 knot over the next 3 sts, increase 1 st (= 8 sts worked and increased to 10 sts). Can this help?
15.11.2021 - 07:15Drops enchanted evening . Just to clarify , do you mean yes the 4th and 5th row of the chart repeat each other (lined up over precious repeat ) or have I miscounted somewhere ? It’s pretty hard to do those make one stitches over the previous row if it is correct that these rows align. Thank you
12.11.2021 - 14:06DROPS Design answered:
Dear Debbie, knots should be lined up just as shown in diagram, ie the 4th in height (= 14th row in A.1 smaller sizes) over the 2nd ( = 6th row in same diagram), the 3rd (= 10th row in same diagram) over the 1st (2nd row same diagram), just follow the stitches as shown in diagram to locate the knots over the correct sts. Hope this will help. Happy knitting!
12.11.2021 - 14:19