
Popular categories
Looking for a yarn?


Clue #2 - The yoke
Now that we have knitted the double neck for our sweater, the next step is to work on the yoke and the motifs.
INCREASE TIP (evenly spaced):
Increase 1 stitch by making 1 yarn. On the next round work the yarn overs twisted to avoid holes. Work the new stitches in stocking stitch.
YOKE:
Change to needle size 4 mm. Insert 1 marker-thread at the beginning of the round and allow it to follow your work onwards.

Knit 1 round and increase 24-26-28-30-32-32-34 stitches evenly spaced – read INCREASE TIP above = 104-110-114-118-122-126-130 stitches. Insert 1 marker in the middle of the round (mid-front). The yoke is measured from this marker.

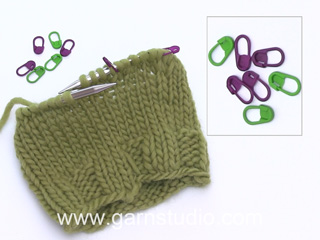
Work an ELEVATION at the back - read the description below. If you do not want an elevation skip to the next step. We are using purple stitch makers to highlight where we have turned the project.
ELEVATION:
To make the jumper a bit higher on the back of the neck, when working a round yoke, knit an elevation as follows:
Start from the right side and knit 9-10-11-12-13-14-15 stitches past the marker-thread at the beginning of the round (mid-back), turn, tighten the strand and purl 18-20-22-24-26-28-30 stitches back.
Turn, tighten the strand and knit 27-30-33-36-39-42-45 stitches, turn, tighten the strand and purl 36-40-44-48-52-56-60 stitches back.
Turn, tighten the strand and knit 45-50-55-60-65-70-75 stitches, turn, tighten the strand and purl 54-60-66-72-78-84-90 stitches back.
Turn, tighten the strand and knit to the marker-thread mid-back.
Continue knitting the yoke as explained in the pattern.

If you don’t want to have an elevation or have already knitted it, continue working as explained here.
Work stocking stitch in the round. REMEMBER THE KNITTING TENSION.
When there are 2 rounds left before the yoke measures 3-3-4-4-5-5-6 cm from the marker, increase 24-26-30-34-38-42-46 stitches evenly on the next round = 128-136-144-152-160-168-176 stitches. After the 2 rounds, work pattern and increase as follows – read KNITTING TIP and PATTERN in explanations below. Change to longer circular needles when you have enough stitches.

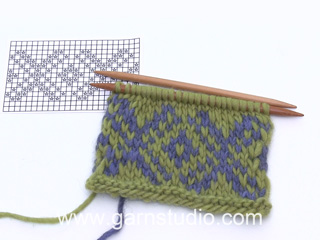
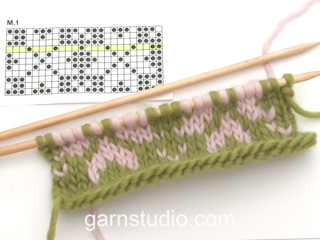
PATTERN:
See diagram A.1. Choose the diagram for your size. The whole pattern is worked in stocking stitch.
KNITTING TIP:
To avoid the knitting tension losing its elasticity when working the pattern, it is important that the strands at the back are not tight. Use a size larger needle when working the pattern if the piece becomes tight.
A.1:
Choose the diagram for the size you are knitting. The round begins at the marker-thread.
Work A.1 16-17-18-19-20-21-22 times on the round.
AT THE SAME TIME on each round marked with an arrow increase as follows:
ARROW-1: Increase 32-32-32-40-40-40-48 stitches evenly spaced = 160-168-176-192-200-208-224 stitches.
ARROW-2: Increase 32-32-32-32-40-40-40 stitches evenly spaced = 192-200-208-224-240-248-264 stitches.
ARROW-3: Increase 16-16-16-16-16-16-16 stitches evenly spaced = 208-216-224-240-256-264-280 stitches.
ARROW-4: Increase 0-4-8-4-0-4-0 stitches evenly spaced = 208-220-232-244-256-268-280 stitches.
When A.1 is finished, continue with stocking stitch and colour 85, light beige.

 |
= | DROPS Karisma colour 85, light beige |
 |
= | DROPS Karisma colour 55, light beige brown |
 |
= | DROPS Karisma colour 48, wine red |
 |
= | DROPS Karisma colour 87, moss green |
 |
= | DROPS Karisma colour 45, light olive |
 |
= | increase round |

Work until the yoke measures 13-14-15-16-17-18-19 cm from the marker.

Now the yoke is divided into body and sleeves as follows: Knit 31-33-35-37-39-41-43 (half back piece), place the next 42-44-46-48-50-52-54 stitches on 1 thread for the sleeve, cast on 8 stitches (in side under sleeve, insert 1 marker in the middle of the 8 stitches), knit 62-66-70-74-78-82-86 (front piece), place the next 42-44-46-48-50-52-54 stitches on 1 thread for the sleeve, cast on 8 stitches (in side under sleeve), knit the last 31-33-35-37-39-41-43 stitches (half back piece). The body and sleeves are finished separately. The piece is now measured from here!
Cut the thread and start the round at the marker, or knit to the marker with colour 85, light beige (the round starts here).

And that’s all for the yoke!
Now our jumper’s yoke is complete and the second clue in this KAL has been solved. Are you ready to continue? Then click below on Next > to get to the next step of the jumper.
Remember to send pictures of your progress to our gallery. Click here to submit a link!
Need some help?
Below you'll find a list of resources to help you with the yoke of your Christmas jumper.
Still have doubts? You can leave questions using the form at the bottom of the page and one of our knitting experts will then try to help you!


With over 40 years in knitting and crochet design, DROPS Design offers one of the most extensive collections of free patterns on the internet - translated to 17 languages. As of today we count 304 catalogues and 11422 patterns - 11422 of which are translated into English (UK/cm).
We work hard to bring you the best knitting and crochet have to offer, inspiration and advice as well as great quality yarns at incredible prices! Would you like to use our patterns for other than personal use? You can read what you are allowed to do in the Copyright text at the bottom of all our patterns. Happy crafting!
Tere. Peale 1noole kasvatust on suurus 7/8 varrastel 192 silma. 2 noole juures tuleb kasvatada 40 silma=232 s. Juhendis kirjas 224. Sarnane viga ka suurusel 13/14. Siit alates viga neil suurustel kuni kehaosa ja varrukate jagamiseni.
24.10.2023 - 09:27