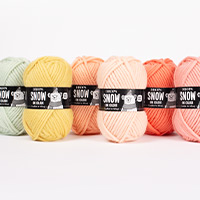
Hvernig á að lesa prjón mynsturteikningu

Mynsturteikning samanstendur af rúðum, 1 rúða = 1 lykkja – útskýring á mynsturtáknum segir til um hvernig á að prjóna lykkjurnar. Mynsturteikning sýnir allar lykkjur séð frá réttu (ef annað er ekki tekið fram).

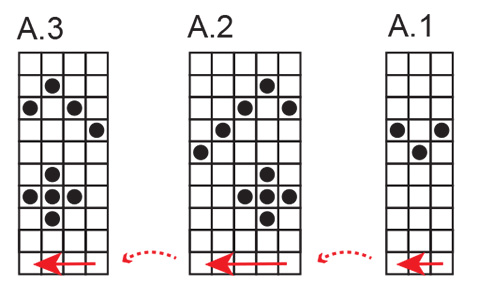
Mynsturteikning lítur út þannig:

  1. A.1 er nafnið á mynsturteikningunni og vísar í alla mynsturteikninguna.
  2. A.2 er einungis hluti af mynsturteikningu sem er innan í sviga.
  3. Þessi fjöldi sýnir hversu margar lykkjur eru innan fyrstu umferðar sem mynsturteikning nær yfir.
  4. Þetta eru mynsturtáknin: Þau sýna hvernig hver lykkja er prjónuð, eða í hvaða lit er prjónað.

Mynsturteikning er lesin gagnstætt við það sem við lesum vanalega: Frá hægri til vinstri, neðan frá og upp. Þú byrjar sem sagt neðst í hægra horninu og vinnur þig til vinstri og upp (sjá RAUÐAN hring og örvar að neðan). Ef byrjað er á einhverri annarri lykkju þá er það tekið sérstaklega fram – hægt er t.d. að byrja á mismunandi stöðum eftir mismunandi stærðum (sjá BLÁAN ferning að neðan).

Ef prjóna á fleiri einingar af mynsturteikningu (þ.e.a.s. ef endurtaka á mynstrið á breiddina), þá prjónar þú til enda á umferð og byrjar uppá nýtt aftur frá fyrsta tákni.

Fram og til baka:

Þegar þú prjónar fram og til baka, þá kemur önnur hver umferð til með að prjónast frá réttu og önnur hver umferð frá röngu. Þar sem mynsturteikning sýnir allar lykkjur séð frá réttu, þá verður þú því að prjóna gagnstætt þegar þú prjónar frá röngu (sjá bláa ör í mynsturteikningu að neðan): Þú lest umferðina frá vinstri til hægri, sléttar lykkjur eru prjónaðar brugðnar, brugðnar lykkjur eru prjónaðar slétt (þetta stendur oftast í útskýringu á mynsturtáknum: «slétt frá réttu, brugðið frá röngu»).

Í hring:

Þegar þú prjónar í hring, eru allar umferðir prjónaðar frá réttu og mynsturteikning er því lesin frá hægri til vinstri. Þegar þú byrjar á nýrri umferð þá ferðu einfaldlega beint í táknið alveg til hægri í næstu röð í mynsturteikningu (sjá rauð ör í mynsturteikningu að neðan).

Margar mismunandi mynsturteikningar á eftir hverri annarri.:

Ef þú átt að prjóna mismunandi mynsturteikningar á eftir hverri annarri á breiddina/í umferð þá prjónar þú þannig: Prjónið 1 umferð í 1. mynsturteikningu, prjónið síðan 1 umferð í 2. mynsturteikningu og 1 umferð í 3. mynsturteikningu o.s.frv. MUNIÐ EFTIR: Ef prjónað er fram og til baka þá verður að prjóna mynsturteikninguna í gagnstæðri röð frá röngu – þ.e.a.s. byrjið með mynsturteikningu 3, síðan mynsturteikningu 2 og að lokum mynsturteikningu 1. Prjónað er áfram frá gagnstæðri hlið eins og venjulega.

Í mynstrinu getur verðið skrifað þannig: «Prjónið A.1, A.2, A.3 alls 1-1-2-3-4 sinnum». Hér er fyrst prjónað A.1, síðan er A.2 prjónað, á meðan A.3 er endurtekið 1-1-2-3-4 sinnum á breiddina (veldu mynsturteikningu fyrir þína stærð). Þ.e.a.s. að EINUNGIS A.3 er endurtekið. A.1 og A.2 er bara prjónað 1 sinni hvort.

Þegar lykkjufjöldinn gengur ekki upp í allri einingunni í mynsturteikningu:

Stundum þá gengur lykkjufjöldinn ekki upp í allri einingunni á mynsturteikningu á breiddina t.d: A.1 nær yfir 12 lykkjur, þetta á að endurtaka yfir 40 lykkjur. Hér prjónar þú þá 3 heilar mynstureiningar af A.1 (= 36 lykkjur) og síðan prjónar þú 4 fyrstu lykkjurnar á fjórðu einingunni (sjá rauða línu að neðan). Oftast á þetta við um mynsturteikningu með endurteknu mynstri, þannig að hluti af mynstrinu vantar ekki í stykkið.

Athugasemdir (610)

Jan Arneberg wrote:

I am knitting the Sky Feather sweater. My question refers to the charts On A 1 after row 4 the two or three stitches on each edge are not shown in the graph. Where are they?

03.12.2023 - 18:51:

DROPS Design answered:

Dear Jan, the stitches on the edges are repeated every 4 rows. That is, when working row 5 of the central stitches, you work row 1 of the edge stitches. Happy knitting!

03.12.2023 - 23:44:

Noreen wrote:

Hallo, Mijn fair isle telpatroon is niet deelbaar, waardoor ik 3 steken overhoud. Het is me niet helemaal duidelijk wat u bedoelt met 'eerste 4 steken in het telpatroon over de overgebleven steken '. Brei ik die steken dan samen? Heeft u misschien een uitleg op video? Bedankt en groetjes, Noreen

03.12.2023 - 09:05:

DROPS Design answered:

Dag Noreen,

Je begint gewoon met een nieuwe herhaling van het patroon, maar je stopt als je 4 steken van het patroon hebt gebreid. Als het ware knip je dus eens stukje van het patroon af.

07.01.2024 - 14:41:

Vercoutere wrote:

Pas compris les diagrammes pour pull sailor drops blue jacket. Merci pour votre réponse

02.12.2023 - 20:27:

DROPS Design answered:

Bonjour Mme Vercoutere, dans ce modèle, les diagrammes sont pour les augmentations de l'empiècement, autrement dit, sur l'endroit, tricotez le 1er rang des diagrammes comme indiqué pour la taille, vous allez augmenter 2 mailles dans chacun de ces diagrammes, pour A.1, vous répétez 13-14-15-16-18-19 fois ces diagrammes en largeur, vous allez donc augmenter 2 mailles dans chacun de ces 13-14-15-16-18-19 motifs, soit 26-28-30-32-36-38 mailles en plus après le 1er rang de A.1. Bon tricot!

09.01.2024 - 08:38:

Nicola wrote:

Ich brauche Hilfe mit dem Diagram, bin erst bei A1 und komme schon nicht weiter "Spill the beans" ist das Muster. Ich durfte hier keinen link einfuegen. Es gibt keine gute Anleitung wie man die Symbole verstehen soll. Vielen Dank fuer die Hilfe.

29.11.2023 - 18:38:

Regine Dhaene wrote:

Ik brei de kindertrui North Star. Ik heb een probleem met het patroon, op de plaats waar ik een nieuwe ronde begin volgt het patroon niet en heb ik de steek die verspringt. Heel storend! Nergens vind ik uitleg hoe ik dit kan oplossen ;( Een video Fair Isle breien in het rond staat niet op de site en ook nergens uitleg ook niet bij de andere scandinavische breipatronen. Graag hulp aub, ik denk dat nog klanten met dit probleem zitten? Mvg,

29.11.2023 - 08:31:

Lynette wrote:

Thank you so much for both replies how to knit Drops 219-8. I finally understand how to work all the charts and what it means to work over the first set.. I’m finally making progress. Thank you again for taking the time to answer my questions.

27.11.2023 - 23:48:

Drops 43-5 wrote:

Hi, I'm knitting Sweet Gleam. In the charts above I don't see how to handle the increases. Do you repeat them or is this just to get the number of stitches for the pattern? Thank you, Tina

27.11.2023 - 16:49:

DROPS Design answered:

Dear Tina, the increases are included in diagrams, as you repeat diagrams in the round, you will repeat the increases in the round, for ex when you work (A.1, A.2) all the round you will increase 1 st in each A.1 and 1 stitch in each A.2 all the round. Happy knitting!

28.11.2023 - 09:13:

Brigitte Asp wrote:

Hej! Jag stickar precis pulsvärmare 173-21.\r\nA11 visar 6 rader, men efter rad 4 fattas beskrivningen vad man skall göra med dom ytterste 5 maskor på båda sidorna. Hur skall jag göra?\r\nTack för hjälpen\r\nBrigitte

26.11.2023 - 20:31:

Lynette wrote:

Hello, I’m knitting Drops 219-8. I don’t quite understand “work A2b and A3b over A2a and A3a”? (adjust to make the cable on the same round as A1)?

25.11.2023 - 21:09:

DROPS Design answered:

Dear Lynette, it means that you work the stitches of A.2b over the stitches worked according to chart A.2a and A.3b over the stitches in A.3a. Since all of the charts' rounds are the same, except for the one with the cable, you need to work the round with the cable in the same round as you work the cable in A.1; the rest of the rounds of A.2b and A.3b are worked as repeats of p2, k6, p2. Happy knitting!

26.11.2023 - 17:37:

Barbara wrote:

I'm knitting Sweet Erika. When there is a 0 on the line of the pattern within the box it means to do a YO, that I understand. But, in the box, which ever pattern box we are using at the time, do we knit a stitch, yo then knit the next stitch making three stitches out of two or do we make the last stockinette stitch and use that as a springboard for the yo from the there, making 1 pattern stitch into two? Thank you for your help. Barbara :)

25.11.2023 - 17:26:

DROPS Design answered:

Dear Barbara, when there is a 0 between 2 boxes/stitches, you k1 (first box), make 1 yarn over and k1 (second box). In the next round, there should be 1 more stitch for every yarn over (0) worked, unless you also worked decreases in the same round (which removes 1 stitch from the next round). Happy knitting!

26.11.2023 - 17:47:

Elisabeth wrote:

I am knitting Drops Gleam Jumper. I do not understand the A1 A2 charts. Does it mean every other stitch in row 1 and then every stitch in rows 2-5? I'm not good with pictures so I'm sorry if this is a daft question but I really don't get it. And is A1 and A2 five rows?

24.11.2023 - 23:17:

DROPS Design answered:

Dear Elisabeth, in A.1 in row 1 work k1, yarn over, k1 and then work in stocking stitch the next 4 rows (purl from the wrong side and knit from the right side). In A.2, the first row is worked as in A.1 but the next 4 rows are worked in reverse stocking stitch (knit from the wrong side and purl from the right side). There are a total of five rows in both charts. When you are working the piece, since you are alternating between A.1 and A.2, you should have something similar to a rib; on the 2nd row, for example, you have *purl 3 (A.1) and knit 3 (A.2)* and repeat this rib. Continue until you have worked all 5 rows of charts A.1 and A.2. Happy knitting!

26.11.2023 - 17:59:

Barbara Dietricg wrote:

I have the back on Bluebird Drops Design 134.1 done and am knitting the front. I don’t understand when I get toward the top, and the graph is split. How do I read this? DoI do M.3 and M.3C with 2 dierrerent balls of yarn, skipping the no graph areas?

19.11.2023 - 01:09:

DROPS Design answered:

Dear Mrs Dietricg, that's because you are decreasing on some rows, then on next row you have fewer stitches, to be able to draw the diagram, there are empty spaces (for decreased stitches), so just continue working in line, skipping the spaces that are just matching the stitches you previously decreased. Happy knitting!

20.11.2023 - 11:45:

Viviane Azou wrote:

Hoe lees je een telpatroon bij eentrui die van boven naar beneden wordt gebreid? De oneven cijfers staan rechts en de even staan links

17.11.2023 - 20:35:

Ramona wrote:

Hallo, ich verstehe das Diagramm zu Pullover DROPS Children 32-10 nicht. Wenn ich Größe 80/86 stricken möchte, nehme ich Diagramm A1 mit 6 Maschen. Also A1 6. Ist das korrekt? Aber was bedeuten die Zahlen 12/18-2 darunter? Danke für eine Erklärung. Ramona

17.11.2023 - 12:21:

Katelyn Foster wrote:

I am making Winter Berry Cardigan. I don’t understand why the pattern keeps saying A1 in the first row of the yoke. Am I following a1 or am I following the number of stitches in the pattern?

16.11.2023 - 14:49:

DROPS Design answered:

Dear Mrs Foster, follow the description of the pattern, A.1 will be worked a total of 4 times in the row for each raglan. So just follow the description of the row from RS at the beg of yoke, working stocking stitch (see the number of sts for your size), A.1 at each raglan (a total of 4 times) and 1 stitch in garter stitch on each side. Happy knitting!

17.11.2023 - 08:57:

Raja Paulussen wrote:

Model 244-10. Forest echo cardigan. Bij welke maat brei ik A 1, A2 of A3? Om voor maat S aan 238 steken te komen na A1? Daarna moet ik na patroon A4, A5 of A 6 269 steken hebben maar alleen in A5 en A6 wordt nog een steek per patroon gemeerderd en bij A4 niets meer. Ik heb bij patroon 244-9 gekeken en daar volgt na A1 A2. Maar bij het vest moet A1 A2 A3 A4 A5en A6 achter elkaar gebreid worden. Dat klopt niet, welk patroondelen horen voor welke maat bij elkaar? Dank voor Uw hulp.

14.11.2023 - 22:21:

DROPS Design answered:

Dag Raja,

A.1, A.2 en A.3 brei je in alle maten. In de breedte op de naald brei je eerst A.1, dan herhaal je steeds A.2 in de breedte en tot slot brei je A.3. Dan keer je het werk en brei je terug, waarbij je ook de steken terug leest. Dus op de teruggaande naald brei je eerst A.3, dan herhaal je steeds A.2 en tot slot A.3. Zo brei je steeds heen en weer totdat je deze patronen in de hoogte hebt gebreid. Als het goed is kom je dan (samen met de biessteken) op het juiste aantal steken.

26.11.2023 - 07:47:

Tana wrote:

Können Sie bitte die Diagramme A1 und A3 in der Anleitung 231-16 erklären ? Bis zu Runde 12 ist alles klar, danach sind die Felder entweder nach links oder nach rechts versetzt, damit komme ich nicht zurecht. Vielen Dank

13.11.2023 - 17:15:

DROPS Design answered:

Liebe Tana, setzen Sie Markierungen genau nach jedem Diagram, es wird sich einfach so gestrickt daß die letzte Masche von A.1 z.B. wird zusammen mit den 2 ersten Maschen von A.2/A.3 gestrickt. Deshalb sieht das Diagram etwas anders aus, but stricken Sie einfach weiter genauso wie beschrieben. Viel Spaß beim stricken!

14.11.2023 - 11:09:

Aillaud wrote:

Dans le modèle sheep happens, que veut dire la phrase : (le tour commence au milieu du dos)A.1 (=6-6-6-5-5-5mailles ) au-dessus des 12-12-12-10-10-10,premières mailles(=2 fois au total) ,A.2 (=12 mailles) A.1 au dessus des 42..... mailles suivantes(=7 -.....fois au total). Merci

05.11.2023 - 17:15:

DROPS Design answered:

Bonjour Mme Aillaud, le diagramme A.1 comporte 6 mailles, ainsi on va le tricoter 2 fois = au-dessus des 12 premières mailles, ou bien 7 fois = au-dessus des 42 mailles suivantes. Bon tricot!

06.11.2023 - 09:31:

Annie Vesterbæk wrote:

Skal man stadig læse diagrammet fra nederst højre hjørne hvis man strikker den anden vej rundt? (Venstrehåndet!) Mvh Annie

31.10.2023 - 17:46:

Raymonde wrote:

Pour nmodele 20-15 au diagramme la flèche vers haut veut. Il dire début manche droite et pointillé c est pour plier et l autre pointillé le devant qui sera plié dans le sens du pointillé Le côté rectangulaire le dos est-ce bien cela merci de votre attention pour moi

31.10.2023 - 14:54:

DROPS Design answered:

Bonjour Raymonde, la flèche indique le sens du tricot, la ligne pointillé au milieu de la manche indique le milieu de la manche / l'épaule (là où le gilet sera plié en double pour les coutures), la ligne pointillé en diagonale à droite, sur le devant, correspond au marqueur du devant, celui où vous augmentez de chaque côté. Bon tricot!

31.10.2023 - 16:42:

Skrifa athugasemd eða spurningu við þetta kennslumyndband

Netfangið þitt verður ekki birt. Það verður að merkja við svæði merktri með *.