
Vinsælir flokkar
Ertu að leita að garni?


|
||||||||||||||||||||||||||||||||||||||||||||||
Fall Festival |
||||||||||||||||||||||||||||||||||||||||||||||
 |
 |
|||||||||||||||||||||||||||||||||||||||||||||
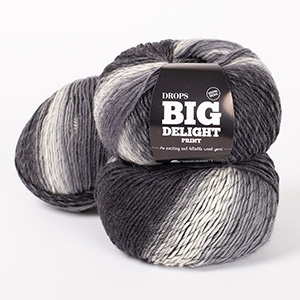
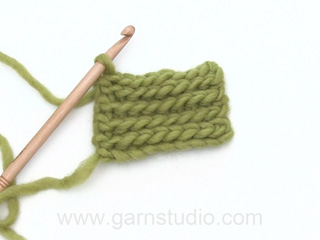
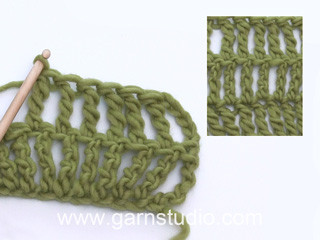
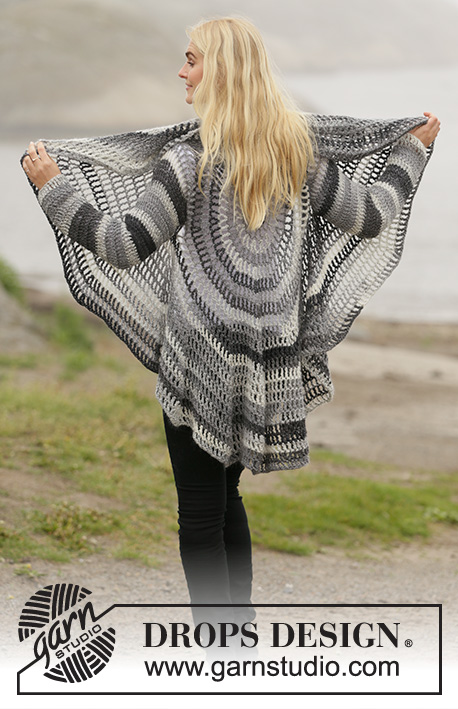
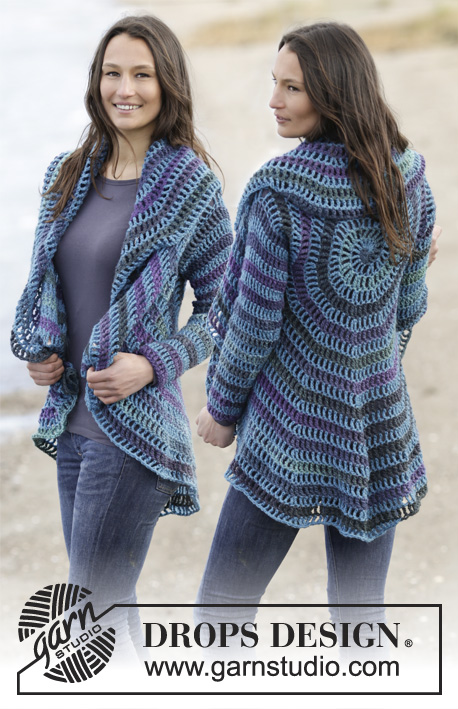
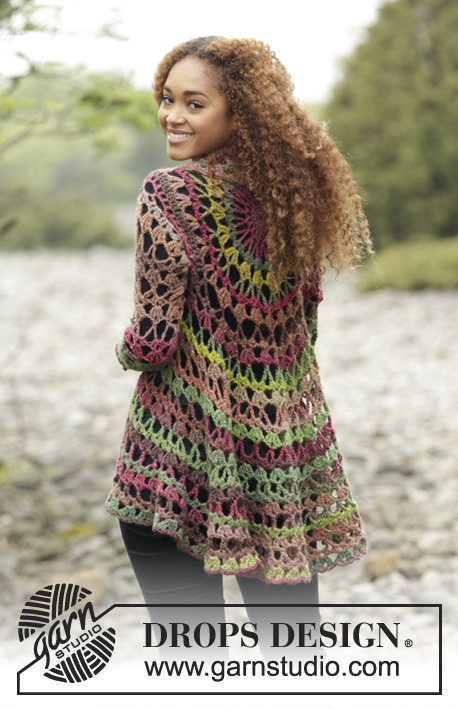
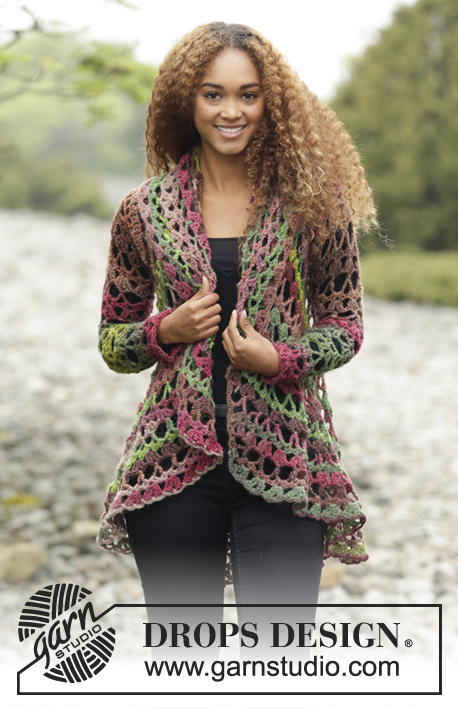
Hekluð hringpeysa úr 1 þræði DROPS Big Delight eða 1 þræði DROPS Fabel og 1 þræði DROPS Flora (2 þræðir). Stærð S - XXXL.
DROPS 171-21 |
||||||||||||||||||||||||||||||||||||||||||||||
|
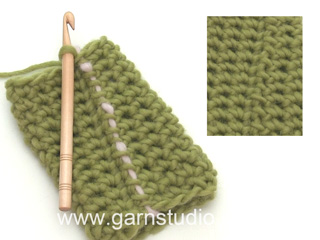
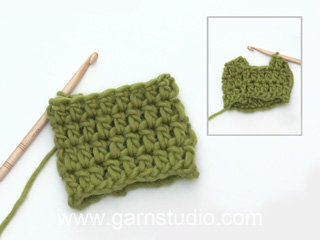
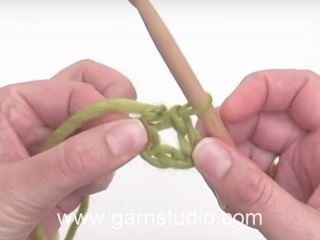
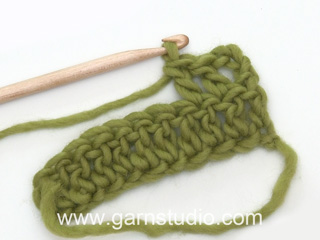
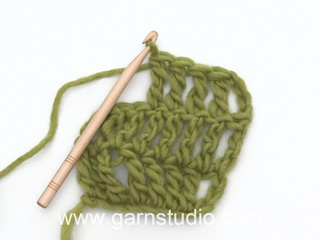
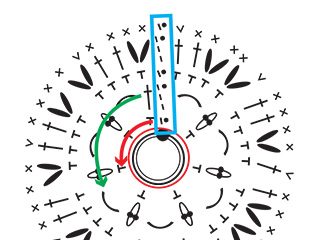
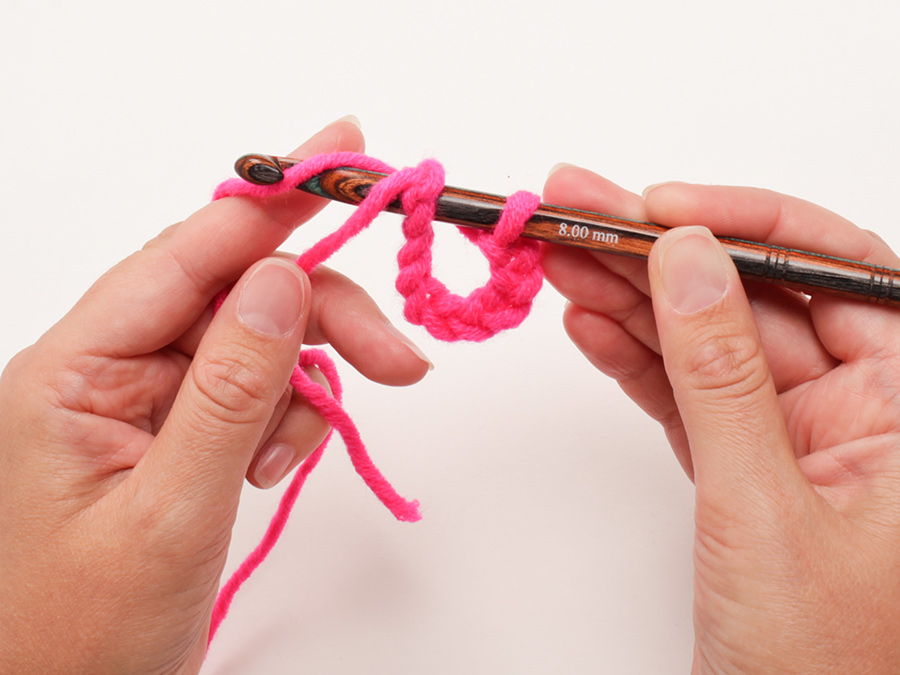
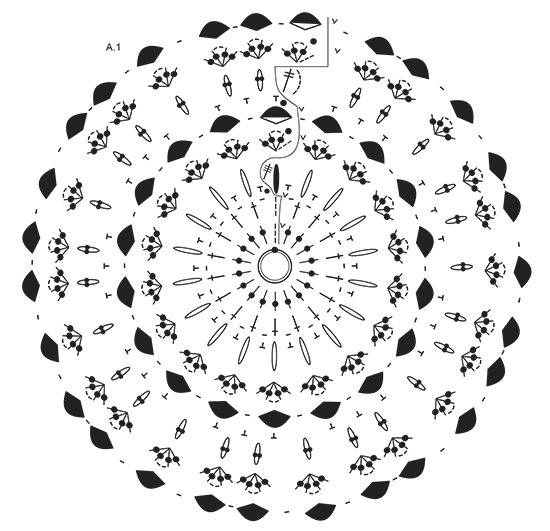
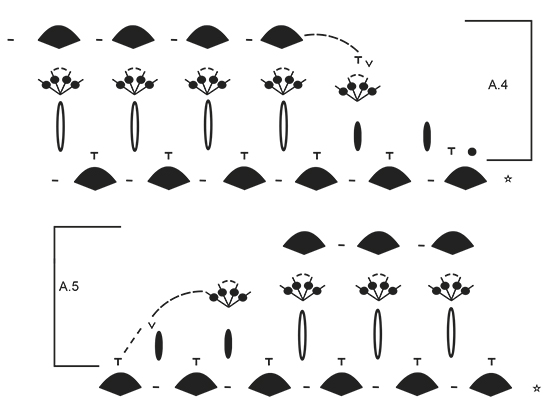
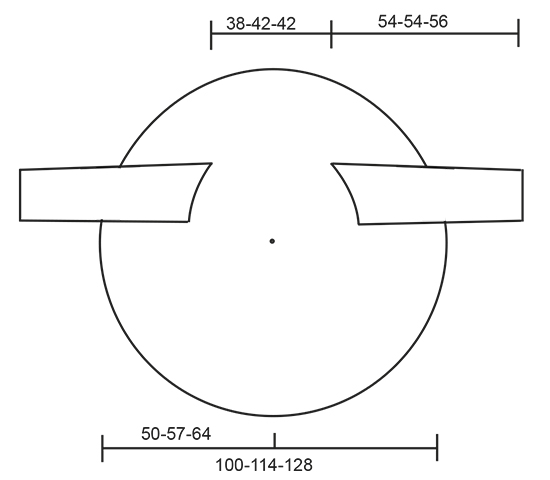
------------------------------------------------------- UPPLÝSINGAR FYRIR MYNSTUR: ------------------------------------------------------- MYNSTUR: Sjá mynsturteikningu A.1 til A.5. HEKLLEIÐBEININGAR: Fyrstu fl í byrjun umf er skipt út fyrir 1 ll, umf endar með 1 kl í 1. ll í byrjun umf. Fyrsta st í byrjun umf er skipt út fyrir 3 ll, umf endar með 1 kl í 3. ll í byrjun umf. Fyrsta tbst í byrjun umf er skipt út fyrir 4 ll, umf endar með 1 kl í 4. ll í byrrjun umf. ------------------------------------------------------- BYRJIÐ Á STYKKI HÉR: ------------------------------------------------------- HRINGPEYSA - STUTT ÚTSKÝRING Á STYKKI: Stykkið er heklað í hring. HRINGPEYSA: Heklið 4 ll með heklunál nr 5,5 með 1 þræði Big Delight eða 1 þræði Fabel og 1 þræði Flora (2 þræðir) og tengið saman í hring með 1 kl. Haldið síðan áfram eftir A.1. LESIÐ HEKLLEIÐBEININGAR! ATHUGIÐ HEKLFESTUNA! Þegar A.1 hefur verið heklað til loka mælist hringurinn ca 33 cm að þvermáli og það eru 27 tbst-hópar í umf. STÆRÐ L/XL-XXL/XXXL: Heklið eftir A.2, í fyrstu umf í A.2 er aukið út um 9 ll-boga jafnt yfir (aukið er alveg eins út eins og í 6. umf í A.1, aukið út um 1 ll-boga þannig: Heklið 1 fl um ll-bogann mitt í tbst-hópinn, 9 ll, 1 fl um ll á milli tbst-hópa, 9 ll, 1 fl um ll-boga mitt í næsta tbst-hóp) = 36-36 ll-bogar. Heklið A.2 til loka 1 sinni á hæðina. ALLAR STÆRÐIR: = 27-36-36 tbst-hópar. Næsta umf er hekluð eins og 1. umf í A.3, JAFNFRAMT er handvegurinn heklaður þannig: 1 fl um ll-boga mitt í tbst hópinn, heklið 30-33-36 lausar ll, hoppið yfir 5-6-7 tbst-hópa, 1 fl um ll-boga mitt í næsta tbst-hóp (nú er annar handvegurinn heklaður), * 12 ll, 1 fl um ll-boga mitt í næsta tbst-hóp *, endurtakið frá *-* alls 8-14-12 sinnum, heklið 30-33-36 lausar ll, hoppið yfir 5-6-7 tbst-hópa, 1 fl um ll-boga mitt í næsta tbst-hóp (nú er hinn handvegurinn heklaður), * 12 ll, 1 fl um ll-boga mitt í næsta tbst-hóp *, endurtakið frá *-* umf hringinn og endið með 1 kl í fyrstu fl í byrjun umf (í stað 1 fl um næsta ll-boga). Næsta umf er hekluð eins og 2. umf í A.3 þannig: Heklið alveg eins og áður með 2 st + 2 ll + 2 st um hvern ll-boga, um hvern ll-boga fyrir handveg eru heklaðir 6-7-8 st-hópar, JAFNFRAMT er aukið út um 7 st-hópa jafnt yfir í umf, aukið út um 1 st-hóp með því að hekla 2 st + 2 ll + 2 st + 2 st + 2 ll, 2 st um 1 ll-boga = 36-45-45 st-hópar. UMFERÐ 3: Heklið 2 tbst + 2 ll + 2 tbst um ll-boga mitt í hvern st-hóp og 1 ll á milli hverra tbst-hópa = 36-45-45 tbst-hópar með 1 ll á milli hverra. Haldið áfram að hekla eftir A.3, JAFNFRAMT er aukið út um 9 ll-boga jafnt yfir í hvert skipti sem 1. umf er hekluð þannig: UMFERÐ 1: Heklið kl að miðju á fyrsta ll-boga (mitt í tbst-hóp), 1 fl, * 12 ll, 1 fl um næsta ll-boga mitt í tbst-hóp *, endurtakið frá *-* umf hringinn JAFNFRAMT er aukið út um 9 ll-boga jafnt yfir í umf = 45-54-54 ll-bogara (endið umf með 6 ll og 1 þbst í fyrstu fl í byrjun umf). UMFERÐ 2: Heklið 2 st + 2 ll + 2 st um hvern ll-boga umf hringinn = 45-54-54 st-hópar. UMFERÐ 3: Heklið 2 tbst + 2 ll + 2 tbst um hvern ll-boga mitt í st-hópinn og 1 ll á milli hverra tbst-hópa umf hringinn = 45-54-54 tbst-hópur með 1 ll á milli hverra. Endurtakið 1. – 3. umf 3-3-4 sinnum til viðbótar, JAFNFRAMT er aukið út um 9 ll-boga í hvert skipti sem 1. umf er hekluð = 72-81-90 tbst-hópar. Til að peysan fái sporöskulaga form er nú heklað fram og til baka einungis yfir neðstu 47-54-61 tbst-hópana, ekki er heklað yfir miðju 25-27-29 tbst-hópa efst í hnakka. Byrjið frá réttu og endurtakið 1.-3. umf í A.3 eins og áður alls 2 sinnum (þ.e.a.s. bakstykki fær 6 umf fleiri á hæðina), til að fá fallega skiptingu í hvert skipti sem snúið er við er heklað eins og útskýrt er í A.4 og A.5, JAFNFRAMT er aukið út um 7 ll-boga í hvert skipti sem 1. umf er hekluð (= alls 86-95-104 tbst- hópar í umf meðtaldir tbst-hópar í hnakka). Að lokum er hekluð 1 umf með ll-bogum í kringum alla peysuna (frá réttu) þannig: * 4 ll, 1 fl um ll-boga mitt í einn tbst-hóp, 4 ll, 1 fl á undan næsta tbst-hóp *, endurtakið frá *-* umf hringinn, klippið frá og festið enda. ERMI: Heklið upp 60-66-72 st í kringum handveginn (ca 5 st í hvern tbst-hóp og ca 30-33-36 st um ll-boga – byrjið mitt undir ermi). Næsta umf er hekluð þannig: * 1 st í fyrsta/næsta st, 1 ll, hoppið yfir 1 st *, endurtakið frá *-* umf hringinn = 30-33-36 st + 30-33-36 ll. Heklið síðan þannig: UMFERÐ 1: * 6 ll, hoppið yfir 5 l, 1 fl í næstu l *, endurtakið frá *-* umf hringinn = 10-11-12 ll-bogar. UMFERÐ 2: Heklið 2 st + 2 ll + 2 st um hvern ll-boga umf hringinn = 10-11-12 st-hópar. UMFEÐR 3: Heklið 2 tbst + 2 ll + 2 tbst um hvern ll-boga mitt í st-hópinn og 1 ll á milli hverra tbst-hópa umf hringinn = 10-11-12 tbst-hópar með 1 ll á milli hverra. UMFERÐ 4: * 12 ll, 1 fl um ll-boga mitt í tbst-hópinn *, endurtakið frá *-* umf hringinn = 10-11-12 ll-bogar, en fækkið jafnframt um 1 ll-boga í umf mitt undir ermi þannig: 1 fl um ll-boga mitt í næst síðasta tbst-hóp í umf, 6 ll, 1 st um ll-boga mitt í tbst-hópinn sem hoppa á yfir, 6 ll, 1 fl um ll-boga mitt í næsta tbst-hóp). Í næstu umf er heklaður st-hópur mitt undir ermi í st á milli 2 ll-boga með 6 ll = 9-10-11 st-hópar. Endurtakið umf 2-4 og fækkið jafnframt um 1 ll-boga í 3. hverri umf þannig að í hverri mynstureiningu á hæðina verður 1 tbst-hópur/ll-bogi færri í umf. Þegar það eru 5-6-7 tbst-hópar/ll-bogar í umf er síðan heklað án úrtöku þar til ermin mælist 54-54-56 cm, eða að óskuðu máli, mátið e.t.v. peysuna á meðan hún er í vinnslu. Klippið frá, festið enda og endurtakið á sama hátt á hinni erminni. |
||||||||||||||||||||||||||||||||||||||||||||||
Skýringar á teikningu |
||||||||||||||||||||||||||||||||||||||||||||||
|
||||||||||||||||||||||||||||||||||||||||||||||
|
||||||||||||||||||||||||||||||||||||||||||||||

|
||||||||||||||||||||||||||||||||||||||||||||||
|
||||||||||||||||||||||||||||||||||||||||||||||
|
||||||||||||||||||||||||||||||||||||||||||||||
|
Hefur þú gert þessa eða einhverja af annarri hönnun frá okkur? Merktu myndirnar þínar á samfélagsmiðlum með #dropsdesign svo að við séð þær! Vantar þig aðstoð með þetta mynstur?Þú finnur kennslumyndbönd, dálk með athugasemdum/spruningum og fleira með því að skoða mynstrið á garnstudio.com © 1982-2024 DROPS Design A/S. Við áskiljum okkur öll réttindi. Þetta skjal ásamt öllum undirhlutum þess, hefur höfundarétt. Lestu meira varðandi hvað þú mátt gera við mynstrin okkar neðst á hverju mynstri á síðunni okkar. |
||||||||||||||||||||||||||||||||||||||||||||||


Með yfir 40 ára prjóna- og hekl hönnun, býður DROPS Design uppá eitt umfangsmesta vöruúrval af mynstrum án endurgjalds á netinu – þýdd á 17 tungumálum. Í dag þá erum við komin í 304 vörulista og 11422 mynstur - 6940 mynstur sem eru þýdd á íslensku.
Við vinnum hörðum höndum við að færa þér það besta sem prjón og hekl hefur uppá að bjóða, innblástur, ráðgjöf og auðvitað frábært gæða garn á ótrúlegu verði! Langar þig að nota mynstrin okkar fyrir annað en til einkanota? Þú getur lesið hér ákvæði hvað leyfilegt er að gera í textanum Copyright sem er neðst á öllum mynstrunum okkar.
Athugasemdir / Spurningar (292)
Buongiorno. Ha provato a seguire lo schema ma non mi è chiaro come devo procedere con le maniche. Può gentilmente aiutarmi? Grazie
27.02.2021 - 14:03DROPS Design answered:
Buonasera Katya, quale parte delle maniche le crea difficoltà? Buon lavoro!
27.02.2021 - 19:26No es muy exacto el patrón, yo decidí hacerle ajustes, porque las explicaciones son confusas y cuando vi la cantidad de preguntas, me quedo claro que hay problemas con la explicación. Yo hice el círculo hasta obtener el ancho de espalda y luego tejí cadenas que para hacer las sisas y una vez las cerré, recomencé la puntada, porque no cuadra fácilmente con las explicaciones. Creo que quien las escribe, no diseño el tejido
16.02.2021 - 05:25I have crocheted a few round rows, the last round I crocheted had the long chains that skipped groups in order to make sleeves. However moving in to the next several rounds has me confused. Should the rounds after the sleeves include working the chains that previously made the sleeve and skipping that same section that was skipped when making the sleeve chain, or should I skip the chain and work the Part that was skipped over for the chain sleeve as part of the round. Or should I work both.
08.02.2021 - 06:13DROPS Design answered:
Dear Natalie, for the armholes you are skipping stitches replaced by chains on both places on the round. After this round has been worked, you will crochet in the round as before, ie crochet in both ch-spaces for armholes as they were stitches and no holes so that the pattern will continue as before. Hope this will help. Happy crocheting!
08.02.2021 - 11:04I have just finished A3 . it says Repeat 1st-3rd round (4) more times.. so I am going around the whole piece doing A3-- 4 more times? I feel like that will wind up covering the beautiful circle mandala in the middle of the back. If this is the case... then how do I then skip to under the middle and neck area back and forth to make the "oval"? where am I starting the row on the piece? My clusters look good but my bumber count is off so 29 groups is not the right place on my piece
05.02.2021 - 16:01DROPS Design answered:
Dear Lanie, if your tension is correct, you should have same measurements as in the chart when you have worked the 5 repeats of A.3 in total (increasing 9 ch-spaces every time you work 1st round so that you end with 90 tr-groups. To make the oval shape, lye circle flat and fold it double so that armholes are over each other, place markers to count the bottom 61 tr groups where you will work over and the 29 tr-groups towards neck you will leave now unworked. Happy crocheting!
08.02.2021 - 07:32How can I get this pattern in English on YouTube
23.01.2021 - 21:04DROPS Design answered:
Dear Dorena, this pattern is only available in our website - you will find some lessons and video to help you if required - see just above your comment. Happy crocheting!
25.01.2021 - 09:07I am working on the first row after the armholes, 2nd row of A3. So If I am understanding correctly, I need to do the increase after every 4th dc group to add 9 evenly around. So does that mean in the armhole space I will add an increase at the 4th dc group which would be the 3rd dc group in the armhole, so with that plus the 8 dc groups in the armhole chain space I would actually have 9 dc groups in the first armhole space?
31.12.2020 - 19:12DROPS Design answered:
Dear Crystal, after the armhole you continue working in the both chains for armholes as if they weren't stitch groups skipped and at the same time you increase evenly in the round 9 dc groups, ie the 9 ch-spaces have to be increased evenly and not only in the chains for armholes. Happy crocheting!
04.01.2021 - 13:58Hello there, Can you tell me which size would make a UK 12-14 please?
29.12.2020 - 21:08DROPS Design answered:
Hi Alison, There is a measurements chart for each size at the bottom of the pattern . Happy crocheting!
30.12.2020 - 08:05Why not offer full written instructions for this pattern for people who struggle to follow a chart. You seem to reply to endless questions relating to problems understanding the chart which could easily be avoided if the instructions were written out in full. Drops do have some lovely patterns but so many are difficult to follow.
27.12.2020 - 22:19DROPS Design answered:
Dear Maura McFall! Maybe you find this lesson helpful: https://www.garnstudio.com/lesson.php?id=69&cid=19 Hope it helps!
03.01.2021 - 03:01I love the looks of this pattern and I'd really like to make the sweater, however, I notice the yarn is 100% wool. I am super sensitive to itchy wools. Can you recommend a yarn substitute that is NOT itchy?
14.11.2020 - 16:41DROPS Design answered:
Dear Susanne, everyone's sensitivity is different, the best would be to contact your DROPS Store - even per mail - they will be able to help you finding the best alternatives for you. Happy knitting!
16.11.2020 - 08:20I finished the jacket and it turned out so cool this is my first ever jacket I have made so I am super excited about it! I wish I knew how to share a picture! Thank you!!! ♡
29.10.2020 - 23:04DROPS Design answered:
Dear Christine, we are really happy that you finished the jacked and you like it. You can always share the picture with us on Facebook at the DROPS workshop group, or by taggong wour pictures on the social networking sites (facebook, instagram etc) with #dropsdesign #dropsfan tags. Gappy Crafting!
31.10.2020 - 13:20