DROPS Kid-Silk uni colour 75% Mohair, 25% Silk |
25.00 RON /25g |
Order |
Clicking the ORDER button will redirect you to Andrele website
The yarn cost is calculated from the pattern’s smallest size and the yarn’s cheapest product type. Looking for an even better price? You might find it on the DROPS Deals!
-------------------------------------------------------
Alternative Yarn – See how to change yarns here
Yarn Groups A to F – Use the same pattern and change the yarn here
Yarn usage using an alternative yarn – Use our yarn converter here
-------------------------------------------------------
DROPS Kid-Silk uni colour 75% Mohair, 25% Silk 25.00 RON /25g Order |
Clicking the ORDER button will redirect you to Andrele website
The yarn cost is calculated from the pattern’s smallest size and the yarn’s cheapest product type. Looking for an even better price? You might find it on the DROPS Deals!
= knit from right side, purl from wrong side | |
= purl from right side, knit from wrong side | |
= place 2 stitches on cable needle in front of piece, knit 2, knit 2 from cable needle | |
= place 4 stitches on cable needle in front of piece, knit 4, knit 4 from cable needle | |
= bobble: knit 1, 1 yarn over, knit 1 in same stitch (= 3 stitches), work 5 rows stocking stitch over these stitches, on row 6 knit all 3 stitches together = 1 stitch. |
Each of our patterns has specific tutorial videos to help you.
These step-by-step tutorials might also help you:
Why is the knitting/crochet tension so important?
Knitting tension is what determines the final measurements of your work, and is usually measured per 10 x 10 cm. It is provided like so: number of stitches in width x number of rows in height - eg: 19 stitches x 26 rows = 10 x 10 cm.
The knitting tension is very individual; some people knit/crochet loosely while others work tightly. You adjust the knitting tension with the needle size, which is why the suggested needle size is only meant as a guide! You need to adjust this (up or down) to ensure that YOUR knitting tension matches the knitting tension provided in the pattern. If you work with a different knitting tension than provided you will have a different yarn consumption, and your work will have different measurements than what the pattern suggests.
The knitting tension also determines which yarns can replace each other. As long as you achieve the same knitting tension you can replace one yarn with another.
See DROPS lesson: How to measure your tension/gauge
See DROPS video: How to make a gauge tension swatch
How do I know how many balls of yarn I need?
The required amount of yarn is provided in grams, eg: 450 g. To calculate how many balls you’ll need you first need to know how many grams are in 1 ball (25g, 50g or 100g). This information is available if you click on the individual yarn quality on our pages. Divide the amount required with the amount of each ball. For example, if each ball is 50g (the most common amount), the calculation will be as follows: 450 / 50 = 9 balls.
Can I use a different yarn than what the pattern suggests?
The important thing when changing from one yarn to another is that the knitting/crochet tension remains the same. This is so that the measurements of the finished piece will be the same as on the sketch provided. It is easier to achieve the same knitting tension using yarns from the same yarn group. It is also possible to work with multiple strands of a thinner yarn to achieve the knitting tension of a thicker one. Please try our yarn converter. We recommend you to always work a test swatch.
Please NOTE: when changing yarn the garment might have a different look and feel to the garment in the photo, due to individual properties and qualities of each yarn.
See DROPS lesson: Can I use a different yarn than the one mentioned in the pattern?
What are the yarn groups?
All our yarns are categorised into yarn groups (from A to F) according to thickness and knitting tension – group A contains the thinnest yarns and group F the thickest. This makes it easier for you to find alternative yarns to our patterns, should you wish to switch yarn. All yarns within the same group have a similar knitting tension and can easily replace each other. However, different yarn qualities have different structures and properties which will give the finished work a unique look and feel.
How do I use the yarn calculator?
At the top of all our patterns you’ll find a link to our yarn calculator, which is a helpful tool should you wish to use a different yarn than suggested. By filling in the yarn quality you wish to replace, the amount (in your size) and number of strands, the calculator will present good alternative yarns with the same knitting tension. Additionally it will tell you how much you’ll require in the new qualities and whether you’ll need to work with multiple strands. Most skeins are 50g (some are 25g or 100g).
If the pattern is worked with multiple colours, every colour will have to be calculated separately. Similarly, if the pattern is worked with several strands of different yarns (for example 1 strand Alpaca and 1 strand Kid-Silk) you will have to find alternatives for each, individually.
Why do you show discontinued yarns in the patterns?
Since different yarns have different qualities and textures we have chosen to keep the original yarn in our patterns. However, you can easily find options among our available qualities by using our yarn calculator, or simply pick a yarn from the same yarn group.
It is possible that some retailers still have discontinued yarns in stock, or that someone has a few skeins at home that they would like to find patterns for.
The yarn calculator will provide both alternative yarn as well as required amount in the new quality.
What size should I knit?
If you think it's hard to decide what size to make, it can be a good idea to measure a garment you own already and like the size of. Then you can pick the size by comparing those measures with the ones available in the pattern's size chart.
You'll find the size chart at the bottom of the pattern.
See DROPS lesson: How to read size chart
Why do I get the wrong knitting tension with the suggested needle size?
The needle size provided in the pattern serves only as a guide, the important thing is to follow the knitting tension. And since knitting tension is very individual, you will have to adjust the needle size to ensure that YOUR tension is the same as in the pattern – maybe you’ll have to adjust 1, or even 2 needle sizes, up or down to achieve the correct tension. For this, we recommend that you work test swatches.
Should you work with a different knitting tension than the one provided, the measurements of the finished garment might deviate from the measurement sketch.
See DROPS lesson: How to measure your tension/gauge
See DROPS video: How to make a tension/gauge swatch
Why is the pattern worked top-down?
Working a garment top-down provides more flexibility and room for personal adjustment. For example it is easier to try the garment on while working, as well as making adjustments to length of yoke and shoulder caps.
The instructions are carefully explaining every step, in the correct order. Diagrams are adjusted to the knitting direction and are worked as usual.
How do I work according to a knitting diagram?
The diagram depicts all rows/rounds, and every stitch seen from the right side. It is read from bottom to top, from right to left. 1 square = 1 stitch.
When working back and forth, every other row is worked from the right side and every other row is worked from the wrong side. When working from the wrong side, the diagram will have to be worked reversed: from left to right, knit stitches are purled, purl stitches are knit etc.
When working in the round every round is worked from the right side and the diagram are worked from right to left on all rounds.
See DROPS lesson: How to read knitting diagrams
How do I work according to a crochet diagram?
The diagram depicts all rows/rounds, and every stitch seen from the right side. It is worked from bottom to top, from right to left.
When working back and forth every other row is worked from the right side: from right to left and every other row is worked from the wrong side: from left to right.
When working in the round, every row in the diagram are worked from the right side, from right to left.
When working a circular diagram you start in the middle and work your way outwards, counter clockwise, row by row.
The rows usually start with a given number of chain stitches (equivalent to the height of the following stitch), this will either be depicted in the diagram or explained in the pattern.
See DROPS lesson: How to read crochet diagrams
How do I work several diagrams simultaneously on the same row/round?
Instructions for working several diagrams after each other on the same row/round, will often be written like so: “work A.1, A.2, A.3 a total of 0-0-2-3-4 times". This means you work A.1 once, then A.2 is worked once, and A.3 is repeated (in width) the number of times provided for your size – in this case like so: S = 0 times, M = 0 times, L=2 times, XL= 3 times and XXL = 4 times.
The diagrams are worked as usual: begin with the first row in A.1, then work the first row in A.2 etc.
See DROPS lesson: How to read knitting diagrams
See DROPS lesson: How to read crochet diagrams
Why are the sleeves shorter in larger sizes?
The total width of the garment (from wrist-to-wrist) will be larger in the larger sizes, despite the actual sleeves being shorter. The larger sizes have longer sleeve caps and wider shoulders, so there will be a good fit in all sizes.
Where on the garment is the length measured?
The measurement sketch/schematic drawing provides information regarding the full length of the garment. If it’s a jumper or a jacket the length is measured from the highest point on the shoulder closest to the neckline, and straight down to the bottom of the garment. It is NOT measured from the tip of shoulder. Similarly, the length of yoke is measured from the highest point on the shoulder and down to where yoke is split into body and sleeves.
On a jacket measures are never taken along bands, unless specifically stated. Always measure inside band stitches when measuring the length.
See DROPS lesson: How to read a schematic drawing
What is a repeat?
Diagrams are often repeated on the round or in height. 1 repeat is the diagram the way it appears in the pattern. If it says to work 5 repeats of A.1 in the round, then you work A.1 a total of 5 times after/next to each other in the round. If it says to work 2 repeats of A.1 vertically/in height you work the entire diagram once, then begin again at the start and work the entire diagram one more time.
Why does the piece start with more chain stitches than it’s worked with?
Chain stitches are slightly narrower than other stitches and to avoid working the cast-on edge too tight, we simply chain more stitches to begin with. The stitch count will be adjusted on the following row to fit the pattern and measurement sketch.
Why increase before the rib edge when the piece is worked top-down?
The rib edge is more elastic and will contract slightly compared to, for example, stocking stitch. By increasing before the rib edge, you avoid a visible difference in width between the rib edge and the rest of the body.
Why increase in the cast-off edge?
It’s very easy to cast off too tightly, and by making yarn overs while casting off (and simultaneously casting these off) you avoid a too tight cast off edge.
See DROPS video: How to bind off with yarn overs (yo)
How do I increase/decrease on every 3rd and 4th row/round alternately?
To achieve an even increase (or decrease) you can increase on, for example: every 3rd and 4th row alternately, like so: work 2 rows and increase on the 3rd row, work 3 rows and increase on the 4th. Repeat this until the increase is complete.
See DROPS lesson: Increase or decrease 1 st on every 3rd and 4th row alternately
How can I work a jacket in the round instead of back and forth?
Should you prefer to work in the round instead of back and forth, you may of course adjust the pattern. You’ll need to add steeks mid-front (usually 5 stitches), and follow the instructions. When you would normally turn and work from the wrong side, simply work across the steek and continue in the round. At the end you’ll cut the piece open, pick up stitches to work bands, and cover the cut edges.
See DROPS video: How to knit steeks and cut open
Can I work a jumper back and forth instead of in the round?
Should you prefer to work back and forth instead of in the round, you may of course adjust the pattern so you work the pieces separately and then assemble them at the end. Divide the stitches for the body in 2, add 1 edge stitch in each side (for sewing) and work the front and back pieces separately.
See DROPS lesson: Can I adapt a pattern for circular needles into straight needles?
Why is the pattern slightly different than what I see in the photo?
Pattern repeats can vary slightly in the different sizes, in order to get the correct proportions. If you’re not working the exact same size as the garment in the photo, yours might deviate slightly. This has been carefully developed and adjusted so that the complete impression of the garment is the same in all sizes.
Make sure to follow instructions and diagrams for your size!
How do I make a women’s size garment into a men’s size one?
If you have found a pattern you like which is available in women’s size it’s not very difficult to convert it to men’s size. The biggest difference will be the length of sleeves and body. Start working on the women size that you think would fit across the chest. The additional length will be worked right before you cast off for the armhole/sleeve cap. If the pattern is worked top-down you can add the length right after the armhole or before the first decrease on sleeve.
Regarding additional yarn amount, this will depend on how much length you add, but it is better with a skein too many than too few.
How do I prevent a hairy garment from shedding?
All yarns will have excess fibres (from production) that might come off as lint or shedding. Brushed yarns (ie hairier yarns) have more of these loose, excess fibres, causing more shedding.
Shedding also depends on what is worn under or over the garment, and whether this pulls at the yarn fibres. It’s therefore not possible to guarantee that there will be no shedding
Below are some tips on how to get the best result when working with hairier yarns:
1. When the garment is finished (before you wash it) shake it vigorously so the looser hairs come off. NOTE: do NOT use a lint roller, brush or any method that pulls at the yarn.
2. Place the garment in a plastic bag and put it in your freezer - the temperature will cause the fibres to become less attached to each other, and excess fibres will come off easier.
3. Leave in the freezer for a few hours before taking it out and shaking it again.
4. Wash the garment according to the instructions on the yarn label.
Why does my garment pill?
Pilling is a natural process that happens to even the most exclusive of fibers. It's a natural sign of wear and tear that is hard to avoid, and that is most visible in high friction areas of your garment like a sweater's arms and cuffs.
You can make your garment look as new by removing the pilling, using a fabric comb or a pill/lint remover.
River Rapids |
||||||||||||||||
|
|
|||||||||||||||
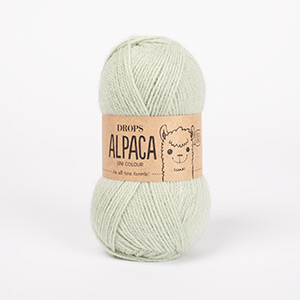
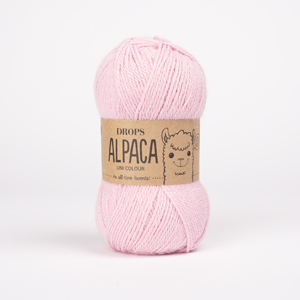
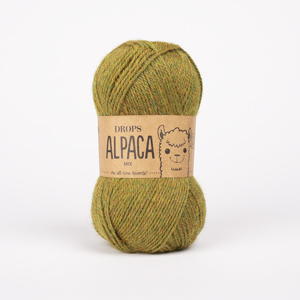
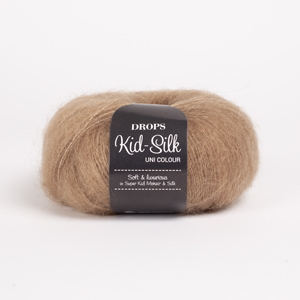
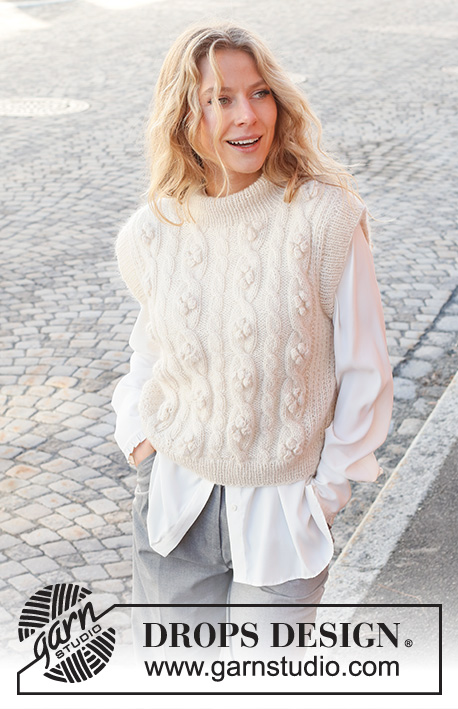
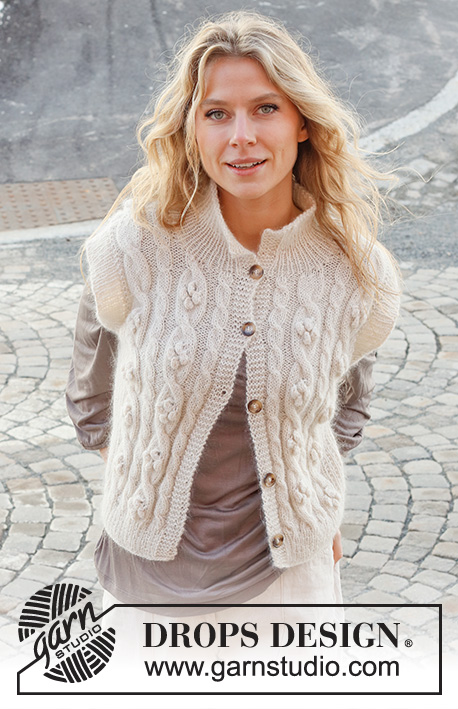
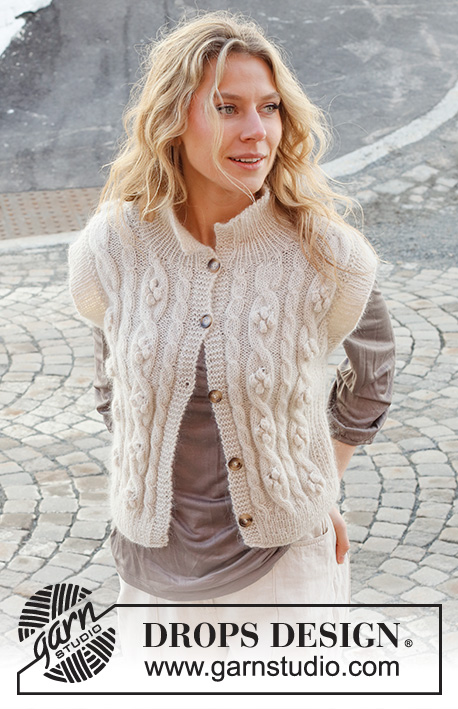
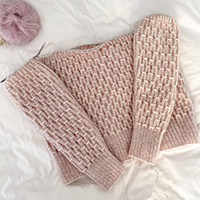
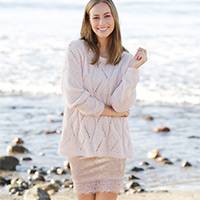
Knitted vest in DROPS Alpaca and DROPS Kid-Silk. The piece is worked with cables, bobbles and ribbed edges. Sizes S - XXXL.
DROPS 227-7 |
||||||||||||||||
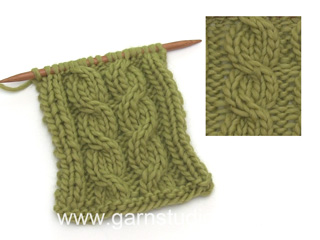
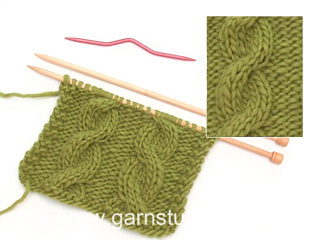
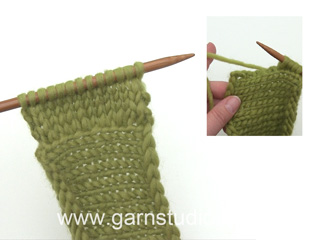
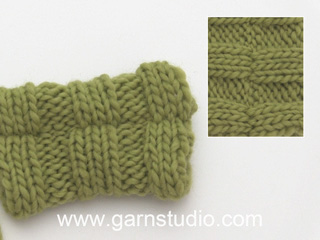
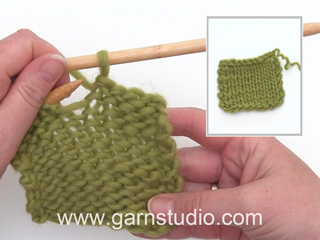
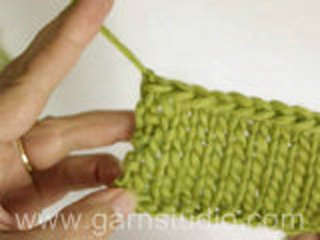
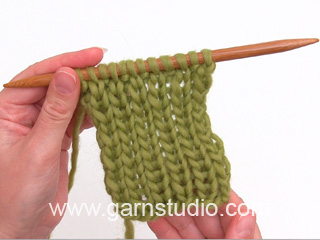
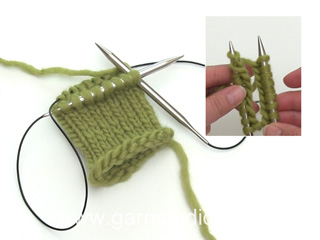
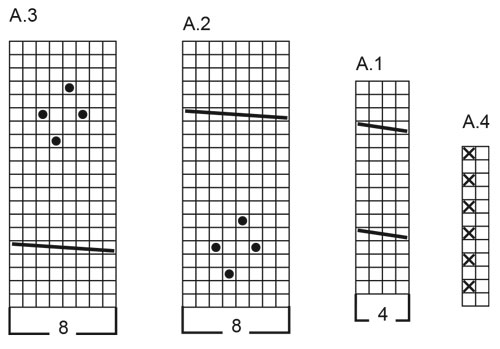
------------------------------------------------------- EXPLANATIONS FOR THE PATTERN: ------------------------------------------------------- RIDGE/GARTER STITCH (worked back and forth): Knit all rows. 1 ridge = knit 2 rows. PATTERN: See diagrams A.1 to A.4. The diagrams show all rows in the pattern from the right side. BUTTONHOLES: Work buttonholes on the right band. 1 BUTTONHOLE = knit together the 3rd and 4th stitch from the edge and make 1 yarn over. On the next row knit the yarn over to leave a hole. Work the buttonholes when the piece measures: S: 5, 15, 25, 35 and 45 cm M: 5, 13, 21, 29, 38 and 47 cm L: 5, 13, 22, 31, 40 and 49 cm XL: 5, 14, 23, 32, 41 and 50 cm XXL: 5, 14, 23, 32, 42 and 52 cm XXXL: 5, 13, 21, 29, 37, 45 and 54 cm INCREASE TIP (evenly spaced): To work out how to increase evenly, count the total number of stitches on the needle (e.g. 175 stitches), minus the bands (e.g. 10 stitches) and divide the remaining stitches by the number of increases to be made (e.g. 45) = 3.6. In this example, increase by making 1 yarn over after alternately each 3rd and 4th stitch. On the next row work the yarn overs twisted to avoid holes. ------------------------------------------------------- START THE PIECE HERE: ------------------------------------------------------- VEST – SHORT OVERVIEW OF THE PIECE: The piece is worked back and forth with circular needle, from mid-front as far as the armholes, then divided and the front and back pieces finished separately. Ribbed edges are worked around the armholes and neck. The vest is worked with 1 strand DROPS Alpaca and 1 strand DROPS Kid-Silk (= 2 strands). BODY: Cast on 175-191-199-215-239-263 stitches (including 5 band stitches on each side) with circular needle size 4 mm and 1 strand of each quality (= 2 strands). Purl 1 row from the wrong side, then work rib as follows from the right side: 5 band stitches in GARTER STITCH – read description above, * knit 1, purl 1 *, work from *-* until there are 6 stitches left, knit 1 and 5 band stitches in garter stitch. Continue this rib for 6 cm. Change to circular needle size 5 mm. Purl 1 row from the wrong side where you increase 45-45-45-53-53-53 stitches evenly spaced – read INCREASE TIP = 220-236-244-268-292-316 stitches. Continue as follows from the right side: Sizes S-M-L: 5 band stitches in garter stitch, purl 2, A.1 (= 4 stitches), purl 4, A.2 (= 8 stitches), purl 4, A.1, purl 4, A.3 (= 8 stitches), purl 2, A.4 over the next 29-37-41 stitches (start and finish with knit 1), purl 2, A.2, purl 4, A.1, purl 4, A.3, purl 4, A.1, purl 4, A.2, purl 4, A.1, purl 4, A.3, purl 2, A.4 over the next 29-37-41 stitches (start and finish with knit 1), purl 2, A.2, purl 4, A.1, purl 4, A.3, purl 4, A.1, purl 2 and 5 band stitches in garter stitch. Sizes XL-XXL-XXXL: 5 band stitches in garter stitch, purl 2, A.1 (= 4 stitches), purl 4, A.2 (= 8 stitches), purl 4, A.1, purl 4, A.3 (= 8 stitches), purl 4, A.1, purl 2, A.4 over the next 37-49-61 stitches (start and finish with knit 1), purl 2, A.1, purl 4, A.2, purl 4, A.1, purl 4, A.3, purl 4, A.1, purl 4, A.2, purl 4, A.1, purl 4, A.3, purl 4, A.1, purl 2, A.4 over the next 37-49-61 stitches (start and finish with knit 1), purl 2, A.1, purl 4, A.2, purl 4, A.1, purl 4, A.3, purl 4, A.1, purl 2 and 5 band stitches in garter stitch. Continue this pattern. Remember the BUTTONHOLES on the right band – read description above. REMEMBER THE KNITTING TENSION! When the piece measures 27-28-29-30-31-32 cm, cast off for the armholes from the right side as follows: Work as before over the first 55-59-61-67-73-79 stitches (= right front piece), cast off 6 stitches, work the next 98-106-110-122-134-146 stitches (= back piece), cast off 6 stitches, work the last 55-59-61-67-73-79 stitches (= left front piece). Each piece is finished separately. Place the first and last 55-59-61-67-73-79 stitches on a thread and work the back piece over the remaining 98-106-110-122-134-146 stitches. Cut the strand. BACK PIECE: = 98-106-110-122-134-146 stitches. Continue the pattern and cast off at the beginning of each row in each side for the armholes as follows: 2 stitches 3-3-3-4-5-6 times and 1 stitch 3-3-3-4-5-7 times = 80-88-92-98-104-108 stitches. When the piece measures 50-52-54-56-58-60 cm, work the next row as follows from the right side: Work the first 22-22-23-25-27-28 stitches, work the next 36-44-46-48-50-52 stitches AT THE SAME TIME decrease 2 stitches over each A.1 and 4 stitches over each A.2/A.3 (a total of 10-10-14-14-14-14 stitches decreased over the cables), then work the last 22-22-23-25-27-28 stitches. On the next row cast off the middle 26-30-32-34-36-38 stitches for the neck and each shoulder is finished separately. Continue working until the piece measures 51-53-55-57-59-61 cm, decrease 2 stitches over A.1 (applies to sizes S, XXL and XXXL) and 4 stitches over A.2/A.3 (all sizes) (6-4-4-4-6-6 stitches decreased) = 16-18-19-19-21-22 stitches on the shoulder. Cast off when the piece measures 52-54-56-58-60-62 cm. Work the other shoulder in the same way. RIGHT FRONT PIECE: Place the first 55-59-61-67-73-79 stitches back on circular needle size 5 mm. Continue the pattern and cast off for the armhole at the beginning of each row from the wrong side as follows: 2 stitches 3-3-3-4-5-6 times and 1 stitch 3-3-3-4-5-7 times = 46-50-52-55-58-60 stitches. When the piece measures 46-48-50-51-53-55 cm, decrease 2 stitches over the first 2 repeats of A.1 (towards mid-front) and 4 stitches over A.2. On the next row from the right side place the first 14-16-17-18-19-19 stitches on a thread for the neck (work them first). Then cast off on each row from the neck as follows: 2 stitches 1 time and 1 stitch 2-2-2-2-2-3 times = 20-22-23-25-27-28 stitches on the shoulder. Continue working until the piece measures 51-53-55-57-59-61 cm, decrease 2 stitches over A.1 (in sizes XL, XXL and XXXL) and 4 stitches over A.3 = 16-18-19-19-21-22 stitches. Cast off when the piece measures 52-54-56-58-60-62 cm. LEFT FRONT PIECE: Place the last 55-59-61-67-73-79 stitches back on circular needle size 5 mm. Continue the pattern and cast off for the armhole at the beginning of each row from the right side as follows: 2 stitches 3-3-3-4-5-6 times and 1 stitch 3-3-3-4-5-7 times = 46-50-52-55-58-60 stitches. When the piece measures 46-48-50-51-53-55 cm, decrease 2 stitches over the last 2 repeats of A.1 (towards mid-front) and 4 stitches over A.3. On the next row from the wrong side place the first 14-16-17-18-19-19 stitches on a thread for the neck (work them first). Then cast off on each row from the neck as follows: 2 stitches 1 time and 1 stitch 2-2-2-2-2-3 times = 20-22-23-25-27-28 stitches on the shoulder. Continue working until the piece measures 51-53-55-57-59-61 cm, decrease 2 stitches over A.1 (in sizes XL, XXL and XXXL) and 4 stitches over A.2 = 16-18-19-19-21-22 stitches. Cast off when the piece measures 52-54-56-58-60-62 cm. ASSEMBLY: Sew the shoulder seams. Sew the buttons onto the left band. NECK: Start mid-front, from the right side and knit up 91 to 101 stitches around the neck (including the stitches from the threads) with circular needle size 4 mm and 1 strand of each quality (= 2 strands). The number of stitches must be divisible by 2 + 1. Work rib as follows from the wrong side: 5 band stitches in garter stitch, purl 1, * knit 1, purl 1 * work from *-* until there are 5 stitches left 5 band stitches in garter stitch. Continue this rib for 12 cm. Cast off with knit over knit and purl over purl. SLEEVE-EDGES: Start from the right side at the bottom of the armhole and knit up 102 to 126 stitches around the armhole (number of stitches must be divisible by 2), with short circular needle size 4 mm and 1 strand of each quality (= 2 strands). Work rib (knit 1, purl 1) in the round for 4 cm. Cast off with knit over knit and purl over purl. Work the other sleeve edge in the same way. |
||||||||||||||||
Diagram explanations |
||||||||||||||||
|
||||||||||||||||
Have you made this or any other of our designs? Tag your pictures in social media with #dropsdesign so we can see them! Do you need help with this pattern?You'll find tutorial videos, a Comments/Questions area and more by visiting the pattern on garnstudio.com. © 1982-2024 DROPS Design A/S. We reserve all rights. This document, including all its sub-sections, has copyrights. Read more about what you can do with our patterns at the bottom of each pattern on our site. |
With over 40 years in knitting and crochet design, DROPS Design offers one of the most extensive collections of free patterns on the internet - translated to 17 languages. As of today we count 304 catalogues and 11422 patterns - 11422 of which are translated into English (UK/cm).
We work hard to bring you the best knitting and crochet have to offer, inspiration and advice as well as great quality yarns at incredible prices! Would you like to use our patterns for other than personal use? You can read what you are allowed to do in the Copyright text at the bottom of all our patterns. Happy crafting!
Comments / Questions (14)
Wil Kerkmeer wrote:
Ik zou deze spencer zo graag in de kleur paardenbloem willen maken en kom dan uit bij Nord ipv Alpaca. Welke kid-silk kleur leent zich goed om te combinere? Zou de limonadekleur er goed bij kleuren of wijkt deze teveel af? En anders in Nepal, hoeveel garen heb ik dan nodig? Vrgr
19.10.2023 - 13:27DROPS Design answered:
Dag Wil,
Voor het vervangen van het garen kun je de garenvervanger gebruiken, deze vindt je onderaan de lijst met materialen bij ieder patroon. Voor de kleur is het ook een beetje een kwestie van persoonlijke smaak ben ik bang. Wat je zou kunnen doen is extra bollen bestellen en welke je niet gebruikt terug sturen.
19.10.2023 - 19:52Helen MCLEAN wrote:
Where can I find the finished measurements for all the different sizes?
06.07.2023 - 03:47DROPS Design answered:
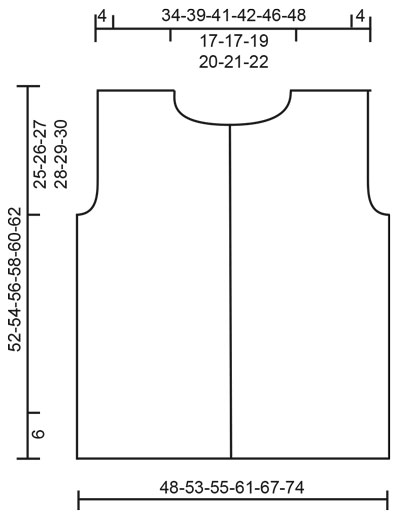
Dear Helen, for the finished measurements please see the sketch below the instructions (measurements are given in the same order as the sizes). Happy knitting!
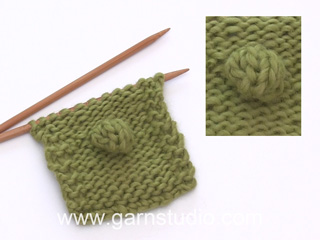
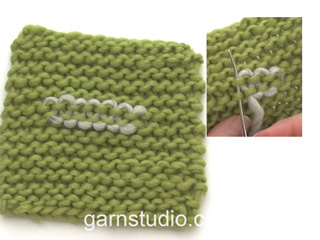
06.07.2023 - 04:39Rinat wrote:
Hello I have big holes around the bobble, Is that normal?
18.11.2022 - 14:35DROPS Design answered:
Dear Rinat, there might be holes when working bobbles, but when working next row, the holes should be smaller/almost hidden - but to be sure, you can show your work to your store (even sending a picture by mail), or ask other knitters in our DROPS Workshop. Happy knitting!
18.11.2022 - 15:45Janne T wrote:
Ryg og forstykke. Der skulle være 220 masker i smalle, men mønsteret giver 224 masker. Og de 29 masker er et ulige antal, men mønster A4 er beregnet til et lige antal, (deleligt med 2 masker). Har talt sammen flere gange og kan ikke få 220. Hvad gør jeg, hvor er fejlen?
11.06.2022 - 20:59DROPS Design answered:
Hei Janne. Husk at det står at A.4 skal strikkes over 29 masker. Så du strikker ikke en hel rapport av A.4, men over det maskeantallet det står i oppskriften (da starter og slutter det med 1 maske rett). Når du da strikker slik det står, stemmer maskeantallet med 220 masker i str. S. 5+2+4+4+8+4+4+4+8+2+29+2+8+4+4+4+8+4+4+4+8+4+4+4+8+2+29+2+8+4+ 4+4+8+4+4+2+5=220 masker. mvh DROPS Design
13.06.2022 - 10:40Kjersti Swang Unnerud wrote:
Vedr flettemønster. Står kun flette mot venstre på diagrammet. Og diagram A.2 står det ikke som det ser ut på bildet av vesten at det skal være flettemønster før boblene. Vanskelig for å forstå oppskriften her.
06.02.2022 - 21:39DROPS Design answered:
Hej Kjersti, mønstrene strikkes lidt forskelligt i de forskellige størrelser. Hvilken størrelse strikker du? og hvilket diagram mangler du?
09.02.2022 - 10:00Solbjörg Thoresson wrote:
Hej, Om jag vill sticka denna i bara Alpacka i str L, hur mycket garn skall jag köpa då?
25.01.2022 - 09:26DROPS Design answered:
Hei Solbjørg. Om du ønsker å strikke denne med 2 tråder Alpaca må du nesten doble garnmengden i Alpaca for å være sikker. I str. L = ca 650-700 gram. mvh DROPS Design
25.01.2022 - 14:37Lisette wrote:
Encore moi et bien après avoir débuté mon tricot je constate qu il y a des erreurs côté droit et gauche des torsades on devrait plutôt lire : A1, A3 et non A2,A1, A3, A1, A4 au dessus des 37 mailles, A1, A3 et non A2,A1, A3, A1,A3 et non A2, A1,A3, A1,A4 au dessus des 37 m, A1,A3 au lieu de A2, A1, A3 là les deux devants sont pareils …merci
27.11.2021 - 18:26DROPS Design answered:
Bonjour Lisette, les diagrammes sont corrects ainsi, les deux devants ne sont pas identiques, comme vous pourrez le constater sur la photo, les nopes ne sont pas au même niveau sur la 1ère grande torsade (A.2 et A.3) de part et d'autre de A.1 (ou encore sur le zoom, dernière photo). Bon tricot!
29.11.2021 - 08:43Lisette wrote:
Merci votre explication est très claire.
24.11.2021 - 20:56Lisette wrote:
Y a t il erreur, lorsque je débute le patron grandeur xl le patron débute par 5 m bordure 2 m envers A1 (4 M) = 11 m la fin du rang se termine par 4 m enversA1 ,(4 m) 2 m envers 5 m de bordure cela donne 15 mailles il n y a donc pas symétrie lorsque je débute sur l envers du tricot qu est ce ce que ne comprends pas. je devrais avoir le même nombre de mailles à gauche et à droite…. merci
23.11.2021 - 17:58DROPS Design answered:
Bonjour Lisette, j'ai peur de ne pas bien comprendre votre question: dans toutes les tailles, vous avez 5 m de bordure devant, 2 m env, A.1 et 4 m env = 15 m pour le devant droit et 4 m env, A.1, 2 m env, 5 m de bordure devant = 15 m pour le devant gauche en fin de rang, vous avez bien ces mêmes 15 mailles. Aurais-je mal compris?
24.11.2021 - 07:32Lisa wrote:
Gehört auch definitiv zu meinen Favoriten ❤🧡💛
15.09.2021 - 18:15