
Popular categories
Looking for a yarn?


|
|
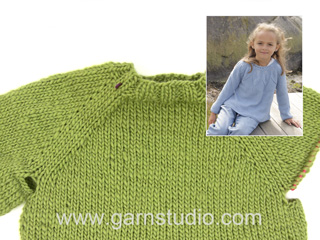
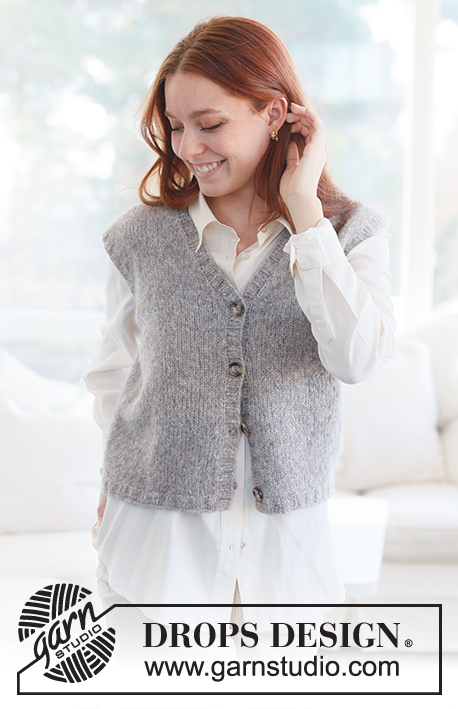
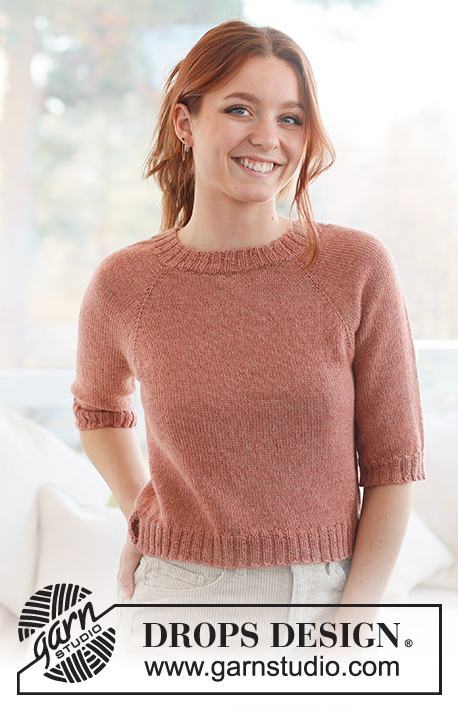
Moody Judy |
|
 |
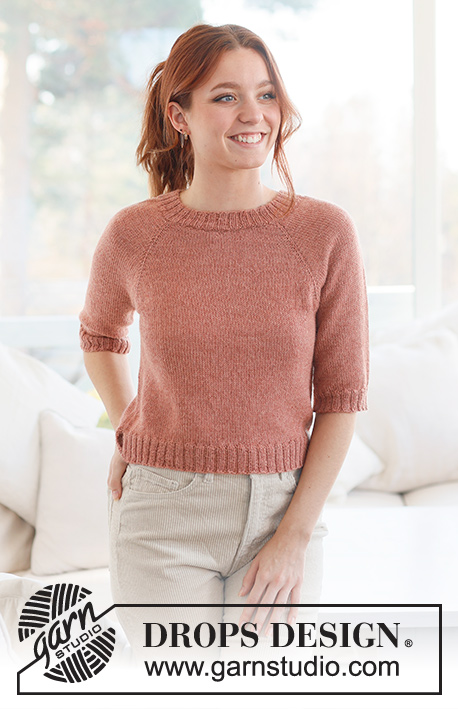 |
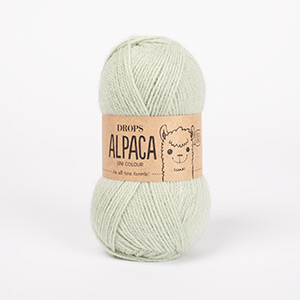
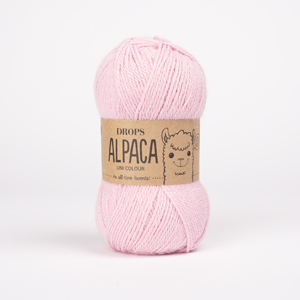
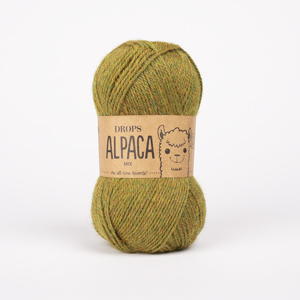
Knitted jumper in DROPS Alpaca. Piece is knitted top down with raglan, stocking stitch and short sleeves. Size: S - XXXL
DROPS 236-18 |
|
|
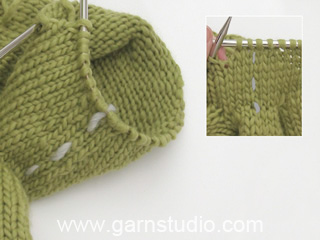
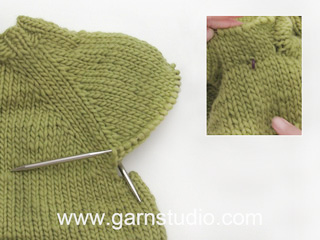
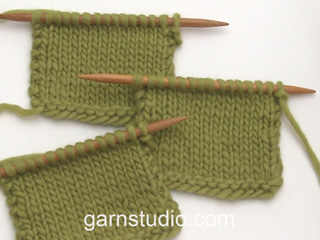
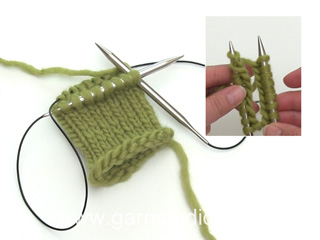
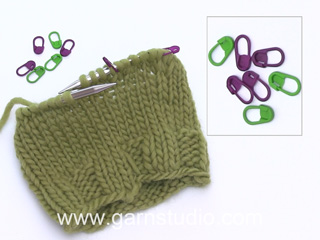
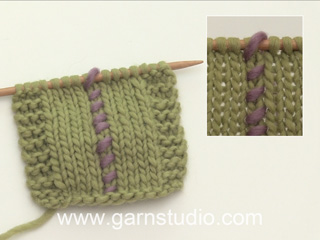
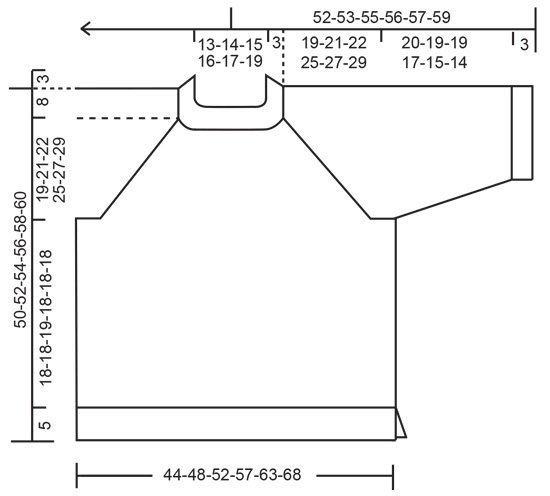
---------------------------------------------------------- EXPLANATION FOR THE PATTERN: ---------------------------------------------------------- RAGLAN: Increase differently on body and sleeves in the different sizes. Increase for body before 3rd and 1st marker and after 2nd and 4th marker. Increase for sleeves after 3rd and 1st marker and before 4th and 2nd marker. Increase 1 stitch on each side of stitch with marker. Increase 1 stitch by making 1 yarn over. When working back and forth, work yarn overs from wrong side as follows before and after marker: BEFORE MARKER: Purl yarn over in back loop of stitch. It should not make a hole. AFTER MARKER: Slip stitch off left needle and put it back on left needle but the opposite way (insert left needle in from behind when slipping it back on needle). Purl yarn over in front loop of stitch. It should not make a hole. When working in the round, work yarn overs on next round as follows before and after marker: BEFORE MARKER: Slip stitch off left needle and put it back on left needle but the opposite way (insert left needle in from behind when slipping it back on needle). Knit yarn over in front loop of stitch (yarn over is twisted towards the right). It should not make a hole. AFTER MARKER: Knit yarn over in back loop of stitch (yarn over is twisted towards the left). It should not make a hole. DECREASE TIP (applies to mid under sleeves): Decrease 1 stitch on each side of marker thread as follows: Work until 3 stitches remain before marker thread and knit 2 together, knit 2 (marker thread is between these 2 stitches), slip 1 stitch knitwise, knit 1, pass slipped stitch over stitch worked. GARTER STITCH (back and forth): Knit all rows. 1 ridge vertically = knit 2 rows. ---------------------------------------------------------- START THE PIECE HERE: ---------------------------------------------------------- JUMPER - SHORT OVERVIEW OF THE PIECE: Work neck edge and yoke in the round on circular needle from mid back, top down. Now divide yoke for body and sleeves. Work body in the round on circular needle, before dividing the piece and work back and forth for vents. Work sleeves in the round on double pointed needles/a short circular needle. NECK EDGE: Cast on 140-144-148-152-160-168 stitches on circular needle size 2.5 mm with DROPS Alpaca. Work rib in the round (knit 2/purl 2) until rib measures 3 cm. Now insert 4 markers in piece as explained below (without working the round). Use markers when increasing for raglan. Count 15-16-17-18-20-22 stitches (half back piece), insert 1st marker in next stitch, count 38 stitches (sleeve), insert 2nd marker in next stitch, count 30-32-34-36-40-44 stitches (front piece), insert 3rd marker in next stitch, count 38 stitches (sleeve), insert 4th marker in next stitch, 15-16-17-18-20-22 stitches remain on round (half back piece). Cut the yarn. NECK LINE: Now work neck line with short rows as explained below. AT THE SAME TIME as increasing differently on body and sleeves in the different sizes as follows: SIZE S, M and L: Increase every other round on body and increase every 4ht round on sleeves. Switch to circular needle size 3.5 mm. Begin from right side, 2 stitches before 3rd marker (i.e. in left side of neck if wearing the garment). Work in stocking stitch and increase for RAGLAN - read explanation above, until 2 stitches past 2nd marker have been worked (right side of neck at the front - 8 stitches have been increased for raglan). Turn piece, tighten yarn and work from wrong side until 2 stitches have been worked past where the short rows began at 3rd marker. Turn piece and work back from right side until 2 stitches have been worked past where the last turn was at 2nd marker - remember increase for raglan, NOTE! Increase only on body, increase before 3rd marker and 1st marker and after 2nd and 4th marker (4 stitches have been increased for raglan). Turn piece, tighten yarn and work from wrong side until 2 stitches have been worked past last turn was at 3rd marker. Turn piece and work back from right side until 2 stitches have been worked past last turn at 2nd marker - remember increase for raglan, now increase both on body and sleeve - i.e. on each side of all 4 markers (8 stitches have been increased for raglan). Turn piece, tighten yarn and work from wrong side until 2 stitches have been worked past last turn was at 3rd marker. Cut the yarn. Work yoke as explained below. SIZE XL, XXL and XXXL: Increase every other round on body, on sleeves increase first every other round, then every 4th round. Switch to circular needle size 3.5 mm. Begin from right side, 2 stitches before 3rd marker (i.e. in left side of neck if wearing the garment). Work in stocking stitch and increase for RAGLAN - read explanation above, until 2 stitches past 2nd marker have been worked (right side of neck at the front - 8 stitches have been increased for raglan). Turn piece, tighten yarn and work from wrong side until 2 stitches have been worked past where the short rows began at 3rd marker. Turn piece and work back from right side until 2 stitches have been worked past where the last turn was at 2nd marker - remember increase for raglan (8 stitches have been increased for raglan). Turn piece, tighten yarn and work from wrong side until 2 stitches have been worked past last turn was at 3rd marker. Turn piece and work back from right side until 2 stitches have been worked past last turn at 2nd marker - remember increase for raglan (8 stitches have been increased for raglan). Turn piece, tighten yarn and work from wrong side until 2 stitches have been worked past last turn was at 3rd marker. Cut the yarn. Work yoke as explained below. YOKE: SIZE S, M and L: Begin mid back and continue increases for raglan every other round for body and every 4th round for sleeves until increase has been done 11-14-17 times in total for sleeves after neck edge (increases on sleeves are done but increase on front piece/back piece continues). REMEMBER THE KNITTING TENSION! Continue increase on body until increase has been done 29-33-34 times on body. There are 300-332-352 stitches on round (60-66-72 stitches for each sleeve and 90-100-104 stitches for front pieces/back piece including stitches with markers). SIZE XL, XXL and XXXL: Begin mid back and continue increases for raglan every other round on body and sleeves until increase has been done 6-5-8 times after neck edge. REMEMBER THE KNITTING TENSION! Now increases on sleeves change, increase as follows: Continue increase on body every other round until increase has been done 33-38-39 more times (39-43-47 times in total on body). At the same time increase for sleeves every 4th round 15-17-16 times (21-22-24 increases in total for sleeve). There are 392-420-452 stitches on round (80-82-86 stitches for each sleeve and 116-128-140 stitches for front pieces/back piece). ALL SIZES: = 300-332-352-392-420-452 stitches. Work without increases until piece measures 19-21-22-25-27-29 cm mid front (measured after neck edge). Now divide yoke for body and sleeves as follows from beginning of round: Work the first 45-50-52-58-64-70 stitches as before (half back piece), slip the next 60-66-72-80-82-86 stitches on a thread for sleeve, cast on 16-16-20-20-24-24 new stitches on row (in the side under sleeve), work the next 90-100-104-116-128-140 stitches (front piece), slip the next 60-66-72-80-82-86 stitches on a thread for sleeve, cast on 16-16-20-20-24-24 new stitches on needle (in the side under sleeve) and work the remaining 45-50-52-58-64-70 stitches as before (half back piece). BODY: = 212-232-248-272-304-328 stitches. Insert 1 marker thread in each side on body, in the middle of the 16-16-20-20-24-24 stitches that were cast on under each sleeve. Move the marker threads upwards when working; they should be used for dividing for vents in each side. Begin round at one of the marker threads, and work stocking stitch in the round until piece measures 18-18-19-18-18-18 cm from division. Keep the first 106-116-124-136-152-164 stitches on needle and slip the last 106-118-124-136-152-164 on a thread. Switch to circular needle size 2.5 mm. Knit 1 row from right side while increasing 20-18-22-26-30-30 stitches evenly = 126-134-146-162-182-194 stitches. Work next row from wrong side: 2 stitches in GARTER STITCH - read explanation above, * purl 2, knit 2 *, repeat from *-* until 4 stitches remain, purl 2 and 2 stitches in garter stitch. Continue rib like this for 5 cm. Cast off stitches with knit over knit and purl over purl. Garment measures approx. 50-52-54-56-58-60 cm from shoulder. Slip stitches from thread on to circular needle size 2.5 mm, and work the same way. SLEEVES: Slip the 60-66-72-80-82-86 stitches from stitch holder in one side of piece on a short circular needle/double pointed needles size 3.5 mm and pick in addition up 1 stitch in each of the 16-16-20-20-24-24 stitches cast on under sleeve = 76-82-92-100-106-110 stitches. Insert a marker thread in the middle of the new stitches. Work in stocking stitch in the round. When piece measures 2 cm, decrease 2 stitches mid under sleeve - read DECREASE TIP. Decrease like this approx. every 4-4-3½-2½-3-3½ cm 4-4-5-6-5-4 times in total = 68-74-82-88-96-102 stitches. Work until piece measures 20-19-19-17-15-14 cm, approx. 3 cm remain before finished measurements (try the garment on and work to desired length before rib). Switch to double pointed needles size 2.5 mm. Knit 1 round and increase 12-14-14-16-16-18 stitches evenly = 80-88-96-104-112-120 stitches. Work rib (knit 2/purl 2) for 3 cm. Cast off stitches with knit over knit and purl over purl. Sleeve measures approx. 23-22-22-20-18-17 cm from division. Work the other sleeve the same way. |
|
|
|
|
Have you made this or any other of our designs? Tag your pictures in social media with #dropsdesign so we can see them! Do you need help with this pattern?You'll find tutorial videos, a Comments/Questions area and more by visiting the pattern on garnstudio.com. © 1982-2024 DROPS Design A/S. We reserve all rights. This document, including all its sub-sections, has copyrights. Read more about what you can do with our patterns at the bottom of each pattern on our site. |
|


With over 40 years in knitting and crochet design, DROPS Design offers one of the most extensive collections of free patterns on the internet - translated to 17 languages. As of today we count 304 catalogues and 11422 patterns - 11422 of which are translated into English (UK/cm).
We work hard to bring you the best knitting and crochet have to offer, inspiration and advice as well as great quality yarns at incredible prices! Would you like to use our patterns for other than personal use? You can read what you are allowed to do in the Copyright text at the bottom of all our patterns. Happy crafting!
Comments / Questions (19)
Als ik de trui in het rond wil breien, moet ik dan ook verkorte toeren breien of niet ?
15.02.2024 - 16:45DROPS Design answered:
Dag Veerle,
Dit patroon wordt in de rondte gebreid en er worden verkorte toeren gebreid voor de hals. Alleen bij de verkorte toeren brei je heen en weer om een verhoging te maken. Als de verkorte toeren klaar zijn, brei je weer verder in de rondte
25.02.2024 - 11:03Hej! När jag delar upp för ärmar, framstycke och bakstycke, var ingår då de fyra maskorna som markörerna suttit i? Ska de följa med ärmarna eller fram- och bakstycke? Det framgår inte i mönstret.
22.07.2023 - 09:14DROPS Design answered:
Hei Åsa. De 4 maskemarkørene har blitt brukt når du har økt til raglan. Når du er ferdig med bærestykket / raglan og skal dele opp arbeidet til forstykke, bakstykke og ermer, behøvs ikke maskemarkørene lengre. Når du har delt opp (følg maskeantallet i oppskriften til den størrelsen du strikker), skal du sette 2 nye maskemarkører / merketråder. Disse merketrådene skal brukes når arbeidet skal deles til splitt i hver side. mvh DROPS Design
27.07.2023 - 09:06Hei, hva er grunnen til at man øker masker rett før vrangborden i slutten av ermene og bolen?
15.07.2023 - 22:50DROPS Design answered:
Hei Aleksandra, Vi øker masker før vrangborden slik at den ikke blir for stram. God fornøyelse!
17.07.2023 - 07:39Hallo, in der Anleitung des Rumpfteils ist ein Schreibfehler. Und zwar ab dem Teil, wo die Teilung beschrieben wird. "Die ersten 106-116- .... Maschen auf der Nadel lassen und die letzten 106-118-... Maschen stillegen." Die 118 muss auch eine 116 sein.
07.04.2023 - 12:33Bei diesem Modell steht, dass ab einer bestimmten Höhen an der Raglanlinie auf der Ärmelseite nur alle 4 Reihen eine Masche zugenommen wird. Bei mir verändert sich dadurch die Raglanlinie, sie wird ab dieser Höhe dann dünner. Wie kann ich das vermeiden?
04.04.2023 - 14:41DROPS Design answered:
Liebe Frau Peters, es wird für den Raglan zuerst in jeder 2. Runde (8 Maschen) zugenommen, dann wird es abwechslungsweise in jeder 2. Runde 4 Maschen (= nur Rumpfteil) und 8 Maschen (= wie zuvor) zugenommen. Die Zunahmen entstehen genauso wie zuvor. Viel Spaß beim stricken!
11.04.2023 - 11:13Hur kommer det sig att det står i mönstret att ärmarna skall vara kortare ju större storlek?
15.03.2023 - 19:23DROPS Design answered:
Hej Lena. I de större storlekarna kommer den totala vidden (från handled till handled) att vara större än i de mindre storlekarna, även om själva ärmen är kortare. De större storlekarna har längre ärmkupa samt bredare axelvidd. Detta resulterar i en bra passform i alla storlekar. Mvh DROPS Design
16.03.2023 - 10:45Hur sätter jag en markör i en maska? Hur får jag den att följa med uppåti stickningen?
08.01.2023 - 14:48DROPS Design answered:
Hej Agnet, du er nødt til at flytte den selv når du sætter den i en maske :)
10.01.2023 - 13:39There is a mistake in the number of stitches to cast on for size s. When placing the stitch markers i only count a total of 136 and you have to cast on 140....
29.10.2022 - 12:38DROPS Design answered:
Dear Ev, please note that the markers should be added in a stitch and not between stitches, so that you should have: 15+1+38+1+30+1+38+1+15=140 stitches. Happy knitting!
31.10.2022 - 09:53Hej, Var betyder "... tills det återstår 3 maskor, sticka 2 avigmaskor och 2 maskor i rätstickning" i nederkant av fram och bakstycke? Tack för hjälpen!
26.10.2022 - 13:52DROPS Design answered:
Hej Erika, tack för info. Vi skal få design til at se på den og så bliver der lagt en rettelse ud!
27.10.2022 - 09:58Stickar stl M (144 maskor i halskanten) När jag ska dela upp 4 markörer för raglan så får jag 4 maskor över. 1:a 16 maskor 2:a 38 maskor 3:e 32 maskor 4:e 38 maskor, sen är det 20 maskor kvar inte 16som det står beskrivet.
26.09.2022 - 15:08DROPS Design answered:
Hej Carolina, det är de 4 maskorna du sätter markören i (du sätter markören i maskan inte mellan maskorna) :)
27.09.2022 - 10:29