
Popular categories
Looking for a yarn?


|
|||||||||||||
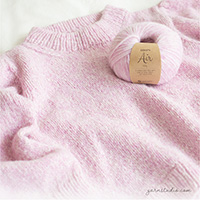
Lake View Vest |
|||||||||||||
 |
 |
||||||||||||
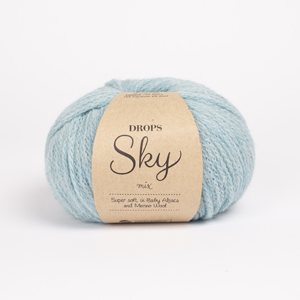
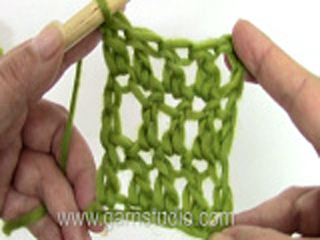
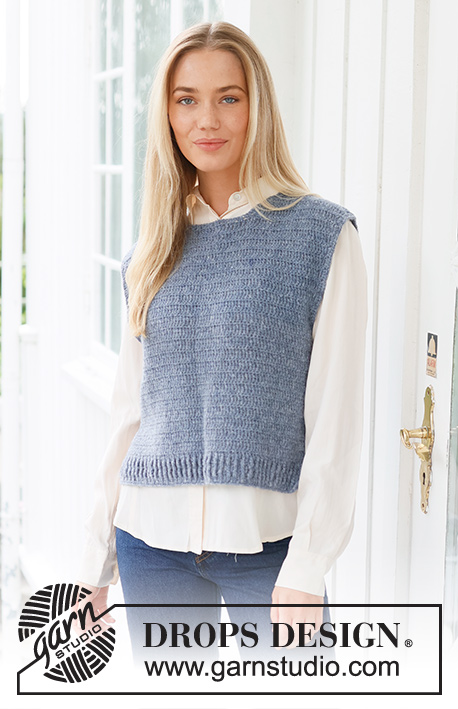
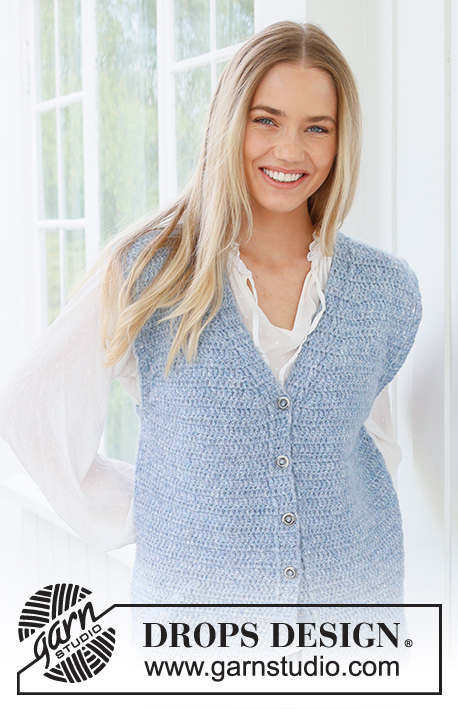
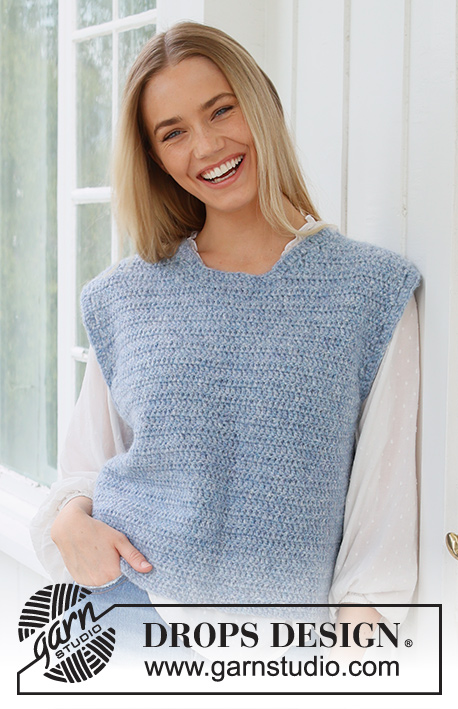
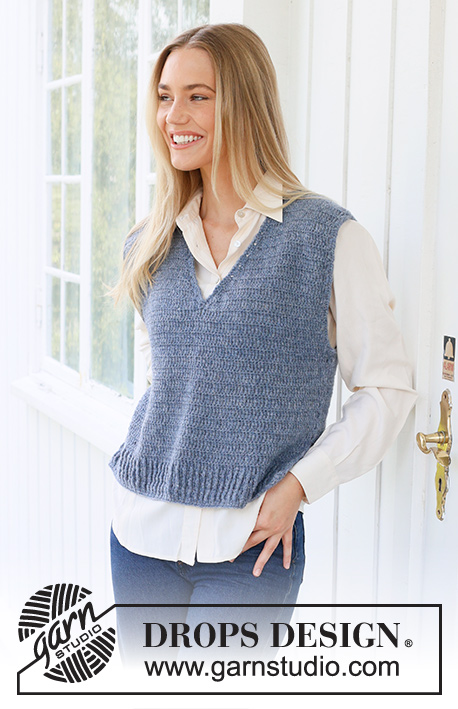
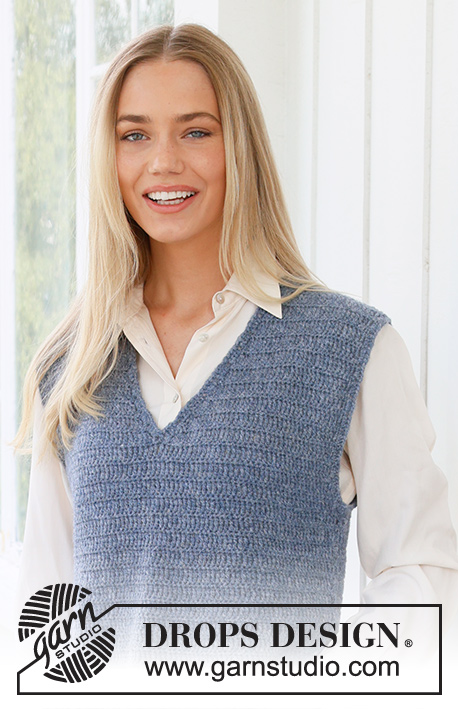
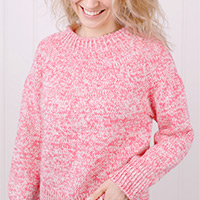
Crocheted vest in DROPS Sky. The piece is worked bottom up with relief-pattern, V-neck and split in the sides. Sizes S - XXXL.
DROPS 236-32 |
|||||||||||||
|
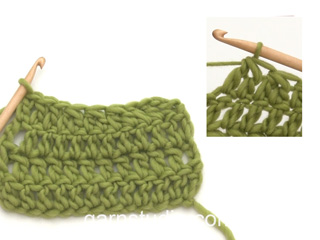
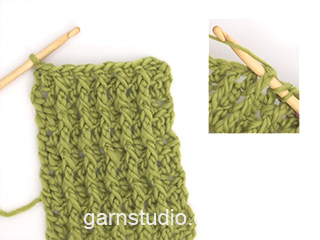
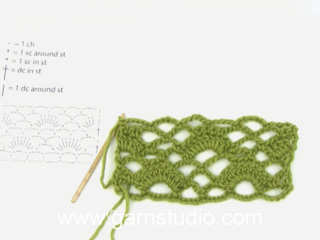
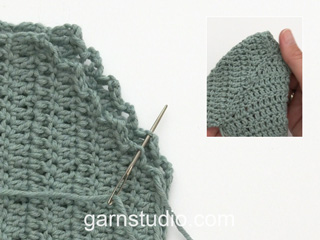
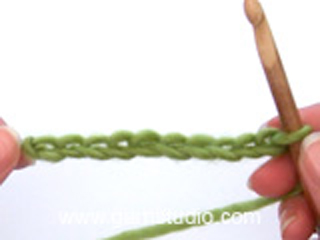
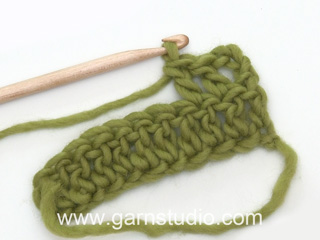
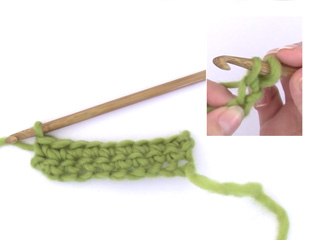
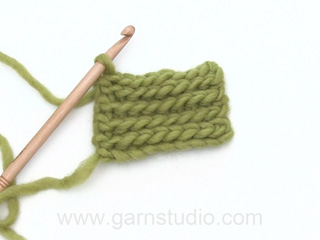
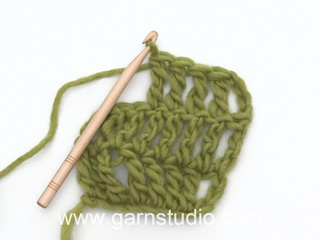
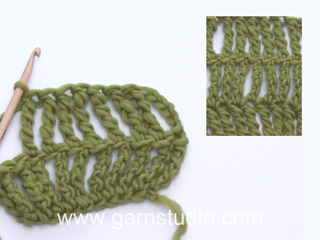
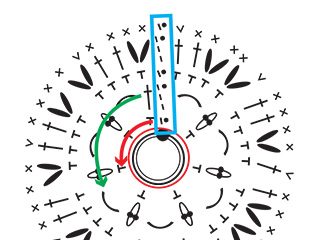
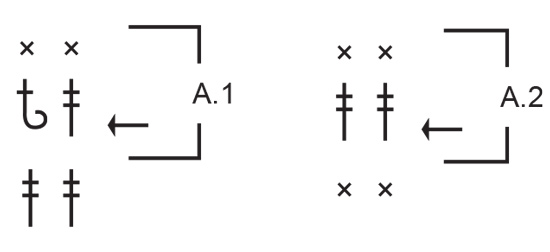
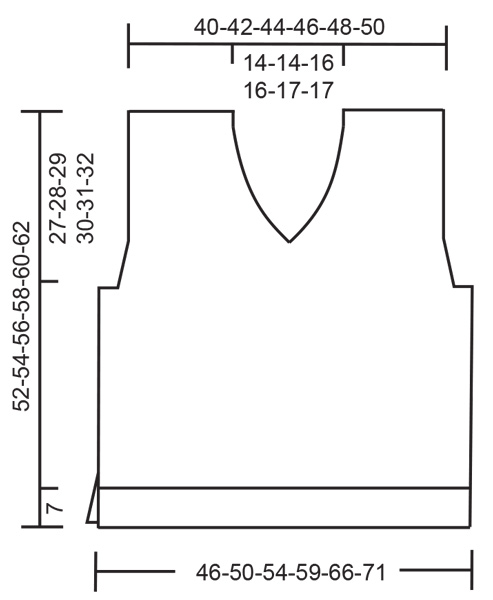
------------------------------------------------------- EXPLANATIONS FOR THE PATTERN: ------------------------------------------------------- CROCHET INFORMATION: Each row of treble crochets starts with 4 chain stitches which are in addition to the treble crochets and are not included in the stitch count. Each row of single crochets starts with 1 chain stitch which is in addition to the single crochets and is not included in the stitch count. On the sleeve-edges and V-neck (round 2), replace the first double crochet with 3 chain stitches and finish the round with 1 slip stitch in the 3rd chain stitch at the beginning of the round. CHAIN STITCH: If you work outermost on the hook the chain stitch will often be too tight; 1 chain stitch should be as long as 1 single crochet/treble crochet is wide. PATTERN: See diagrams A.1 and A.2. DECREASE TIP-1: Insert the hook through the first stitch and pick up the strand, insert the hook through the next stitch and pick up the strand, make 1 yarn over and pull it through all 3 loops on the hook (1 single crochet decreased). DECREASE TIP-2 (armholes and back of neck): Always decrease on a row of treble crochets! Beginning of row: Replace the number of stitches to be decreased with 1 slip stitch. End of row: Do not work the number of stitches to be decreased. DECREASE TIP-3 (front of neck): Decrease inside the stitch by the neck, i.e. when decreasing at the end of the row, work until there are 3 stitches left decrease 1 stitch as described below and work the last stitch as before. When decreasing at the beginning of the row, work the first stitch as before then decrease 1 stitch as described below. DECREASE 1 SINGLE CROCHET: Insert the hook through the first stitch and pick up the strand, insert the hook through the next stitch and pick up the strand, make 1 yarn over and pull it through all 3 loops on the hook (1 single crochet decreased). DECREASE 1 TREBLE CROCHET: Work 1 treble crochet in the first stitch, but wait with the last yarn over and pull-through, work 1 treble crochet in the next stitch and pull the last yarn over through all 3 loops on the hook (1 treble crochet decreased). ------------------------------------------------------- START THE PIECE HERE: ------------------------------------------------------- VEST – SHORT OVERVIEW OF THE PIECE: The back and front pieces are worked separately, back and forth and bottom up. The piece is sewn together and edges worked around the armholes and neck. BACK PIECE: Read CHAIN STITCH and CROCHET INFORMATION and work 87-95-103-111-123-133 chain stitches (including 4 chain stitches to turn) with hook size 4 MM = US 6 and DROPS Sky. Work 1 treble crochet in the 5th chain stitch from the hook, then 1 treble crochet in each stitch = 83-91-99-107-119-129 treble crochets. Turn and work 1 single crochet in each treble crochet. Work as follows from the right side: Start with 4 chain stitches as before, work A.1 until there is 1 stitch left, work the first stitch in A.1 so the pattern is symmetrical. Work A.1 back and forth until A.1 has been worked 3 times in height – AT THE SAME TIME at the end of the last row of single crochets, decrease 1 stitch by working 2 single crochets together – read DECREASE TIP-1 = 82-90-98-106-118-128 stitches. Work A.2, with alternate rows of treble crochets and single crochets. REMEMBER THE CROCHET GAUGE! When the piece measures 25-26-27-28-29-30 cm = 9¾"-10¼"-10⅝"-11"-11⅜"-11¾", start to work the armholes – adjust so the next row is a row of treble crochets. Decrease 3-4-5-6-8-10 stitches for the first armhole – read DECREASE TIP-2, work 1 treble crochet in each of the next 76-82-88-94-102-108 single crochets, turn (do not work the last 3-4-5-6-8-10 stitches for the second armhole). Then decrease for each armhole on each row of treble crochets as follows: Decrease 1 treble crochet 2-3-4-6-8-9 times on each side = 72-76-80-82-86-90 stitches. Continue the pattern until the piece measures 48-50-52-54-56-58 cm = 19"-19¾"-20½"-21¼"-22"-22¾" and the next row is a row of treble crochets. Finish each shoulder separately. RIGHT SHOULDER: Work the first 24-26-27-28-29-31 stitches, turn and work single crochets back. On the next row decrease 1 stitch by the neck – read DECREASE TIP-2 = 23-25-26-27-28-30 stitches on the shoulder. Work until the piece measures 52-54-56-58-60-62 cm = 20½"-21¼"-22"-22¾"-23⅝"-24⅜". Cut and fasten the strand. LEFT SHOULDER: Start from the right side (a row of treble crochets), skip the next 24-24-26-26-28-28 stitches after the right shoulder and work treble crochets over the last 24-26-27-28-29-31 stitches. Turn and work single crochets back. On the next row decrease 1 stitch by the neck = 23-25-26-27-28-30 stitches on the shoulder. Work until the piece measures 52-54-56-58-60-62 cm = 20½"-21¼"-22"-22¾"-23⅝"-24⅜". Cut and fasten the strand. FRONT PIECE: Work in the same way as the back until the front piece measures 31-32-33-34-35-36 cm = 12¼"-12½"-13"-13⅜"-13¾"-14¼" (in sizes L, XL, XXL and XXXL the decreases for armholes continue). Insert a marker in the middle of the row (between 2 stitches). Divide at the marker as described below and finish each shoulder separately. LEFT SHOULDER (when the garment is worn): Continue to decrease for the armhole if necessary and work to mid-front. Work alternate rows of treble crochets and single crochets back and forth over the shoulder. AT THE SAME TIME decrease 1 stitch towards the neck – read DECREASE TIP-3 as follows: 1 stitch on each row (from both the right and wrong side) a total of 9-9-9-9-10-10 times, then every 2nd row 4-4-5-5-5-5 times = 23-25-26-27-28-30 stitches on the shoulder. Work until the piece measures 52-54-56-58-60-62 cm = 20½"-21¼"-22"-22¾"-23⅝"-24⅜". Cut and fasten the strand. RIGHT SHOULDER: Start mid-front at the marker and work alternate rows of treble crochets and single crochets back and forth over the shoulder. Continue to decrease for the armhole if necessary. AT THE SAME TIME decrease 1 stitch towards the neck – remember DECREASE TIP-3, as follows: 1 stitch on each row (from both the right and wrong side) a total of 9-9-9-9-10-10 times, then every 2nd row 4-4-5-5-5-5 times = 23-25-26-27-28-30 stitches on the shoulder. Work until the piece measures 52-54-56-58-60-62 cm = 20½"-21¼"-22"-22¾"-23⅝"-24⅜". Cut and fasten the strand. ASSEMBLY: Sew the shoulder seams edge to edge. Sew the side seams edge to edge with small, neat stitches, leaving a 10 cm = 4" split at the bottom. SLEEVE-EDGES: Start at the bottom of the armhole with hook size 3.5 MM = US E/4 and work as follows: ROUND 1: * Work 1 single crochet in the single-crochet row, 3 chain stitches, skip the treble crochet row *, work from *-* round the armhole, finish with 1 slip stitch in the first single crochet ROUND 2: Read CROCHET INFORMATION, work 1 slip stitch around the first chain-space, then 4 double crochets around each chain-space, but only 3 double crochets around the 6 middle chain-spaces on each shoulder and the 3 bottom chain-spaces on the front/back piece. Work a similar edge around the other armhole. EDGE AROUND NECK: Start mid-front with hook size 3.5 MM = US E/4 and work as follows: ROUND 1: * Work 1 single crochet in the single crochet row, 3 chain stitches, skip 1 treble crochet row *, work from *-* around the neck, but along the back of the neck adjust so you have the same distance between each single crochet (approx. 2 cm = ¾") as down the V-neck. Finish with 1 slip stitch in the first single crochet. ROUND 2: Work 1 slip stitch around the first chain-space, then 4 double crochets around each chain-space. |
|||||||||||||
Diagram explanations |
|||||||||||||
|
|||||||||||||
|
|||||||||||||
|
|||||||||||||
|
Have you made this or any other of our designs? Tag your pictures in social media with #dropsdesign so we can see them! Do you need help with this pattern?You'll find tutorial videos, a Comments/Questions area and more by visiting the pattern on garnstudio.com. © 1982-2024 DROPS Design A/S. We reserve all rights. This document, including all its sub-sections, has copyrights. Read more about what you can do with our patterns at the bottom of each pattern on our site. |
|||||||||||||

With over 40 years in knitting and crochet design, DROPS Design offers one of the most extensive collections of free patterns on the internet - translated to 17 languages. As of today we count 304 catalogs and 11422 patterns - 11417 of which are translated into English (US/in).
We work hard to bring you the best knitting and crochet have to offer, inspiration and advice as well as great quality yarns at incredible prices! Would you like to use our patterns for other than personal use? You can read what you are allowed to do in the Copyright text at the bottom of all our patterns. Happy crafting!
Comments / Questions (10)
Hallo meine vorherige Frage hat sich erledigt :). Danke und liebe Grüße
12.05.2024 - 01:23Hallo, ich stecke beim Beginn der Abnahmen fest. Ich habe 106 Maschen, dann mache ich aus 12= 6 Maschen? Dann bleiben ja nur 94 übrig und ich kann keine 6 Maschen am Ende übrig lassen? Oder mache ich aus 6= 3 Maschen, häkel 94 Maschen, dann bleiben 6 übrig. Dann habe ich aber in der nächsten Runde 97 und soll 12 Maschen abnehmen und komme so nicht auf 82 Maschen? Wo liegt mein Denkfehler? Liebe Grüße und danke
11.05.2024 - 15:31DROPS Design answered:
Liebe, Bianka, es sind 106 M und man soll 6 M beidseitig abnehmen (siehe ABNAHMETIPP-2 , es sind so 94 M übrig (106-6 am Anfang der Reihe - 6 am Ende der Reihe); dann wird man 1 Masche beidseitig (jeweils 2 Maschen / Reihe - siehe ABNAHMETIPP-1) 6 Mal abnehmen = insgesamt 2 x 6 = 12 M; es waren 94 Maschen - 12=82 Maschen übrig. Viel Spaß beim Häkeln!
13.05.2024 - 07:47Buon pomeriggio. Ho riscontrato un errore: "Lavorare il davanti e il dietro in piano e dall’alto in basso." In realtà si lavora dal basso in alto. Grazie e buon lavoro a tutti!
09.05.2024 - 17:00DROPS Design answered:
Buonasera Lorenza, grazie per la segnalazione: abbiamo corretto il lavoro. Buon lavoro!
11.05.2024 - 21:13Hi I'm a newbie and have a question about the pattern; After I finish the first double crochet row in the back piece, what do I do next? Diagram A.1 tells me to start the double-treble & relief row, but it also says that the previous row should've been a double-treble crochet row. Thank you
09.06.2023 - 05:40DROPS Design answered:
Dear Xinyi, after the foundation chain you have worked 1 row with double treble crochets + 1 row with double crochet, then starting A.1 you will crochet the relief stitches around the very first row worked. Happy crocheting!
09.06.2023 - 09:30Hola. No entiendo cómo hacer los hombros. Una vez que he hecho 48 cm de la espalda (para la talla S en este caso), ¿giro y hago 24 puntos altos dobles y luego vuelvo a girar con fila de punto bajo? ¿hay que cortar el hilo? ¿hago el hombro derecho o el izquierdo visto por el revés? No sé cómo seguir…necesito ayuda! Gracias!
09.02.2023 - 16:56DROPS Design answered:
Hola Marta, los hombros se trabajan sobre los 24 pts más externos desde cada lado de la espalda. Para simplificar la labor, recomendamos colocar marcapuntos para los hombros: Contar 24 pts desde el inicio de la fila y colocamos el marcapuntos en el punto 24 (hombro derecho de la labor con la prenda puesta). Contamos los siguientes 24 pts y colocamos el siguiente marcapuntos (escote de la espalda, no se trabaja sobre estos pts. Los pts restantes en la fila son del hombro izquierdo. Primero trabajas el hombro derecho entero, cortas el hilo y después trabajas el hombro izquierdo.
16.02.2023 - 22:41Salve lo schema A1 prevede che la riga precedente sia di maglie alte doppie invece, sia la prima volta che le ripetizioni, hanno come riga precedente una riga di maglie basse. Devo girare attorno alle maglie alte doppie della riga due volte sotto? Grazie Francesca
24.01.2023 - 22:31DROPS Design answered:
Buonasera Francesca, può lavorare il motivo nelle maglie basse. Buon lavoro!
13.02.2023 - 22:43Salve lo schema A1 prevede che la riga precedente sia di maglie alte doppie invece, sia la prima volta che le ripetizioni, hanno come riga precedente una riga di maglie basse. Devo girare attorno alle maglie alte doppie della riga due volte sotto? Grazie Francesca
23.01.2023 - 17:56DROPS Design answered:
Buonasera Francesca, può lavorare il motivo nelle maglie basse. Buon lavoro!
13.02.2023 - 22:43Pourquoi les prix sont en euro.
30.12.2022 - 17:00DROPS Design answered:
Bonjour Mme Demers, c'est la devise retenue pour les modèles en français - retrouvez les magasins au Canada (contactez Nordic Yarns) ou expédiant au Canada ici. Bon tricot!
02.01.2023 - 13:32No entiendo muy bien como se hace la parte el diagrama A.1. en este patrón. Muchas gracias
20.11.2022 - 18:24DROPS Design answered:
Hola Ana María, en el diagrama A.1 solo hay 2 filas (la fila de abajo del todo ya está trabajada y solo indica sobre qué puntos tienes que trabajar las dos siguientes filas). Se trata de un patrón de elástico con punto relieve. Puedes ver el siguiente vídeo sobre cómo trabajar este patrón: https://www.garnstudio.com/video.php?id=205&lang=es.
21.11.2022 - 00:56Podrían mostrar comon se ve el tejido por la parte del reves? Para asegurarme de que lo estoy haciendo bien.
20.11.2022 - 00:26DROPS Design answered:
Hola Krystal, las fotos que están online son las únicas fotos que tenemos disponibles de la labor.
21.11.2022 - 00:52